User Manual
Main Body

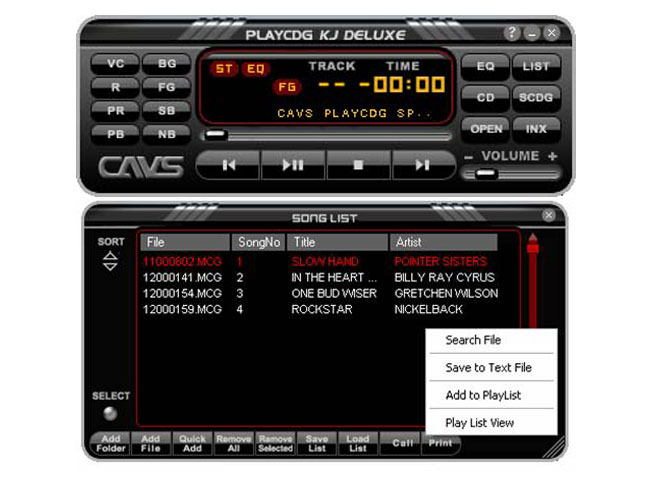
- Show Equalizer window.
- Show Song List and Play List window.
- Play the songs from CD or CD+G disc in the disc drive.
- Browse and select songs (files).
- Show INX (Super CD+G song list) window.
- Read INX (Super CD+G song list) from Super CD+G disc.
- Display track, time, status, song title information.
- Indicate the play position.
- Go to previous song or previous track.
- Begin play or pause. Press twice to release pause.
- Stop play.
- Go to next song or next track.
- Voice Cancel: Select Stereo / Right / Left channels (In Multiplex CD+G songs, vocal recording is found in the right channel, and by selecting the left channel, vocal recording can be turned off).
- Repeat the songs in the Play List sequentially. When it is on, the Repeat sign will be lit in the Display.
- Show Preference Dialog window.
- Go to previous background image
- Enable/Disable background image display.
- Enable/Disable CD+G graphics display.
- Pause background image slide show.
- Go to next background image.
- Slide right / left to increase / decrease music volume level.
- Display About, Help, OpenURL, and Preference buttons.
- Minimize the program.
- Exit the program.
Equalizer

- Reset Equalizer settings to default values.
- Enable / Disable Equalizer.
- Lit when the Equalizer is enabled.
- Predefined equalizer settings (PC Speakers, Large Hall, Club, Party).
- Reset Tempo control settings to default value.
- Rest Pitch control settings to default value.
- Reset Speed control settings to default value.
- Close Equalizer window.
- Speed slider.
- Pitch slider.
- Tempo slider.
- Load saved Equalizer settings.
- Save current Equalizer settings.
- Display Pre-amplifier Level.
- Equalizer sliders.
Song List

- Sort the songs by alphabetically descending order.
- Sort the songs by alphabetically ascending order.
- Display the song list.
- Close Play List window.
- Scroll up Play List.
- Slide Play List.
- Scroll down Play List.
- Resize Play List.
- Print the song list.
- Load Play List from a file.
- Save current Play List as a file.
- Remove selected songs from Play List.
- Clear all songs in Play List.
- Quick Add (Search specified folders and add songs to Play List).
- Add songs (files) to Play List.
- Add a folder to Play List.
- Select / De-select all songs in Play List.
- Display the name of next singer in the waiting list.*
Song List with Songs

The newly improved Song List now displays not only the song filename, but automatically assigns song number , and reads Title and Artist information from ID3 tag. Refer to How to add/edit ID3 tag for detail. Sub options (right click on Song List to enable options):
- Search File: Select search method and type keyword, and press Search.

- Save to Text File: Save the contents in the Song List on a text file. Such text file can be opened from a text editor program such Microsoft Excel, to create a song book for printouts. Refer to How to open song list text file from MS Excel.
- Add to Play List: Select song(s) and click on Add to Play List to program songs for playback.
- Play List View: Displays Play List window.
Helpful instructions on using Song List features:
- How to add/edit ID3 tag for Title/Artist:
- Select MP3 file and right click on mouse.
- Click on Properties.
- Select Summary tab.
- Click on Advanced.
- Add/edit Artist and Title tags.
- How to add/edit Title/Artist from Song List without editing ID3 tag:
- Click on appropriate cell under Title or Artist.
- Enter desired information.
- Press Enter.
- Select Save Song List if you wish to have the same information the next time KJ Deluxe is started.
- How to select multiple songs from Song List and add to Play List:
- Click and hold left mouse button to highlight desired songs, and right click and select Add to Play List. or
- Press and hold CTRL from keyboard and use left mouse button to select multiple song files, and right click and select Add to Play List.
- How to open and print song list text file from MS Excel:
- Start MS Excel.
- From File, select OPEN and under File Type, select text.
- Navigate to the folder in which text file is saved and select and open.
- In Text Import Wizard, select Delimited and press Next.
- Check delimiter as Other (uncheck existing checkmark) and type | (SHIFT \).
- Under qualifier, select none, and press FINISH.
- Add/edit Artist and Title fields.
Play List
 Songs added from Song List will be displayed as shown above and each song will play automatically in descending order.
In order to change the order, highlight the song and drag it to the desired position in the list.
Songs added from Song List will be displayed as shown above and each song will play automatically in descending order.
In order to change the order, highlight the song and drag it to the desired position in the list.
Preferences – General

- Select a file type to be at top when using Open (file) command.
- Set the default Left position of the CD+G screen.
- Set the default Top position of the CD+G screen.
- Restore default screen size (216p x 300p) and default position (216p, 0p).
- Left point of CD+G screen.
- Top point of CD+G screen.
- Height of CD+G screen.
- Width of CD+G screen.
- Enable/Disable Gap-killer.
Preferences – Display

- Select the display style of song title (song file name) in the Display window.
- Select between Elapsed time / Remaining time in the Display window.
Preferences – Equalizer

- Save Equalizer settings when closing Equalizer window.
- Load Equalizer settings when opening Equalizer window.
- Reset Equalizer settings after playing a song.
- Reset Tempo, Pitch, and Speed settings after playing a song.
- Enable Preamplifier Self-Adjusting.
- Select the duration time for value display in Equalizer window.
Preferences – Play List

- Do not add duplicate files to Play List.
- Do not add CD+G graphic files (MCG, CDG, RW) without corresponding MP3 files.
- Pause after each song is played in the Play List. Resume playing the next song by pressing Play button.
- Display selected folders within which Quick Add will search for a song.
- Add a folder to Search Folder List.
- Delete selected folders from the Search Folder List.
- Clear the Search Folder List.
- Add an Auto Extension to a song (file) name being searched in Quick Add.
- Allow MCG files to be added to Play List.
- Allow CDG files to be added to Play List.
- Allow RW files to be added to Play List.
- Clear file type selections (No graphic file will be added to Play List).
- Select all file type selections (All compatible graphic files will be added to Play List).
Preferences – Background

- Display Background Image List.
- Move the selected image up.
- Move the selected image down.
- Move the selected image to the top.
- Move the selected image down to bottom.
- Shuffle the order of Images randomly.
- Add image files(JPG, BMP, GIF, TIF, PNG, PCX, TGA, ICO, PSD) to Image List.
- Remove the selected images from Image List.
- Clear Image List.
- Refresh Image List.
- Import a Image List.
- Export current Image List to a file.
- Fit each image to the whole screen.
- Display images randomly from the Image List.
- Disable images during playing a song.
- Duration time for display per image.
- Image Preview window.
Preferences – Shortcut
 Assign your own shortcutkey by typing the shortcutkey into Press new shortcut box.
- Enter a character or number in Press New Shortcut box.
- Press Assign.
Dual Screen Display

- Connect HDMI or VGA cable from PC to TV.
- From the PC, click on Start – Settings – Control Panel.
Double click on Display and click on Settings.
The Display Properties screen will appear as below.
 Click on the screen following the the steps shown by red arrows 1- 6.
-
- The menu and pictures shown below may vary on the graphic card and its software installed in your PC.
Click on the screen following the steps shown by red arrows 1- 5.

- The menu and pictures shown below may vary on the graphic card and its software installed in your PC.
Click on the screen following the steps shown by red arrows 1- 5.
-
- The menu and pictures shown below may vary on the graphic card and its software installed in your PC.
Click on the screen following the the steps shown by red arrows 1.

- The menu and pictures shown below may vary on the graphic card and its software installed in your PC.
Click on the screen following the the steps shown by red arrows 1.
- The menu and pictures shown below may vary on the graphic card and its software installed in your PC.
Click on the screen following the steps shown by red arrows 1-4.

-
Hot Key Controls
| 1. R | Repeat |
| 2. E | Active / Deactive Equalizer |
| 3. [ | Show / Hide Equalizer |
| 4. L | Active / Deactive Play List |
| 5. X | Show / Hide INX(SCD+G song list) |
| 6. ] | Show / Hide Play List |
| 7. Q | Quick Add to Play List |
| 8. C | CD |
| 9. D | SCD+G disc |
| 10. O | Open |
| 11. V | Vocal Mode |
| 12. S | Stop |
| 13. P | Play / Pause |
| 14. < | Prev |
| 15. > | Next |
| 16. F | CD+G Graphics On / Off |
| 17. B | Background Images On / Off |
| 18. + | Next Background Image |
| 19. – | Previous Background Image |
| 20. ? | Open Preference Dialog window |
| 21. ` | Pause Background Image |
| 22. 1 | Decrease Pitch Value |
| 23. 2 | Increase Pitch Value |
| 24. 3 | Reset Pitch Value |
| 25. 4 | Decrease Tempo Value |
| 26. 5 | Increase Tempo Value |
| 27. 6 | Reset Tempo Value |
| 28. 7 | Decrease Speed Value |
| 29. 8 | Increase Speed Value |
| 30. 9 | Reset Speed Value |
| 31. M | Detect Mouse Pointer |
Troubleshooting
- Refer to the USER FORUM.
- For tech support, please email to techsupport@cavsusa.com.