CAVS JB-199 IV Online is a new professional karaoke player with a built-in web server. It is the latest of CAVS JB-199 series and thanks to the server, it has the following advantages.
Customers can connect to the JB-199 mini II using any phones and tablets. For example, customers with an iPhones or iPads can connect using the Safari browser. Customers with Android phones or tablets can connect using the Google Chrome. The connection is universal and can be made with a simple scan of QR code.
When connected, the customers can search, reserve, and play the songs using their phones and tablets. Given the thousands or tens of thousands of digitally stored songs, this is almost necessary unless you don't mind printing stacks of paper song books.
Another advantage to using the phone and tablet is that the song search can be done by Voice Command. Simply speak the title or artist's name and the matching songs will instantly appear. This Voice Command feature supports multiple languages including English, Spanish, French, Chinese, Japanese, etc.
Having a web server, the JB-199 IV Online can simultaneously play and stream the audio video outputs. That is, it will play to the TV and speakers in traditional ways and at the same time stream the audio and video to the customers' phones and tablets. The phones and tablets will then play the music and lyrics from their speakers and displays, working like satellite karaoke players you can carry to everywhere, i.e., upstairs, outdoors, pool decks, etc.
The JB-199 IV Online also includes over 40,000 karaoke song subscriptions from service providers, such as Party Tyme and Karaoke Cloud. These songs are commercially licensed for use in bars and restaurants, and updated daily and automatically making sure you have the newest and latest songs. The songs will play seamlessly together with your own collections.
The JB-199 IV Online can record the customer's singings throughout a karaoke show. It will then automatically parse the recordings and upload for your customers to download into their phones and tablets. Imagine the customers' delight when they can save and enjoy the singing immediately after their performances.
JB-199 IV Online
- Built-in web server for easy connection to E-Songbook, phone, and tablet using QR code.
- Customer Interface with song selection, pitch & tempo control, and digital mixer control*
- Song search using Voice Command
- Streaming of music and lyrics to play in E-Songbooks, phones, and tablets.
- Subscription services with automatic and daily song updates
- Instant recording with download
- Support CD+G, MP3+G, ZIP, AVI, MP4, NCG, MCG, Super CD+G, and MIDI karaoke file formats.
- Extract CD, CD+G, Video CD, Super CD+G, and DVD discs.**
- Sync control, Pitch & Tempo controls, Voice cancel, Repeat, Preset, Rotation, Silence gap remover, Equalizer, Interlude, History, Message, Advertisement, etc.
- Customize background with photos, videos, and webcams.
- International song support.
- Reserve with preset and shuffle.
- HDMI, VGA, and RCA audio video outputs.
- Dual 100/1000gbps LAN ports, 4x USB 3.0, serial RS232 control. * Optional CAVS DK3 Karaoke Mixer required.
** Optional disc drive required.
WHEN INSTALLING UNIT
SAFETY
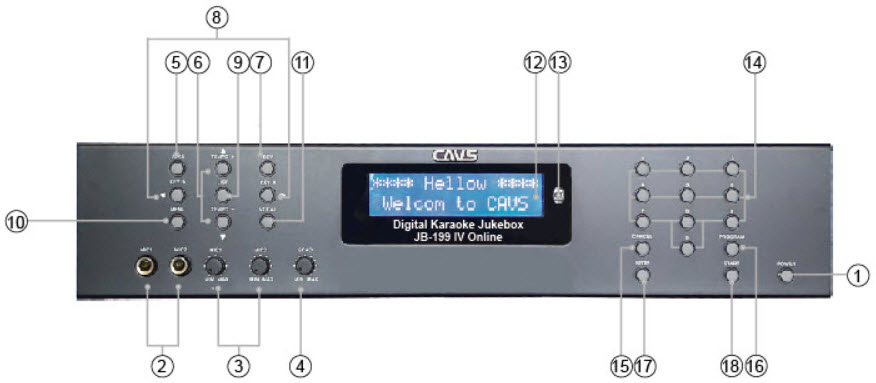
1. Power
2. Mic 1 and Mic 2 inputs
3. Mic 1 and Mic 2 volume controls
4. Echo control
5. Jukebox play/CD play selector
6. Up & down, Tempo up & down
7. Background video
8. Left & right, Pitch up & down
9. Song list
10. Menu
11. Voice cancel
12. LCD display
13. Remote sensor
14. Numeric buttons (0 - 9)
15. Cancel
16. Program/Reserve
17. Stop
18. Play
1. Power
Press to power on. Press to power off.
2. Mic 1 and Mic 2 inputs
Connect microphones 1 and 2 using 1/4 inch jacks.
For wireless microphones, connect their receivers using 1/4 inch jacks.
3. Mic 1 and Mic 2 volume control
Turn clockwise to increase the volume levels of Mic 1 and Mic 2.
4. Echo control
Turn clockwise to increase the echo levels of Mic 1 and Mic 2.
5. Jukebox play/CD play selector
Press to switch between a playlist in My Server and disc.
6. Up & down, Tempo up & down
Press to go up & down in a menu.
When playing a song, press to raise & lower the Tempo (speed) level.
7. Background video
Press to toggle between Off, Photo, Video, and Webcam. power on. Press to power off.
8. Left & right, Pitch up & down
Press to go left & right in a menu.
When playing a song, press to raise & lower the Pitch (key) level.
9. Song list
Press to open the playlist in My Server.
10. Menu
Press to open the Control Panel.
11. Voice cancel
Press to switch between Stereo, Left, and Right channels.
When playing a multiplex song, the right channel contains a singing voice and so playing only the left channel removes the singing voice.
Playing a right or left channel does not mean playing music from only a single speaker.
The selected channel will play from both or all connected speakers.
12. LCD display
Display the song in play, available credit, elapsed/remaining time, play status, song selection, selection status.
13. Remote sensor
Sensor to receive remote controller signals.
14. Numeric button (0-9)
Press to enter numbers.
15. Cancel
Cancel a numeric input or a reservation.
16. Program/Rserve
Press to program/reserve a selected song.
17. Stop
Press to stop a song in play.
18. Play
Press to play a selected song.
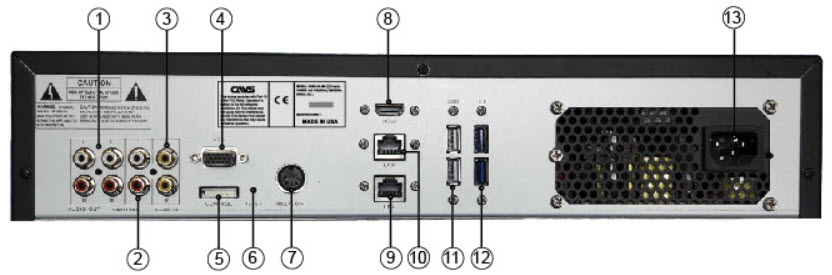
1. Audio outputs
2. Audio inputs
3. Video output, video input
4. VGA output
5. Lighting control
6. Reset
7. Bill/coin acceptor
8. HDMI output
9. LAN (10/100/1000 Mbps)
10. LAN (10/100/1000 Mbps)
11. USB 3.0 (1, 2)
12. USB 3.0 (3, 4)
13. Power cord plug
1. Audio outputs
RCA stereo audio outputs (1 and 2) for playing karaoke songs
2. Audio inputs
RCA stereo audio inputs for recording
3. Video output and input
RCA video output for display and RCA video input for background video feed
4. VGA output
VGA video output for display
5. Lighting control
Serial connector for lighting control
6. Reset
Press to restart.
7. Bill/coin acceptor
5-pin DIN connector for bill/coin acceptor
8. HDMI output
HDMI 1080p connector for display
9. LAN (10/100/1000 Mbps)
Gigabit ethernet connector
10. LAN (10/100/1000 Mbps)
Gigabit ethernet connector
11. USB 3.0 (1, 2)
USB 3.0 ports 1 and 2
12. USB 3.0 (3, 4)
USB 3.0 ports 3 and 4
13. Power cord plug
Power cord plug for AC 110 - 240 Volts, 50 - 60 Hz.
Be sure to confirm the Voltage setting before connecting.
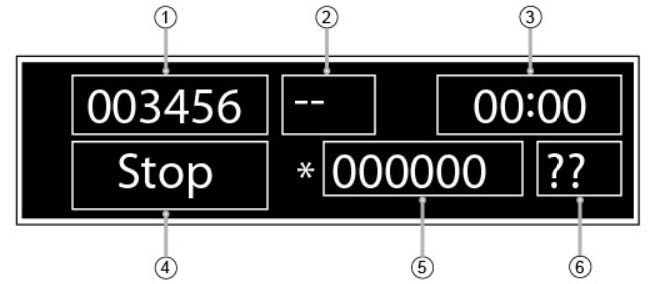
1. Song in play
2. Available credit
3. Elapsed/Remianing time
4. Play status
5. Song selection
6. Selection status
1. Song in play
Show the song in play.
2. Available credit
Show the available credit for play when connected to a bill/coin acceptor.
3. Elapsed/remaining time
Show elapsed time or remaining time.
Press the Menu button in the Front Panel to switch between the two.
4. Play status
Show Play, Stop, or Pause.
5. Song selection
Show the selected song number.>
6. Selection status
Show the selected song number to be valid or invalid.
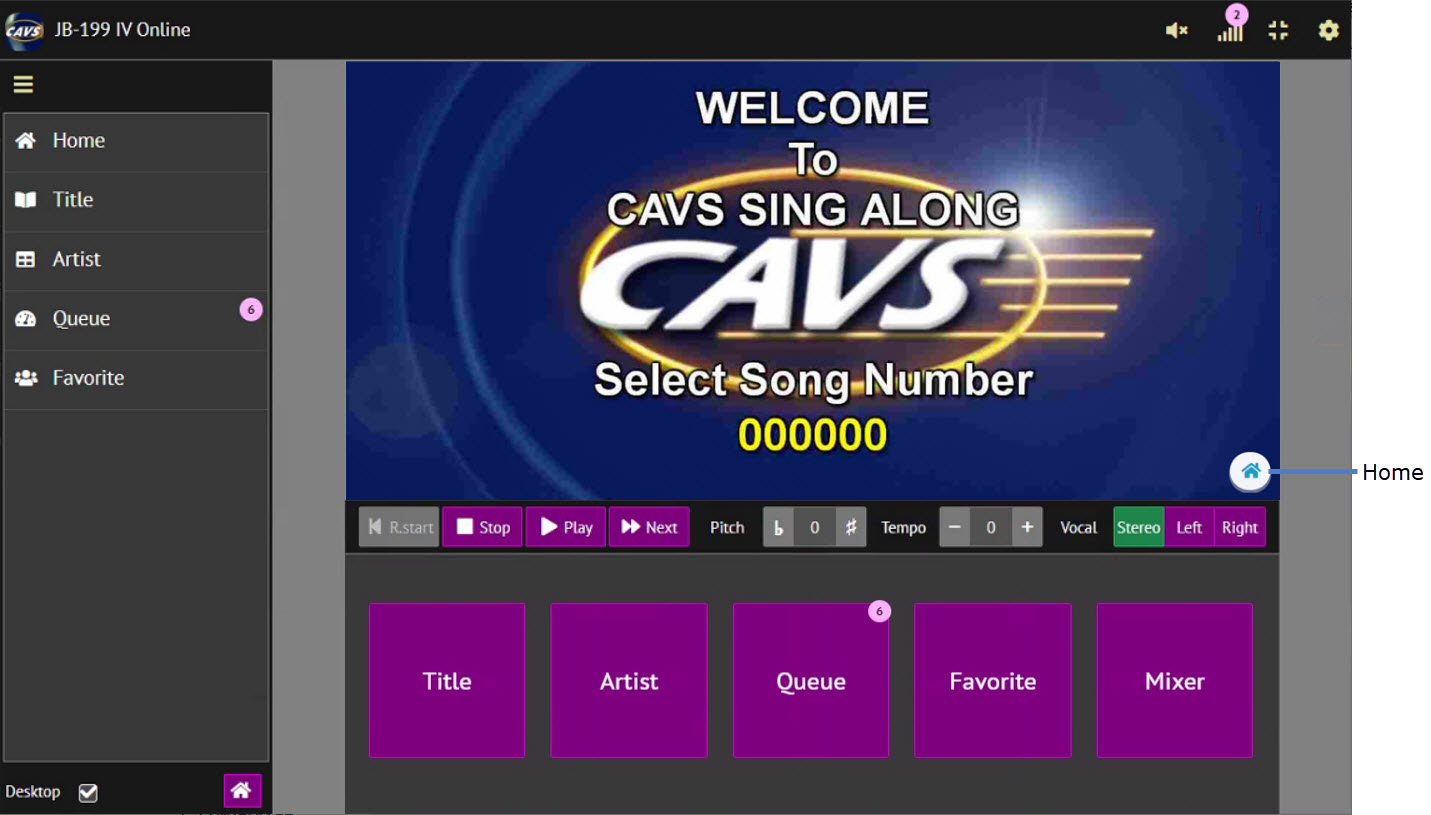
Customer Interface appears when a device such as smartphone, tablet, or laptop connects to the JB-199 IV. The connection can be for an online guest or an E-Songbook. The screen may vary in color or proportion depending on the device used.

1. Main menu
2. Home
3. Title
4. Artist
5. Queue
6. Favorite
7. Mixer
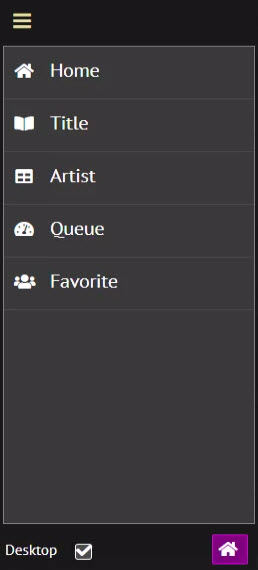
8. Desktop
9. Home
10. Title
11. Artist
12. Queue
13. Favorite
14. Mixer
15. CD+G screen
16. Voice cancel
17. Settings
18. Full screen
19. Connection
20. Music mute
21. Volume control
22. Tempo control
23. Pitch control
24. Restart, Stop, Play, Next
1. Main menu
Press to expand the main menu.

Compressed
Expanded
2. Home
Return to Home page.
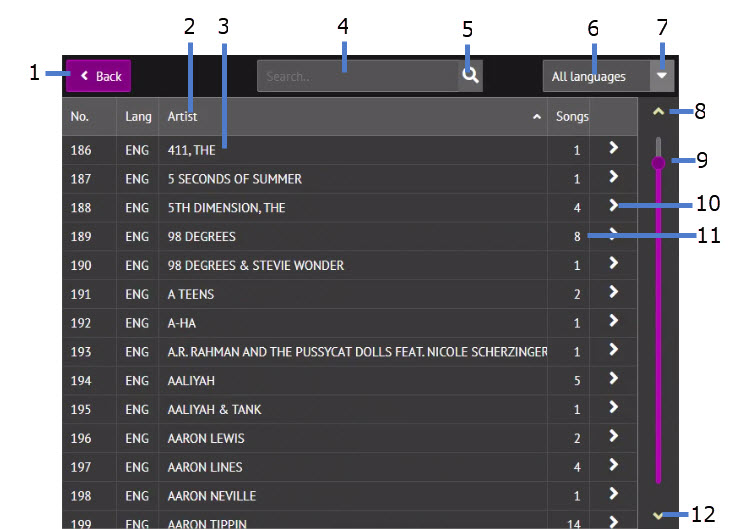
Press to view, scroll, and search the songs by Title. Following popup window will appear.
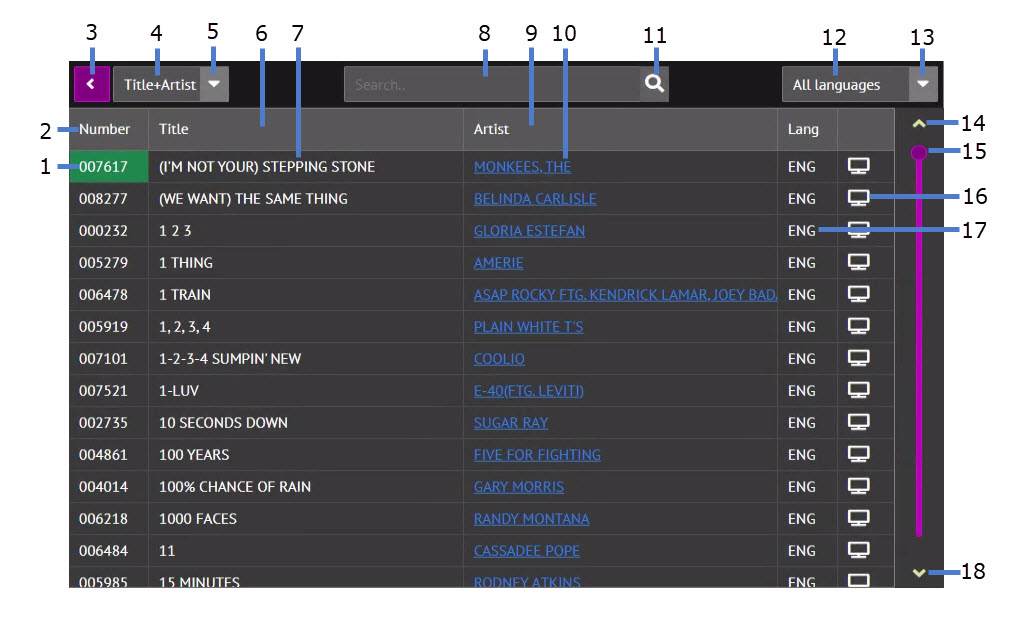
Song list by Title
3.1 Song index
3.2 Index Field
3.3 Return/Back
3.4 Search field status
3.5 Search field menu
3.6 Title field
3.7 Song title
3.8 Search input
3.9 Artist field
3.10 Song artist
3.11 Search
3.12 Language status
3.13 Language selection
3.14 Scroll up by page
3.15 Scroll bar
3.16 Preview
3.17 Song language
3.18 Scroll down by page
3.1 Song index
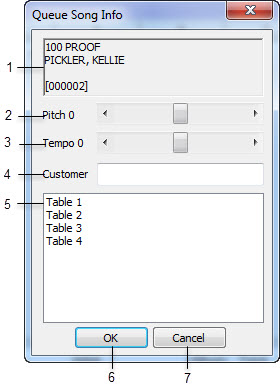
Press to reserve the song. Following popup window will appear.
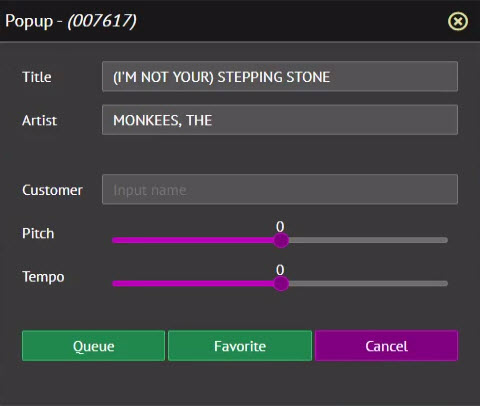
- Put in the Customer name, preset the Pitch, and preset the Tempo. Inputting these values is optional.
- Press Queue to reserve the song. The screen will return to the Title page.
- Press Favorite to add the song into a Favorite list named as Customer.
- If the Customer field is empty, Favorite lists will appear from which you can select or create a Favorite list to add the song.
- If the Customer field is not empty but there is no Favorite list named as such, a new Favorite list will be created and the song will be added.
3.2 Index field
Press to sort the songs by Index in ascending order. Press again to sort in descending order.
3.3 Return/Back
Press to return to previous page.
3.4 Search field status
Indicates the current search field.
3.5 Search field menu
Press to view and select the search field from Title, Artist, Index, Title & Artist.
3.6 Title field
Press to sort the songs by Title in ascending order. Press again to sort in descending order.
3.7 Song title
Press to reserve the song. Following popup window will appear.
- Put in the Customer name, preset the Pitch, and preset the Tempo. Inputting these values is optional.
- Press Queue to reserve the song. The screen will return to the Title page.
- Press Favorite to add the song into a Favorite list named as Customer.
- If the Customer field is empty, Favorite lists will appear from which you can select or create a Favorite list to add the song.
- If the Customer field is not empty but there is no Favorite list named as such, a new Favorite list will be created and the song will be added.
3.8 Search input
Type in the word(s) to search for. The search is conducted within the selected Search field.
3.9 Artist field
Press to sort the songs by artist in ascending order. Press again to sort by descending order.
3.10 Song artist
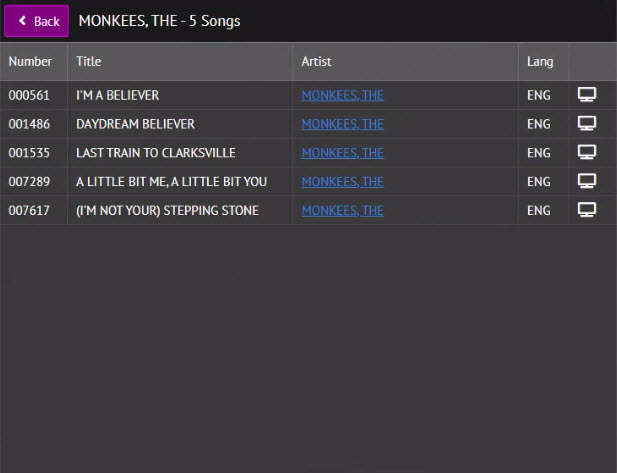
Press to view all songs of the selected artist. Following popup window will appear.
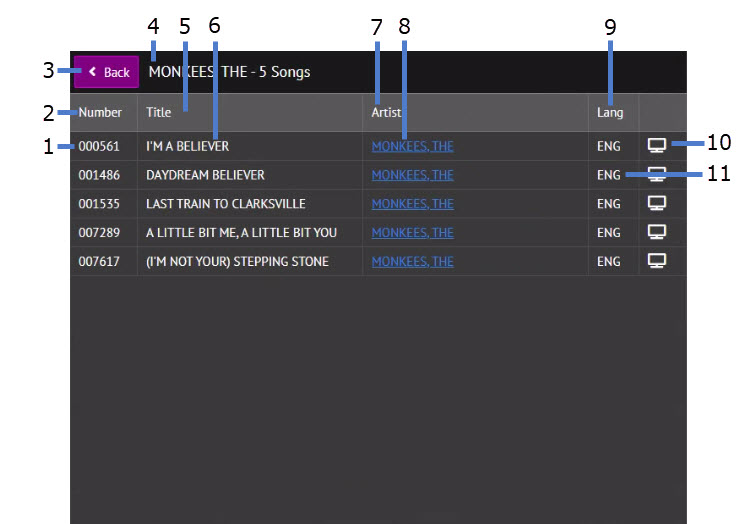
Song list by Artist
3.10.1 Song index
3.10.2 Index Field
3.10.3 Return/Back
3.10.4 Artist - number of songs
3.10.5 Title field
3.10.6 Song title
3.10.7 Artist field
3.10.8 Song artist
3.10.9 Language field
3.10.10 Preview
3.10.11 Song language
3.10.1 Song index
Indicates the song index.
3.10.2 Index field
Press to sort the songs by Index in ascending order. Press again to sort in descending order.
3.10.3 Return/Back
Press to return to previous page
3.10.4 Artist - number of songs
Indicates the selected artist and the number of songs by the artist
3.10.5 Title field
Press to sort the songs by Title in ascending order. Press again to sort in descending order.
3.10.6 Song title
Press to reserve the song. Following popup window will appear.
- Put in the Customer name, preset the Pitch, and preset the Tempo. Inputting these values is optional.
- Press Queue to reserve the song. The screen will return to the Title page.
- Press Favorite to add the song into a Favorite list named as Customer.
- If the Customer field is empty, Favorite lists will appear from which you can select or create a Favorite list to add the song.
- If the Customer field is not empty but there is no Favorite list named as such, a new Favorite list will be created and the song will be added.
3.10.7 Artist field
Press to sort the songs by artist in ascending order. Press again to sort by descending order.
3.10.8 Song artist
Press to reserve the song. Following popup window will appear.
- Put in the Customer name, preset the Pitch, and preset the Tempo. Inputting these values is optional.
- Press Queue to reserve the song. The screen will return to the Title page.
- Press Favorite to add the song into a Favorite list named as Customer.
- If the Customer field is empty, Favorite lists will appear from which you can select or create a Favorite list to add the song.
- If the Customer field is not empty but there is no Favorite list named as such, a new Favorite list will be created and the song will be added.
3.10.9 Language field
Indicate the language column where the song language is shown.
3.10.10 Preview
Press to preview the song.
The preview plays the song and lyrics in a separate CD+G screen which is not shared with other guests.
Karaoke-On-Demand: The preview can be limited in playing time by a setting in the 4.5.A.2.1.5 Server & Browser.
With no time limit, the preview becomes a Karaoke-On-Demand service in which each guest can select and play a different song.
The preview comes with separate pitch control, tempo control, and voice cancel.
Below is a screenshot of the preview.
3.10.11 Song language
Indicate the song language.
3.11 Search
Press to begin the search.
The search in fact begins automatically with each alphabet/character typed in the search field.
When a song is found, proceed to reserve it in Queue.
3.12 Language Status
Indicates the song language currently in effect to filter the songs. Available languages depend on the total songs loaded.
3.13 Language selection
Press the down arrow to see available languages and select. Available languages depend on the total songs loaded.
3.14 Scroll up by page
Press to scroll up by a page in the song list.
3.15 Scroll bar
Drag up and down to scroll through the song list.
3.16 Preview
Press to preview the song.
The preview plays the song and lyrics in a separate CD+G screen which is not shared with other guests.
Karaoke-On-Demand: The preview can be limited in playing time by a setting in the 4.5.A.2.1.5 Server & Browser.
With no time limit, the preview becomes a Karaoke-On-Demand service in which each guest can select and play a different song.
The preview comes with Pitch control, Tempo control, and Voice cancel.
Below is a screenshot of the preview.
3.17 Song language
Indicate the song language.
3.18 Scroll down by page
Press to scroll down by a page in the song list.
Press to view, scroll, and search the songs by artist. Following popup window will appear.
Song list by Title
4.1 Return/Back
4.2 Artist field
4.3 Artist
4.4 Search input
4.5 Search
4.6 Language status
4.7 Language selection
4.8 Scroll up by page
4.9 Scroll bar
4.10 Song list
4.11 Number of songs by artist
4.12 Scroll down by page
4.1 Return/Back
Press to return to previous page
4.2 Artist field
Press to sort the songs by artist in ascending order. Press again to sort in descending order.
4.3 Artist
Press to view all songs by the artist.
4.4 Search input
Input an artist name to search for. You may input any part of the name.
4.5 Search
Press to begin the search.
The search in fact begins automatically with each alphabet/character typed in the search input.
When an artist is found, proceed to view all songs by the artist.
4.6 Language status
Indicates the song language currently in effect to filter the songs. Available languages depend on the total songs loaded.
4.7 Language selection
Press the down arrow to see the available languages and select. Available languages depend on the total songs loaded.
4.8 Scroll up by page
Press to scroll up by a page in the artist list.
4.9 Scroll bar
Drag up and down to scroll in the artist list.
4.10 Song list
Press to view all songs by the selected artist. Following popup window will appear.
For detail description, see 3.10 Song artist.
4.11 Number of songs
Indicates the number of songs by the selected artist.
4.12 Scroll down by page
Press to scroll down by a page in the artist list.
Press to display the reserved songs in the Queue. Following popup window will appear
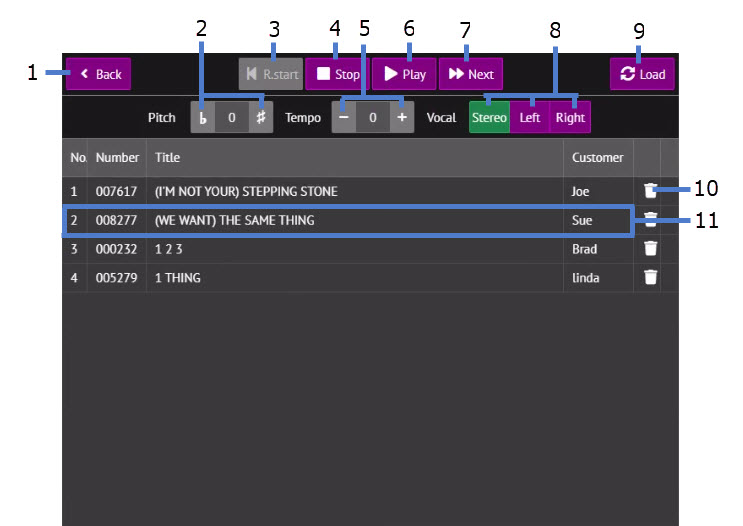
Queue
5.1 Return/Back
5.2 Pitch control
5.3 Restart
5.4 Stop
5.5 Tempo control
5.6 Play
5.7 Next
5.8 Voice Cancel
5.9 Load/Refresh
5.10 Delete
5.11 Shuffle
5.1 Return/Back
Press to go to previous page.
5.2 Pitch control
Press # to raise and ♭ to lower the pitch of the song in play.
5.3 Restart
Press to restart the song in play.
5.4 Stop
Press to stop the song in play.
5.5 Tempo control
Press + to increase and - to decrease the tempo of the song in play.
5.6 Play
Press to play the song at the top of the queue.
5.7 Next
Press to skip to the next song while a song is in play. The next song would be the one at the top of the queue.
5.8 Voice cancel
Press Left, Right, or Stereo to play the left, right, or both channels of music.
In a multiplex song, the left channel contains a singing voice and so playing only the right channel removes the singing voice.
Playing a single channel does not mean playing from a single speaker. The single channel would still play from both the left and right speakers but lack the stereo quality.
5.9 Load/Refresh
Press to refresh the screen.
5.10 Delete
Press to delete the song from the Queue.
5.11 Shuffle
Drag the song up and down to change its position in the Queue.
Press to see the Favorite lists. Following popup window will appear.
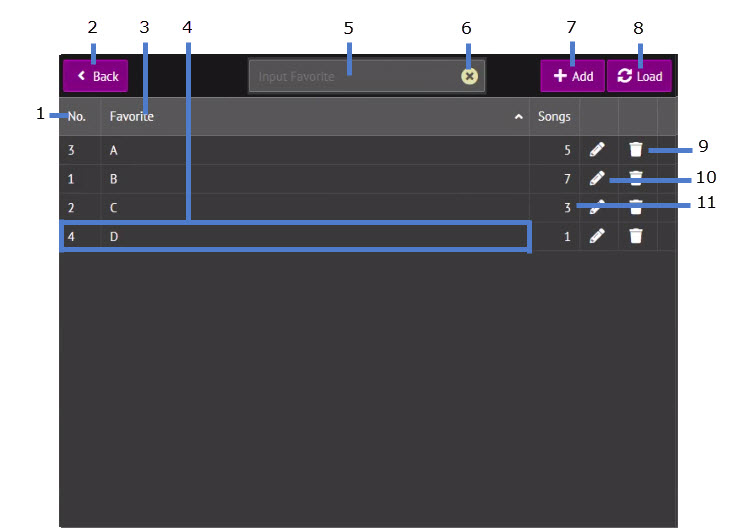
Favorite Lists
6.1 Favorite list index field
6.2 Return/Back
6.3 Favorite list name field
6.4 Favorite list
6.5 Add Favorite list input
6.6 Clear
6.7 Add
6.8 Load/Refresh
6.9 Delete
6.10 Edit/View
6.11 Number of songs
6.1 Favorite list index field
Press to sort the Favorite lists by index in ascending order. Press again to sort in descending order.
6.2 Return/Back
Press to return to previous page.
6.3 Favorite list name field
Press to sort the Favorite lists by name in ascending order. Press again to sort in descending order.
6.4 Favorite list
Press to view/edit the songs in the selected Favorite list. Following popup window will appear.
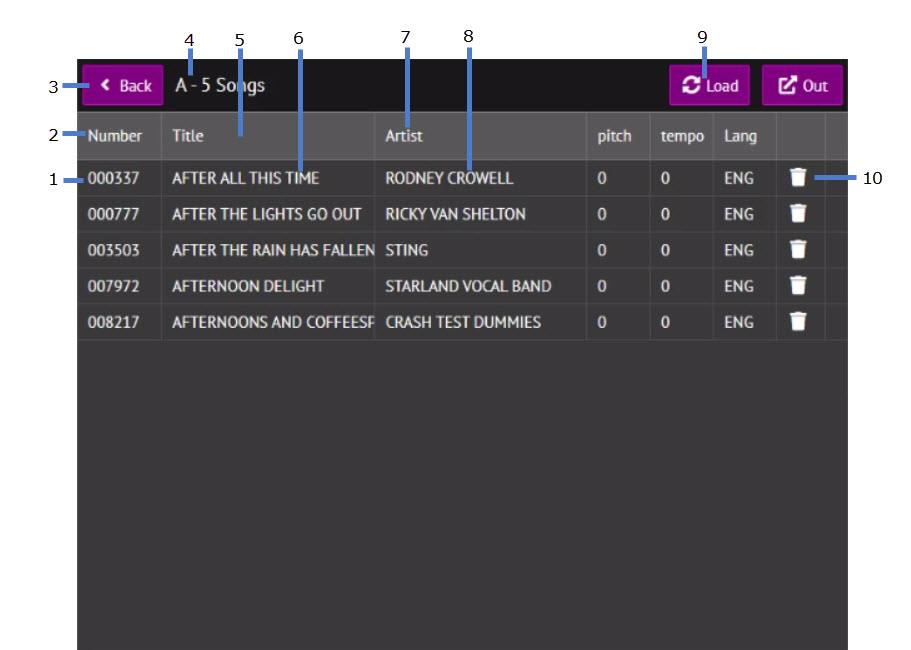
6.4.1 Song index
6.4.2 Index field
6.4.3 Return/Back
6.4.4 Favorite list status
6.4.5 Title field
6.4.6 Song title
6.4.7 Artist field
6.4.8 Song artist
6.4.9 Load/Refresh
6.4.10 Delete
6.4.1 Song index
Press to reserve the selected song in Queue. Following popup window will appear.
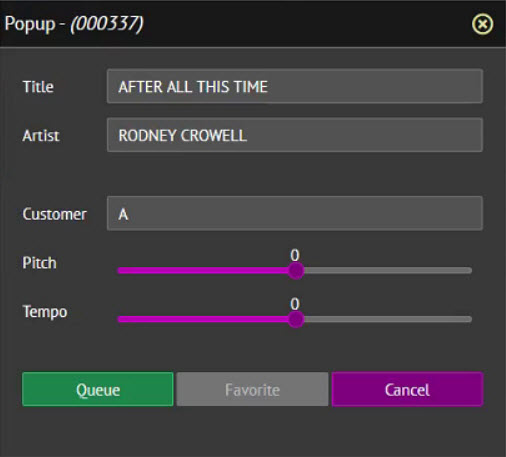
- Customer name is automatically filled in with the Favorite list name. Preset the pitch and tempo. Presetting these values is optional.
- Press Queue to reserve the song. The screen will return to the Favorite list.
- Press Cancel to return to the Favorite list without reserving the song.
6.4.2 Index field
Press to sort the songs by index in ascending order. Press again to sort the songs in descending order.
6.4.3 Return/Back
Press to return to previous page.
6.4.4 Favorite list status
Indicates the selected Favorite list and the number of songs within.
6.4.5 Title field
Press to sort the songs by title in ascending order. Press again to sort the songs in descending order.
6.4.6 Song title
Press to reserve the selected song in Queue. Following popup window will appear.
- Customer name is automatically filled in with the Favorite list name. Preset the pitch and tempo. Presetting these values is optional.
- Press Queue to reserve the song. The screen will return to the Favorite list.
- Press Cancel to return to the Favorite list without reserving the song.
6.4.7 Artist field
Press to sort the songs by artist in ascending order. Press again to sort the songs in descending order.
6.4.8 Song Artist
Press to reserve the selected song in Queue. Following popup window will appear.
- Customer name is automatically filled in with the Favorite list name. Preset the pitch and tempo. Presetting these values is optional.
- Press Queue to reserve the song. The screen will return to the Favorite list.
- Press Cancel to return to the Favorite list without reserving the song.
6.4.9 Load/Refresh
Press to refresh the Favorite list.
6.4.10 Delete
Press to delete the song from the Favorite list.
6.5 Add Favorite list input
Input a name for a new Favorite list to be added.
6.6 Clear
Press to clear the input.
6.7 Add
Press to create a new Favorite list.
A name for the new Favorite list is required in the 6.5 Add Favorite list input.
6.8 Load/Refresh
Press to refresh the Favorite lists.
6.9 Delete
Delete the Favorite list.
6.10 Edit/View
Press to view or edit the Favorite list.
6.11 Number of songs
Indicate the number of songs within the Favorite list.
Press to see the Mixer controls for Master volume, Balance, Music volume, Mic volume, Echo, Reverb, etc. See 4.5.A.2.3 Mixer on how to enable the Mixer and select the controls within.

Mixer Controls
7.1 Control Items
7.2 Step change
7.3 Slider
7.4 Scroll bar
7.5 Refresh
7.6 Back/Return
7.1 Controls
List of controls in the Mixer. To add or remove controls, see 4.5.A.2.3 Mixer.
7.2 Step change
Press - or + buttons to change the control level by a single increment.
7.3 Slide bar
Drag the slide bar left or right to change the control level.
7.4 Scroll bar
Drag the scroll bar up and down to display additional controls in the Mixer.
7.5 Refresh
Press to refresh the Mixer display.
7.6 Back/Return
Press to return to previous page.
When the Desktop is checked, the Customer Interface appears as follows.

When the Desktop is unchecked, the Customer Interface will change as below.
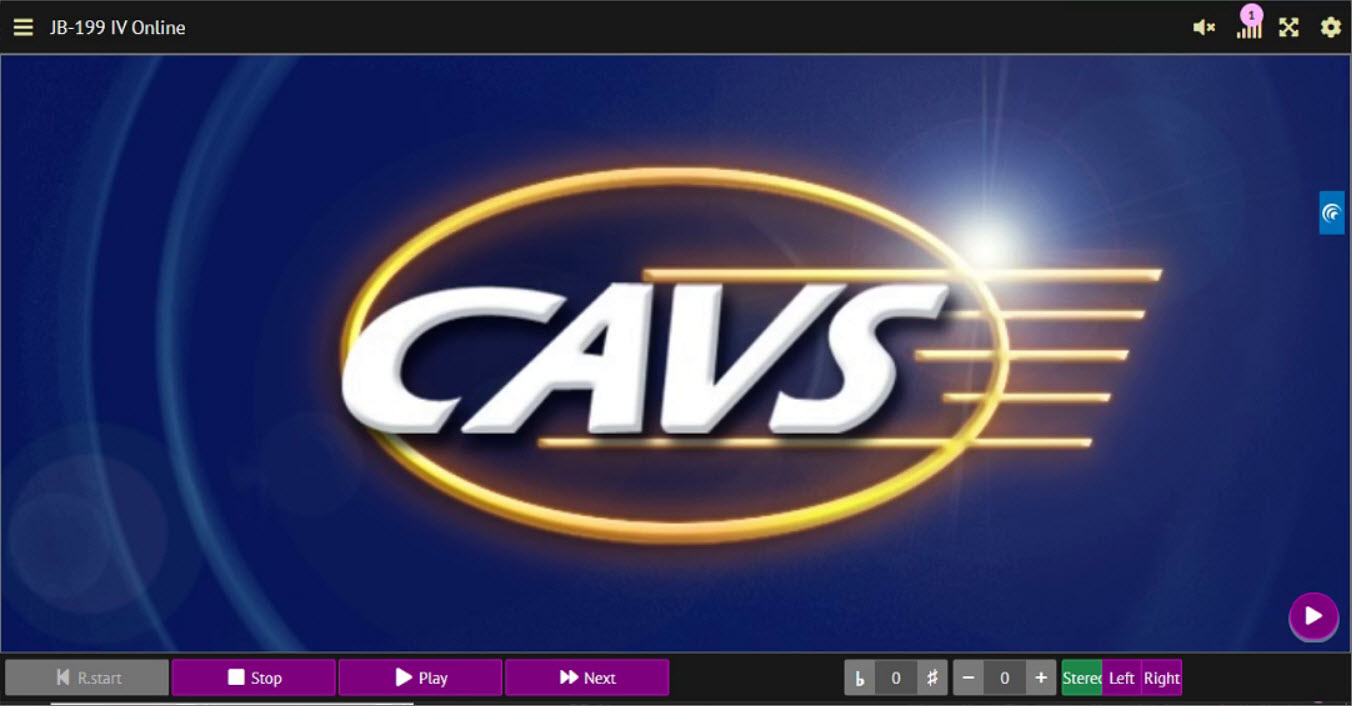
To return to the Desktop mode, press the Main menu as shown below.
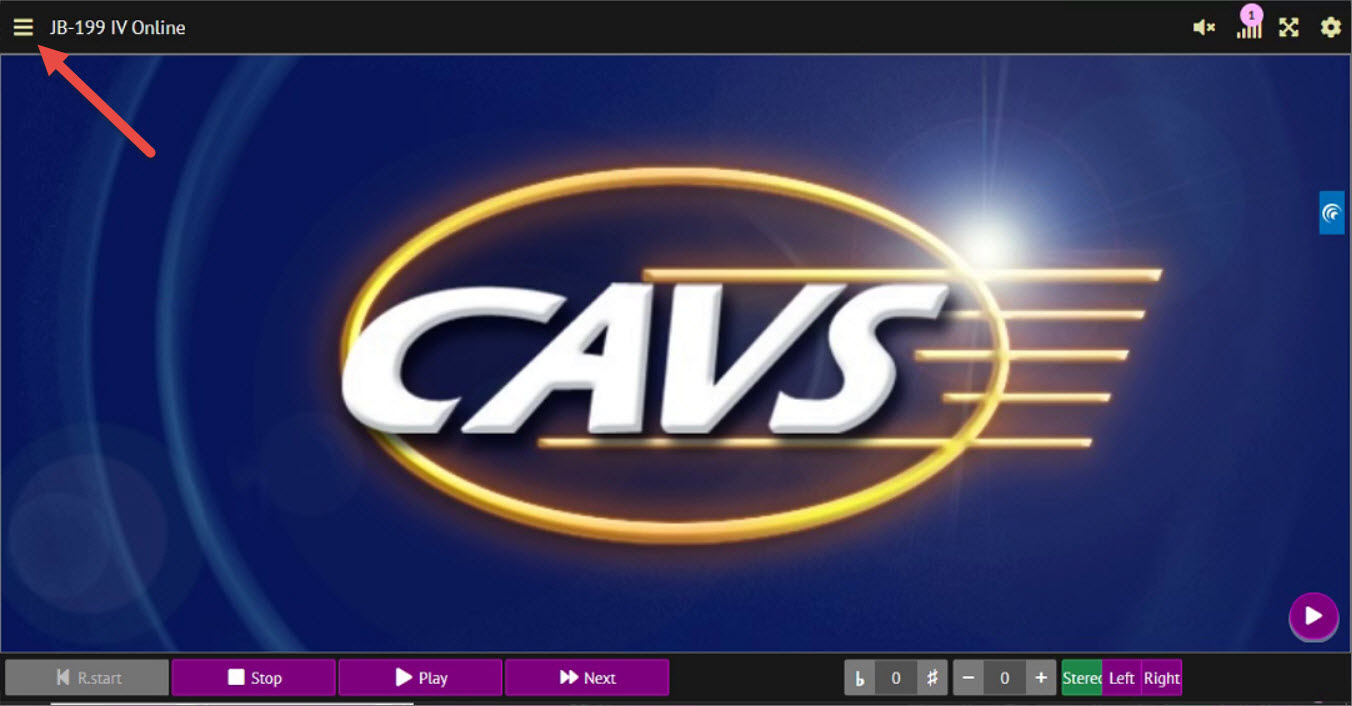
The Main Menu will expand as below. Check the Desktop to return to the Customer Interface in Desktop mode.
9. Home
Return to Home page.
10. Title
Press to view, scroll, and search the songs by title. See 4.4.3 Title for details.
11. Artist
Press to view, scroll, and search the songs by artist. See 4.4.4 Artist for details.
12. Queue
Press to display the reserved songs in the Queue. See 4.4.5. Queue for details.
13. Favorite
Press to see the Favorite lists. See 4.4.6. Favorite for details.
14. Mixer
Press to see the Mixer controls. See 4.4.7. Mixer for details.
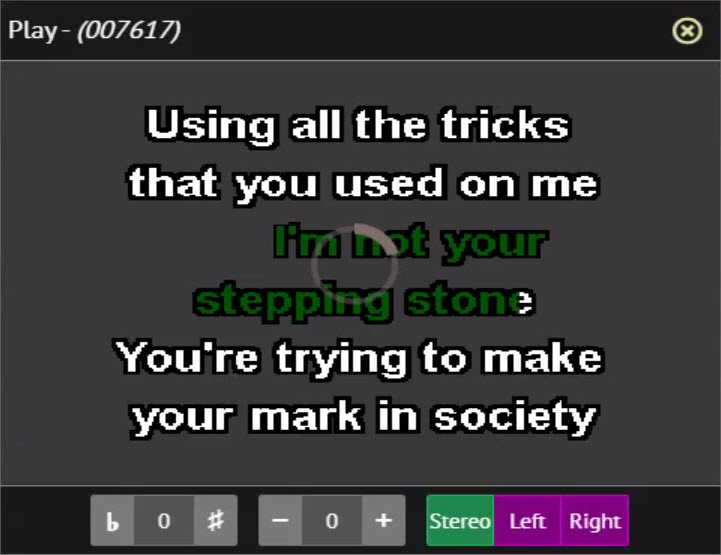
15. CD+G screen
Press to show the CD+G screen of the JB-199 IV. It displays the lyrics of the songs playing in the JB-199 IV.
The CD+G screen displays the lyrics of songs playing in the JB-199 IV. It is like a center stage that can be shared by all online guests. It can in fact be shared by all online and offline guests at the same time. See 4.5.A.2.1.5 Server & Browser for the optional controls. To return to the Home page, press the Home button on the right.
16. Voice cancel
Press Left, Right, or Stereo to play the left, right, or both channels of music.
In a multiplex song, the left channel contains a singing voice and so playing only the right channel removes the singing voice.
Playing a single channel does not mean playing from a single speaker. The single channel would still play from both the left and right speakers but lack the stereo quality.
17. Settings
Press to enter the Control Panel of the JB-199 IV Online.
It requires username and password.
For details, see 4.5.A.2.1 Control Panel.
18. Full screen
Press to expand the Customer Interface to full screen without the page tab and address bar of the Internet browser.
Press again to shrink.
19. Connection
Indicate the network strength and the number of connected devices.
20. Music mute
Press to turn on or off the music streaming from the JB-199 IV.
It is optional to stream the music to all online guests or only to the online guest who reserved the song in play.
See 4.5.A.2.1.5 Server & Browser for the controls.
21. Volume control
Slide to increase or decrease the music volume level.
The slider will appear only when the music is un-muted by pressing the 20. Music mute button.
22. Tempo control
Press + to increase or - to decrease the tempo (speed) of the song in play.
23. Pitch control
Press # to raise or ♭ to lower the pitch (key) of the song in play.
24. Restart, Stop, Play, Next
- Press Play to begin playing the song at the top of the Queue.
- Press Stop to stop the song in play.
- Press Next to play the song at the top of the Queue while a song is in play.
- Press Restart to restart the song in play.
All settings in the Control Panel remain in memory over a reboot of the JB-199 karaoke program or a restart of the JB-199 player.

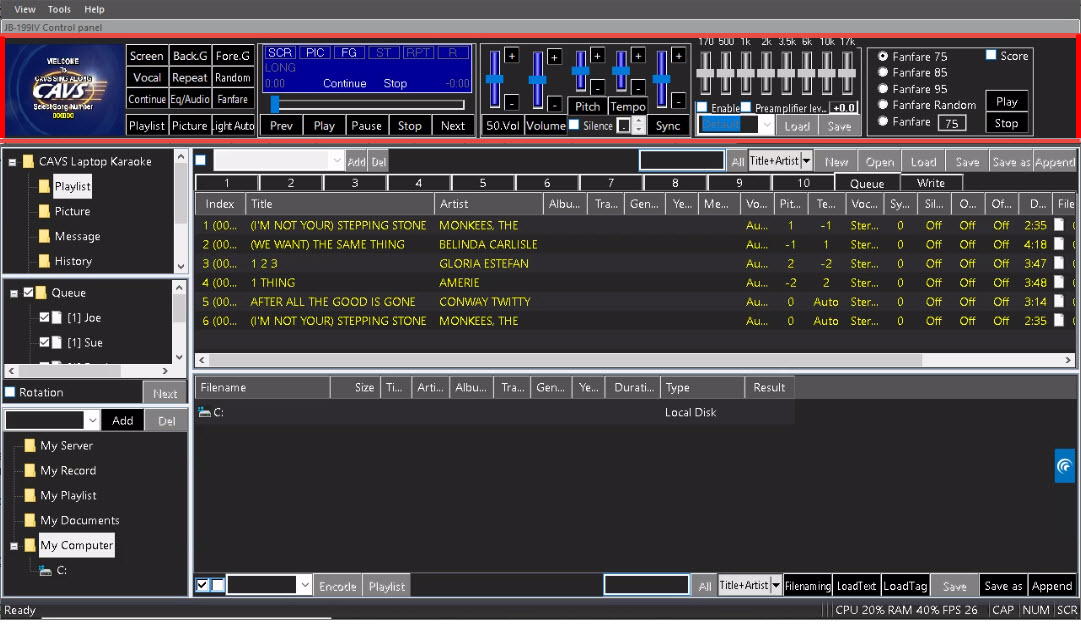
A.1.1 Status Bar On/Off
Turn on/off the following section of the Control Panel.
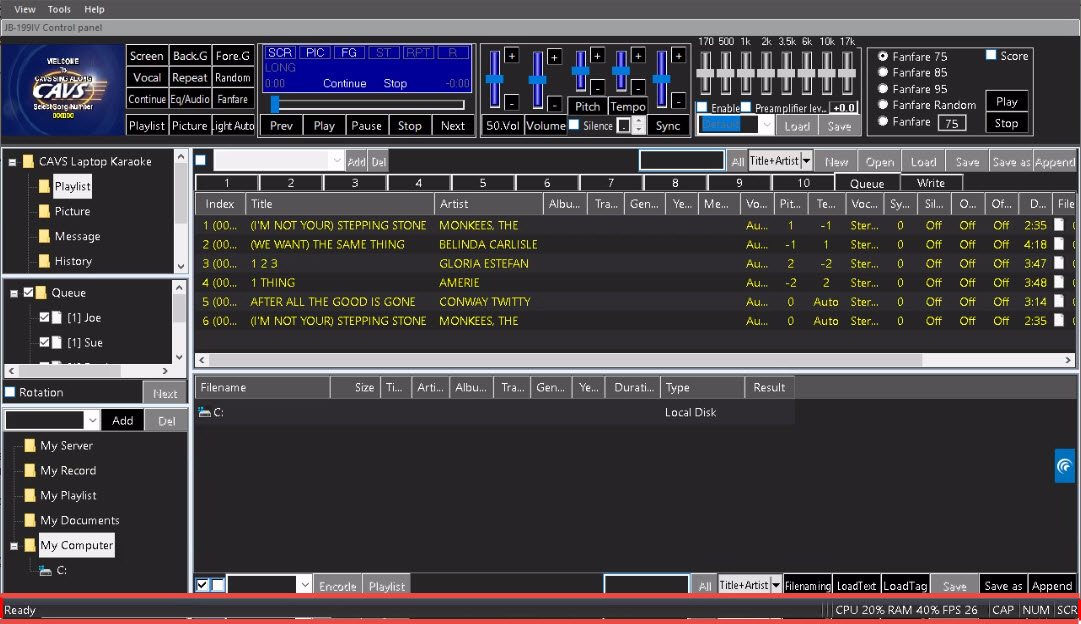
A.1.2 File Browser On/Off
Turn on/off the following section of the Control Panel.
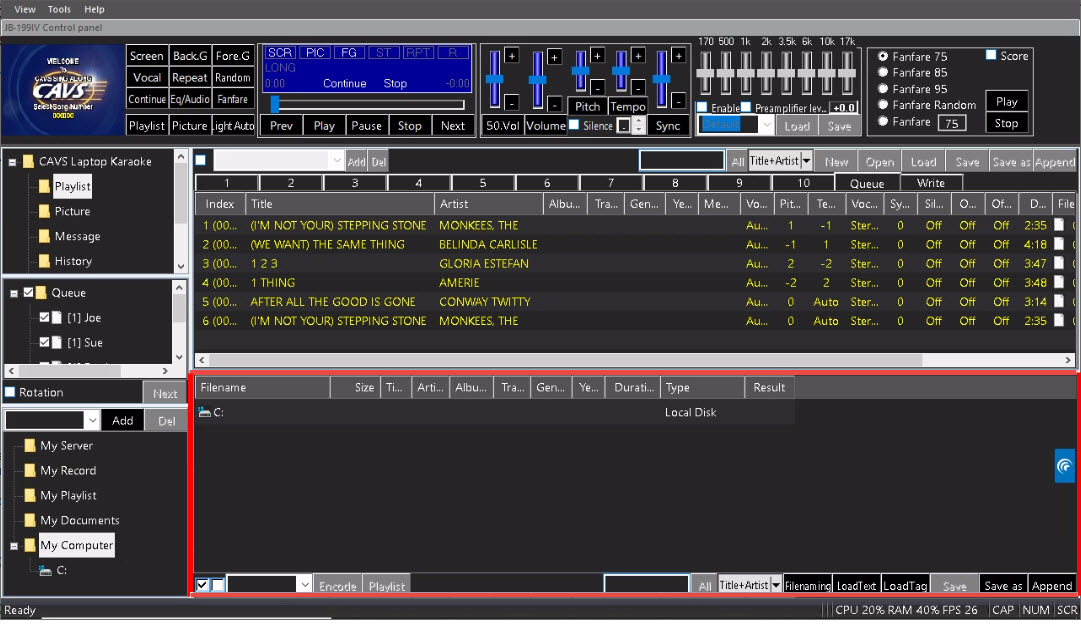
A.1.3 Lyrics display (Screen) On/Off
Turn on/off the following screen.

A.1.4 Control (Player, Controller, EQ) On/Off
Turn on/off the following section of the Control Panel.
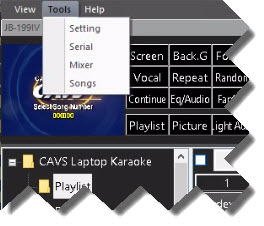
Select Setting and a popup window will appear as below.

Following sections are in the Setting.
- General
- Control Panel
- CD+G Screen
- Sound Device
- Server & Browser
A.2.1.1 General
This section displays general controls for the JB-199 IV karaoke program.
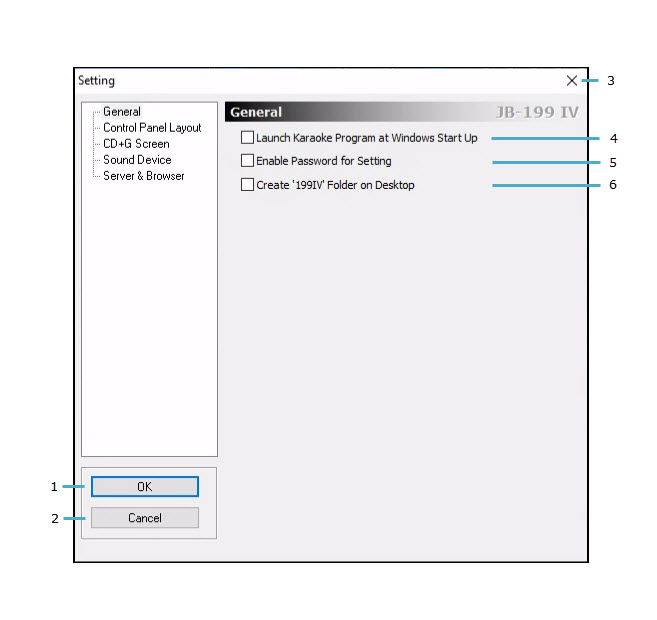
A.2.1.1.1 OK
Save and exit Setting.
A.2.1.1.2 Cancel
Exit Setting without saving.
A.2.1.1.3 X - Close
Close Setting without saving.
A.2.1.1.4 Launch Karaoke Program at Windows Start Up.
Launch the karaoke program at the bootup of the JB-199 IV player.
A.2.1.1.5 Enable Password for Tools Setting
Enable password protection for Setting. The following popup window will appear.
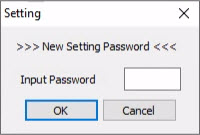
Input a password consisting of 4 digits and press OK. To remove the password, uncheck the option.
A.2.1.1.6 Create '199IV' Folder on Desktop
Save the '199IV' folder containing the Singing Lesson files on the Desktop of the JB-199 IV.
A.2.1.2 Control Panel
This section shows the controls for the Control Panel display.
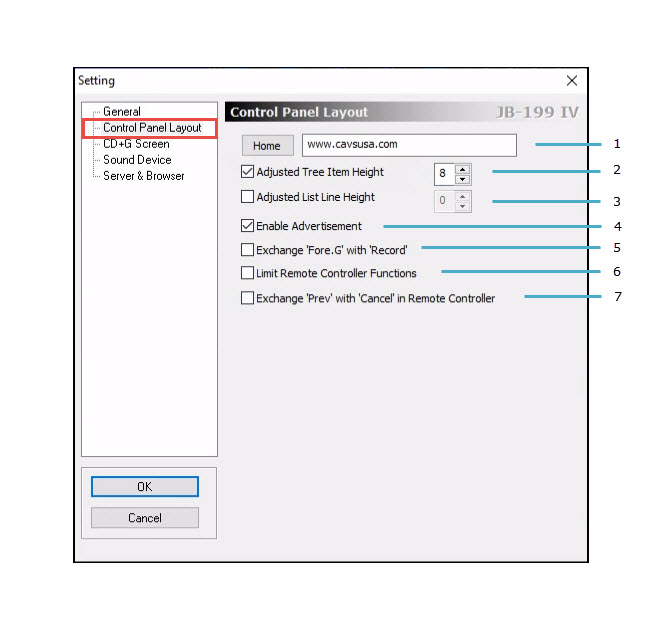
A.2.1.2.1 Home
Input the URL address to be Homepage in 4.5.E FUNCTION MENU.
A.2.1.2.2 Adjust File Tree Line Height
Check to adjust the file tree line height. Select a value in between 0 - 32.
A.2.1.2.3 Adjust Song List Line Height
Check to adjust the song list line height. Select a value in between 0 - 32.
A.2.1.2.4 Enable Advertisement
Check to enable the Advertisement function. The Advertisement menu will appear in 4.5.E FUNCTION MENU.
A.2.1.2.5 Exchange 'Fore G' with 'Record'
Replace 'Fore G' with 'Record' in 4.5.B Player.
A.2.1.2.6 Limit Remote Control Functions
Block the following functions in the remote controller:
A.2.1.2.7 Remocon Button 'Prev' to 'Cancel'
Replace 'Prev' with 'Cancel' in the remote controller.
A.2.1.3 CD+G Screen
This section shows the controls for the CD+G Screen, also known as Lyric Screen.
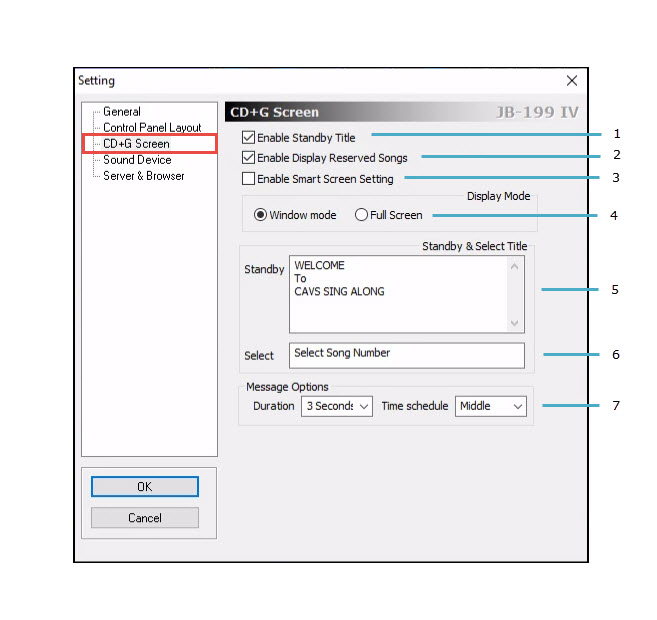
A.2.1.3.1 Enable Standby Title
Display Standby Title shown below in 4.5.A.2.1.3.5 Standby Title.
A.2.1.3.2 Enable Display Reserved Songs
Display reserved songs in the CD+G Screen.
The list of reserved songs in their Index numbers will appear for 15 seconds when a song begins playing or is reserved.
A.2.1.3.3 Enable Smart Screen Setting
Check to automatically assign the CD+G screen to the HDMI output of the JB-199 IV and the Control Panel screen to the VGA output of the JB-199 IV.
A.2.1.3.4 Display Mode
Select Windows mode when using dual monitors, likely a TV and a PC monitor. Select Full Screen mode when using a single monitor, likely a TV.
A.2.1.3.5 Standby Title
Edit the Standby Title which will appear on the CD+G screen when waiting to play.
A.2.1.3.6 Select Title
Edit the Select Title which will appear on the CD+G screen when waiting to play.
A.2.1.3.7 Message Option
Select the duration and time position of a message during play.
The message is set by default as CAVS Inside.
A.2.1.4 Sound Device
This section shows the controls for the Sound Device.
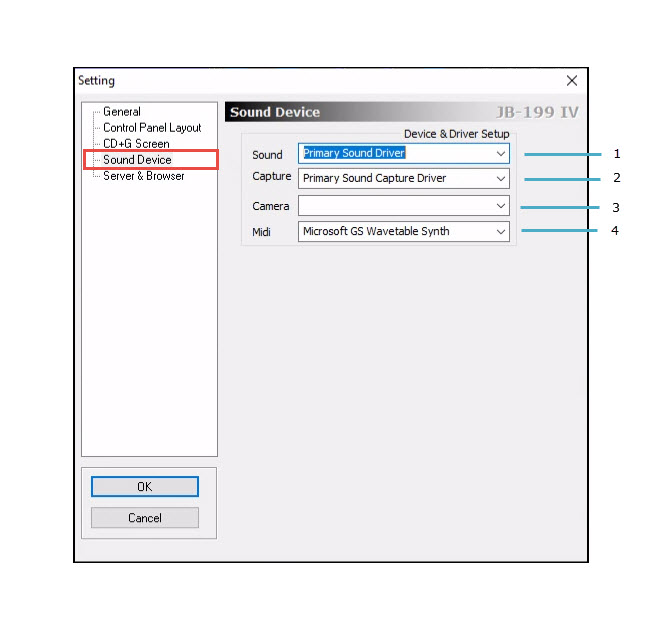
A.2.1.4.1 Sound
Select a sound driver to output the music. Selection of Primary Sound Driver defaults to the sound driver selected in the JB-199 IV.
A.2.1.4.2 Capture
Select a sound capture driver to record the music and singing. Selection of Primary Sound Capture Driver defaults to the sound capture driver selected in the JB-199 IV.
A.2.1.4.3 Camera
Select a camera to capture the background video for the CD+G screen.
A.2.1.4.4 MIDI
Select a MIDI driver to output the music of MID files.
A.2.1.5 Server & Browser
This section shows the controls for the Server and Browser.
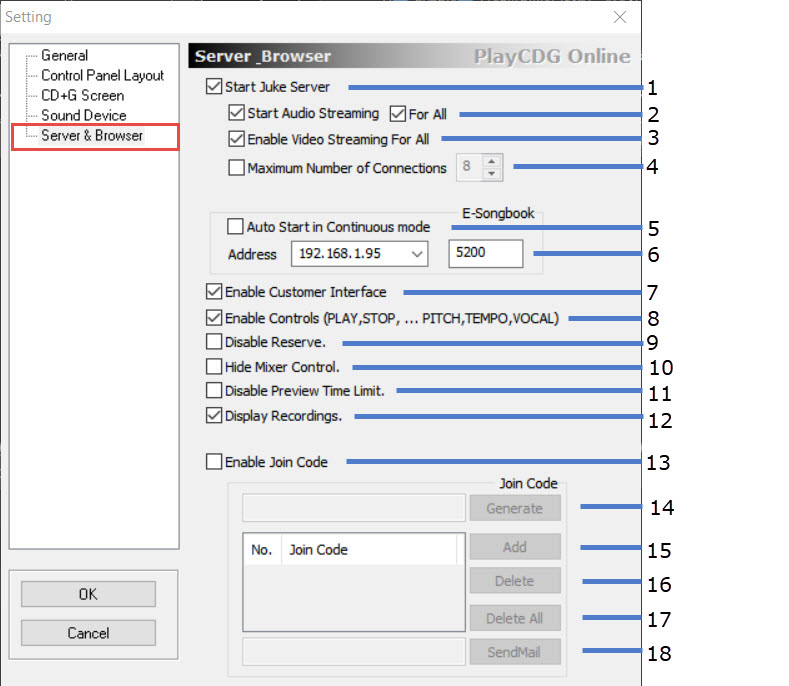
A.2.1.5.1 Start JB-199 IV Online Server
Start the server within the JB-199 IV Online player.
The server enables all communication between the JB-199 IV Online and the E-Songbooks, phones, and tablets of the customers.
A.2.1.5.2 Enable Audio Streaming
Start streaming music to the online guest who reserved the song in play.
Check 'For All' option to stream audio to all online guests.
A.2.1.5.3 Enable Video Streaming For All
Start streaming the CD+G/Lyrics screen of the JB-199 IV Online to all online customers.
A.2.1.5.4 Maximum Number of Connections
Limit the maximum number of connections, i.e., the maximum number of online customers.
Select the maximum limit depending on the streaming load required per guest compared to the available Internet bandwidth.
A.2.1.5.5 Auto Start in Continuous Mode
Start playing the reserved songs in Queue automatically when the JB-199 IV Online player is in Continuous mode. To set the JB-199 IV Online in Continuous mode, see 4.2.B.15 Play Mode.
A.2.1.5.6 Address
Display the local IP address and the port number to connect to the JB-199 IV Online in a local network for the customers.
This address is different from the public IP address to connect to the JB-199 IV Online using Internet from outside of the local network.
To find the public IP address of the JB-199 IV Online, see 5.2 How to Connect: Network.
The port number 5000 is valid for both the public and local IP addresses.
A.2.1.5.7 Enable Customer Interface
Enable Customer Interface in the JB-199 IV Online using the local IP address and the port number.
By default, Google Chrome browser is used.
A.2.1.5.8 Enable Controls (PLAY, STOP, ..., PITCH, TEMPO, VOCAL)
Enable the controls of the JB-199 IV Online to play, stop, cancel, adjust pitch, adjust tempo, and change vocal in Customer Interface.
Checking this option may not be ideal for unruly guests.
A.2.1.5.9 Disable Reserve
Disable the reserve function in the Customer Interface.
Customers will only be able to find songs, but not reserve.
A.2.1.5.10 Hide Mixer Control
Remove the Mixer controls in the Customer Interface.
Customers will not be able to control the Mixer through the Customer Interface.
A.2.1.5.11 Disable Preview Time Limit
Disable the Preview time limit.
Preview is a way for any online customer to play a song independently from the main stage and other online guests.
This option allows the customers to play the full length of the songs rather than for a limited time duration.
When unchecked, the Preview Time Duration is set at 45 seconds.
A.2.1.5.12 Display Recordings
This option adds a button in the Customer Interface to display all recorded files in My Record of the Control Panel.
Customers can then select a recorded file and listen through their phones or tablets.
This option works together with the Record function in 4.2.G.3 which records the customers' singings and stores the recorded files in My Record.
Customers can thus listen instantly to the recorded files of their own singings.
A.2.1.5.13 Enable Join Code
Enable Join Code which is a password system required of the guests or E-Songbook to connect to the JB-199 IV Online.
There can be multiple join codes at any one time from which only one needs to be verified.
A.2.1.5.14 Generate
Generate a join code automatically.
A new joining code may also be typed in manually consisting of 6 digits.
A.2.1.5.16 Add
Add the new join code.
A.2.1.5.16 Delete
Delete a selected join code from the list of active join codes.
A.2.1.5.17 Delete All
Delete all join codes in the pool of active join codes.
A.2.1.5.18 SendMail
Send the Join Code via email.
Select Serial and the following popup window will appear.
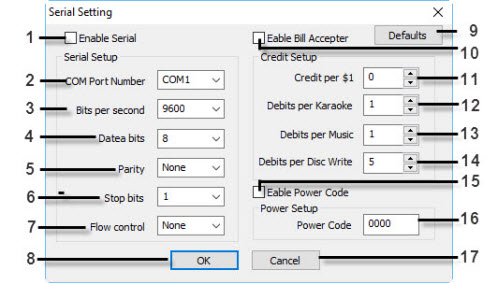
Serial port communication is needed to interface with external devices such as a bill acceptor, a lighting controller, or a third-party remote controller such as Crestron controller.
A.2.2.1 Enable Serial
Open Serial Port Communication.
A.2.2.2 COM Port Number
Select COM port number.
A.2.2.3 Bits per second
Select data transmission speed rate.
A.2.2.4 Data bits
Select data bits.
A.2.2.5 Parity
Select Parity.
A.2.2.6 Stop bits
Select stop bits.
A.2.2.7 Flow control
Select Flow control.
A.2.2.8 OK
Save and exit.
A.2.2.9 Defaults
Revert Bill Acceptor settings to factory default.
A.2.2.10 Enable Bill Acceptor
Open the 5-Pin DIN connector at 4.2.7 Bill/coin acceptorfor Bill Acceptor.
A.2.2.11 Credit per $1
Set credit per $1.
A.2.2.12 Debit per Karaoke
Set debit per karaoke song.
A.2.2.13 Debits per Music
Set debit per music (non-karaoke song).
A.2.2.14 Debits per Disc Write
Set debits per recording.
A.2.2.15 Enable Power Code
Enable password (Power Code) protection for Power button.
A.2.2.16 Power Code
Input the 4 digit Power Code.
A.2.2.17 Cancel
Exit without saving.
Select Mixer and the following popup window will appear. There are two tabs, DK3 Control and AMX Control.
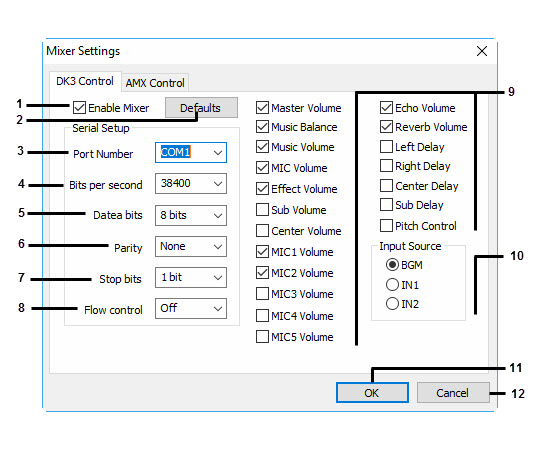
DK3 Mixer
A.2.3.1.1 Enable Mixer
Enable USB connection to DK3 mixer.
A.2.3.1.2 Defaults
Set the option values to factory default.
A.2.3.1.3 Port Number
Select the COM port number assigned to DK3 mixer.
A.2.3.1.4 Bits per second
Select bits per second.
A.2.3.1.5 Data bits
Select data bits.
A.2.3.1.6 Parity
Select parity.
A.2.3.1.7 Stop bits
Select stop bits
A.2.3.1.8 Flow control
Select flow control.
A.2.3.1.9 Control menu
Select controls to display in the Customer Interface at 4.4.7 Mixer.
A.2.3.1.10 Audio input
Select audio input connection in DK3 mixer.
A.2.3.1.11 OK
Save and exit.
A.2.3.1.12 Cancel
Exit without saving.
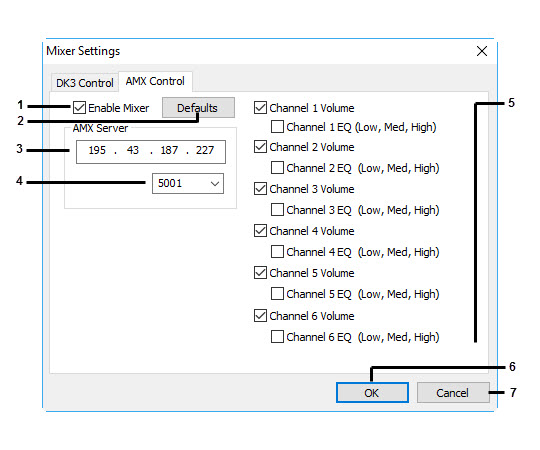
AMX Control
A.2.3.2.1 Enable Mixer
Enable USB connection for AMX control.
A.2.3.2.2 Defaults
Set option values to factory default.
A.2.3.2.3 AMX Server IP address
Input AMX server IP address.
A.2.3.2.4 Port
Select port number.
A.2.3.2.5 Control menu
Select controls to display in AMX control.
A.2.3.2.6 OK
Save and exit.
A.2.3.2.7 Cancel
Exit without saving.
Select Songs and the following popup window will appear. This window shows the total credits used and the total credits used since last reset. It is to count the songs played when the JB-199 IV is operating with a bill acceptor.
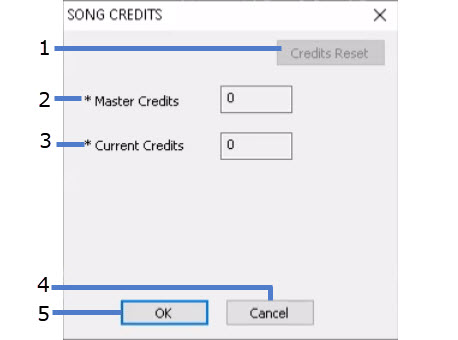
A.2.4.1 Credits Reset
Add the Current credits to Master credits and reset the Current credits to zero.
A.2.4.2 Master Credits
Display the total credits used. It cannot be changed.
A.2.4.3 Current Credits
Display the total number of credits used since the last reset.
A.2.4.4 OK
Save and exit .
A.2.4.5 Cancel
Exit without saving .
A.3 Help
Press Help and the following popup window will appear.
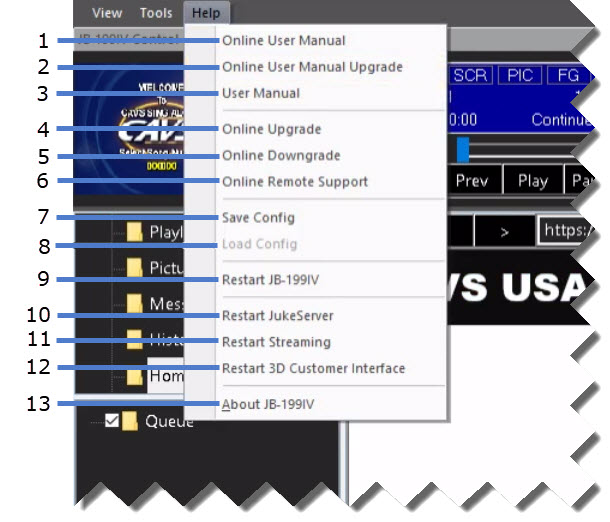
A.3.1 Online User Manual
Open the User Manual at www.cavsusa.com.
A.3.2 Online User Manual Upgrade
Download the latest version of the User Manual from www.cavsusa.com.
A.3.3 User Manual
Open the User Manual in the JB-199 IV.
A.3.4 Online Upgrade
Upgrade the JB-199 IV to the latest version.
A.3.5 Online Downgrade
Downgrade the JB-199 IV to a previous version.
A.3.6 Online Remote Support
Download CAVS Teamviewer from www.cavsusa.com. Install the program and notify CAVS Techsupport the ID and Password of CAVS Teamviewer.
A.3.7 Save Config
Save the current setting of the JB-199 IV.
A.3.8 Load Config
Load the previously saved setting of the JB-199 IV.
A.3.9 Restart JB-199 IV
Close and restart the JB-199 IV program.
A.3.10 Restart JukeServer
Close and restart the JB-199 IV server.
A.3.11 Restart Streaming
Close and restart the streaming.
A.3.12 Restart Customer Interface
Close and restart the Customer interface.
A.3.13 About JB-199 IV
Display the JB-199 IV about information.
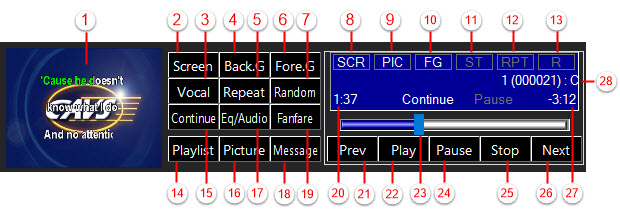
- Monitoring CD+G screen
- Turn on/off CD+G screen (does not affect monitoring)
- Voice cancel - Select Stereo/Left/Right channels
- Background video - Select Off/Picture/Video/Webcam
- Repeat - Select Off/One/All
-
Fore.G: Turn on/off Foreground video (affect CD+G screen)
Record: Turn on/off Record - Turn on/off Random song selection
- Status of CD+G screen - SCR(On)/Off
- Status of Background video - Off/PIC (Picture)/VID (Video)/WEC (Webcam)
- Status of Foreground video - FG(On)/Off
- Status of Voice cancel - Stereo/L(Left)/R(Right)
- Status of Repeat - Off/One/All
- Status of Random - R(On)/Off
- Show Playlist in 4.5.H List Browser
- Select Play mode - Continue/Single
- Show Picture in H. List Browser
- Select Equalizer - Audio/MIDI
- Message: Show Message in H. List Browser
- Fanfare On/Off
- Progressed time in play
- Play previous song
- Play
- Play progress bar - Slide forward or backward
- Pause
- Stop
- Play next song
- Remaining time in play
- Song in play (Song number, title, artist)
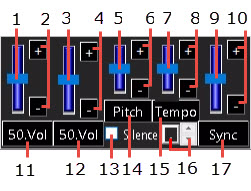
- Karaoke Volume slider
- Karaoke Volume buttons
- Interlude Volume slider
- Interlude Volume buttons
- Pitch level slider
- Pitch level buttons
- Tempo level slider
- Tempo level buttons
- Synch level slider: Controls the timing of lyric coloring relative to music
- Synch level buttons: Controls the timing of lyric coloring relative to music
- Mute (0)/Reset to default (50) Karaoke volume
- Mute (0)/Reset to default (50) Interlude volume
- Silence Gap Remover On/Off
- Reset Pitch level to default (0)
- Reset Tempo level to default (0)
- Silence Gap Remover Setting: Before(-) / After(+) music in second(s)
- Reset Sync level to default (0)
The Equalizer contains 8 frequency blocks and a preamplifier. The preamplifier evens out the music volume levels which may vary between different songs. The Equalizer changes automatically to MIDI Mixer when playing a MIDI song. It also changes automatically to Fanfare controls when the FANFARE button in 4.5.B PLAYER is pressed. If the screen showing the Control Panel is large enough, all three controls (Equalizer, MIDI mixer, and Fanfare) will appear together.
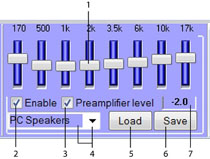
- 8 frequency block sliders
- Turn On/Off Equalizer
- Turn On/Off Preamplifier
- Select Equalizer Pre-settings
- Load Equalizer setting
- Save Equalizer setting
- Indicates Preamplifier effect on music volume
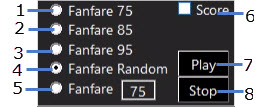
- Fanfare with score at 75
- Fanfare with score at 85
- Fanfare with score at 95
- Fanfare with score at random
- Fanfare with a specified score
- Play Fanfare after each karaoke song
- Play Fanfare
- Stop Fanfare
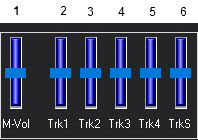
- Volume slider for Melody track
- Volume slider for Track 1
- Volume slider for Track 2
- Volume slider for Track 3
- Volume slider for Track 4
- Volume slider for Track 5
This section shows how to operate and customize the following functions.
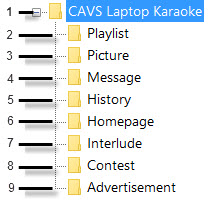
E.1 Open/Close
Open/Close the Function Menu. To see the 9. Advertisement, you must first check the option Enable Advertisement in 4.5.A.2.1.2 Control Panel.
E.2 Playlist
There are 10 Playlist (1 - 10), Queue, and Write slots in this section.
The playlist slots are where you can create, open, load, and edit song playlists.
You can have multiple playlists, for example for birthday, Christmas, Wedding, 70's, Rocks, etc.
In addition to the 10 playlist slots, there are 10 more playlist slots in My Playlist at 4.5.G Folder Menu.
A playlist is a text file listing of song files. Rather than working with the song files and folders, the JB-199 IV works with playlists which is faster to search, sort, and edit. With ever increasing number of songs, the working with playlists provides better protection against accidental deleting or corrupting of song files.
The Queue is where the reserved songs are listed until play. The Write is where the songs to be written/burned onto a disc or drive are listed.
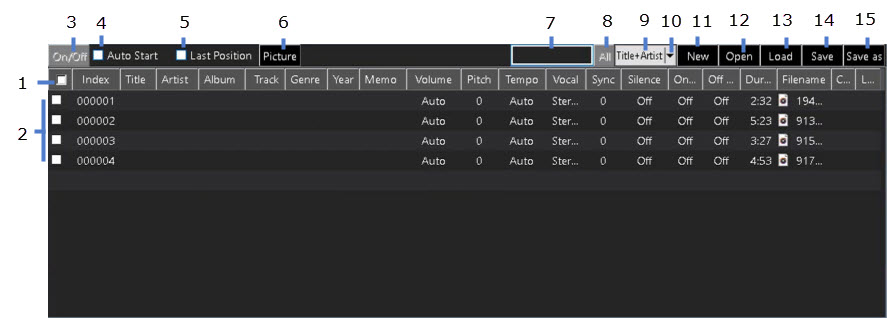
E.2.1 Playlist (1 - 10)
Click on any one of the playlist slots 1 - 10. A following popup window will appear.
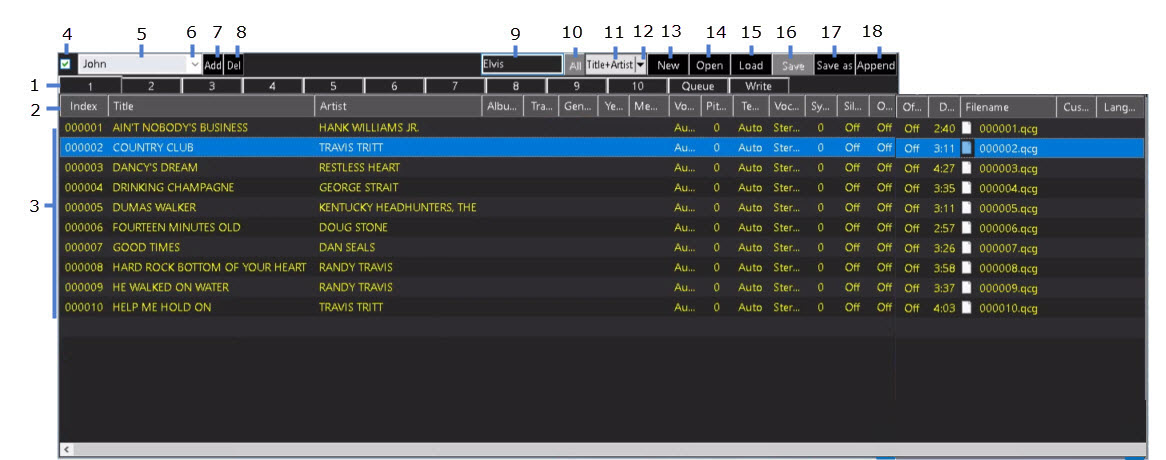
- Select a playlist slot 1 - 10.
- Input field names - After making changes, click on 16. Save or 17. Save as to save.
- Index - Press to sort the playlist by Index
- Title - Press to sort the playlist by Title
- Artist - Press to sort the playlist by Artist
- Album - Press to sort the playlist by Album
- Track - Press to sort the playlist by Track
- Genre - Press to sort the playlist by Genre
- Year - Press to sort the playlist by Year
- Memo - Press to sort the playlist by Memo
- Volume
- Pitch
- Tempo
- Voice Cancel
- Sync
- Silence Gap Remover
- On time
- Off time
- Duration
- Filename - Press to sort the playlist by Filename in ascending order. Press again to sort in descending order.
- Customer
- Language
- Input fields - After making changes, click on 16. Save or 17. Save as to save.
- Index - Double click to edit and press Enter to finish.
- Title - Double click to edit and press Enter to finish.
- Artist - Double click to edit and press Enter to finish.
- Album - Double click to edit and press Enter to finish.
- Track - Double click to edit and press Enter to finish.
- Genre - Double click to edit and press Enter to finish.
- Year - Double click to edit and press Enter to finish.
- Memo - Double click to edit and press Enter to finish.
- Volume - Double click to set it at (1, 100). Default is Auto (0).
- Pitch - Double click to set it at (-6, +6). Default is 0.
- Tempo - Double click to set it at (-6, +6). Default is 0.
- Voice Cancel - Double click to set it at Stereo (0), Left (1), or Right (2). Default is Stereo (0).
- Sync - Double click to set it at (-75, +75). Default is 0.
- Silence Gap Remover - Double click to set it at (-5, +5) in seconds. Default is Off.
- On time - Double click to set the starting time of the song at (1, ...) in seconds. Default is off (0).
- Off time - Double click to set the ending time of the song at (1, ...) in seconds. Default is off (0).
- Duration - Indicate the time duration of the song.
- Filename - Indicate the song file name. Double click to edit and press Enter to finish.
- Customer - Double click to edit and press Enter to finish.
- Language - Double click to edit and press Enter to finish.
- Turn on/off Auto Customer Naming - Automatically add the customer names when reserving songs.
- Customer Input field - Type in a new name to add or select an existing name to delete or reserve a song for.
-
Press to display customer names.
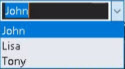
- Add a new customer name.
- Delete a selected customer name.
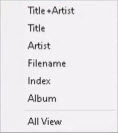
- Search Input - Type in the words to search for.
- Return to the total playlist.
- Indicate the current search category.
-
Select a search category.
- New - Clear the playlist slot.
- Open the MS File Explorer to select and load a playlist.
- Load a playlist. By default the folder Documents/JB-199IV/Playlist is opened.
- Save the current playlist. By default the folder Documents/JB-199IV/Playlist is opened.
- Save as the current playlist. By default the folder Documents/JB-199IV/Playlist is opened.
- Append the current playlist to another playlist. By default the folder Documents/JB-199IV/Playlist is opened.
In a playlist, you can also right click on any song for the following popup window.
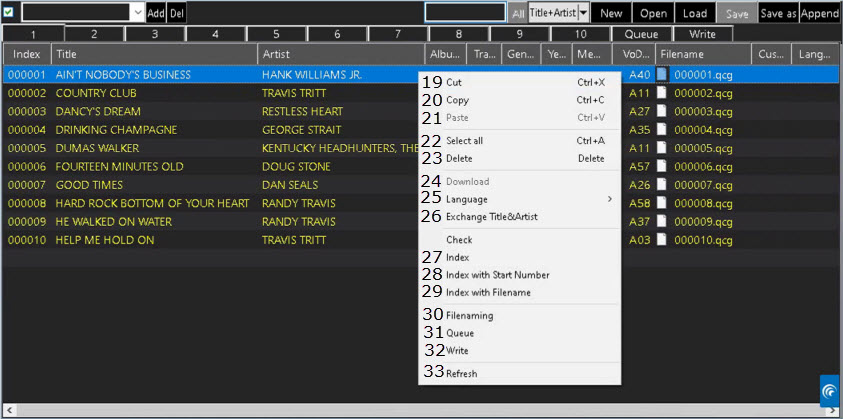
- Cut
- Copy
- Paste
- Select all songs in the playlist
- Delete
- Download from server
- Language - Set language from available options
- Exchange Title and Artist
- Index - Index or re-index all songs starting from 1
- Index with Start Number - Re-index the selected song and the songs below starting from the Start number
- Index with Filename - Re-index selected songs with its filename
-
Filenaming - Extract title, artist, album, and track information from the filenames of the selected songs.
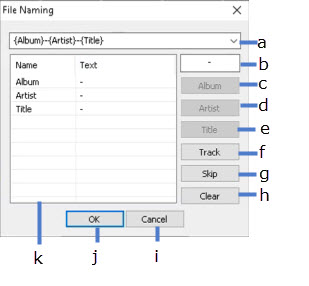
- Display the extraction format
- Separator - Input a separator in between fields in the filename
- Album
- Artist
- Title
- Track
- Skip - Skip the field
- Clear - Clear the format
- Cancel
- OK
- Input fields - Double click any field to edit and press Enter to finish
- Queue - Reserve the selected song into Queue
- Write - Send the selected song to Write
- Refresh the playlist
E.2.2 Queue
The Queue displays the reserved songs which play in the order of top to bottom and exit when played.
The Queue has the same format as a playlist. For details, see 4.5.E.2.1 Playlist (1 - 10).
E.2.3 Write
The Write displays the song files to be written/burn onto a disc or drive.
The following popup window will appear.
The input fields are same as in a playlist and for details, see 4.5.E.2.1 Playlist (1 - 10).

- Select a drive to write the song files into.
- Select a media, such as a 700MB CD or a 4.7GB DVD, into which the songs will be written.
- Input the volume name of the media.
- Write
-
Setting
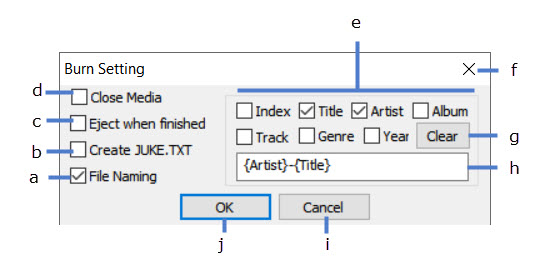
- Name the song files as specified.
- Create and write a song list JUKE.TXT
- Eject when finished
- Close media when done
- Select the fields to be included in the filename
- Close the popup window
- Clear the selection
- Display filename format
- Cancel
- OK
E.3 Picture
The Picture lists photos, videos, and webcams that can be used as background display of the CD+G screen.
Each item can be added, removed, enabled, disabled, or edited for its display time duration.
When done making changes, the Picture with its list of items can be saved and easily reloaded for use at a later time.
To turn on/off the Picture in the JB-199 IV, go to 4.5.B.4 Back.G.
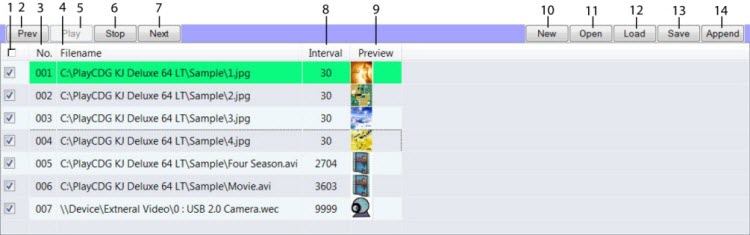
- Enable or disable all items. Play photos (PIC)/ videos (VID)/ webcam (WEC)/ Off using the 4.5.B.4 Back.G button.
- View the previous item
- Sort by Index
- Sort by Filename
- View the selected item
- Stop the view
- View the next item
- Set the duration of play time (in seconds)
- View screenshot
- Clear the list
- Open the MS File Explorer to add an item
- Load a list previously saved
- Save the current list
- Append the current list to an existing list
Right click on any item for the following window

- Cut
- Copy
- Paste
- 0: USB 2.0 Camera - Add the webcam. This option will not be available when no webcam is detected.
E.4 Message
The Message lists notices to be displayed on the CD+G screen.
Each notice can be added, removed, or edited for their content, frequency, duration, font, and color.
When done making changes, the Message with its list of notices can be saved and easily reloaded for use at a later time.

- Interval - Double click to edit the duration of display time in seconds for the selected notice.
- Call message - Double click to edit the content of the selected notice. Press Enter to finish.
- Index - Press to sort the notices by Index.
- Call off - Stop the display in progress.
- Auto Display Message 001 - Display the notice 001 at 1 minute remaining mark of a song in play.
- Call message - Press to sort the notices by content.
- Queue level - Select the number of reserved songs to display in Queue.
- Auto display Queue - Check to display Queue in between karaoke songs.
- Font & Color - Double click to choose font, font size, and color for the selected notice.
- Call - Display the selected notice.
- New - Clear Message.
- Load - Load Message. By default the folder Documents/JB-199IV/Message is opened.
- Save - Save Message. By default the folder Documents/JB-199IV/Message is opened.
- Append - Append Message to another Message. By default the folder Documents/JB-199IV/Message is opened.
In the Message, right click on any notice for the following window.
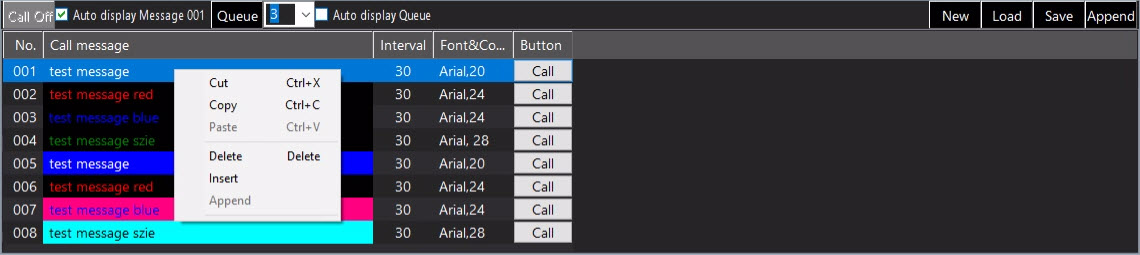
- Cut
- Copy
- Paste - N/A
- Delete
- Insert
- Append - N/A
Following Macros are available for the notices in the Message.
- {title} - Title of the next song
- {artist} - Artist of the next song
- {customer} - Customer of the next song
Here are some sample notices using Macros. Each macro term must be separated by a dash "-" in front and back except for the beginning and ending of the notice.
- "{title}-{artist}-{customer}" - Title Artist Customer of the next song
- "{title}-{artist}-{customer}-2" - Title Artist Customer of the next two songs
- "Get ready-{customer}-for your song-{title}" - Get ready Customer for your song Title
E.5 History
History shows the list of songs that were played in the past.
From History, you can send a song back to Queue, Playlist, or Write.
It is a useful way to accommodate the repeat customers.
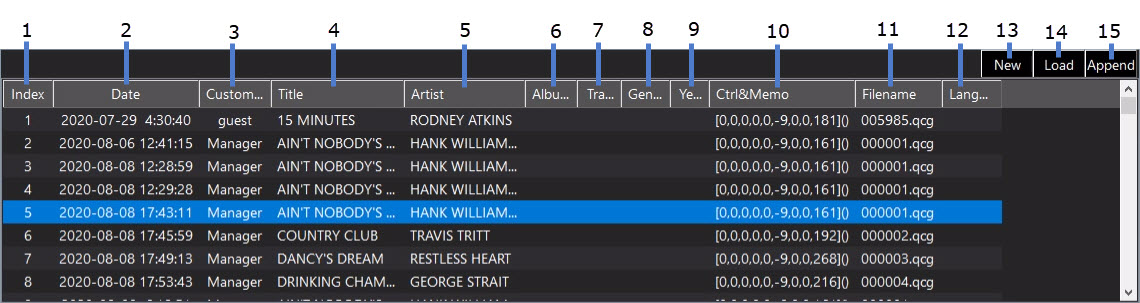
- Sort by Index
- Sort by Date & Time
- Sort by Customer
- Sort by Title
- Sort by Artist
- Sort by Album
- Sort by Track
- Sort by Genre
- Sort by Year
- Controls and Memo
- Sort by Filename
- Sort by Language
- Clear History
- Load History - By default the folder Documents/JB-199IV/Hisotry is opened.
- Append History to another History - By default the folder Documents/JB-199IV/Hisotry is opened.
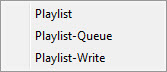
- Playlist - Send to Playlist. By default a most recently opened playlist is used.
- Playlist-Queue - Send to Queue
- Playlist-Write: Send to Write
E.6 Homepage
Homepage opens an web page set at 4.5.A.2.1.2 Control Panel. This section requires Internet connection.
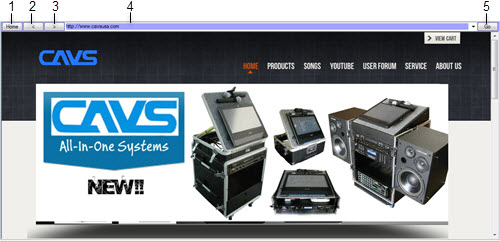
- Homepage
- Go Back
- Go Forward
- URL Address Input Field
- Go to URL address
E.7 Interlude
Interlude lists MP3 files that play as background music in-between karaoke songs.
The interlude files will automatically start with a fade-in when a karaoke song ends, and will stop with a fade-out when a new karaoke song starts.
The input fields for the MP3 files are same as in 4.5.E.2.1 Playlist (1 - 10).
- Enable/disable all MP3 files
- Enable/disable each MP3 file
- Turn on/off Interlude - The Play mode in 4.5.B. Player must be set to Single for the Interlude to play.
- Auto Start - Check to start Interlude automatically at the end of a karaoke song.
- Last Position - Check to start Interlude music from the last ending position.
- Picture - Select a photo to display while playing Interlude.
- Search Input Field - Type in word(s) to search for.
- Return to the total MP3 file list prior to search
- Indicate the current search category
-
Select a search category
- New - Clear Interlude
- Open - Open MS File Explorer to find and add a MP3 file
- Load - Load Interlude from the default folder Documents/JB-199IV/Playlist.
- Save - Save Interlude into the default folder Documents/JB-199IV/Playlist.
- Save as - Save as Interlude into the default folder Documents/JB-199IV/Playlist.
E.8 Contest
Contest shows the controls for conducting a karaoke contest using E-Songbooks, smartphones, tablets, or laptops.
All scores are sent from the guests wirelessly and tallied in the JB-199 IV.
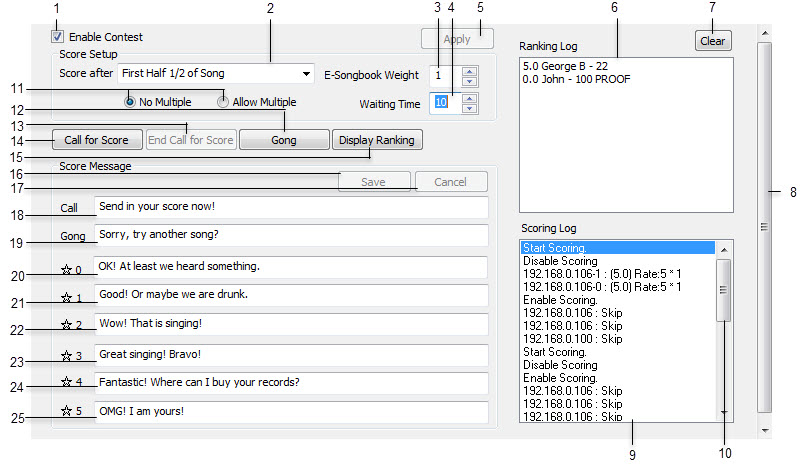
- Turn on/off singing contest
- Select scoring time to be after
- First half 1/2 of song
- Three Quarters 3/4 of song
- Complete song
- Select scoring weight for E-Songbooks. For example, 10 means that a score from an E-Songbook carries 10 times more weight than a score from guests using smartphones, tablets, or laptops. This would be appropriate when the E-Songbooks are given only to the designated judges.
- Select waiting time (in seconds) for scores after a song
- Press to apply any changes made
- Ranking Log - Shows ranking of contestants in their total score.
- Clear Ranking Log
- Scroll bar
- Scoring Log - Shows all scores received.
- Scroll bar for Scoring Log
- Allow/Not allow multiple scores from a same device
- Hit the gong
- End the call for score and tally the already received scores
- Call for score
- Display the ranking of contestants
- Save any changes made in the Score Messages
- Cancel any changes made in Score Messages
- Message sent out when Call for Score is pressed
- Message sent out when Gong is hit
- Message sent out for zero star score
- Message sent out for one star score
- Message sent out for two star score
- Message sent out for three star score
- Message sent out for four star score
- Message sent out for five star score
E.9 Advertisement
Advertisement lists promotional photos or videos such as the commercials from local car dealers, neighborhood bowling alleys, or nearby real estate brokers.
They can be of format JPG (JPEG) for photos and MP4 for videos, both with audio.
They are played between karaoke songs while the play mode is set to Single in 4.5.B.Player.
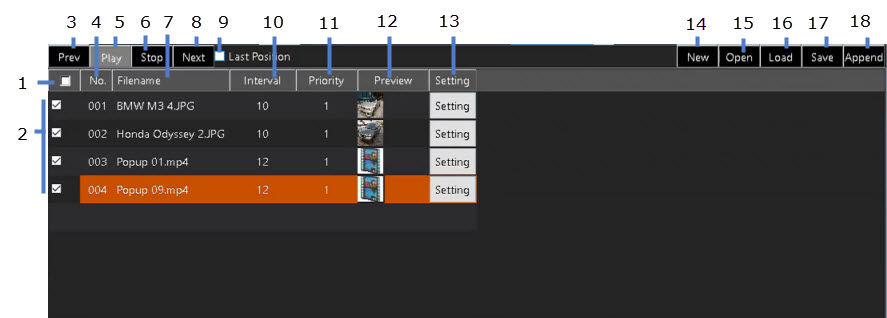
- Enable/disable all items
- Enable/disable each item
- Play/display the previous item
- Index field - Press to sort the items by Index.
- Play the selected item
- Stop the play
- Filename - Press to sort the items by Filename.
- Play the next item
- Last Position - Check to start play from the last ending position.
- Interval - Set time duration for play.
- Priority - Set the priority level (1 - Highest, 10 - Lowest)
- Preview - Display screenshot
- Set posting schedule
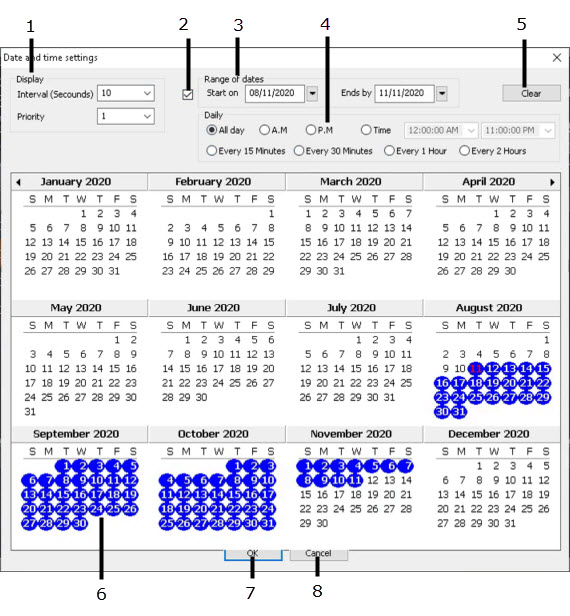
13.1 Set the time duration and priority
13.2 Check to enable
13.3 Set the date range
13.4 Set the intra day time schedule
13.5 Clear the settings
13.6 Set the dates using the calendar
13.7 Save and exit
13.8 Exit without saving
- New - Clear the current list
- Open - Open MS File Explorer to find and add an item
- Load - Load Advertisement from a default folder Documents/JB-199IV/Picture
- Save - Save Advertisement into a default folder Documents/JB-199IV/Picture
- Append - Append Advertisement to another Advertisement in a default folder Documents/JB-199IV/Picture
Rotation manages customers to take turns to sing either as an individual or as a group. For example, if the customers are sitting at 4 tables, the Rotation can assign every 4th song to each table. It will display the queue for each table as well as for all. Each table will stay in the Rotation as long as its queue is not empty.
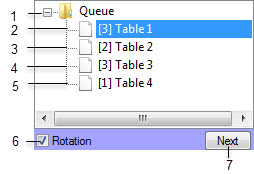
- Queue for all - Display groups in rotation
- Group 1 Queue
- Group 2 Queue
- Group 3 Queue
- Group 4 Queue
- Enable/Disable Rotation
- Show the Queue for next group in rotation
With the Rotation enabled, the following popup window will appear when reserving a song. You can select an existing customer name or type in a new one.
- Song being reserved
- Key (Pitch) control
- Tempo control
- Customer name: Select from the list below or type in a new one
- List of customers/groups
- Save and exit
- Exit without saving
Select a folder in the Folder Menu. The contents will appear on the right side in 4.5.I File Browser.
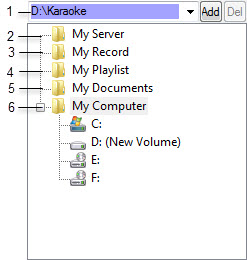
- Directory shortcut
- My Server
- My Record
- My Playlist
- My Documents
- My Computer
G.1 Directory Shortcut
Select a directory shortcut from the pulldown menu for quick access.
To add a shortcut, navigate to a folder you wish and press Add.
To delete, select a shortcut from the pulldown menu and press Delete.
The file tree of the shortcut will appear in the 4.5.I File Browser.
G.2 My Server
My Server will show a playlist slot in 4.5.I File Browser which is same as 4.5.E.2 Playlist (1 - 10).
My Server is indeed another playlist slot however with a difference that a playlist when loaded into My Server will be shared with online guests and E-Songbook.
- Playlist loaded in My Server
- Search, New, Load, Save, and Save as
By default, My Server when empty will load a playlist named Master Playlist located in Documents\JB-199IV\Playlist.
G.3 My Record
My Record shows the recorded files along with controls in the 4.5.I File Browser.
The recorded files are automatically parsed into each song when recorded.
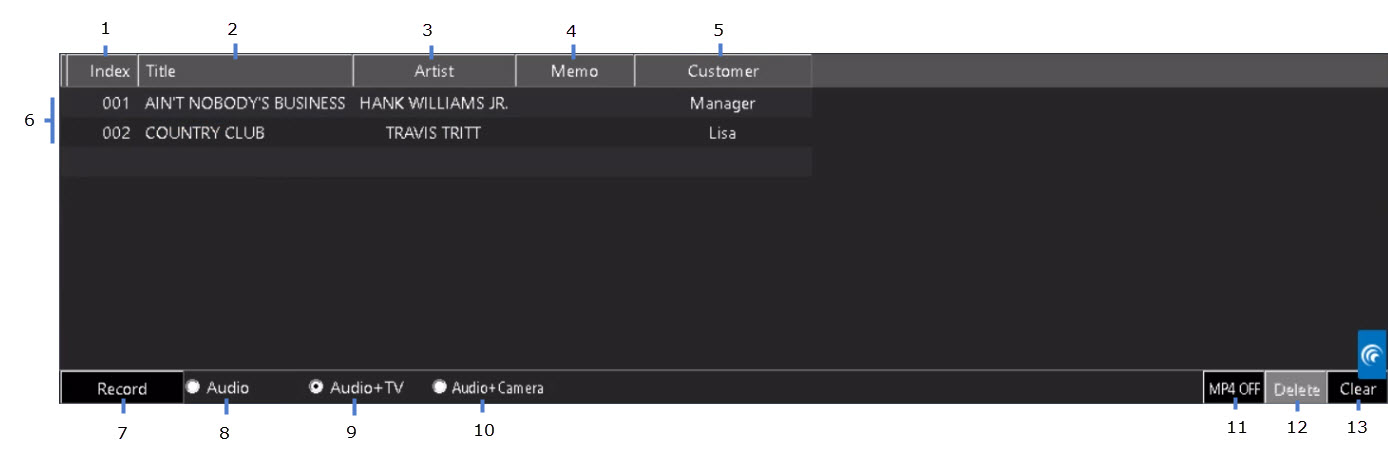
- Index - Sort by Index.
- Title - Sort by Title.
- Artist - Sort by Artist.
- Memo
- Customer
- Recorded song files - Double click on any input field to edit. Press Enter to finish.
- Record/Stop Record
- Audio - Record audio only.To record the karaoke music together with singing voice, the mixed audio output must be looped back into the audio input in the back panel of the JB-199 IV.
- Audio + TV - Recording audio and the CD+G screen.
- Audio + Camera - Record audio and camera
- MP4 Off/MP4 On - Record in MP4 format.
- Delete - Delete a recorded file.
- Clear - Clear all recorded files.
G.4 My Playlist
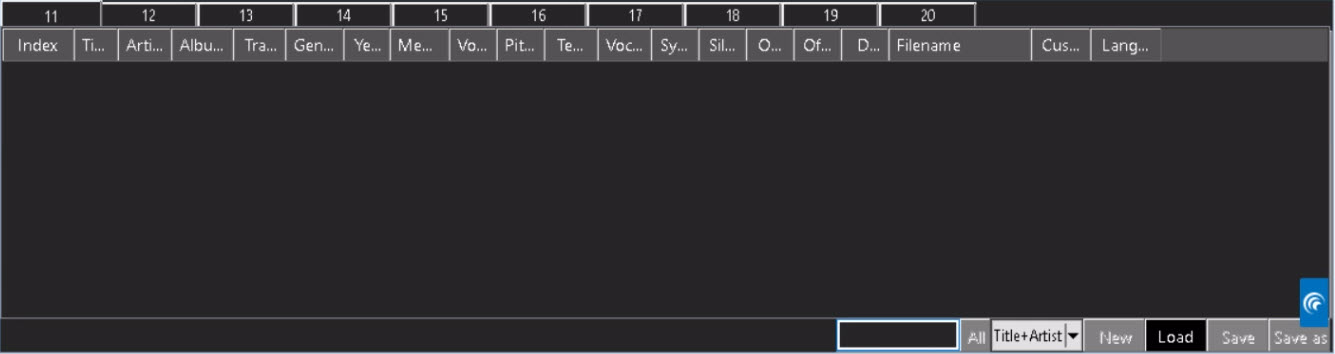
My Playlist will show the playlist slots 11 - 20 in 4.5.I File Browser. They are additional to the playlist slots 1 - 10 in 4.5.E.2 Playlist.
By default, the JB-199 IV loads or saves playlists in the folder Documents/JB-199IV/Playlist.
My Documents provides a quick access to the folder Documents/JB-199IV where subfolders such as History, Message, Picture, Playlist, etc. are located. These subfolders are used by the JB-199 IV in default mode to store the playlists, picture lists, message lists, etc.
Select My Computer to see the directory tree inside the JB-199 IV. A frequent task here is to navigate the directory tree to song files that are copied, extracted, or downloaded into the JB-199 IV. The playlists are then created to use the song files in the JB-199 IV. For the detail instruction on how to create the playlists, go to 7. How to Operate.
List Browser displays the detail contents of the functions in the 4.5.E FUNCTION MENU. For example, it shows the playlists (1 - 10), Queue, and Write for the function Playlist.
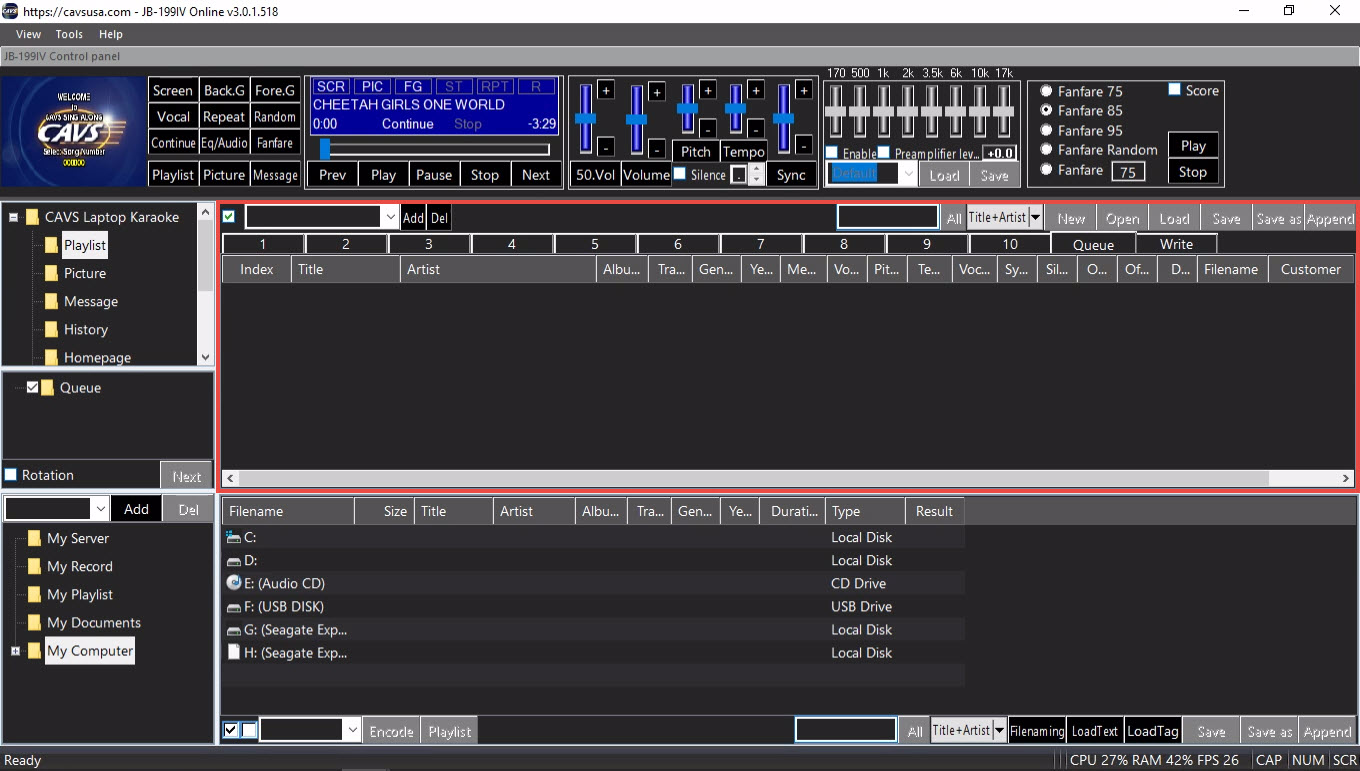
The List Browser also shows a list of photos, videos, and webcams for the function Picture, a list of notices for the function Message, a list of previously played songs for the function History, a list of audio files for the function Interlude, etc. For detailed description of each function and its display, go to 4.5.E FUNCTION MENU.
The List Browser can be loaded with different playlists, different lists of photos, different lists of notices, different lists of audio files, etc. That is, the contents can be changed according to the karaoke need. To manage the contents, use the control buttons New, Open, Load, Save, Save as, and Append that are located on the upper right corner of List Browser.
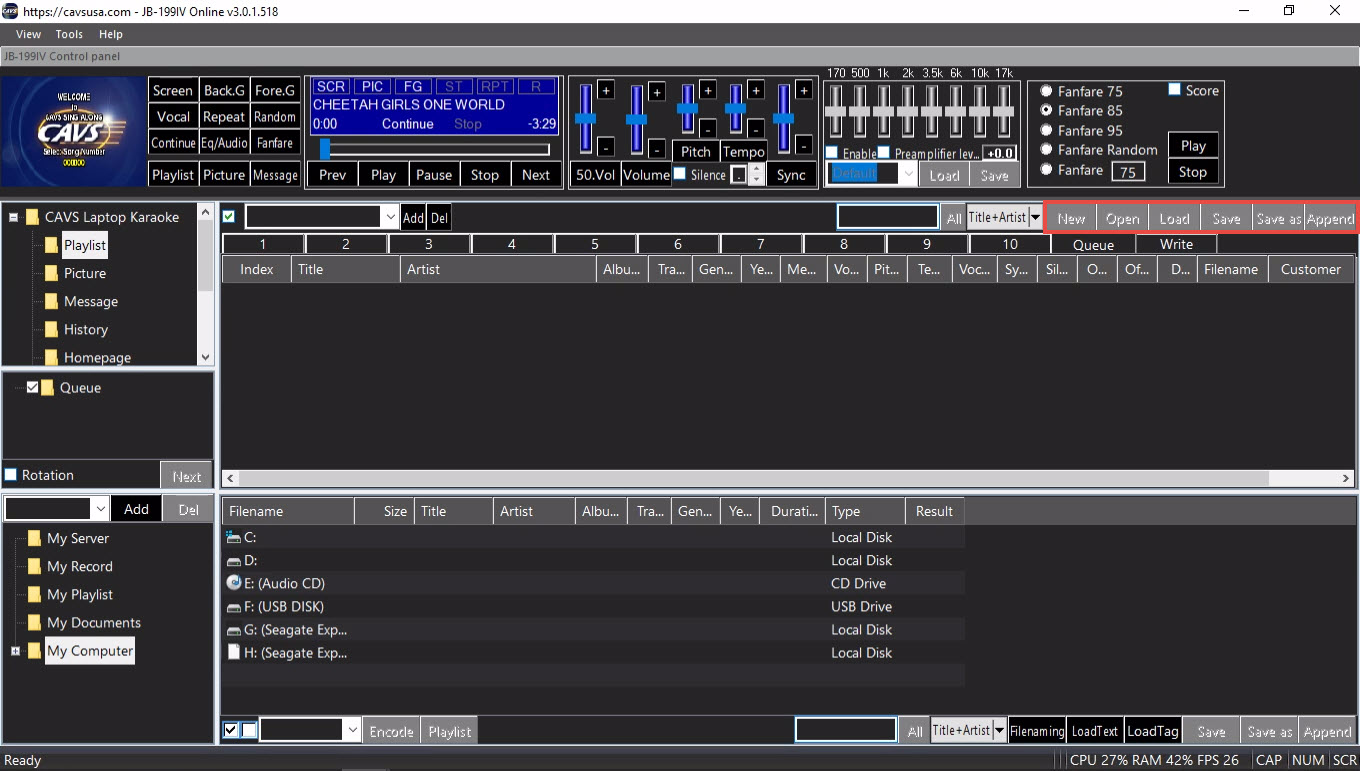
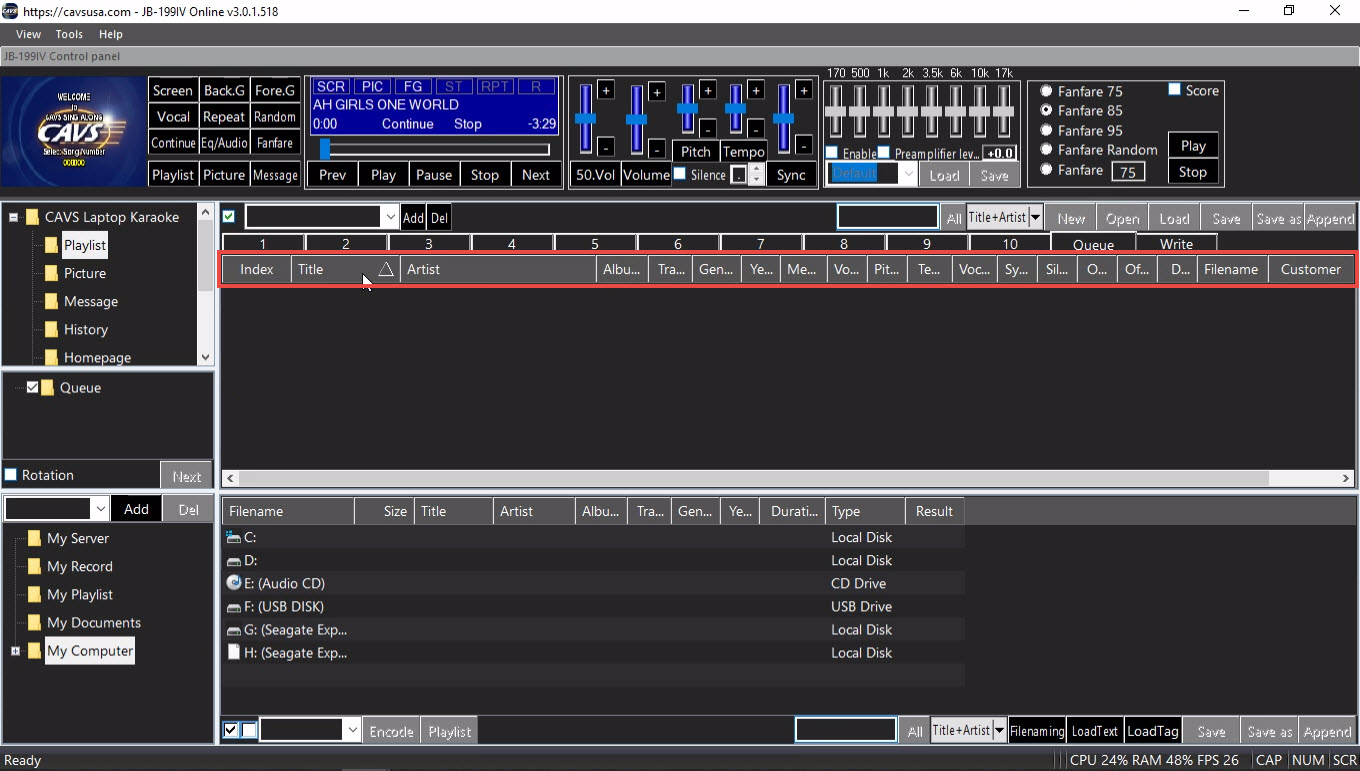
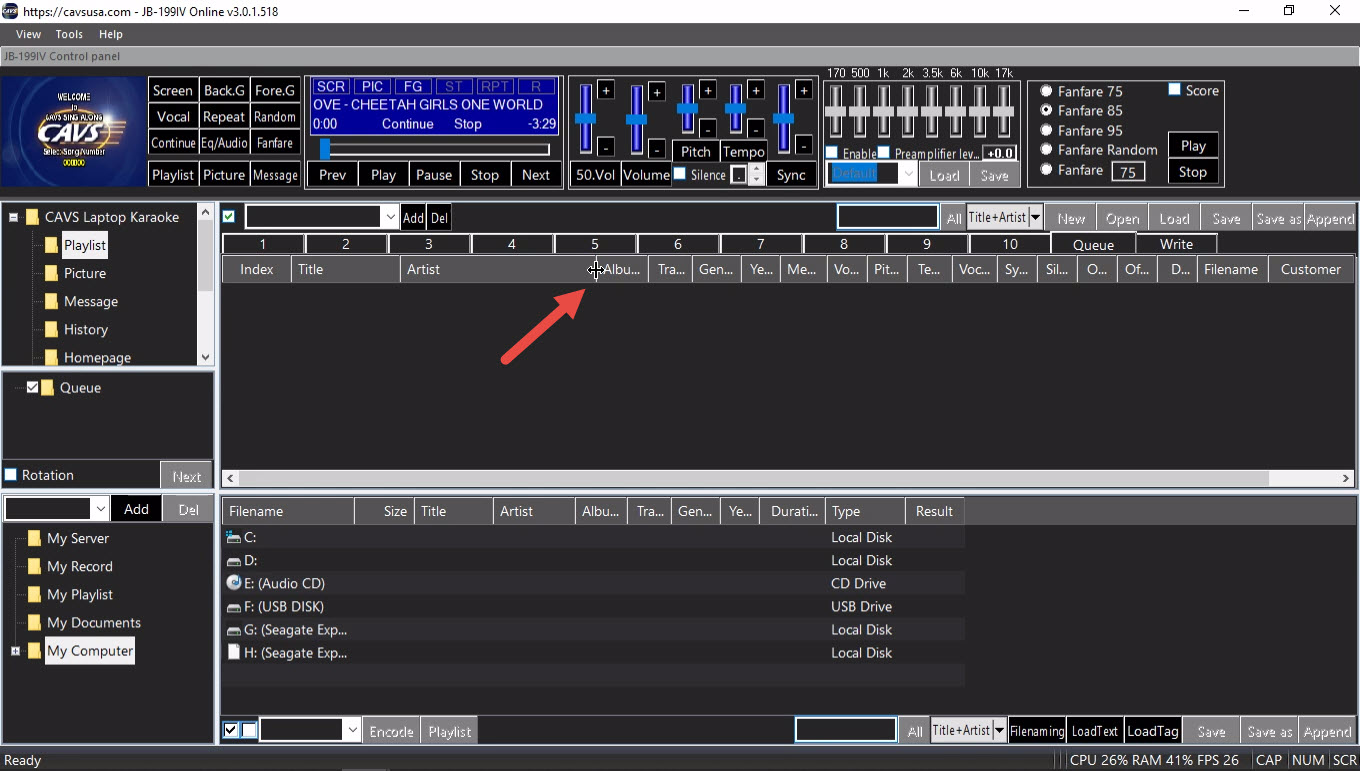
The display layout of the List Browser can be changed. Press a field name to sort the content by the field. For example, press Title to sort by Title. Press again to reverse the sort order. The sort feature applies to other fields and other functions.
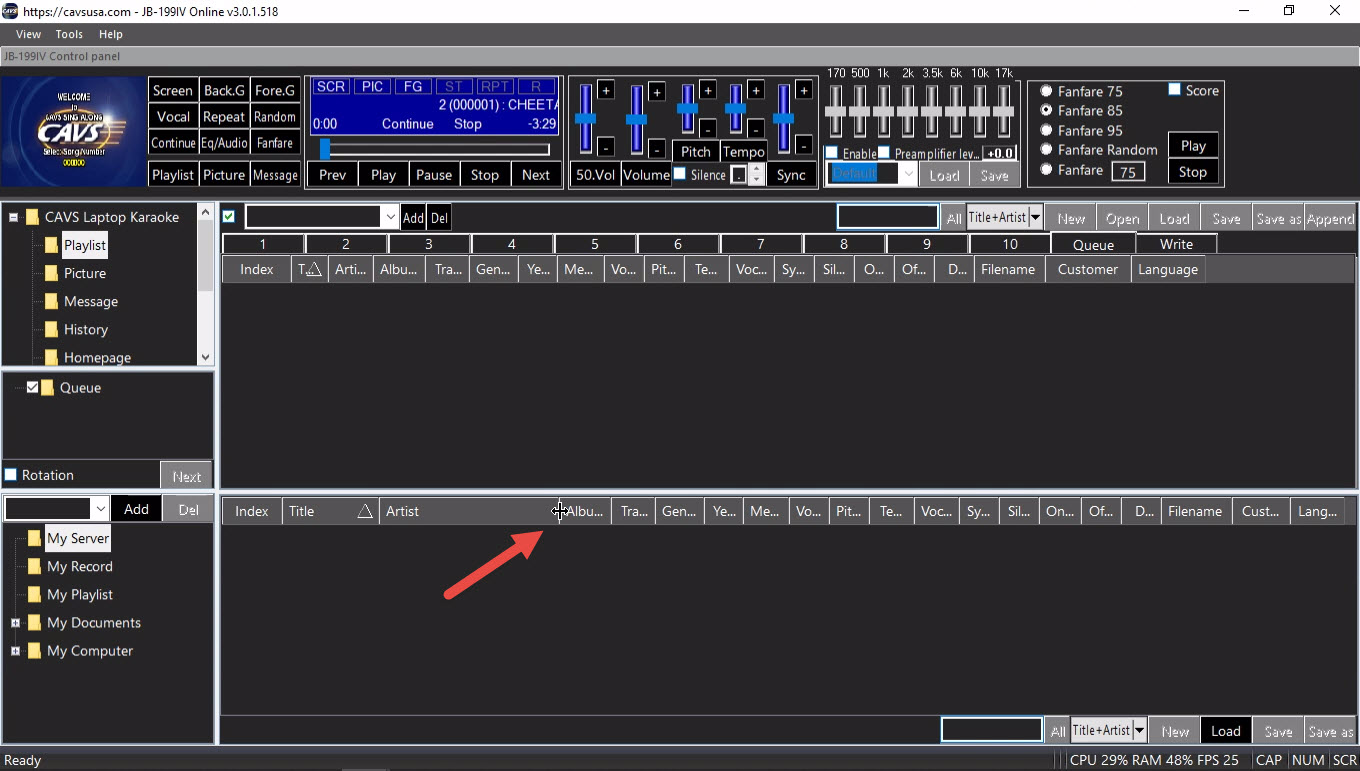
Place a mouse cursor on a boundary between two field names. Press and drag the mouse to left or right to increases or decreases the width of the fields. In the example below, the mouse cursor is placed in between the Artist and Album field names. The adjustment can also be made for other fields and other functions.
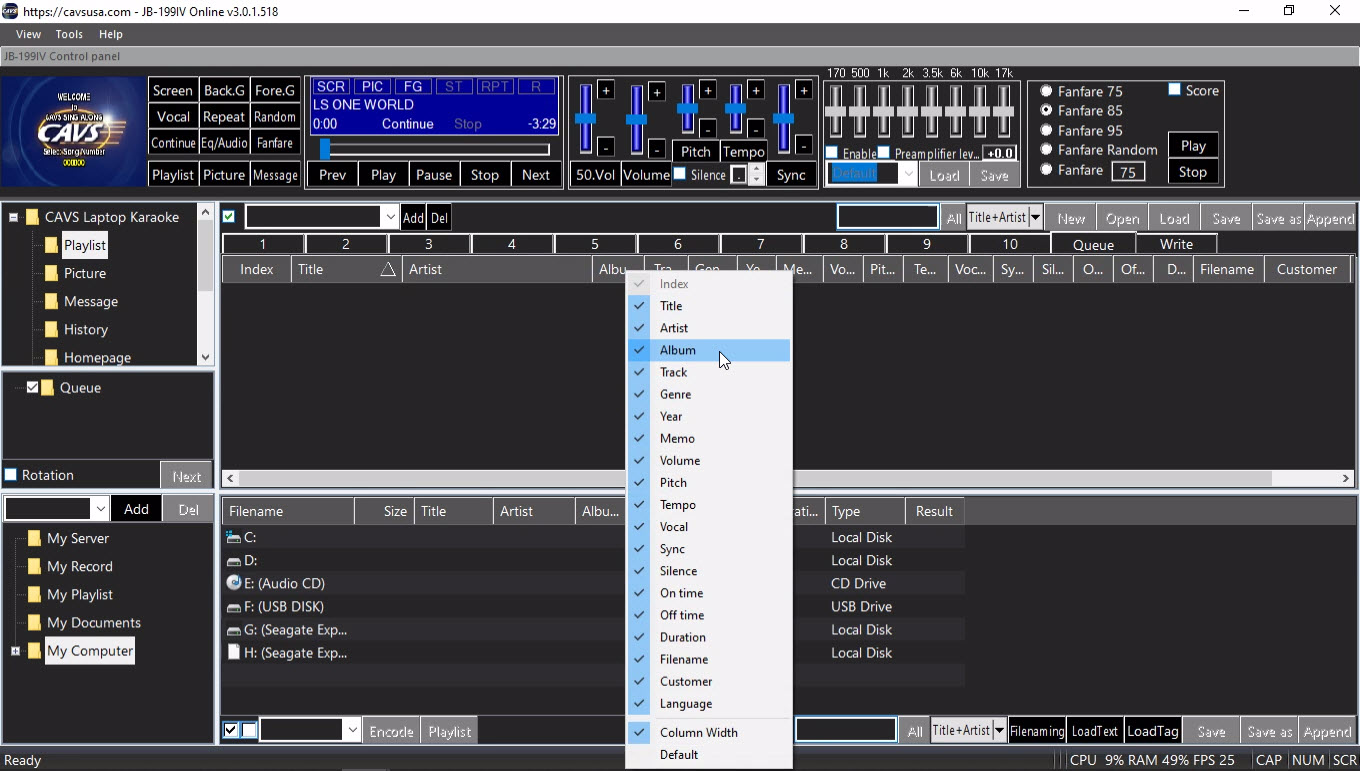
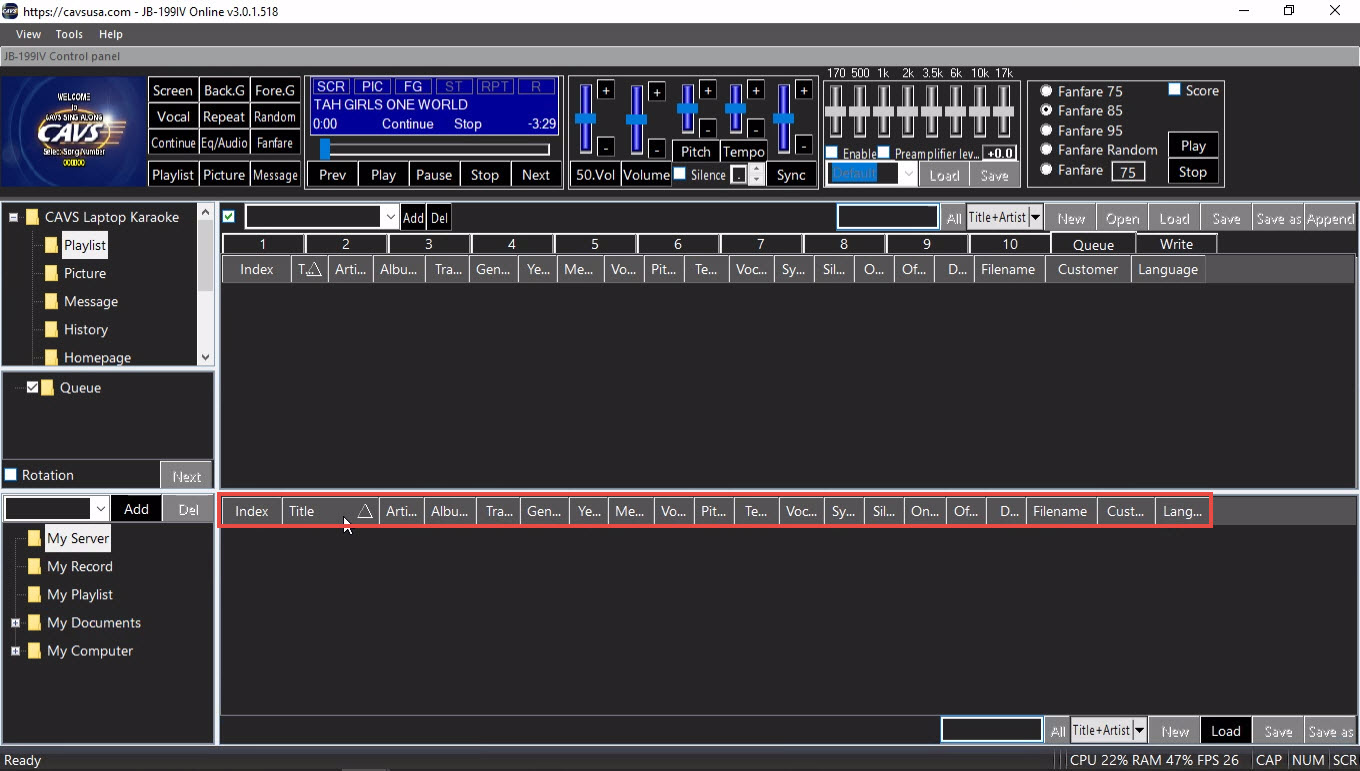
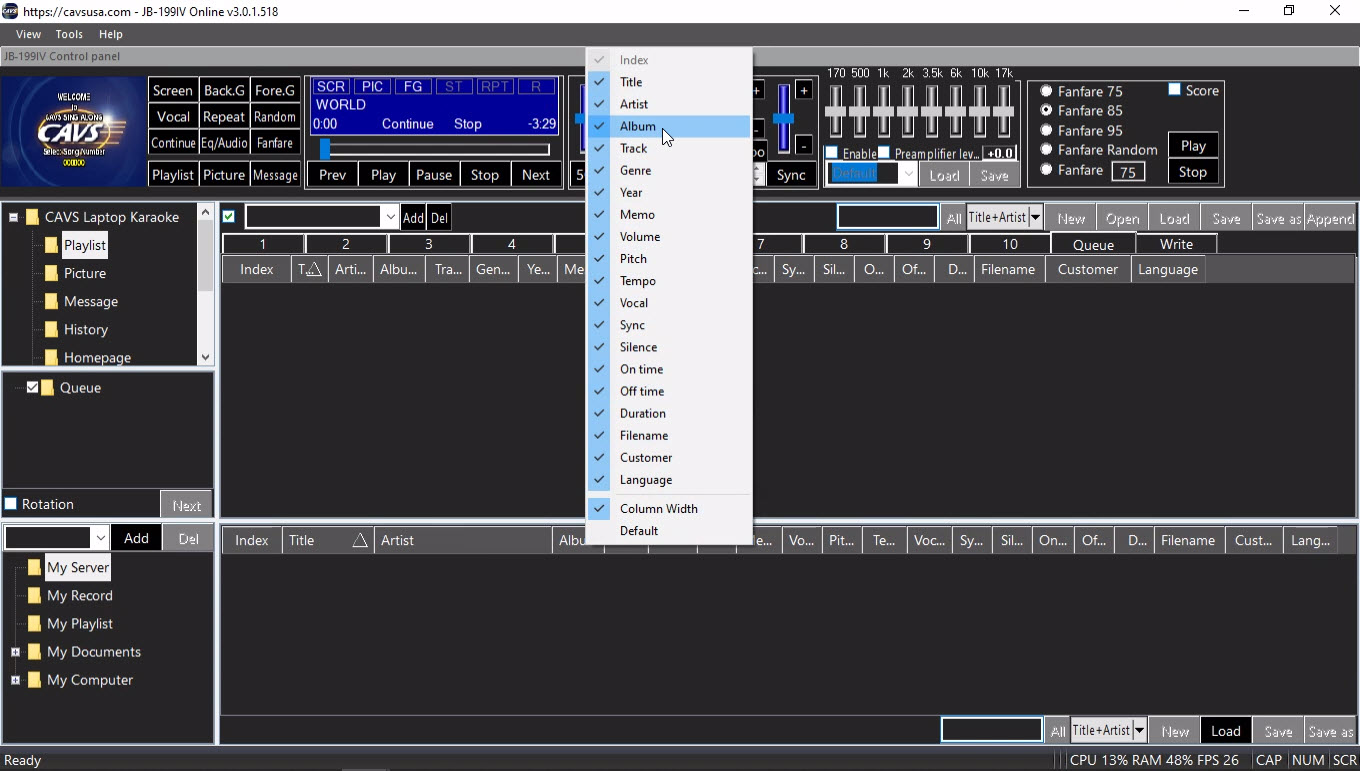
Right click on a field name and uncheck the field in the popup menu to hide the field. To un-hide, right click on any field name and check the field in the popup menu. To make the change permanent, uncheck the "Column width Default" in the popup menu. In the example below, the Album field name is right clicked to show the popup menu. The same procedure applies for other fields and other functions.
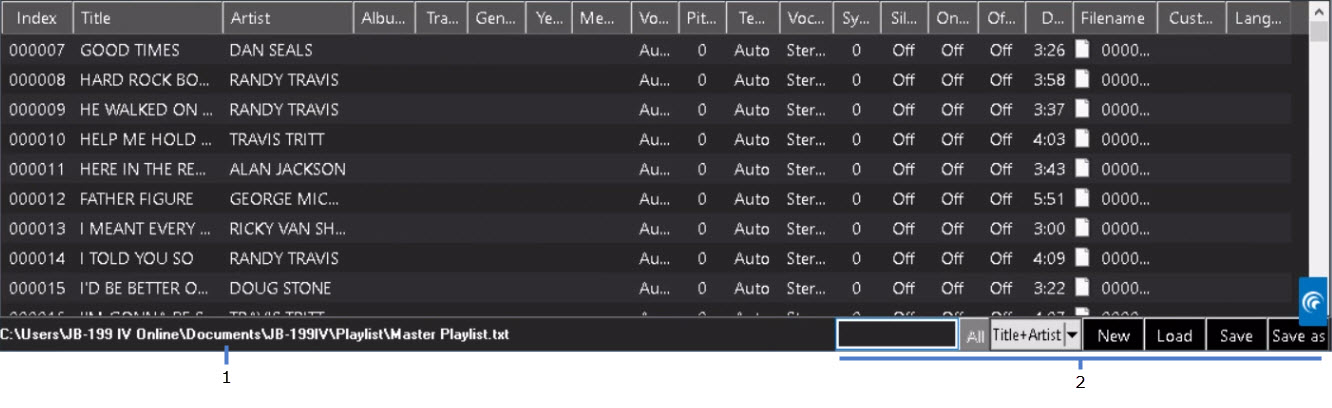
File Browser shows the detail content of each folder in the 4.5.G FOLDER MENU. For example, it shows a playlist slot for My Server.

The File Browser also shows recorded files for My Record, the playlist slots (11 - 20) for My Playlist, a directory tree for My Documents, and a directory tree for My Computer. For detailed description of each folder and its content, go to 4.5.G FOLDER MENU.
For the playlist slots in My Server or My Playlist, any playlist can be loaded and changed according to the karaoke need. The control buttons New, Load, Save, Save as are located on the lower right corner of the File Browser.

The display layout of the File Browser can also be changed. Press a field name to sort the content by the field. For example, press Title to sort by Title. Press again to reverse the sort order. The sort feature applies to other fields and other folders.
Place a mouse cursor on a boundary between any two field names. Press and drag the mouse to left or right to increases or decreases the width of the fields. In the example below, the mouse cursor is placed in between the Artist and Album field names. The width can also be adjusted for other fields and other folders.
Right click on a field name and uncheck the field in the popup menu to hide the field. To un-hide, right click on any field name and check the field in the popup menu. To make the change permanent, uncheck the "Column width Default" in the popup menu. In the example below, the Album field name is right clicked to show the popup menu. The same procedure applies for other fields and other functions.
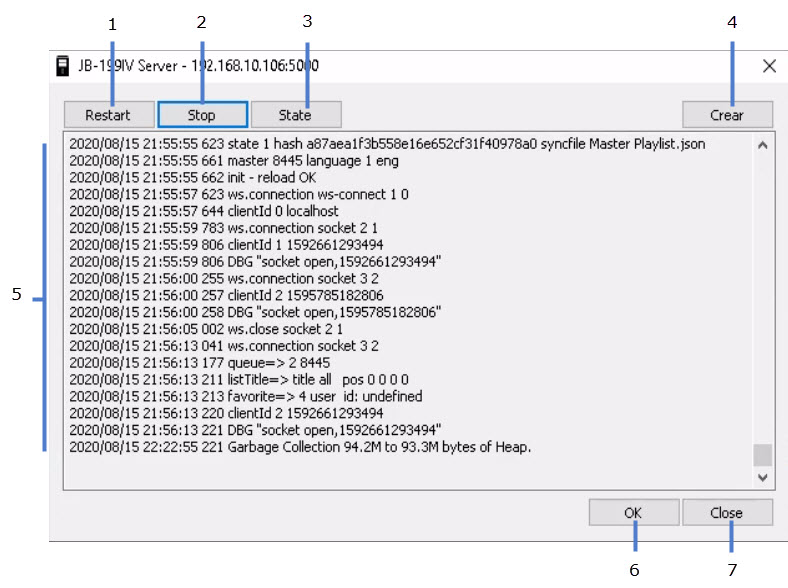
JB-199 IV Server provides the connectivity to online participants and E-Songbooks. It starts when the Start JB-199 IV Server option is checked in 4.5.A.2.1.5 Server & Browser of the Control Panel.
When running, the JB-199 IV Server window can be opened and closed by pressing the following icon in the task bar.
![]()
Closing the JB-199 IV Server window will terminate the server program and end all communication with online participants or E-Songbooks. Be sure to minimize, not close, by pressing OK to maintain the workings of JB-199 IV Server.
- Restart
- Stop
- State
- Clear
- Log
- OK
- Close
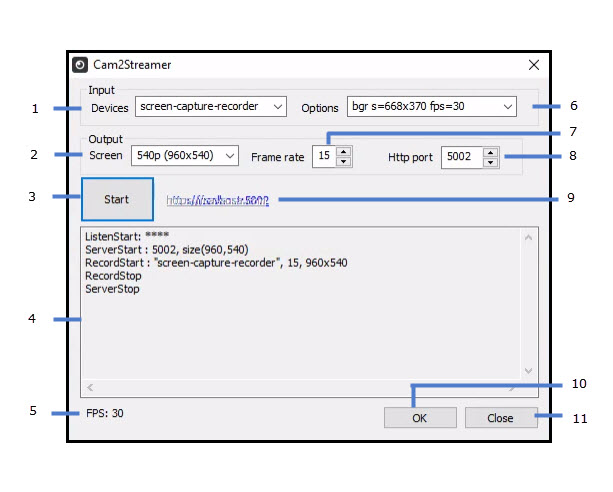
Cam2Streamer controls the video streaming of the JB-199 IV. It is set by default to a speed of 15 Frames Per Second (FPS) output in H.264 compression.
To open the Cam2Streamer window, press the following icon in the task bar.
![]()
The icon is made barely visible to discourage any accidental opening.
After making changes, be sure to click OK to minimize and not close the Cam2Streamer which will terminate the video streaming.
Note that the Cam2Streamer while running will show all setting as disabled. Press the Start/Stop button to enable the setting to make changes.
- Input Devices - Select a screen capture driver. It is set by default to Screen-Capture-Recorder
- Output Screen - Select output resolution.
- Start/Stop - Start or stop video streaming.
- Message - Module message.
- FPS - Display output frame per second.
- Input Options - Select input color scheme, resolution, and FPS
- Output Frame rate - Select output frame rate per second 0 - 30.
- Output HTTP port - Output port number
- https:/localhost:5002 - Link to view the video streaming in a local browser. When the streaming is stopped, the link changes to hppts://cavsusa.com.
- OK - Save changes and minimize the window.
- Close - Terminate the control without saving.
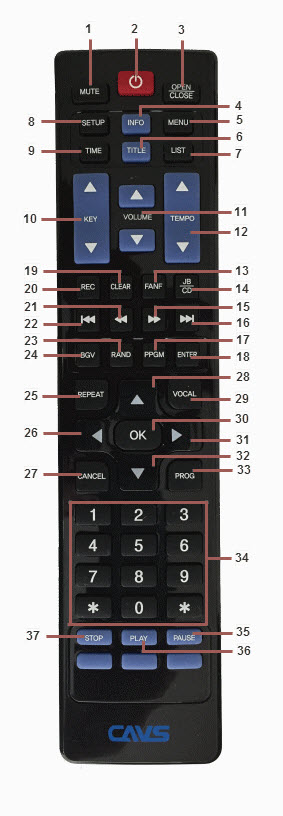
- MUTE: Mute on / off master music volume.
- POWER: Power off the player. To power on, press the POWER button on the front panel.
- OPEN/CLOSE: Open / close disc drive (in Disc mode only)
- INFO: Display SYSTEM SETUP window. Press again to close.
- MENU: Display MENU screen with available functions.
- TITLE (STATUS): Display STATUS information window.
- LIST: Display the song list on TV screen.
- SETUP: Peripheral device control (currently disabled).
- TIME: Select between elapsed / remaining time.
- KEY CONTROL: Raise / lower key (pitch) level
- VOLUME CONTROL: Raise / lower master music volume
- TEMPO CONTROL: Raise / lower tempo (speed) level
- FANFARE: Select between Off / 75 / 85 / 95. Press PLAY.
- JB/CD: Select between JB (Jukebox) / CD (disc)for song selection.
- FAST FORWARD: Move fast forward during play.
- SKIP FORWARD: Go to the next song
- PPGM: Press to priority-program a song (disabled in JB-199 Premier unit with Dual screen).
- ENTER: Press to enter or select.
- CLEAR: Press to clear input.
- RECORD: Press to start/stop the recording.
- FAST BACKWARD: Move fast backward during play.
- SKIP BACKWARD: Go to the previous song.
- RANDOM: Press to turn on the RANDOM play mode.
- BGV: Select between Off / Internal video / Still images / External USB camera for background video.
- REPEAT: Select between Off / Repeat one / Repeat all.
- LEFT: Move cursor left
- CANCEL: Cancel the last programmed song.
- UP: Move cursor up.
- VOCAL (VOICE CANCEL): Select between L / R/ Stereo channels.
- OK: Press to enter or select.
- RIGHT: Move cursor right.
- DOWN: Move cursor down.
- PROG: Press to program a song.
- NUMERIC BUTTONS: Input numbers of a song or menu item.
- PAUSE: Press to pause. Press again to play.
- PLAY: Press to play. Press again to pause.
- STOP: Press to stop / return.
A. HOW TO LOAD THE BATTERIES
1. Open the bottom cover of the remote controller.
2. Load two batteries (1.5V) of "AAA" size with +/- polarities as specified.
3. Close the bottom cover.
B. PRECAUTIONS IN USING BATTERIES
1. When changing batteries
- Check the +/- polarities of the batteries to be as specified on the case of remote controller.
- Do not mix the types of two batteries even though they are of same size.
2. When using a battery charger
- Use the battery charger only after checking carefully its charging time and voltage. (Use only direct voltage of 2.4V to 3.6V for both batteries combined.)
3. When handling batteries
- Do not over charge, heat, disassemble or short-circuit the batteries.
- For long term storage, take out the batteries from remote controller as the batteries may leak electrolytic liquid which can damage the controller.
C. Operating range
1. The effective angle of remote controller is 30 degrees up/down and right/left from the front remote sensor in main body of the unit.
Use the remote controller within this range.
2. The effective distance of remote controller is 7 meters or 23 feet from the remote sensor in the main body of the unit.
Use the remote controller within this distance.
D. Precaution
1. After a bootup, it may take 1 or 2 inputs from the remote controller for JB-199 Premier unit to respond.
2. If remote controller is not working, check the batteries and also the AC power plug of the main unit.
3. If remote controller is malfunctioning, it may be due to cross interference from other equipment nearby.
Try using the remote controller at a closer distance and directly in front of the main unit.
WHEN CONNECTING PC MONITOR (TOUCH SCREEN), KEYBOARD, AND MOUSE
The connection from JB-199 IV to PC monitor, keyboard, and mouse is illustrated below. When the PC monitor is a touch screen, an additional USB connection is required from the monitor to the JB-199 IV Online.

WHEN CONNECTING VIDEO/AUDIO OUTPUT TO TV
The connection for JB-199 IV unit with a TV is illustrated below.
WHEN CONNECTING VIDEO OUTPUT TO TV AND AUDIO OUTPUT TO AMPLIFIER
The connection for JB-199 IV with a TV and an amplifier is illustrated below.
WHEN CONNECTING EXTERNAL DEVICES
The connection for an external disc drive, hard drive, webcam, flash drive to JB-199 IV unit is illustrated below.
WHEN CONNECTING AN AUDIO SOURCE FOR RECORDING
The connection for JB-199 IV unit to an external audio source is illustrated below. To include the singing voice in the recording, be sure that the microphone output is connected to the audio source.
WHEN CONNECTING LIGHT CONTROL OR BILL/COIN ACCEPTOR
The connection for JB-199 IV to a peripheral device, such as a Bill/Coin Acceptor or Lighting Control is illustrated below.
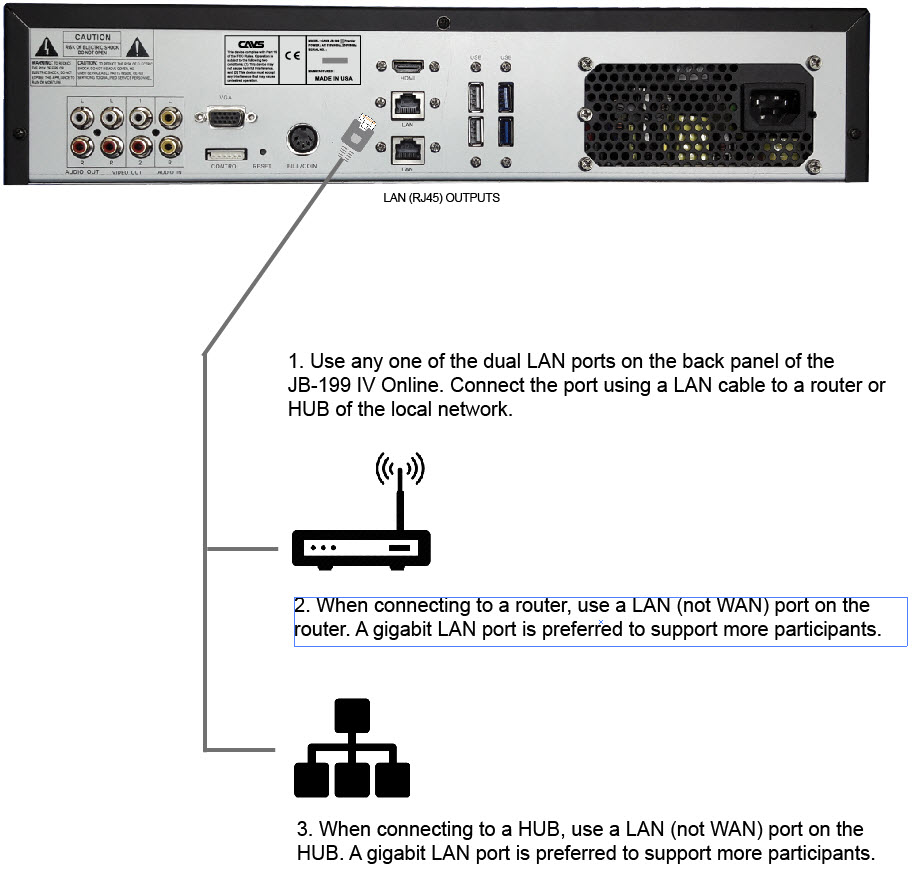
Two cases are considered. First is when the participants are connecting through a local network using a local IP address. Second is when the participants are connecting through Internet using a public IP address.
The connection from JB-199 IV to a local network is illustrated below.
After connecting, find the local IP address assigned to the JB-199 IV by going to Windows Start > Settings > Network > Internet > Status > Properties. Scroll down to the bottom and look for IPv4 address. It is likely of format 192.168.xxx.xxx where xxx.xxx will depend on each location. For example, it shows as 192.168.1.20 below.
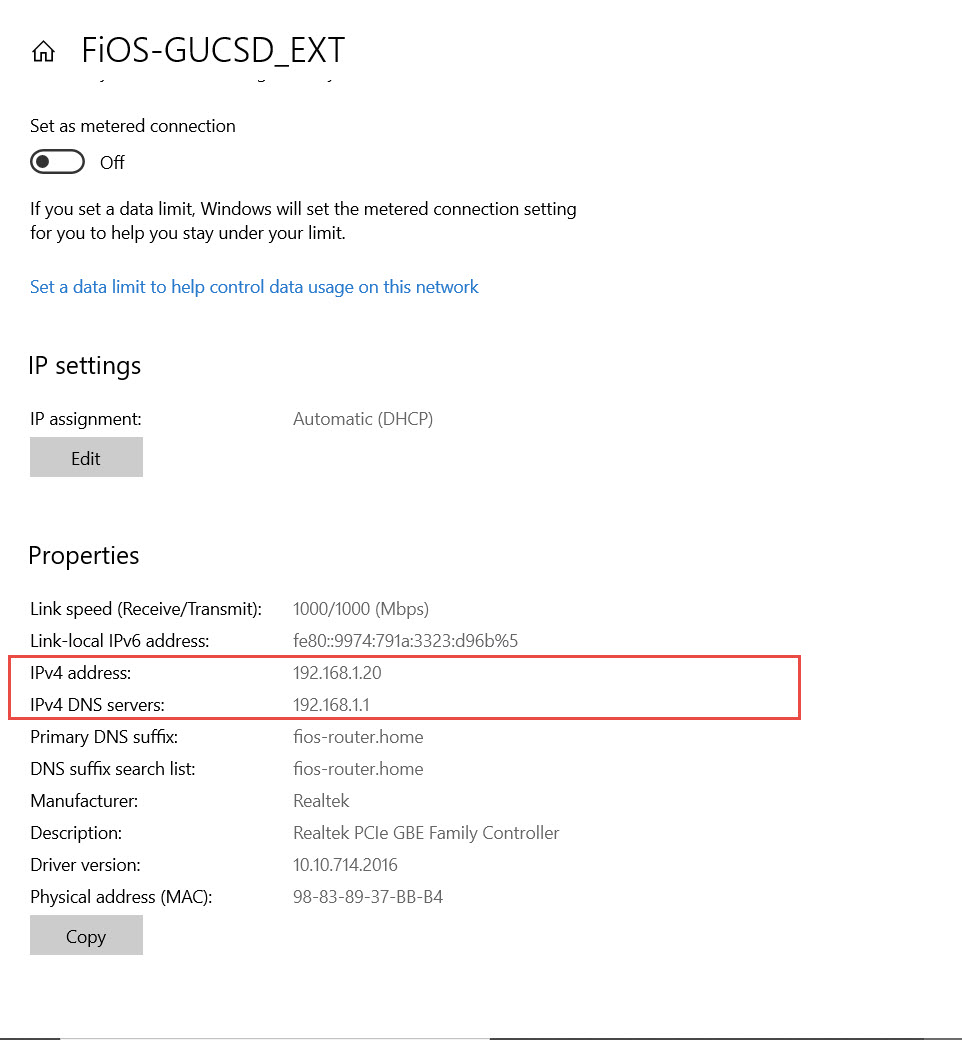
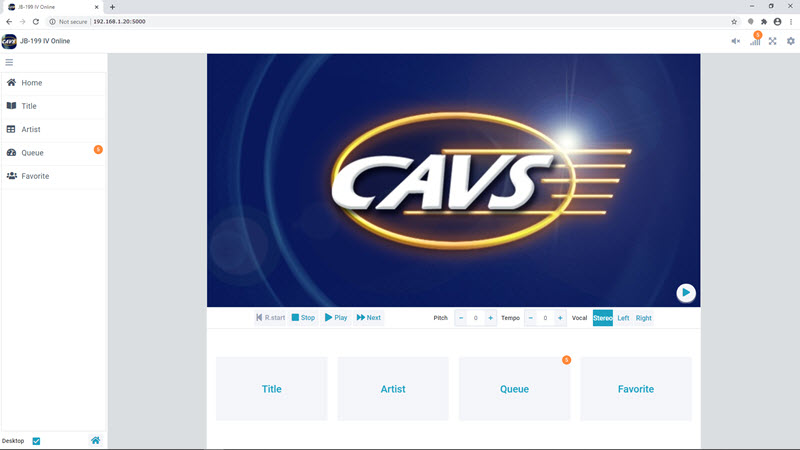
Any device in the local network can then connect to JB-199 IV as shown below by opening the IP address 192.168.xxx.xxx:5000 in an Internet browser, such as MS Explorer, Google Chrome, Firefox, etc.
Not all participants are expected to be in the same local network as the JB-199 IV Online. In fact, many, if not all, participants are likely to connect from outside the local network using Internet. To provide them a public IP address for simple connection, follow the steps below.
-
Use a LAN cable to connect from any one of dual LAN ports on the back of the JB-199 IV to a LAN port on the modem-router of an Internet Service Provider (ISP) such as Verizon, Comcast, AT&T, etc.
Find the local IP address assigned by the modem-router to the JB-199 IV by going to Windows Start > Settings > Network > Internet > Status > Properties. Look for the local IPv4 address and also the IPv4 DNS server.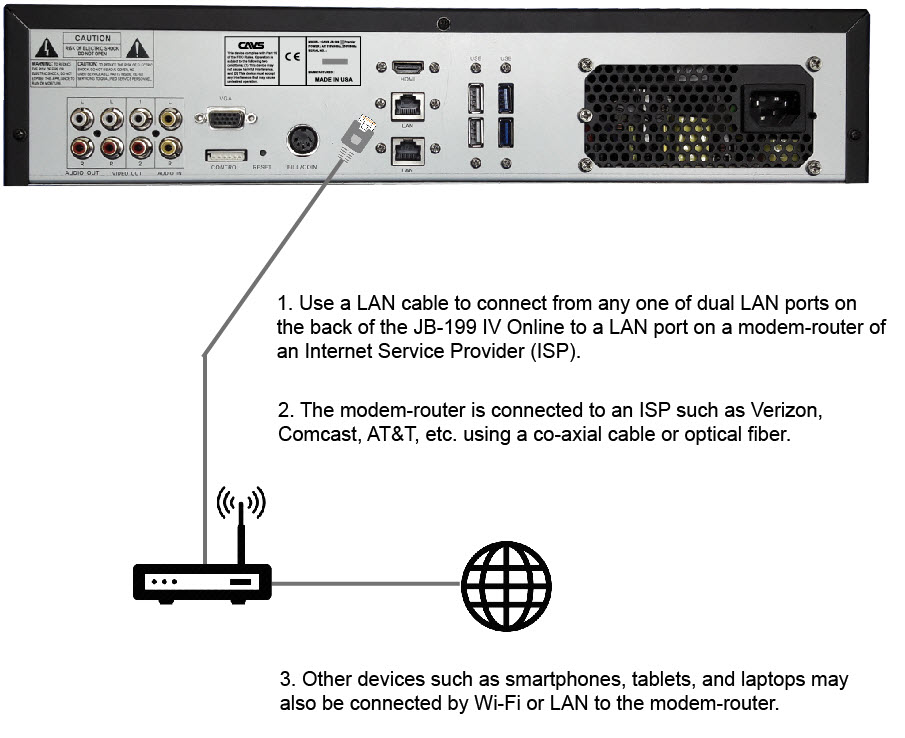
-
Follow the instruction for the modem-router to enter into the administration setup page of the modem-router.
Set the the port forwarding of 5000 - 5010 ports to the local IP address of the JB-199 IV Online.
The specific instruction for port forwarding will vary between different modem-routers.
An alternative to the port forwarding is to setup DMZ (or Super DMZ). It is to forward all ports rather than a subset (5000 - 5010) of the ports to the IP address of the JB-199 IV Online. The specific instruction for setting up DMZ will also vary between different modem-routers.
See Examples below for the port forwarding and DMZ setup instruction in major ISP router-modems. -
The final step of setting up the Internet is to find its public IP address.
Open an Internet browser and search for My Public IP Address.
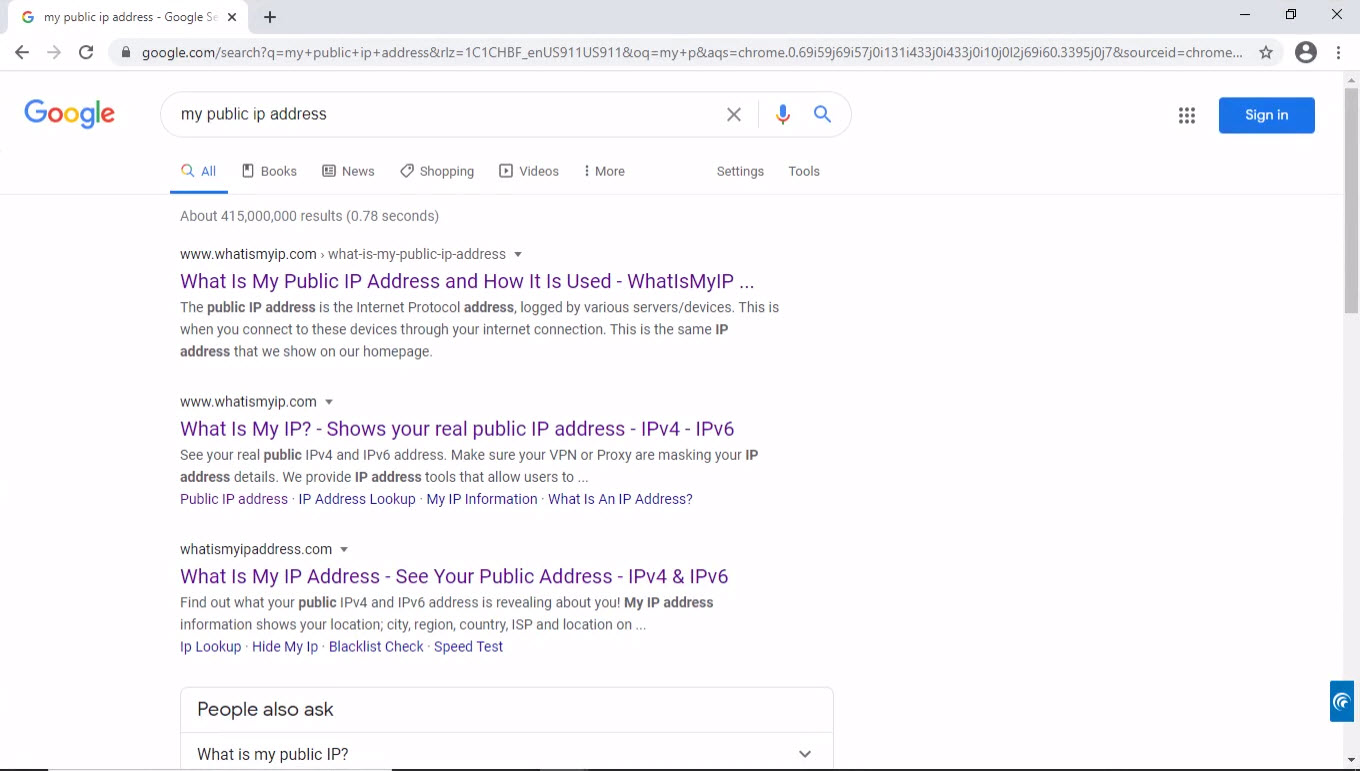
Click on a link to find the Public IP address
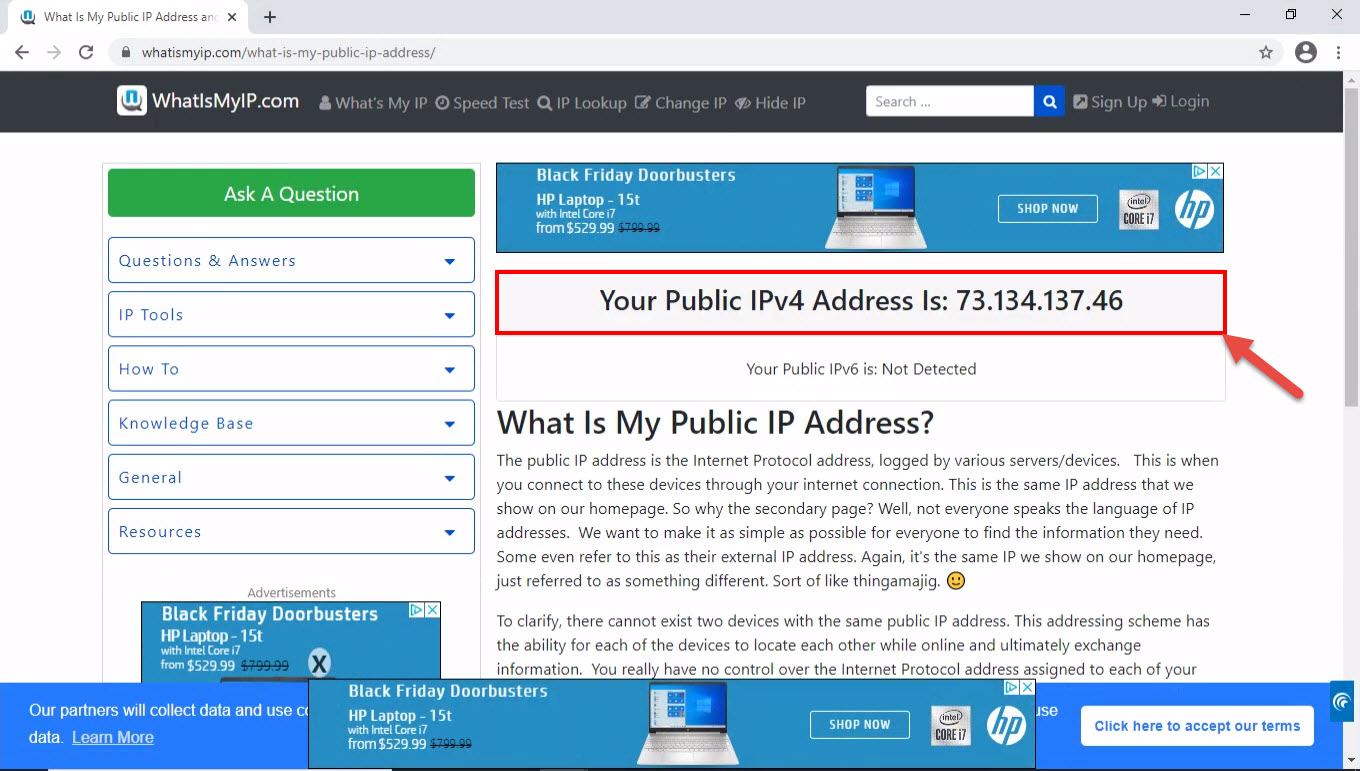
In this example, the public IP address is 73.134.137.46. And the IP address to send to your guests is public IP address:5000, which in this example is 73.134.137.46:5000.
A QR code of the IP address can be sent together with the IP address to the guests. It would simplify the inputting of the IP address for devices such as smartphone which are equipped with a QR scanner. To generate the QR code, use any program like QR Code Generator at qr-code-generator.com. The QR code for the IP address 73.134.137.46:5000 is
Here are some examples of port forwarding and the DMZ setup instructions in commonly found modem-routers.
-
Verizon FIOS modem-router
First step is to find the local IP address and the DNS server of the JB-199 IV. Go to Windows Start > Settings > Network & Internet > Status > Properties. Scroll down for the IPv4 address and the IPv4 DNS server as shown below.
Open an Internet browser and go to myfiosgateway.com or 192.168.1.1 which is the DNS server found above.
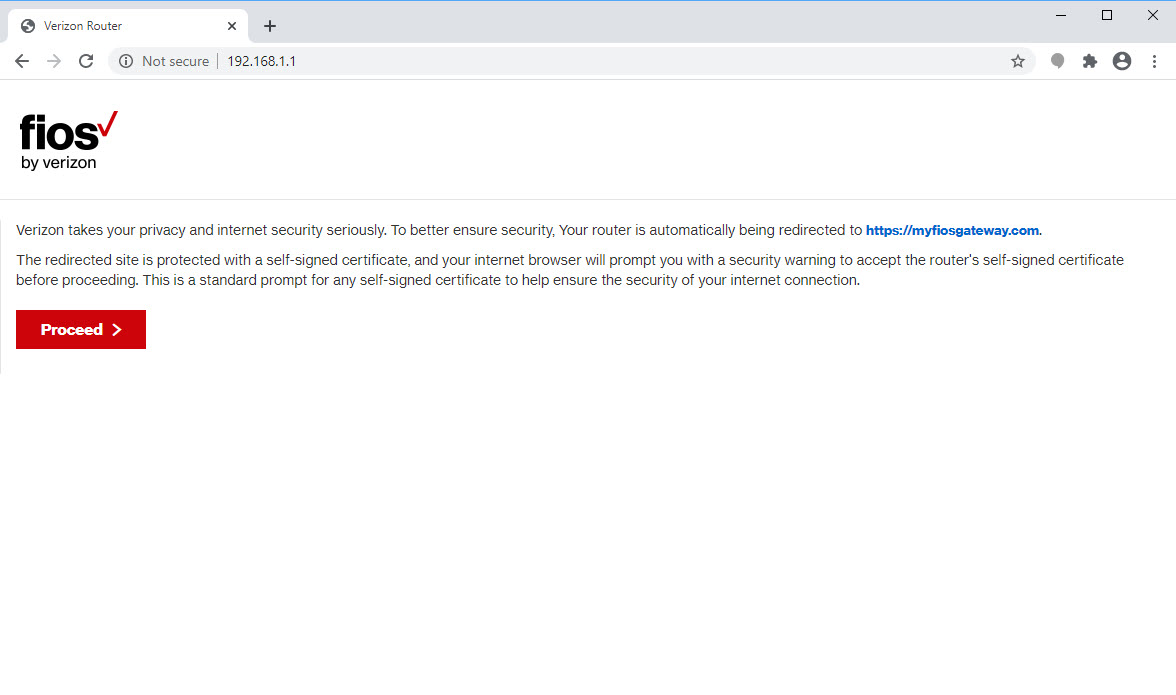
Press Proceed and input the password which is found on the modem-router device itself.
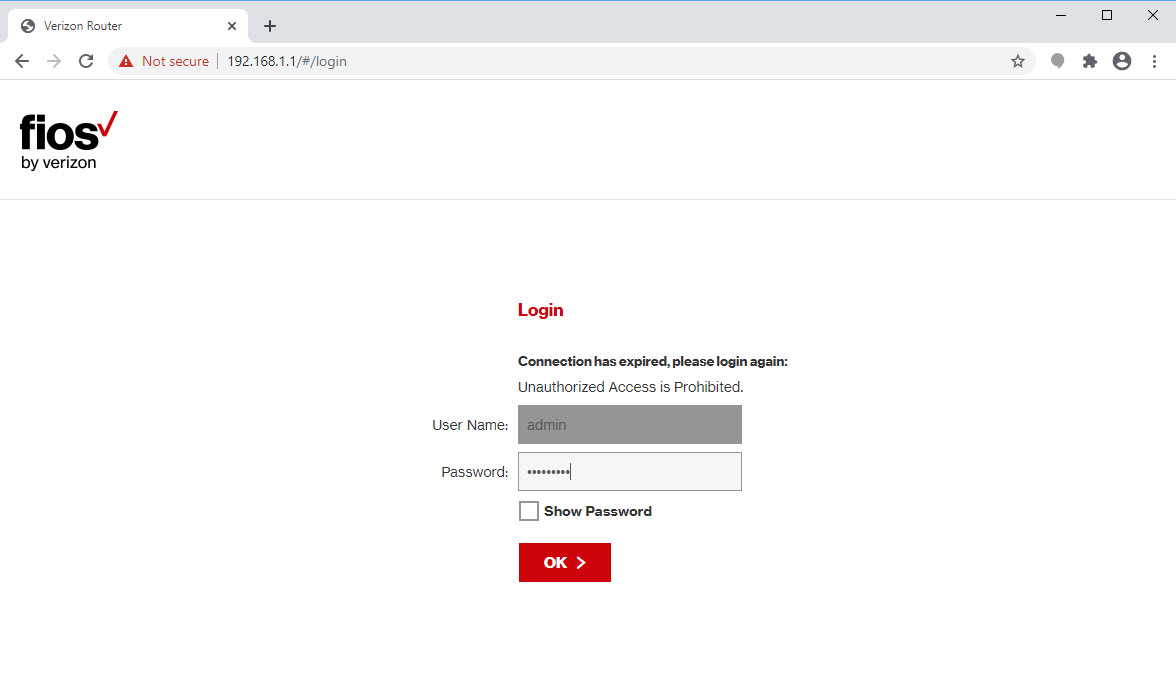
Press OK to enter the administration setup page as shown below.
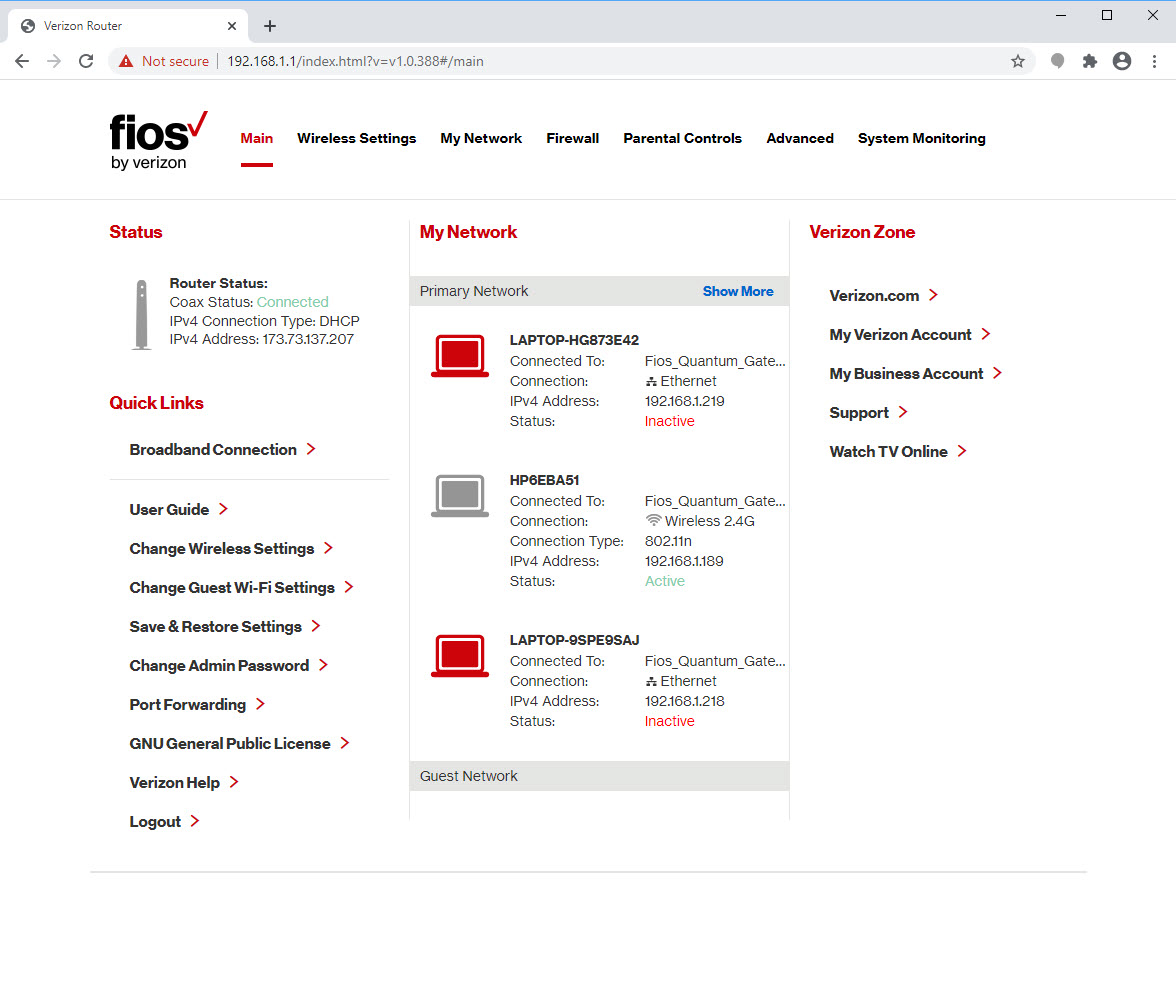
Click on Port Forwarding from the left column for the following window.
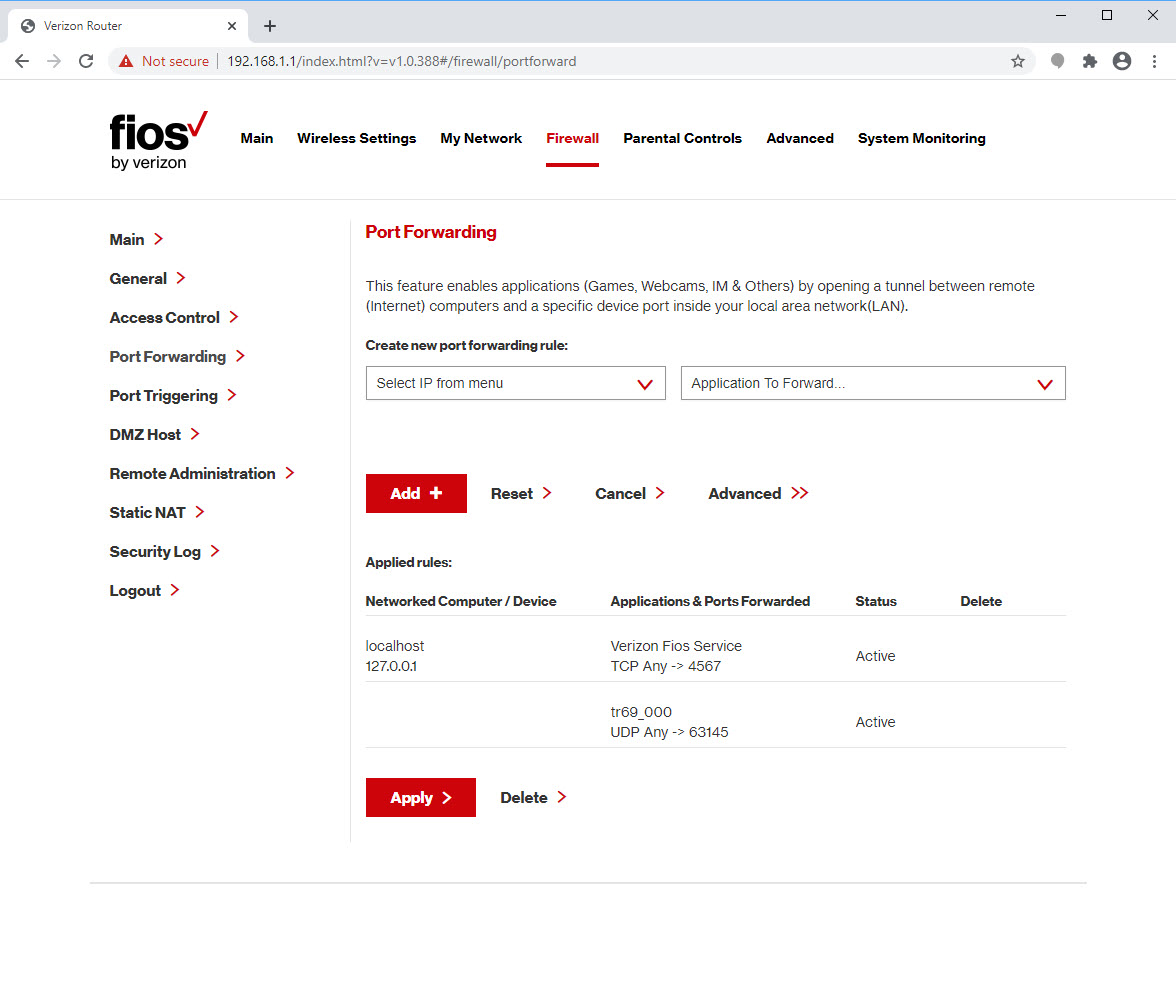
Select Specify IPv4 address and input the local IP address of the JB-199 IV. Select Custom Ports followed by Both for TCP/UDP and 5000-5010 as Custom Ports.
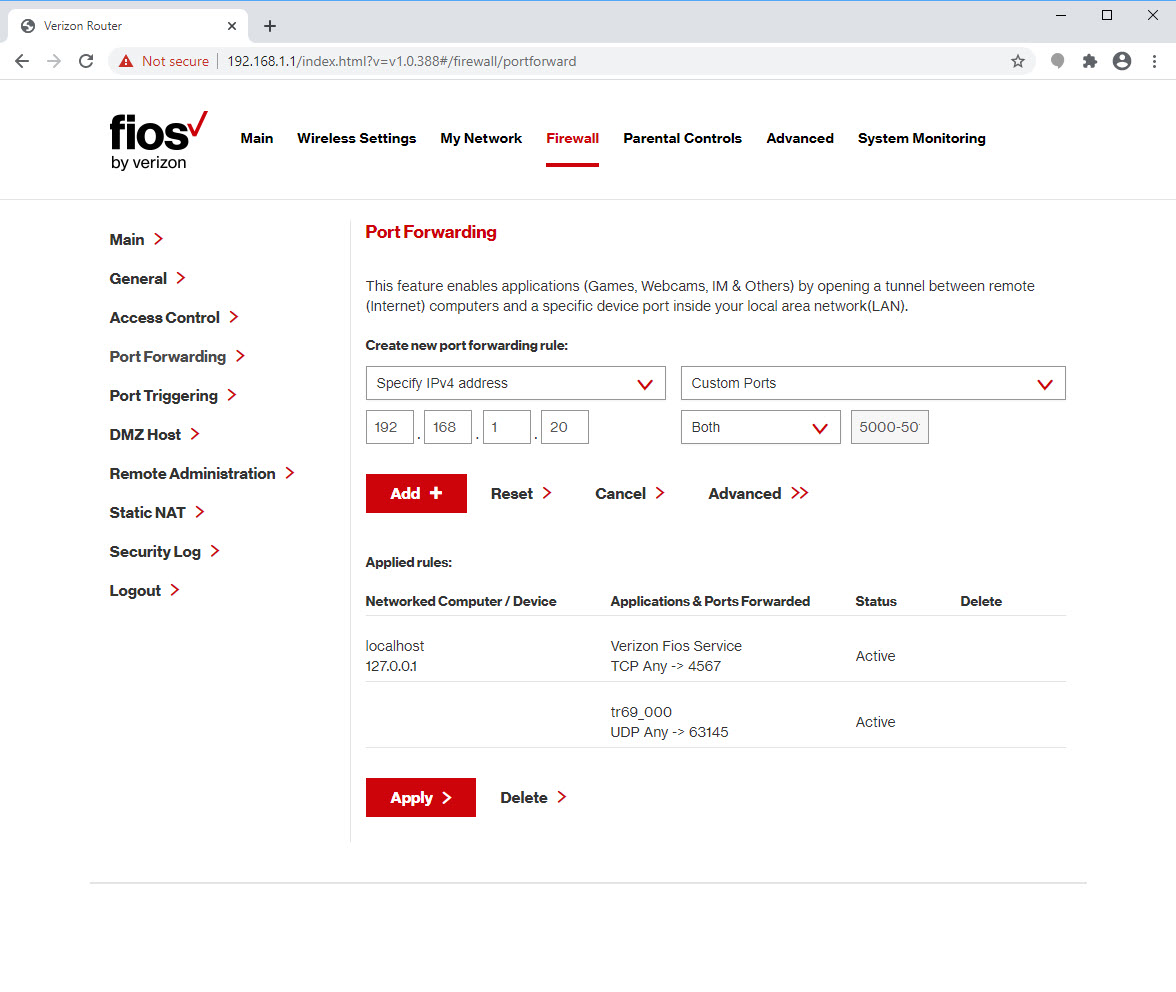
Press Add+ to create the new Port Forwarding rule as shown below.
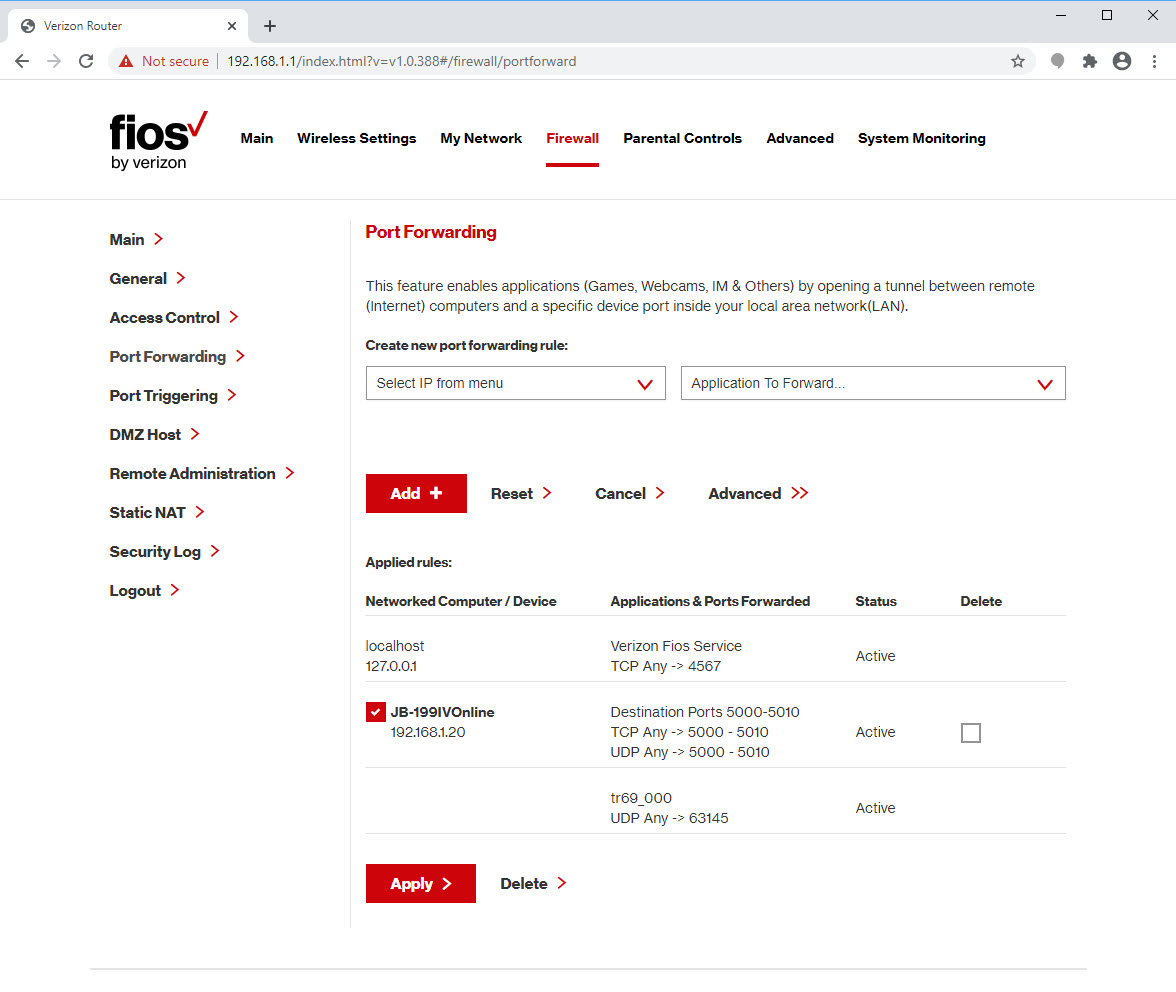
The port forwarding is complete. Press Logout from the left column and exit to JB-199 IV.
-
D-Link (DSR-250)
Check for the local IP address and the DNS server of the JB-199 IV at Windows Start > Settings > Network > Internet > Properties. Scroll down to the IPv4 address and the IPv4 DNS server.
Here the IPv4 address is 192.168.10.106 and the IPv4 DNS server is 192.168.10.1. Open an Internet browser and go to 192.168.10.1. A warning page may show as below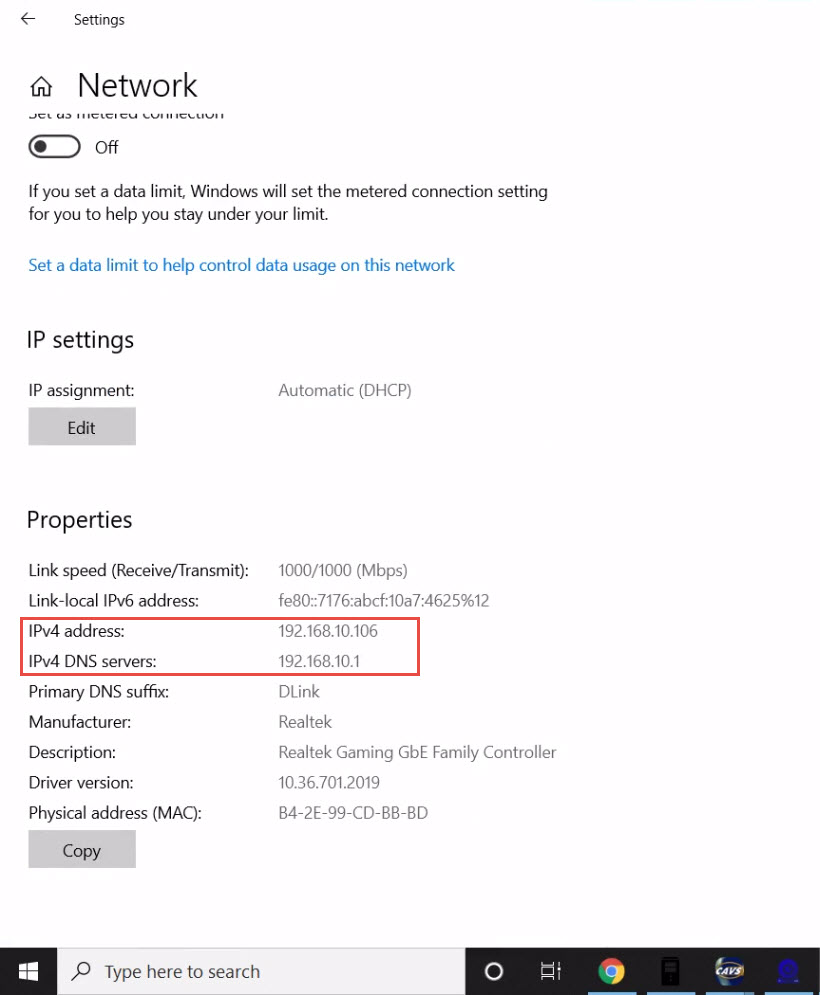
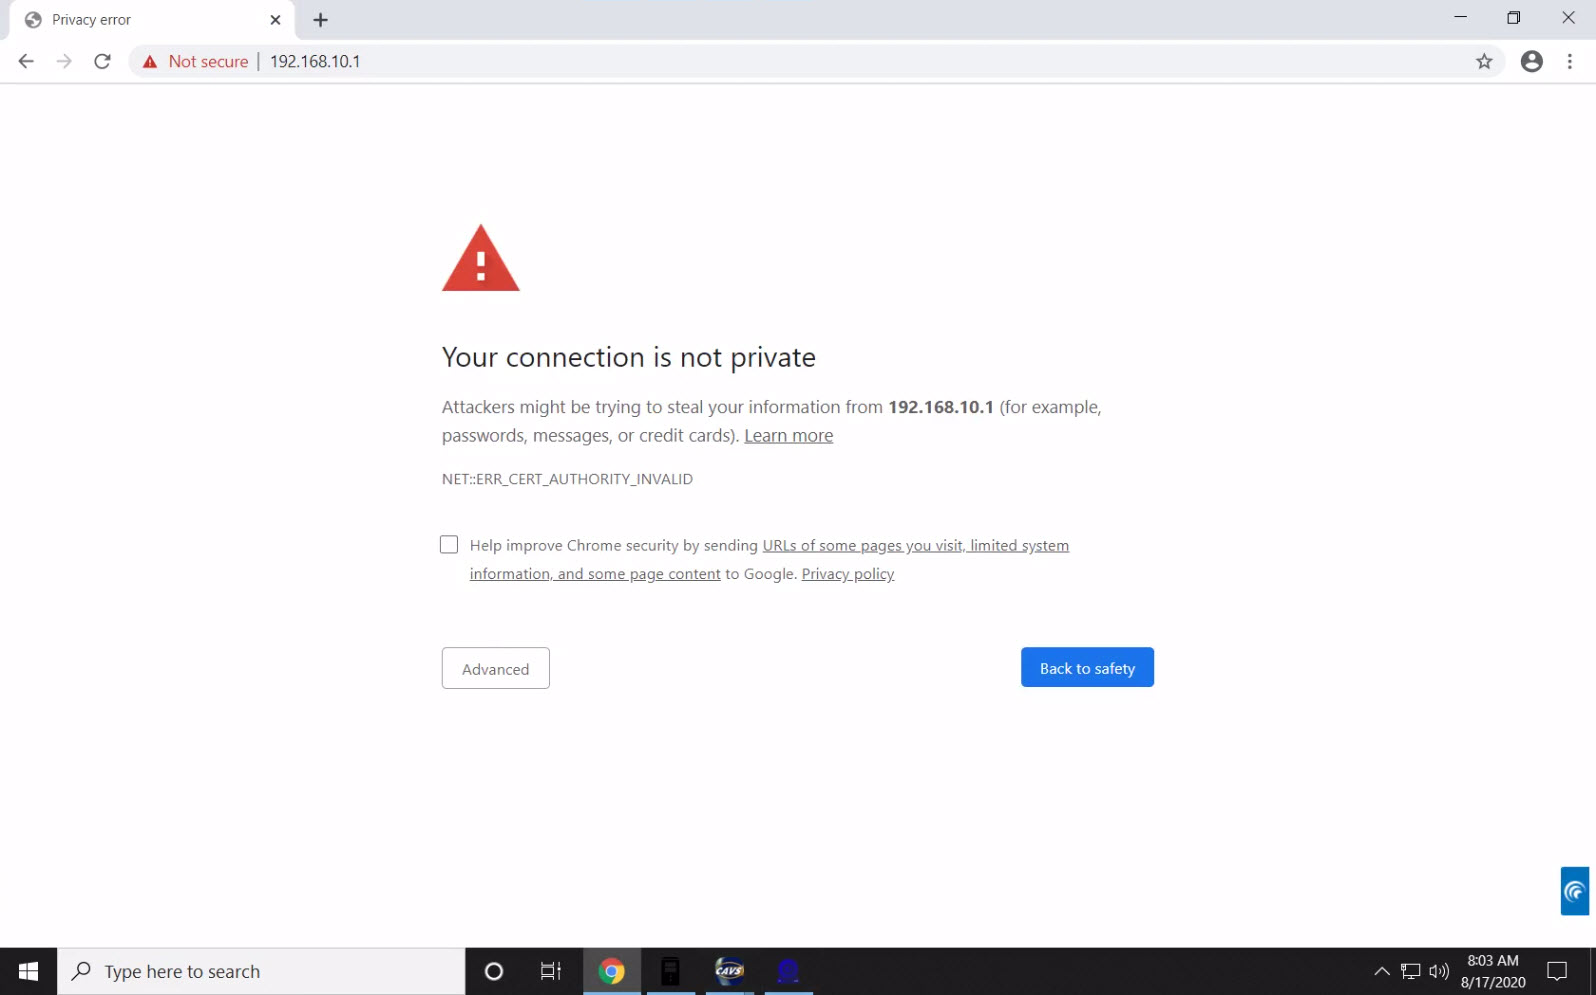
Press Advanced and proceed to the address 192.168.10.1.
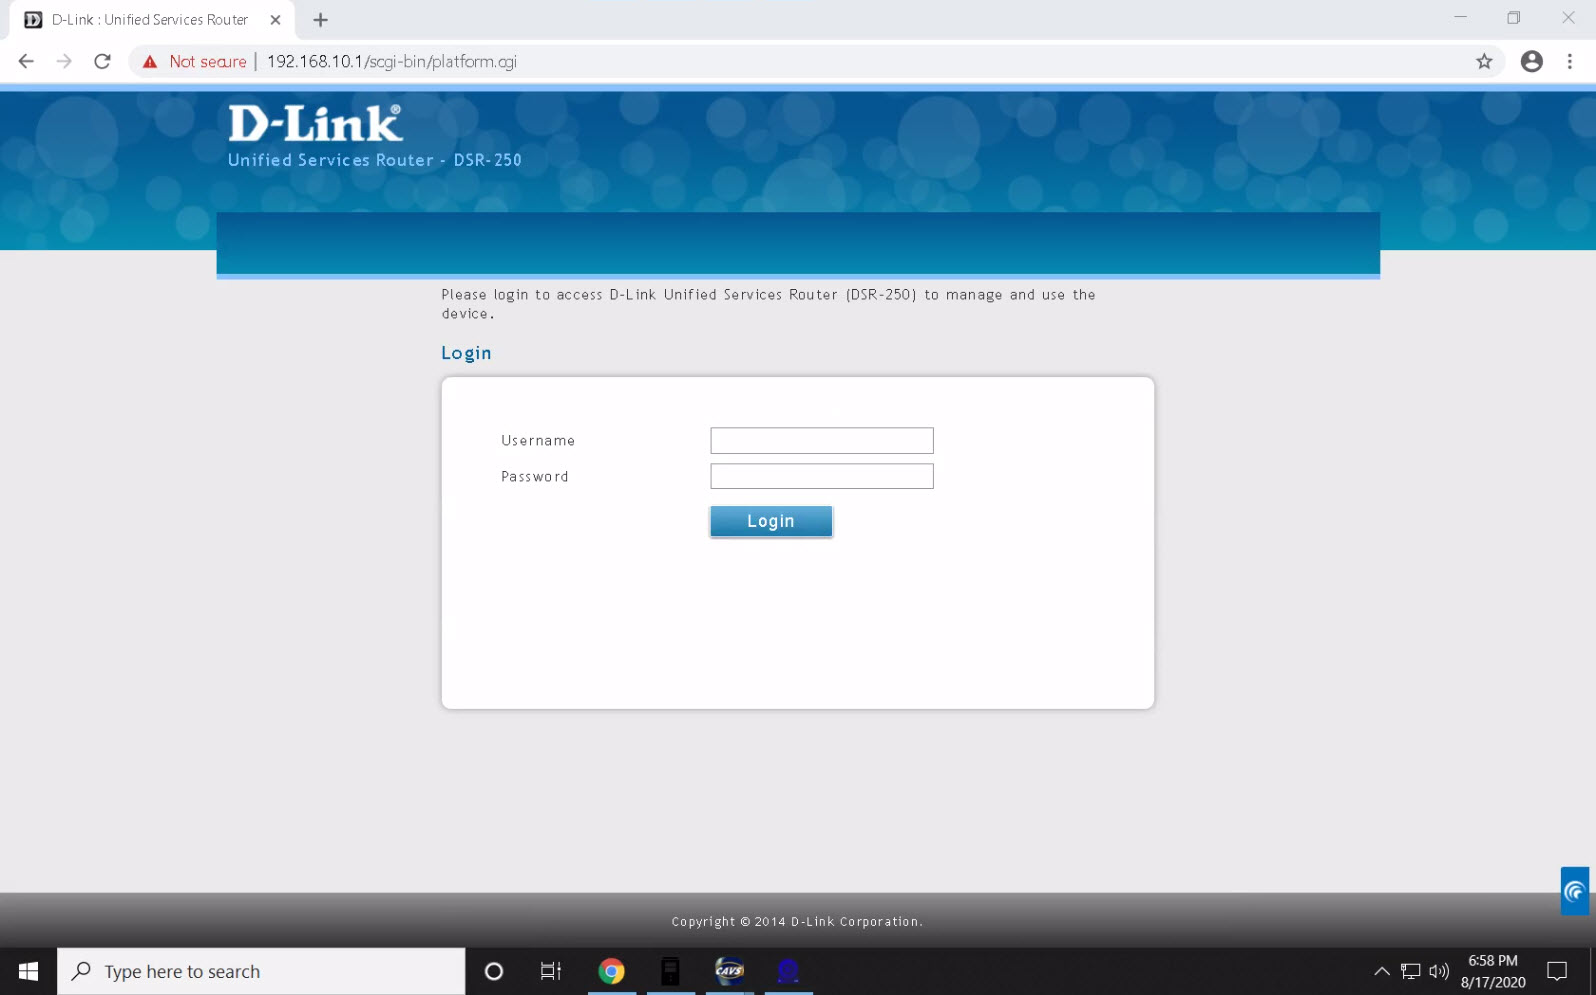
Input admin as both the Username and Password. Press Login to enter the administration setup page of the modem-router.
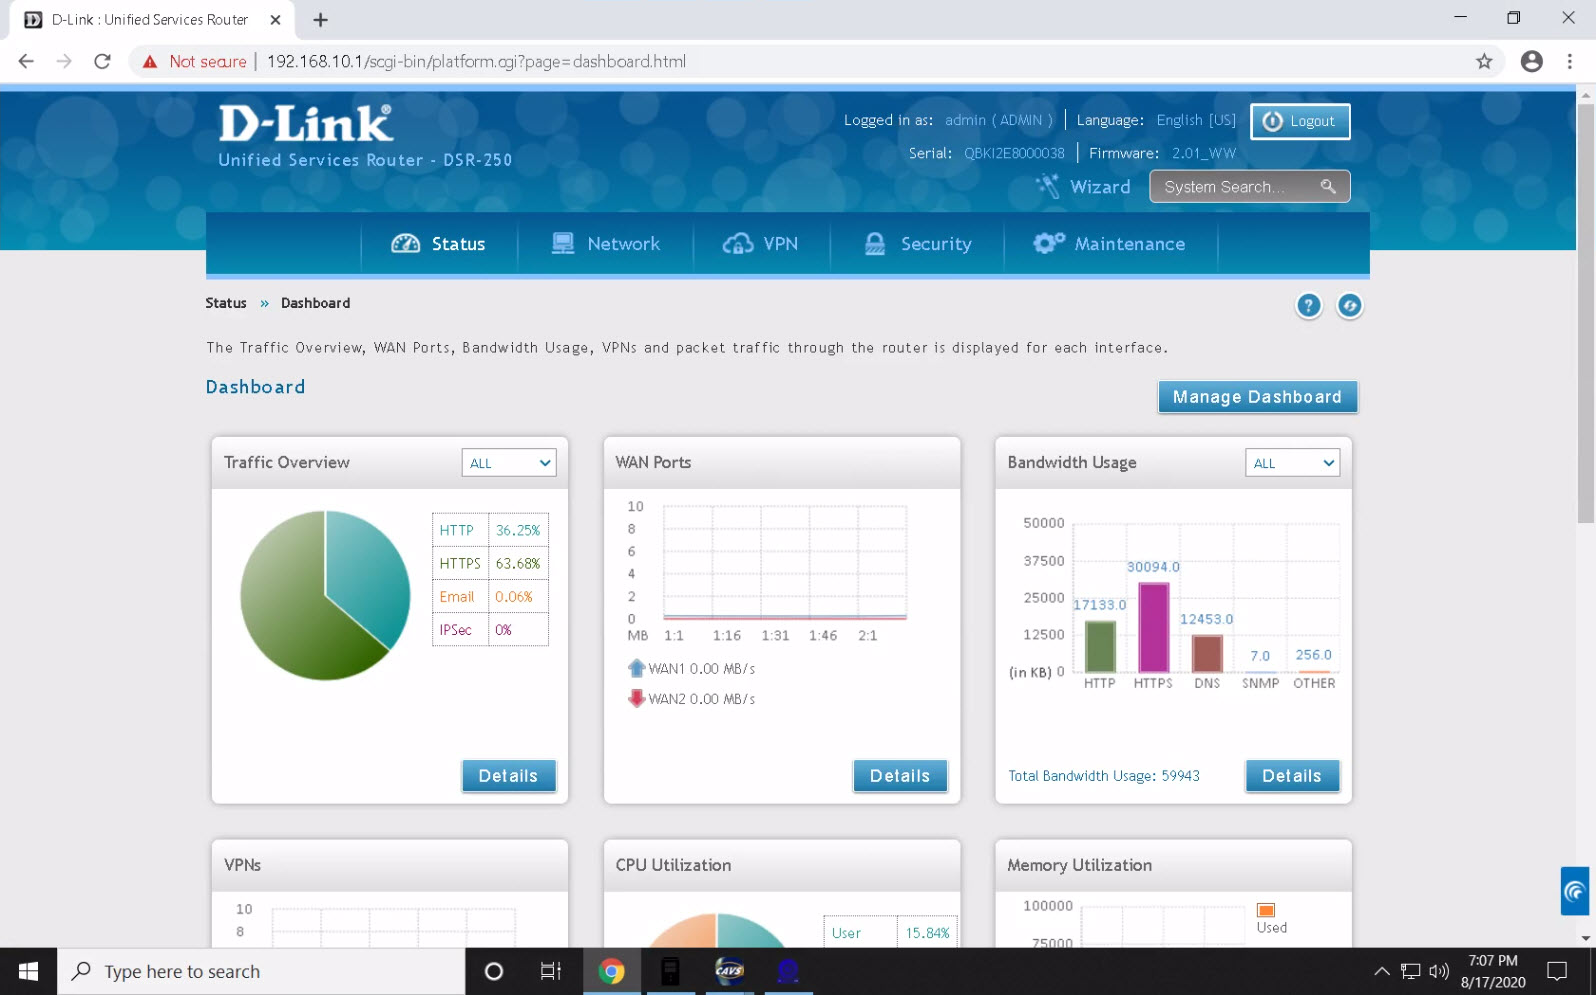
Go to Security > Custom Service.
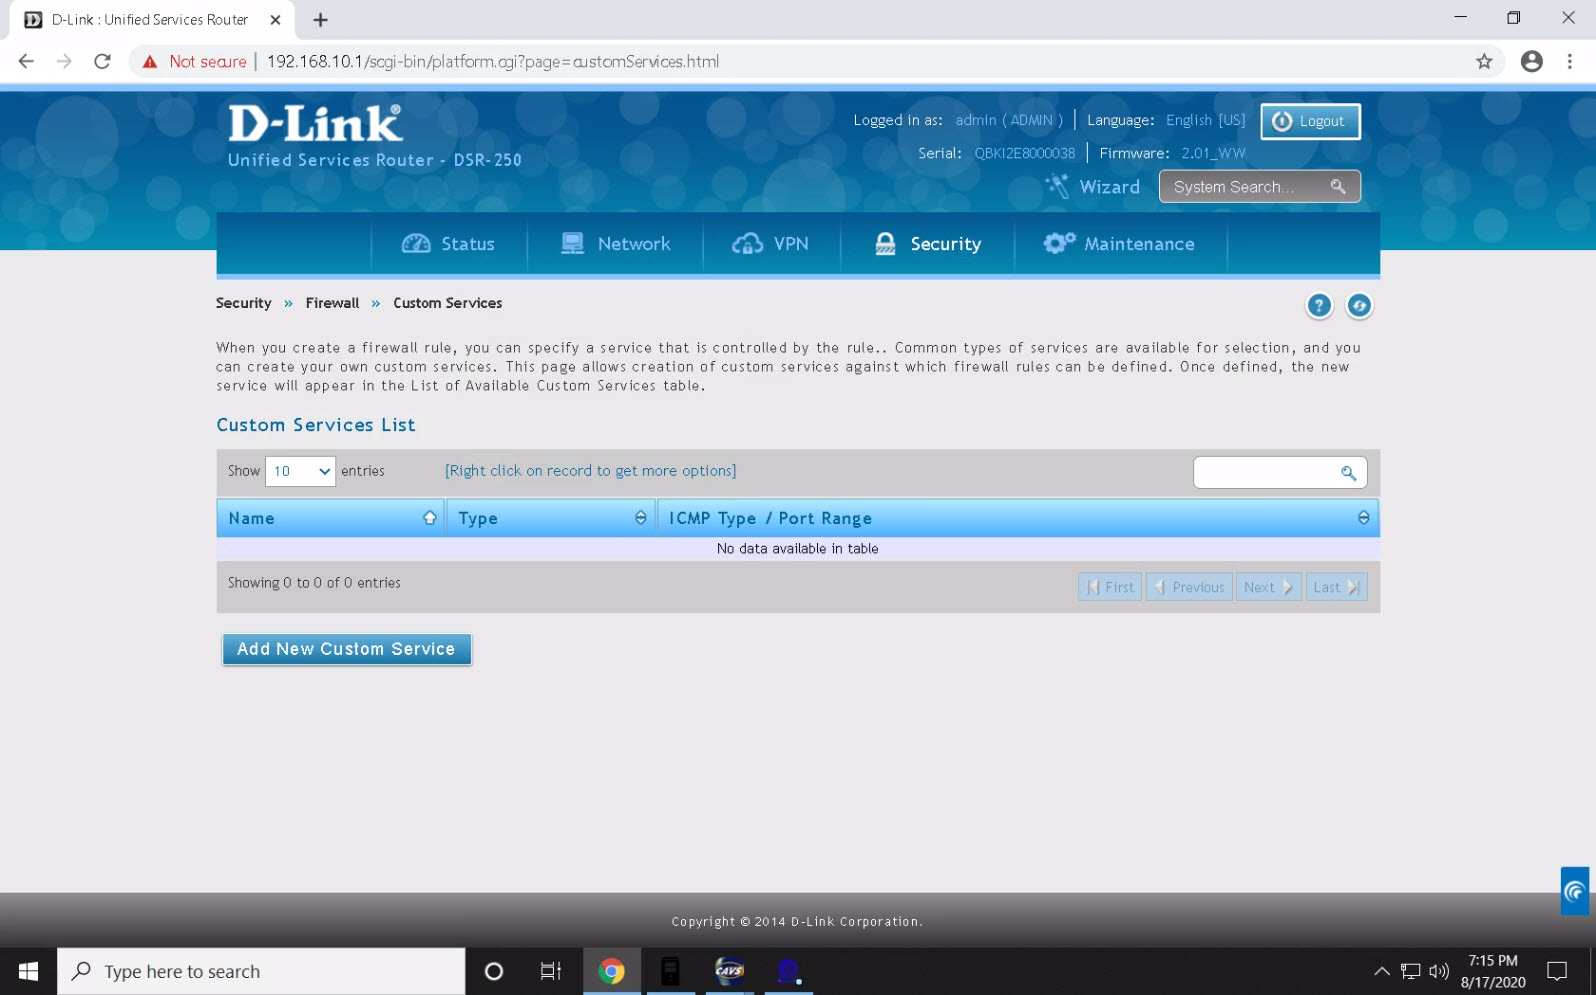
Click on Add New Custom Service. Input any name such as JB-199IVOnine, Both as the Type, 5000 as Start port, and 5010 as Finish port.
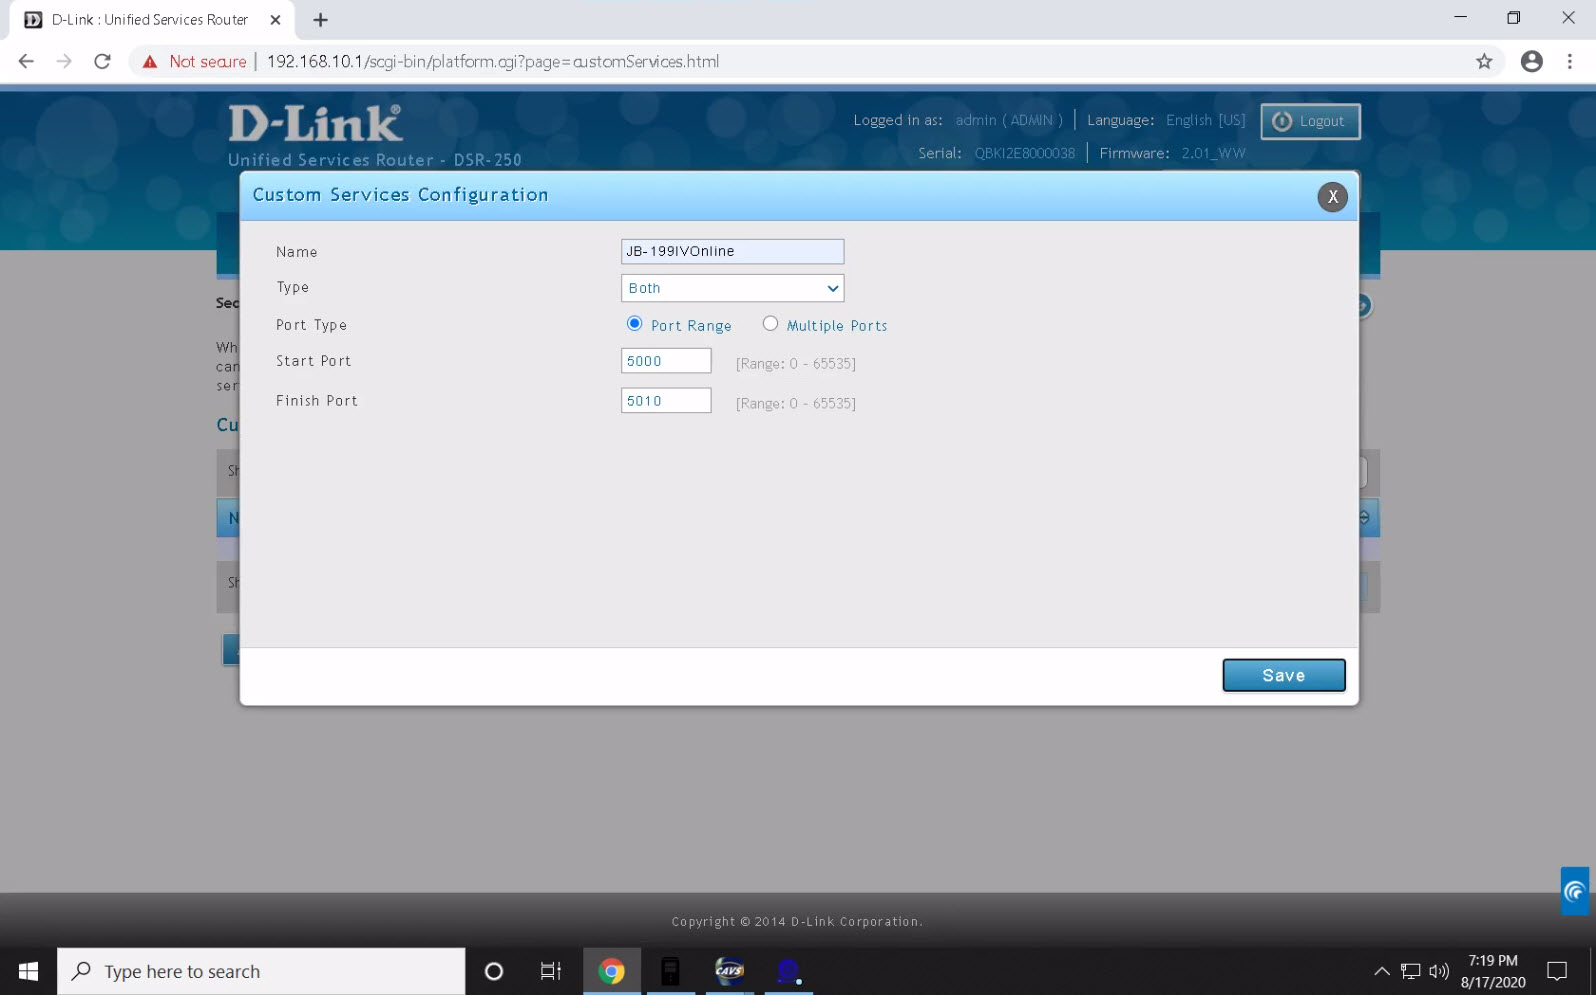
Press Save and a confirmation wll appear.
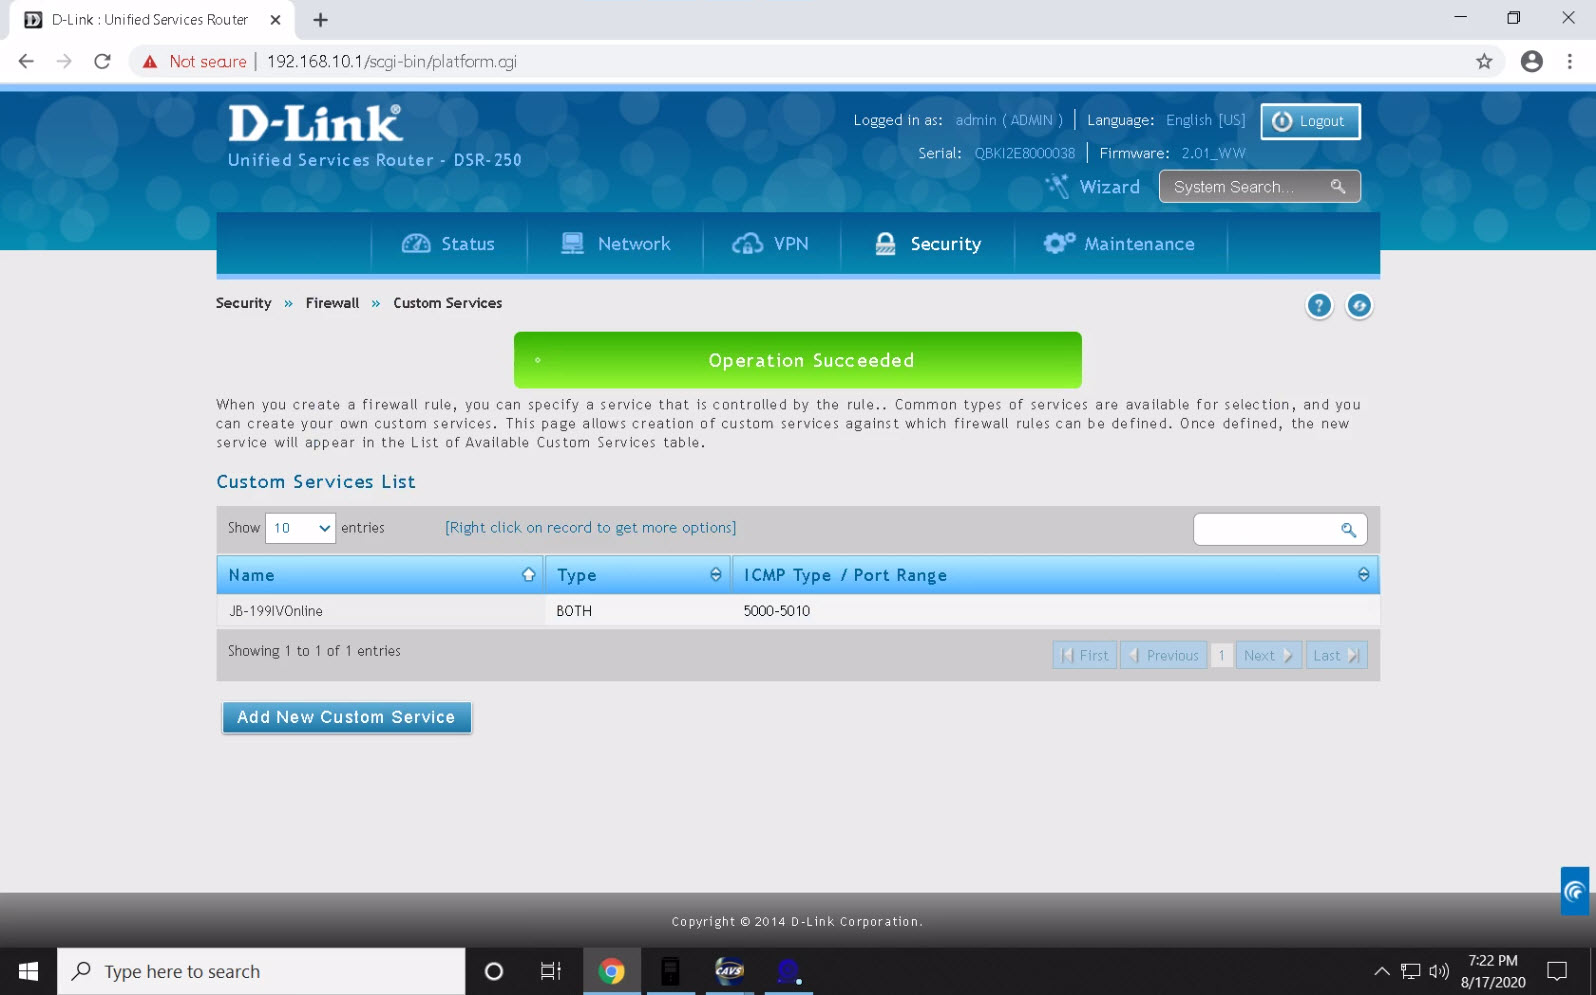
Go to Security > Firewall Rules.
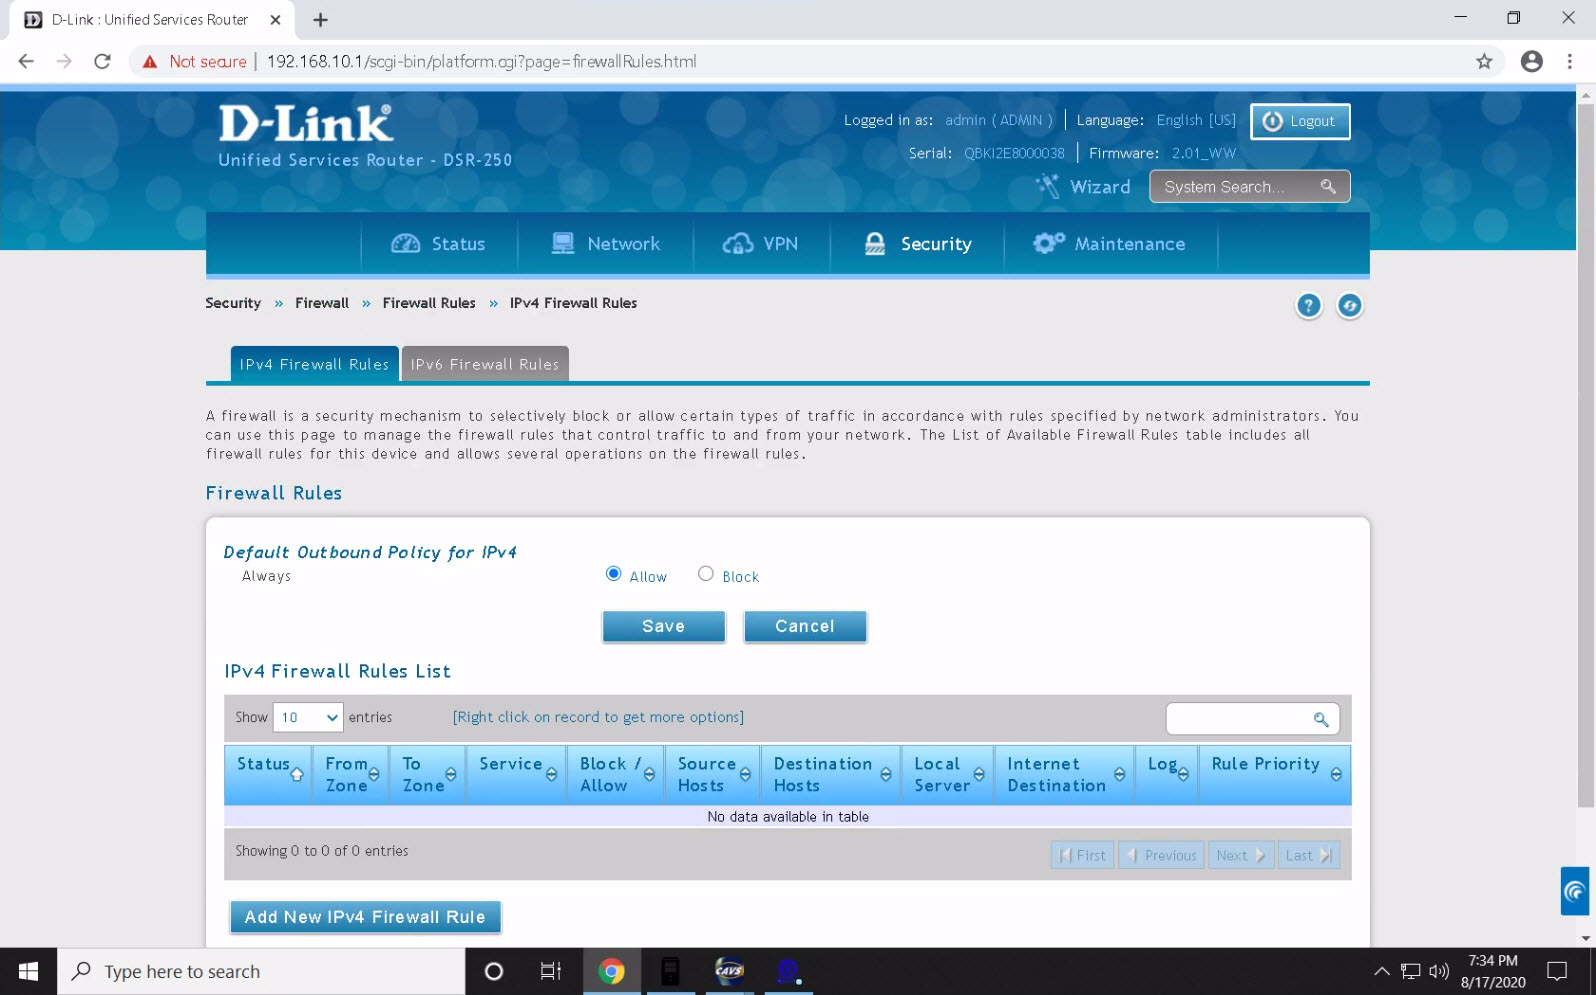
Click on Add New IPv4 Firewall Rule. Select INSECURE (WAN) for From Zone, SECURE (LAN) for To Zone, ANY for Service, Always Allow for Action, Any for Source Hosts, Never for Log, 192.168.10.106 for Internal IP Address, and WAN for External IP Address. Note that 192.168.0.106 is the local IP address of the JB-199 IV.
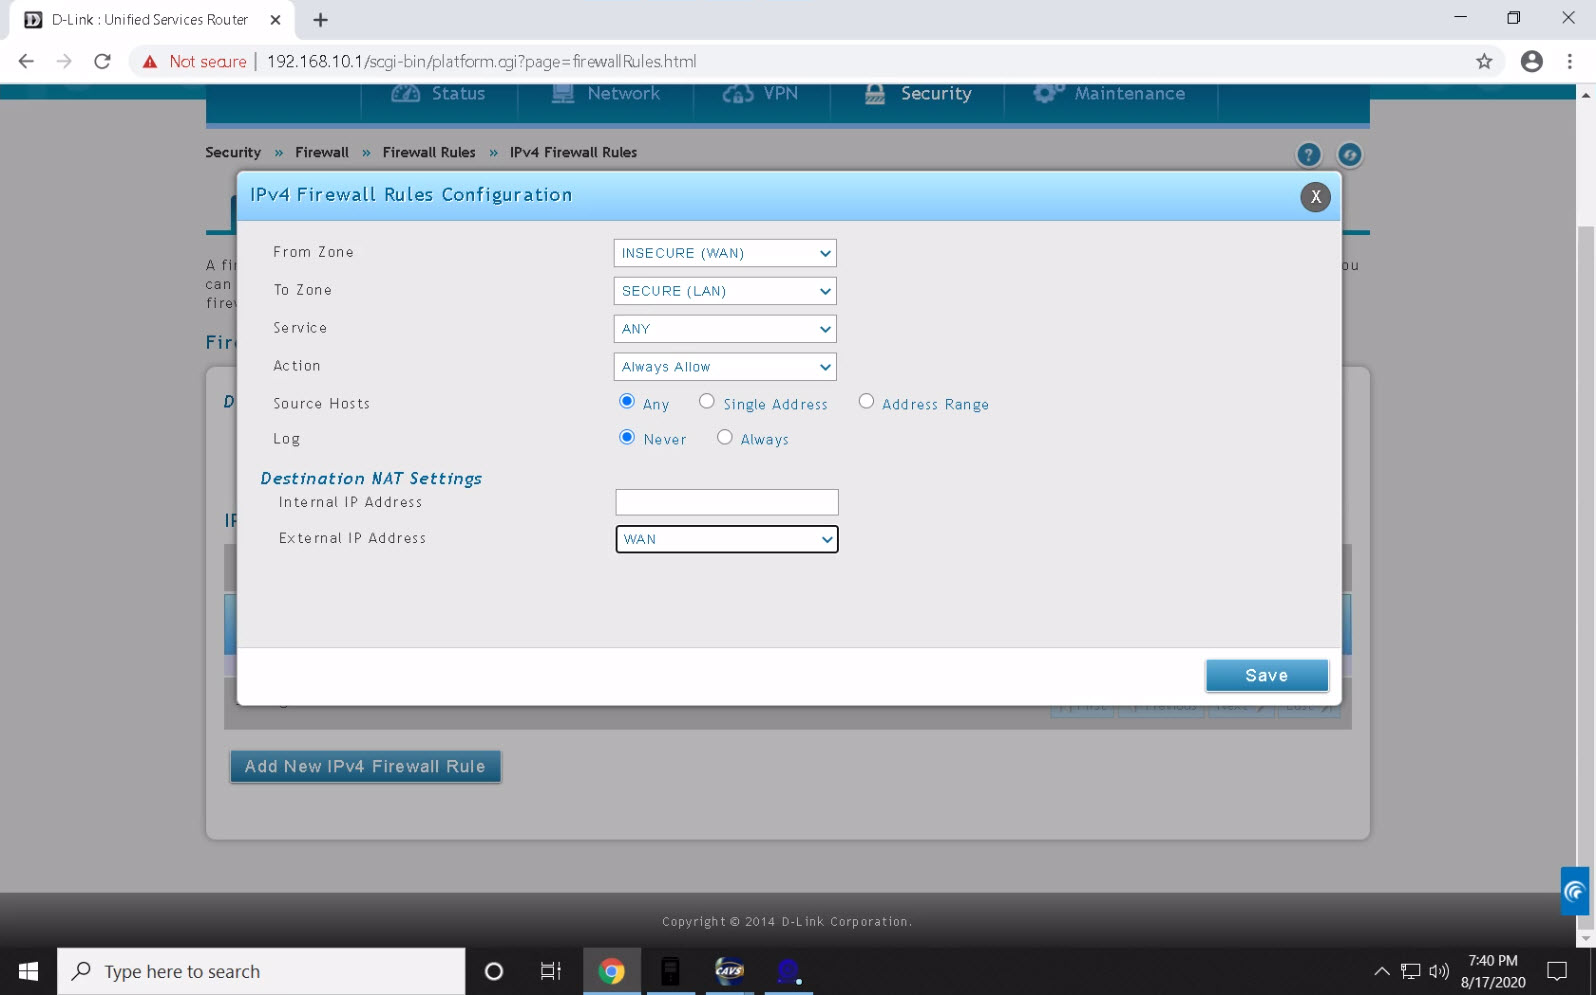
Click Save and a confirmation message will appear.
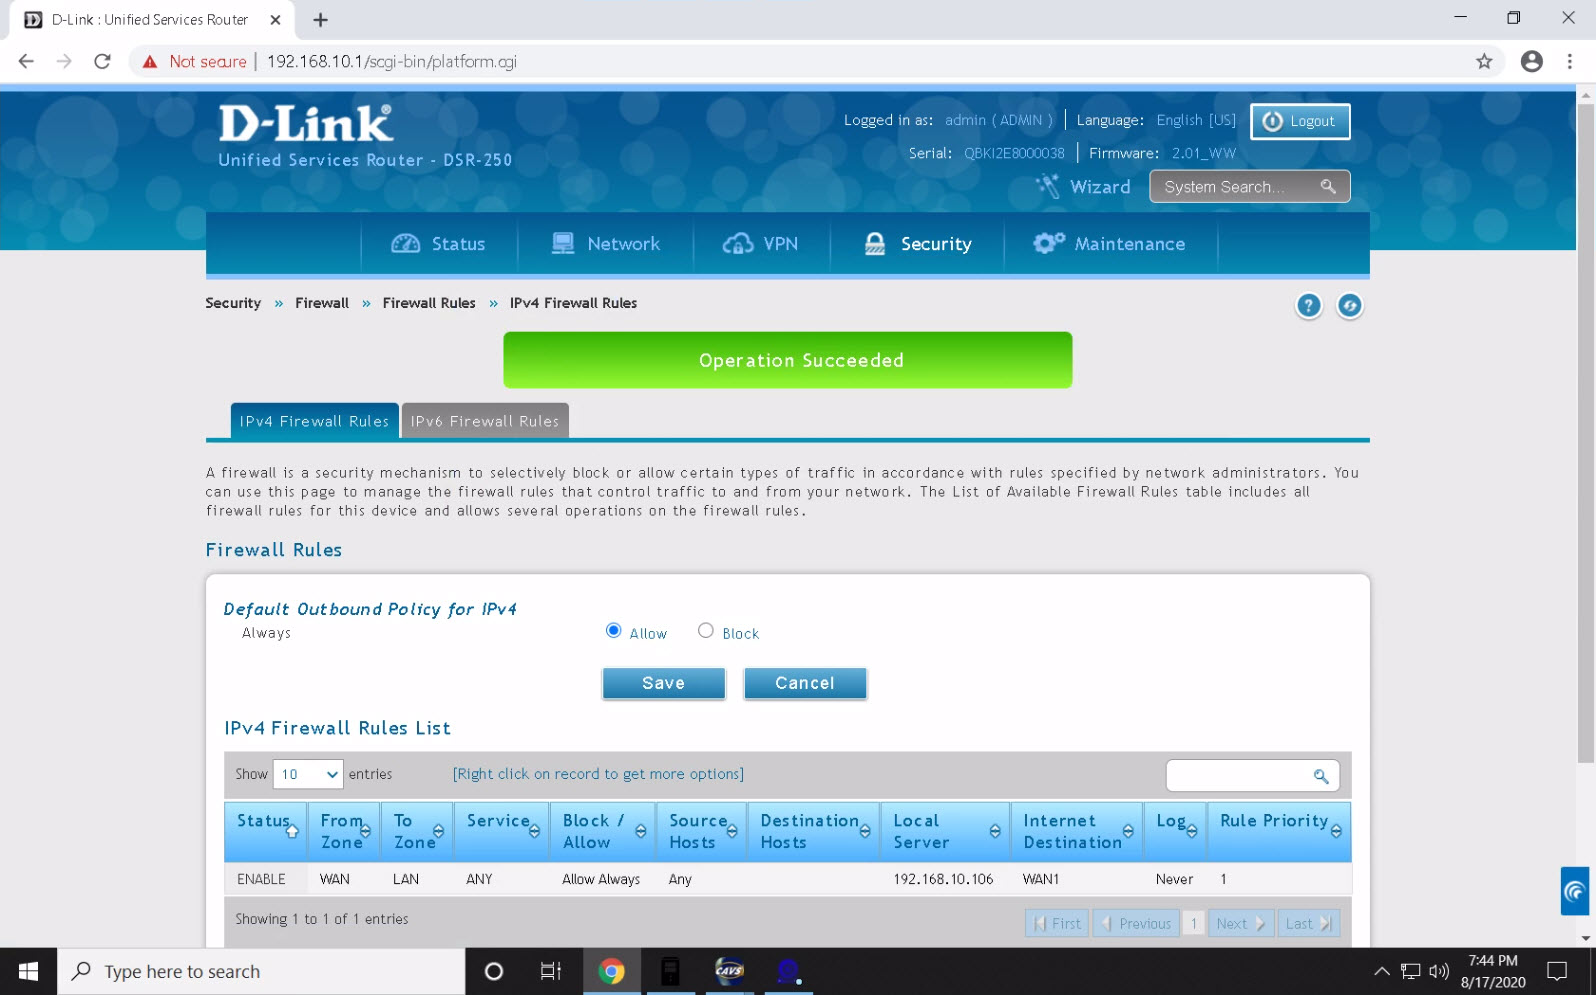
The port forwarding in complete. Logout and exit to JB-199 IV.
-
Comcast Xfinity modem-router
First check for the local IP address and the DNS server of the JB-199 IV by going to Windows Start >Settings > Network & Internet > Status > Properties. Scroll down to the bottom to find the IPv4 IP address and IPv4 DNS server.
Open an Internet browser and go to the DNS server to open the administration setup page.

Login using the Username and Password given on the modem-router itself. Go to Advanced > Port Forwarding.
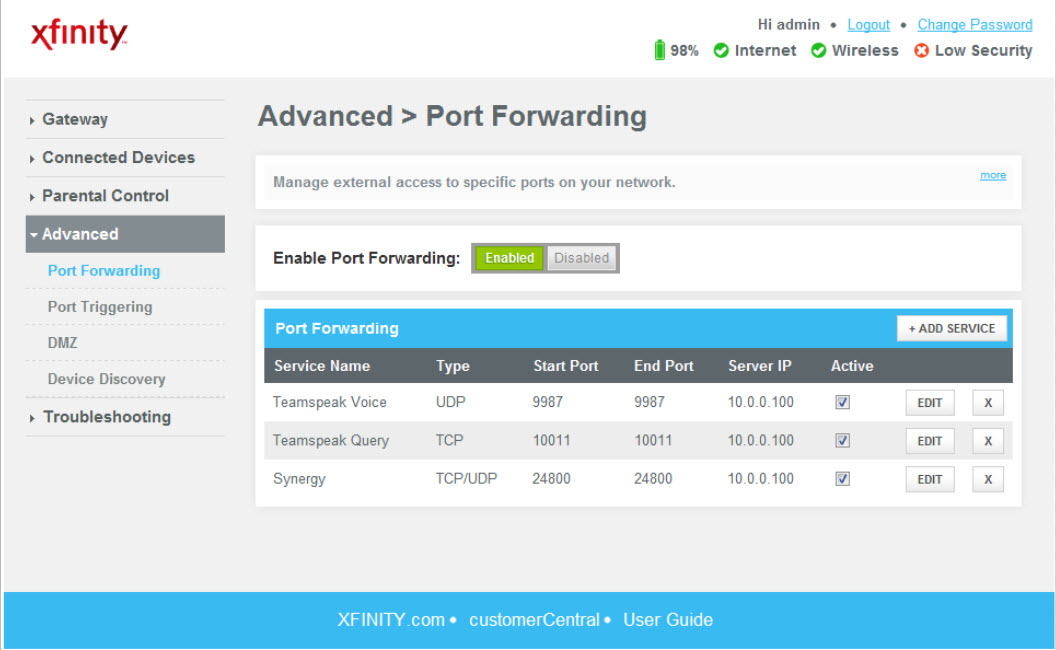
Confirm that the port forwarding is enabled. Click on ADD SERVICE.
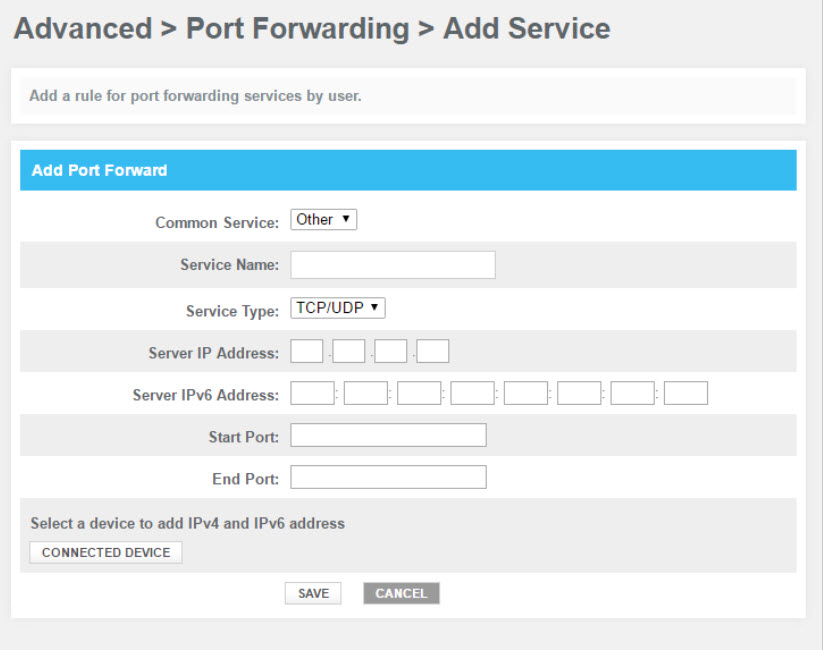
Select Others as Common Services. Input any name for the Service Name, for example JB-199IVOnline. Input the local IP address of the JB-199 IV as Server IP Address. Skip the Server IPv6 Address. Input 5000 as the Start Port. Input 5010 as the End Port. Click on SAVE.
The port forwarding is completed. Logout of the modem-router.
-
AT&T Universe modem-router
This example shows how to setup DMZ for the JB-199 IV Internet connection. First check for the local IP address and the DNS server of the JB-199 IV by going to Windows Start > Settings > Network > Internet > Status > Properties. Scroll down to the bottom to find the IPv4 IP address and IPv4 DNS server. Here it is also important to have IP assignment as Automatic (DHCP).
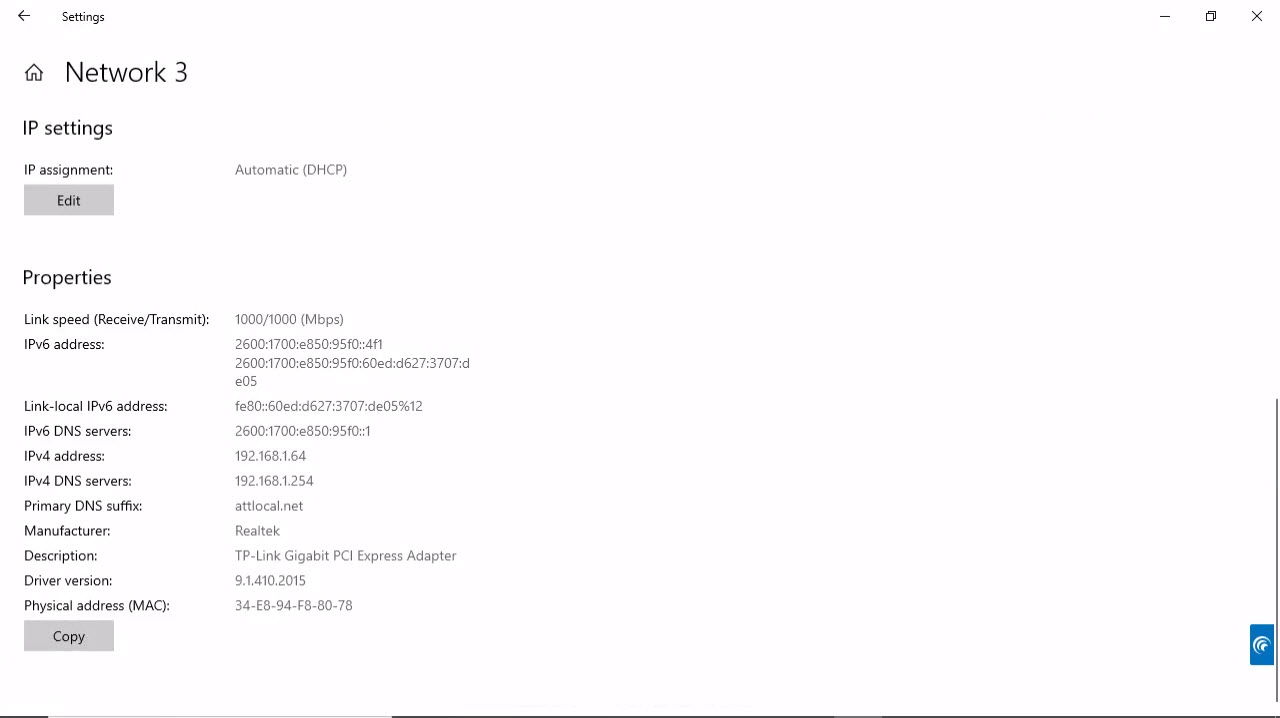
Open an Internet browser and go to the DNS server 192.168.1.254 to open the administration setup page. Go to Settings > Firewall > Applications, Pinholes and DMZ.
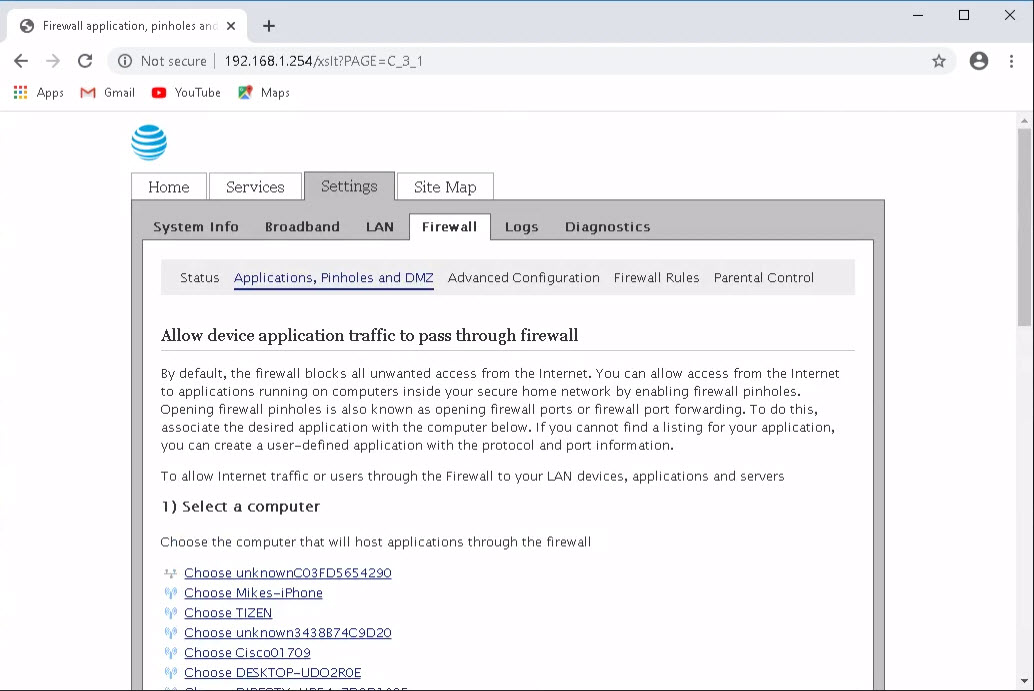
Select the JB-199 IV Online from the list of connected computers.
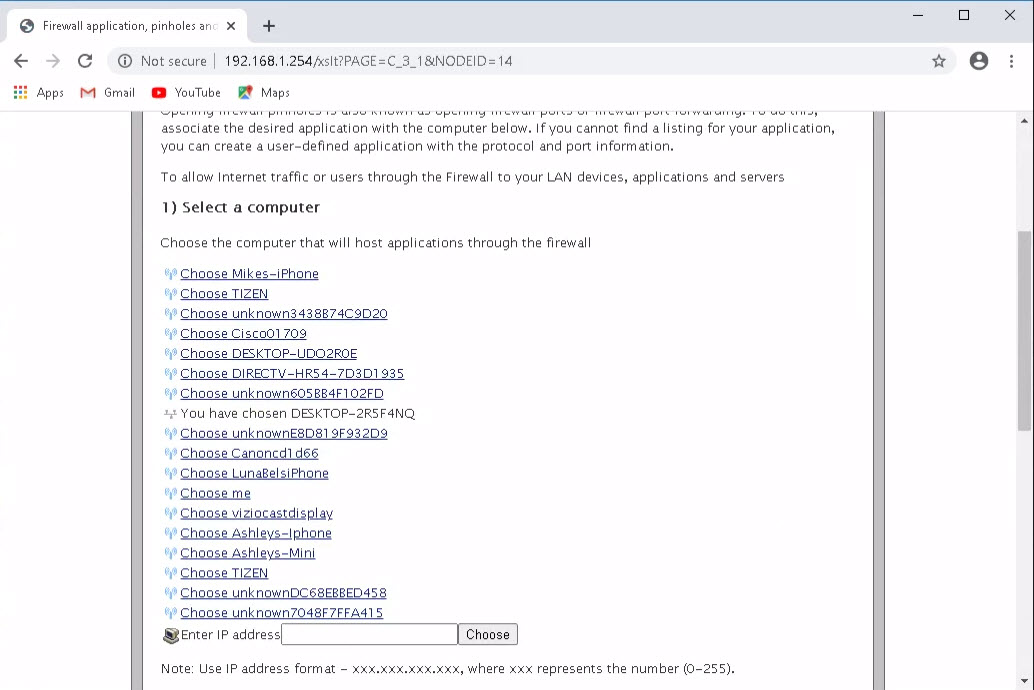
Scroll down and select the option for DMZ. Click Save.
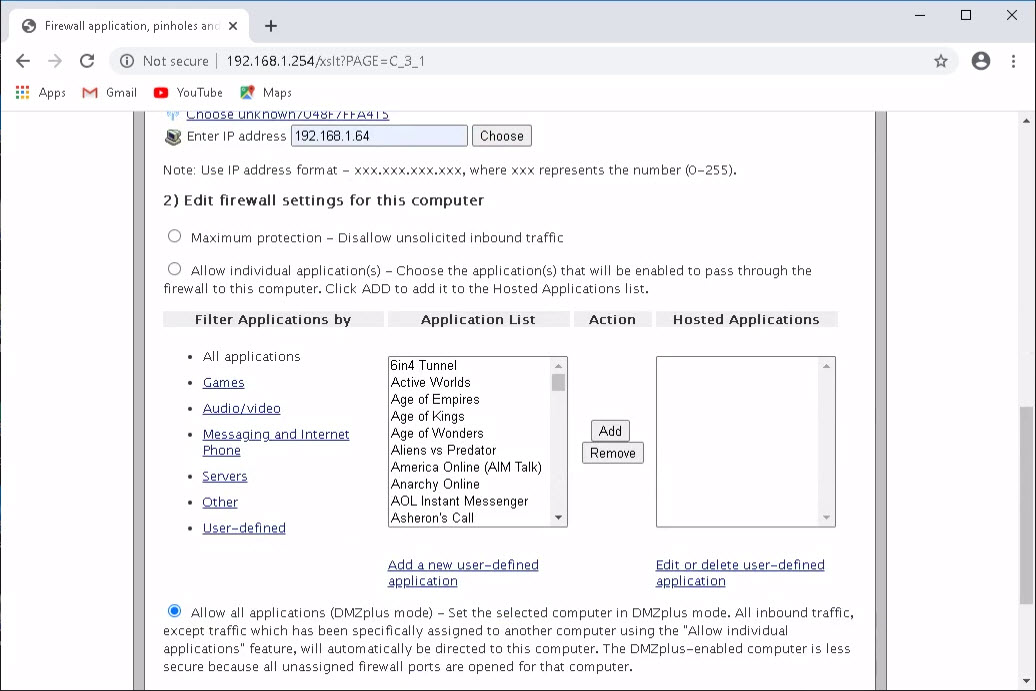
A security window may appear asking for the modem-router password. The password is located on the bottom or a side of the modem-router itself. Input the password and Click Submit.
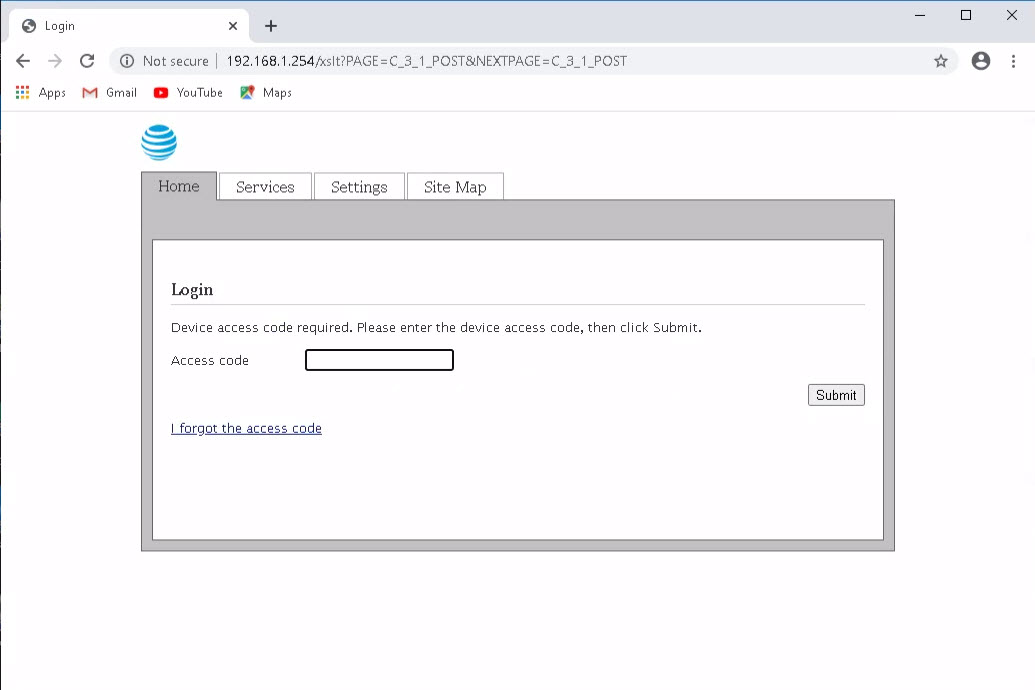
To complete the DMZ setup, reboot the JB-199 IV. This is an important step during which the local IP address of the JB-199 IV Online will change to a new one with the desired DMZ feature. Logout of the AT&T modem-router and go to Windows Start > Settings > Network > Internet > Status > Properties to find the new IPv4 IP address.
Multiple monitors can be connected to the JB-199 IV and be used simultaneously. Here we show how to set the screens of the JB-199 IV to the monitors. Note that there is no single right way and the screens can be rotated around the monitors for your convenience.
1. Control Panel
This is the main control screen of the JB-199 IV. Loading songs, pictures, interludes, messages, advertisement, etc. are done in the screen. KJs will likely have the screen in a separate monitor along with a keyboard and a mouse for control.
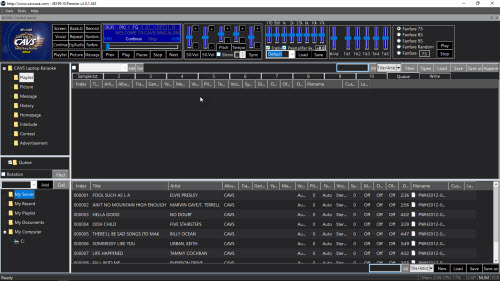
2. CD+G Screen
CD+G screen, also known as lyrics screen, displays the song lyrics and the background pictures. In local operation, it is viewed by the customers and set to a TV using HDMI or RCA connection. In online operation, it is viewed by the guests through Customer Interface. This screen is emulated in the Control Panel at the top left corner.

3. Customer Interface
This is the same screen as the customer interface used for the online guests. It is available as a local screen with less details and thus less frightening than the Control Panel. That is, after setting playlists and options, it can replace the Control Panel for easy running of karaoke shows. It is used by both the local guests and the hosts. To turn on or off the screen, go to 4.5.A.2.1.5 Server & Browser. The Customer Interface works the best in a touch screen monitor.
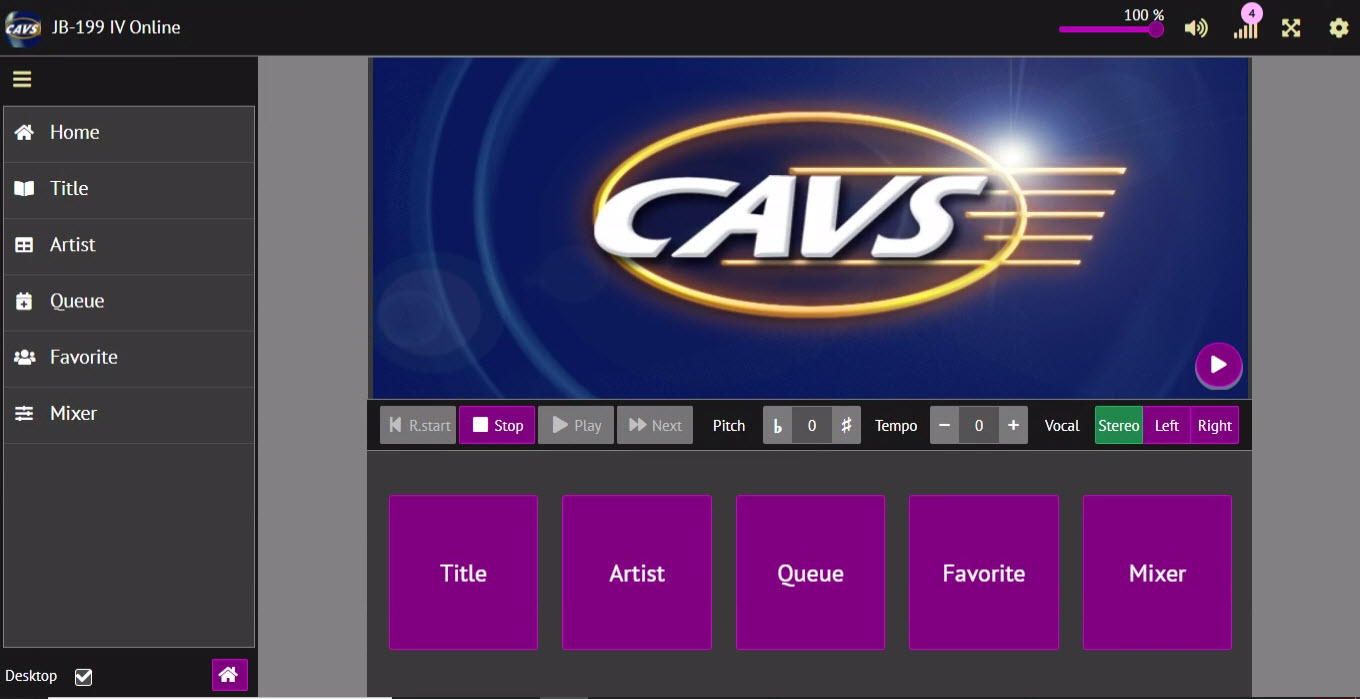
4. JB-199 IV Server
This is the JB-199 Server screen which controls the online communication. It is turned on or off at 4.5.A.2.1.5 Server & Browser. After opening it must be minimized, not closed, as the closing will terminate the server and all online communication.
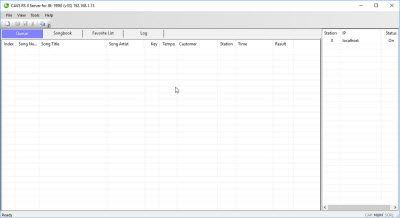
Screen settings for the JB-199 IV depends on the number of connected monitor(s).
1. Single monitor
This is a minimum setup of a single monitor which is likely a TV being connected to the JB-199 IV. Henceforth the monitor is also addressed as the TV monitor. There may actually be multiple TVs but they are connected to a same output of the JB-199 IV using a video splitter and therefore they would be considered as one. There may also be a separate audio system for the music and microphones. Go to 5. How to Connect for the instruction on connecting devices.
Connect the TV monitor to the HDMI output of the JB-199 IV. Turn the TV monitor on and be sure to set the input source as the HDMI. Boot up the JB-199 IV. The CD+G screen will show on the TV monitor.

Double click to shrink the CD+G screen. The Control Panel will appear from behind.
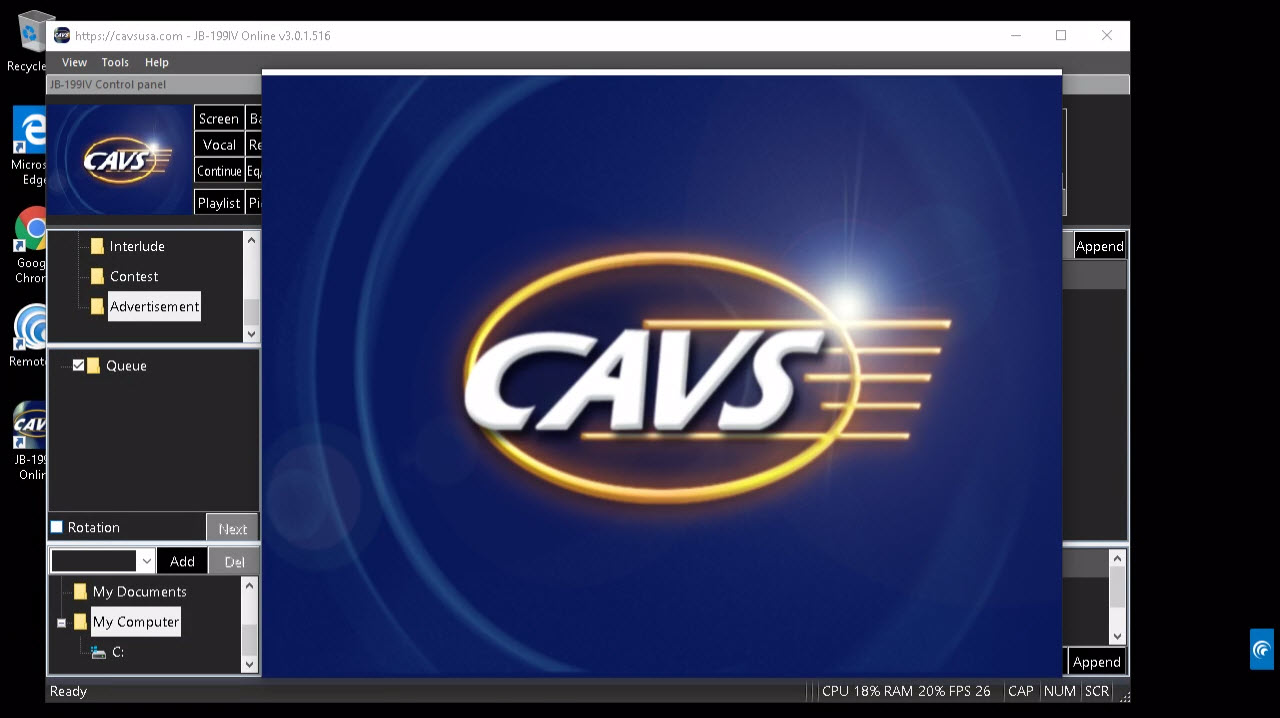
Click on the Control Panel to bring it forward.
Using a keyboard and mouse, setup the Control Panel such as to enable the JB-199 IV Server, enable the Customer Interface, load a playlist, enable the Standby Title, etc. If the Customer Interface is enabled, it will appear in the TV monitor as follows.

To switch between the screens, use the icons in the Task bar. To select the CD+G screen or the Control Panel, hover over the CAVS icon and select.
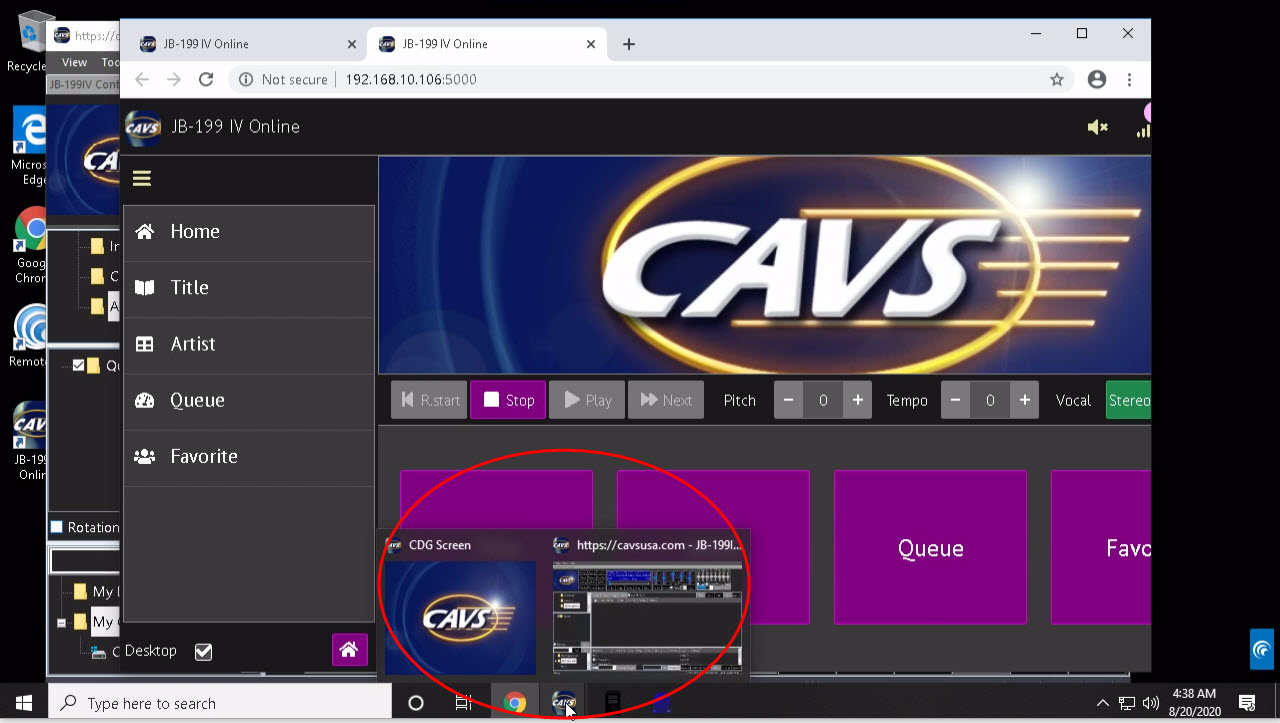
To select the Customer Interface, hover over the Google Chrome icon and select.
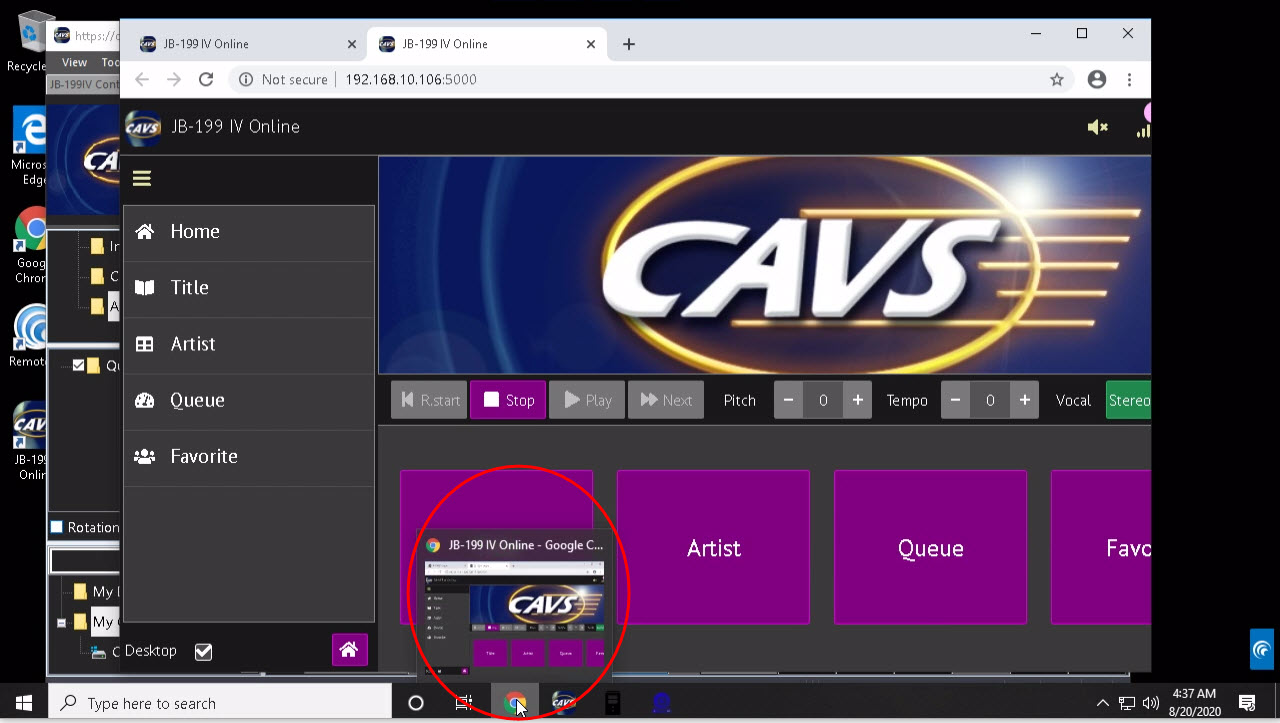
To select the JB-199 IV Server, hover over the following icon and select.>/p>
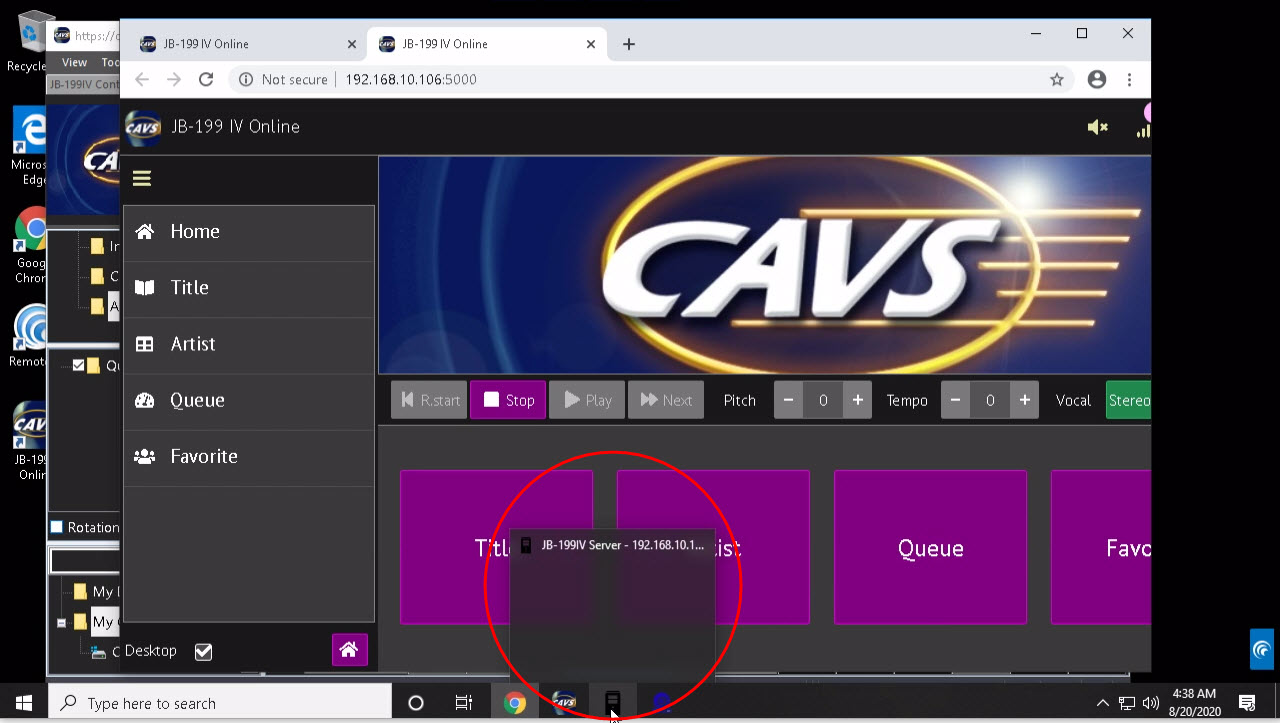
To select the Cam2Streamer, hover over the following icon and select.>/p>
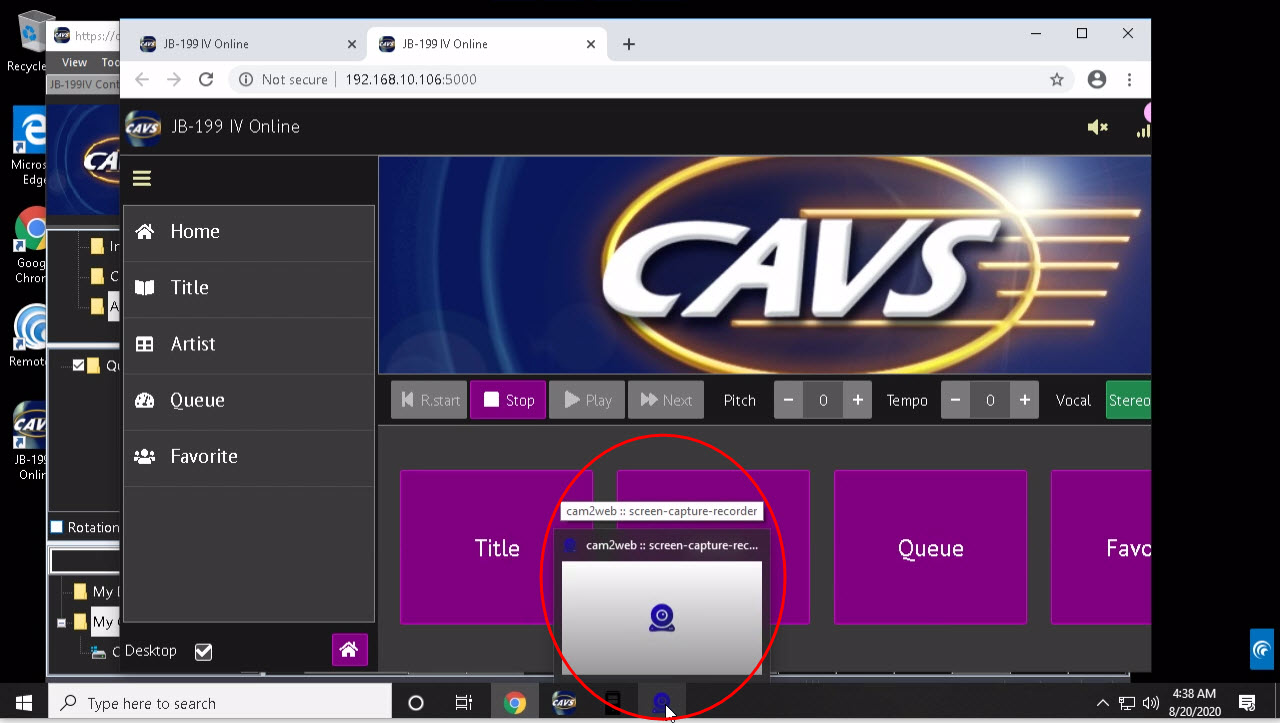
When done, select the CD+G screen and double click to expand.

The screens are now set and ready. Online customers can join in using an Internet browser from smartphones, tablets, and laptops. Offline customers can join in using the Front Panel or E-Songbooks of the JB-199 IV.
Note that the screen in the TV monitor is shown to the customers both offline and online. So any switch from the CD+G screen to the Control Panel or the Customer Interface, for example to change the settings, will be visible to the customers of both offline and online.
2. Dual monitors
This is a preferred setup where one monitor is used for the control and the other is used for TV. Henceforth the monitors are addressed as the control monitor and TV monitor respectively.
Connect the control monitor to the VGA output of the JB-199 IV. Connect the TV monitor to the HDMI output. Again there may be multiple TVs but sharing a single output, they are considered as one. There may also be a separate audio system for the music and microphone. Go to 5. How to Connect for the instruction on connecting devices.
Turn on the monitors. Be sure to set the input source for the control monitor to be VGA and for the TV monitor to be HDMI.
Boot up the JB-199 IV. The Control Panel will show in the control monitor. The CD+G screen will show in the TV monitor.
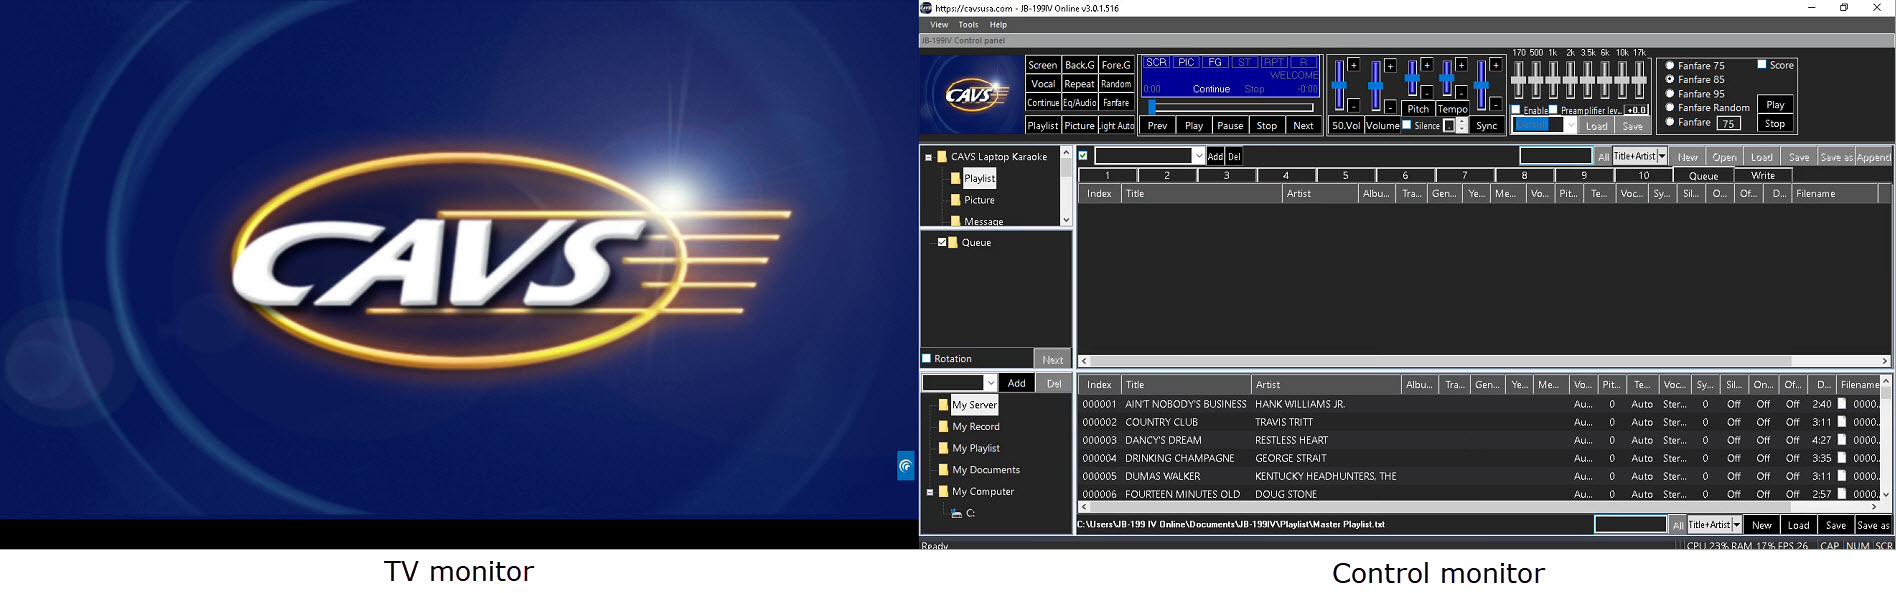
If booting from a non-factory setting, the Control Panel may appear behind the CD+G screen in the TV monitor. Double click to shrink the CD+G screen.
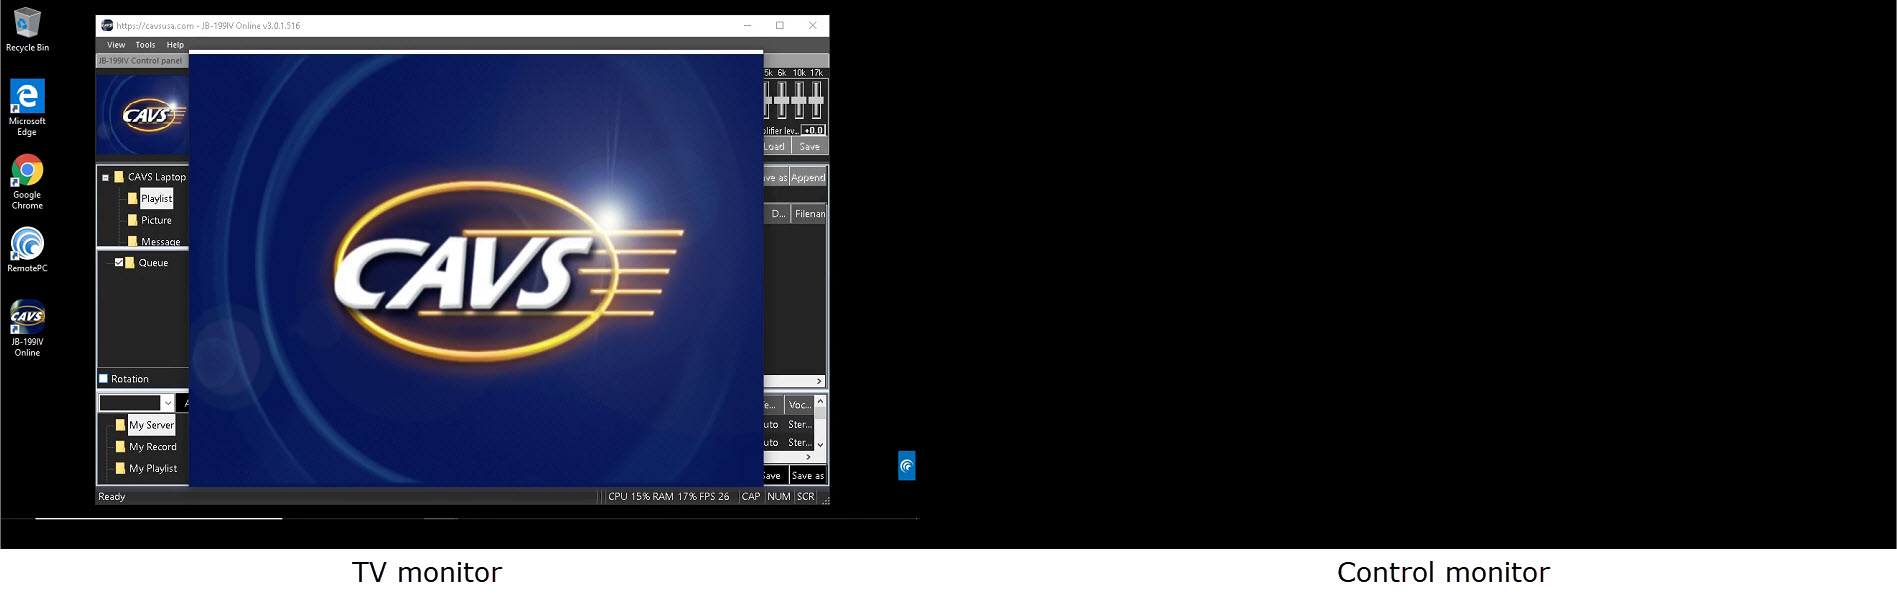
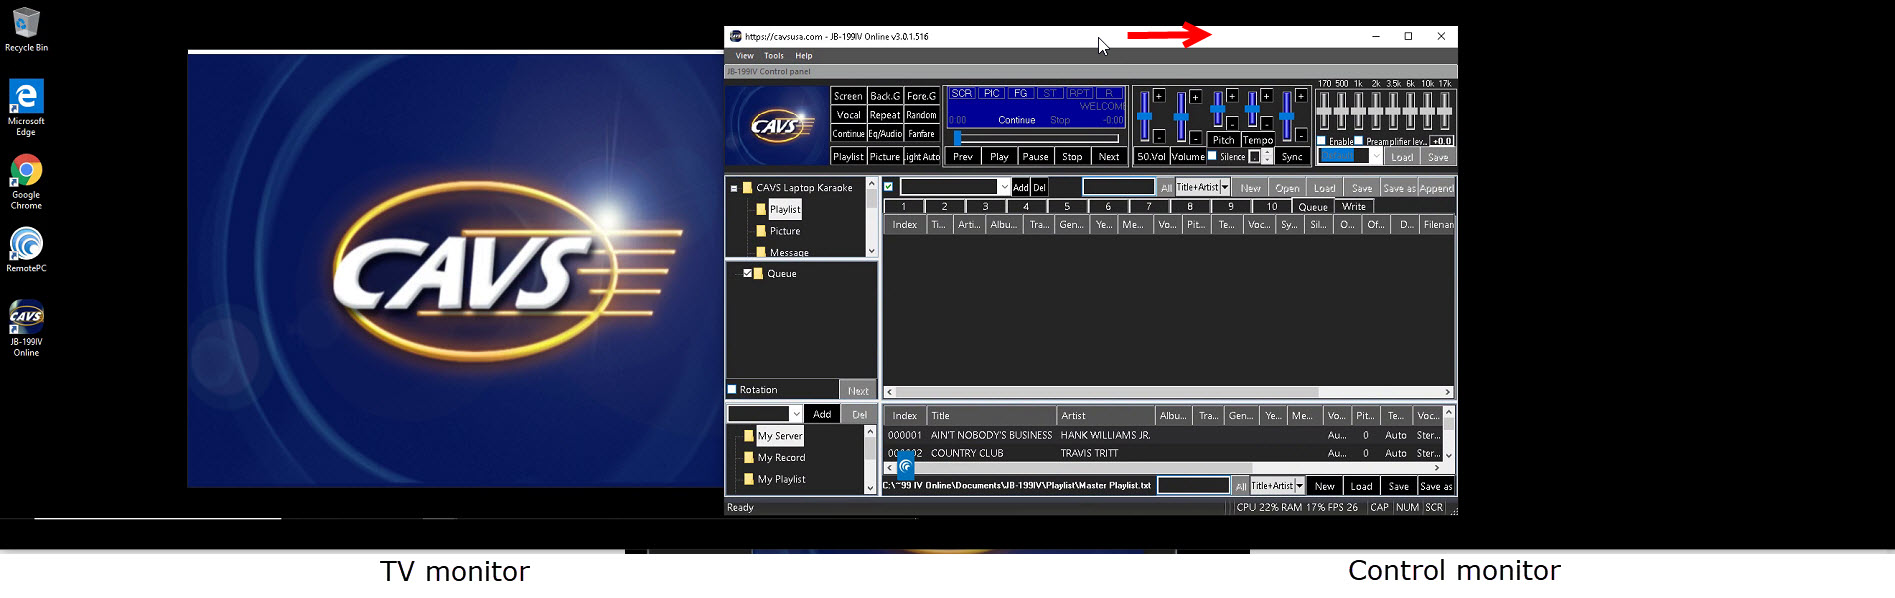
When the whole Control Panel is inside the control monitor, click on the Maximize button to expand the screen.
Next setup the Control Panel such as to enable the JB-199 IV Server, enable the Customer Interface, load a playlist, enable the Standby Title, etc. If the Customer Interface is enabled, it will appear in the control monitor as follows.
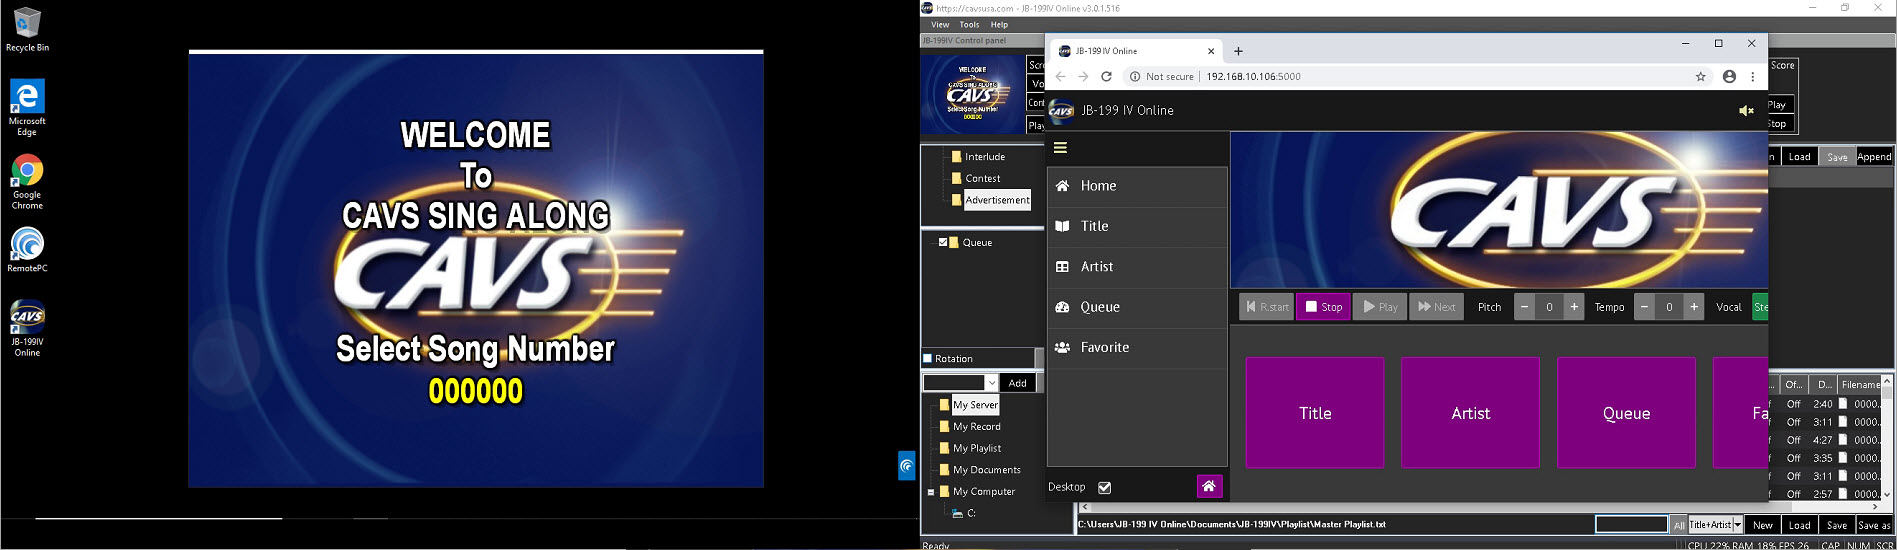
Again if the Customer Interface appears in the TV monitor, drag the screen to the control monitor.
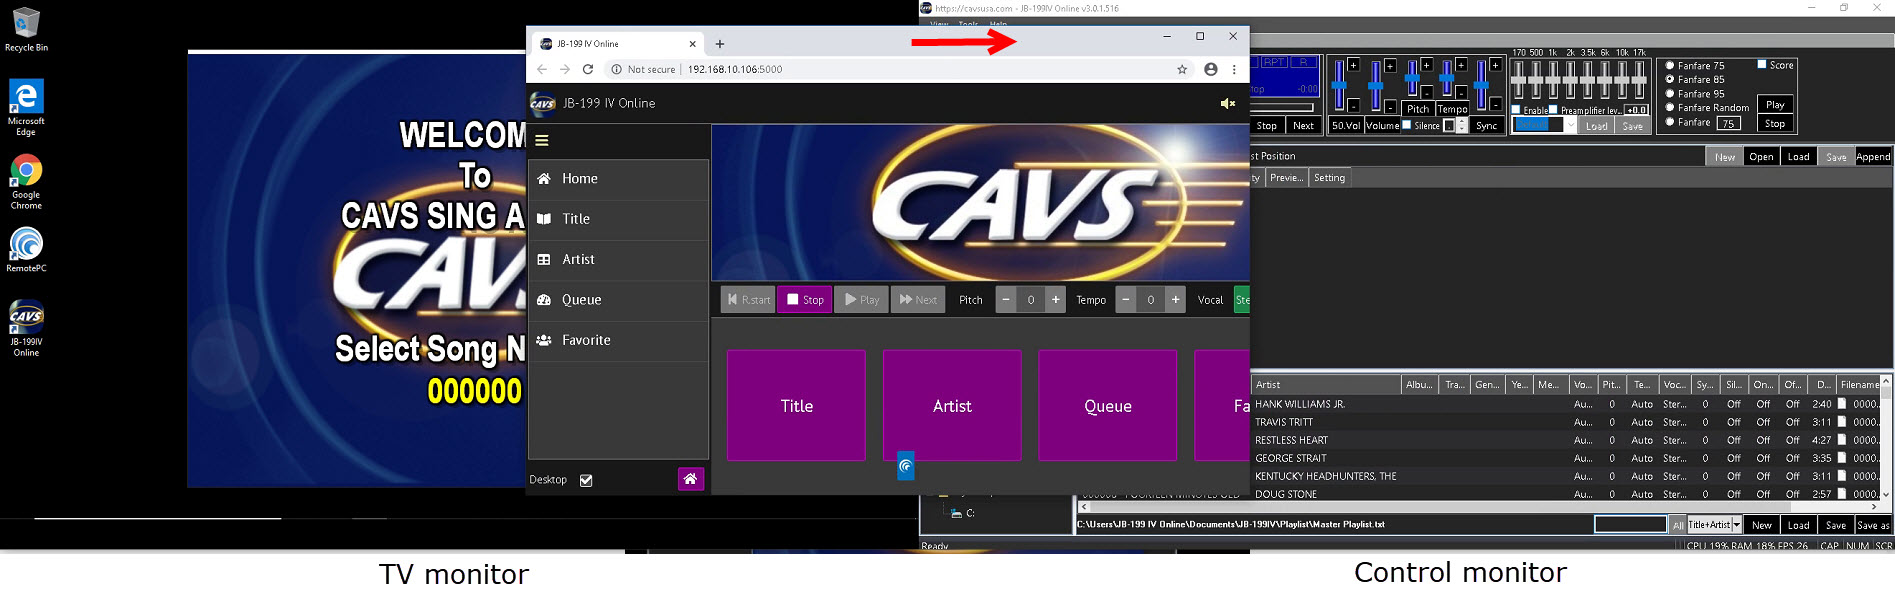
The screens are now set and ready. Online customers can join in using an Internet browser from smartphones, tablets, or laptops. Offline customers can join in using the Front Panel, the E-Songbooks, or the Remote Controller of the JB-199 IV. And having dual monitors, the Control Panel and the Customer Interface can be swapped at any time without interfering with the CD+G screen.
Follow the steps below to recover the correct screen settings for the JB-199 IV.
1. Single monitor
Connect the monitor to the HDMI output of the JB-199 IV. Turn it on and be sure to set the input source as the HDMI. Boot up the JB-199 IV.
-
Following screen appears without any picture or icon.

Right click on any empty spot and select Display settings.
-
The Display settings window appears.
Scroll down to the bottom for Multiple displays and set it as Duplicate these displays.
When asked to confirm, press Keep changes.
Exit out of the Display setting window by clicking on the X mark at the top right corner.
The CD+G screen and Control Panel screen of the JB-199 IV should now be back in the display.
If not, go down to the task bar and select them to open. -
If the Display setting window does not appear, hold down the Windows key in the keyboard and press the Right arrow (→) key repeatedly until the Display setting window appears.
Scroll down in the Display settings window to the bottom for Multiple displays and set it as Duplicate these displays.
When asked to confirm, press Keep changes.
Exit out of the Display setting window by clicking on the X mark at the top right corner.
The CD+G screen and Control Panel screen of the JB-199 IV should now be back in display.
If not, go down to the task bar and select them to open.
-
The Display settings window appears.
-
The CD+G screen appears without the Control Panel in behind.

Right click on any empty spot in the Windows desktop (outside of the CD+G screen). Select Display settings.
-
The Display settings window appears.
Scroll down to the bottom for Multiple displays and set it as Duplicate these displays.
When asked to confirm, press Keep changes.
Exit out of the Display setting window by clicking on the X mark at the top right corner.
The CD+G screen and Control Panel screen of the JB-199 IV should now be back in display.
If not, go down to the task bar and select them to open. -
If Display setting window does not appear, hold down on the Windows key in the keyboard and press the Right arrow (→) key repeatedly until the Display setting screen appears.
Scroll down in the Display settings window to the bottom for Multiple displays and set it as Duplicate these displays.
When asked to confirm, press Keep changes.
Exit out of the Display setting window by clicking on the X mark at the top right corner.
The CD+G screen and Control Panel screen of the JB-199 IV Online should now be back in display.
If not, go down to the task bar and select them to open.
-
The Display settings window appears.
-
The Control Panel screen appears without the CD+G screen.

Right click on any empty spot in the Windows desktop (outside of the Control Panel). Select Display settings.
-
The Display settings window appears.
Scroll down to the bottom for Multiple displays and set it as Duplicate these displays.
When asked to confirm, press Keep changes.
Exit out of the Display settings window by clicking on the X mark at the top right corner.
The CD+G screen and Control Panel screen of the JB-199 IV should now be back in display.
If not, go down to the task bar and select them to open. -
If the Display settings windows does not appear, hold down on the Windows key in the keyboard and press the Right arrow (→) key repeatedly until the Display settings screen appears.
Scroll down in the Display settings window to the bottom for Multiple displays and set it as Duplicate these displays.
When asked to confirm, press Keep changes.
Exit out of the Display settings window by clicking on the X mark at the top right corner.
The CD+G screen and Control Panel screen of the JB-199 IV should now be back in display.
If not, go down to the task bar and select them to open.
-
The Display settings window appears.
2. Dual monitors
Connect the TV monitor to the HDMI output and the control monitor to the VGA output of the JB-199 IV. Turn the TV monitor and the control monitor. Set the input source as the HDMI and VGA respectively. Boot up the JB-199 IV.
-
The two monitors are duplicated showing the same screens.
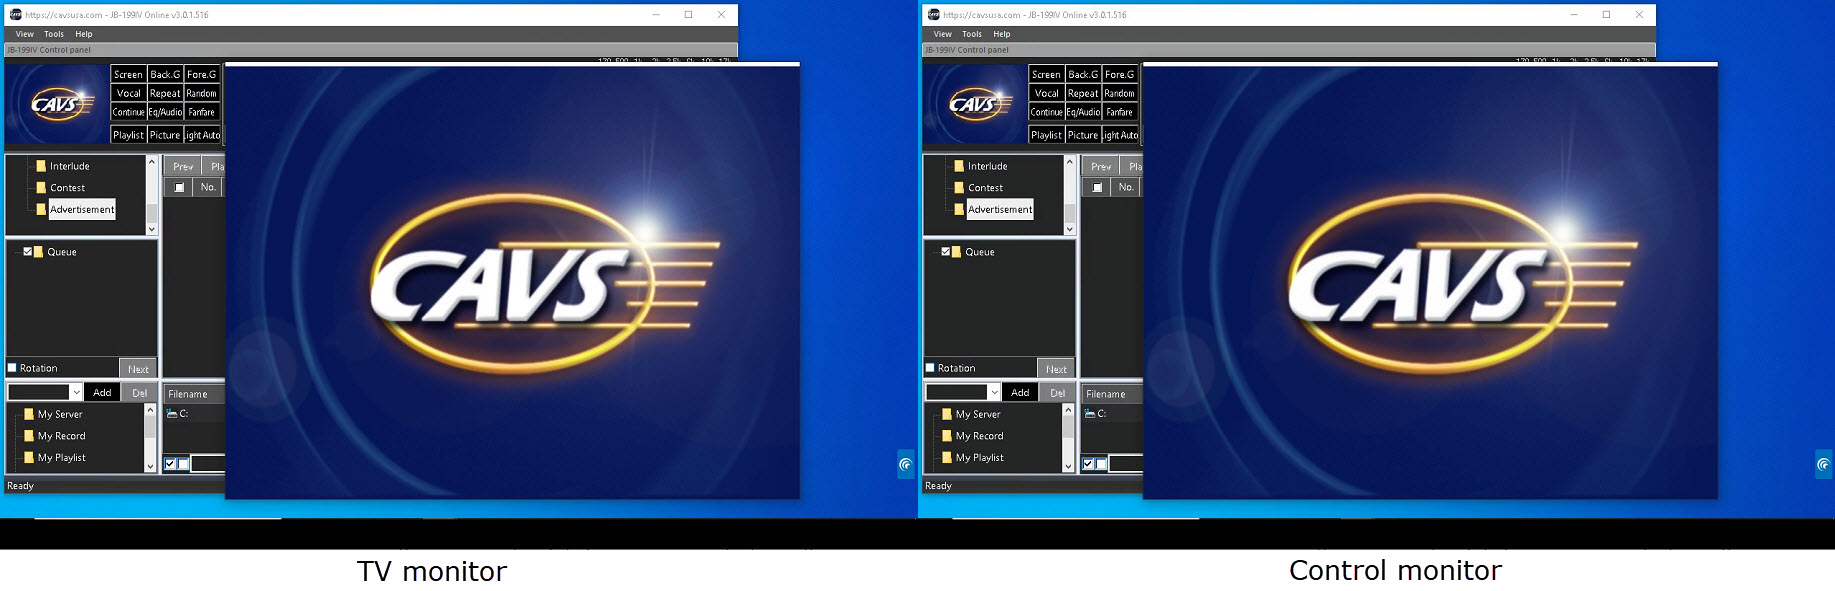
Right click on any empty spot in the Windows desktop, outside of the Contrl Panel and the CD+G screen. Select Display settings.
The Display settings window will appear.
Scroll down to the bottom for Multiple displays and set it as Extend these displays.
When asked to confirm, press Keep changes.
Scroll up to the top for the drawing of two monitors 1 and 2.
Click on Identify to find which monitor in the drawing matches with the TV monitor, and which matches with the control monitor.
Click on the monitor in the drawing that matches with the control monitor.
Scroll down to the bottom and check the option Make this my main display.
Exit out of the Display settings by clicking on the X mark at the top right corner.
Set the screens by sliding the CD+G screen to the TV monitor and the Control Panel to the control monitor.
-
The CD+G screen and the Control Panel appear switched in the monitors.
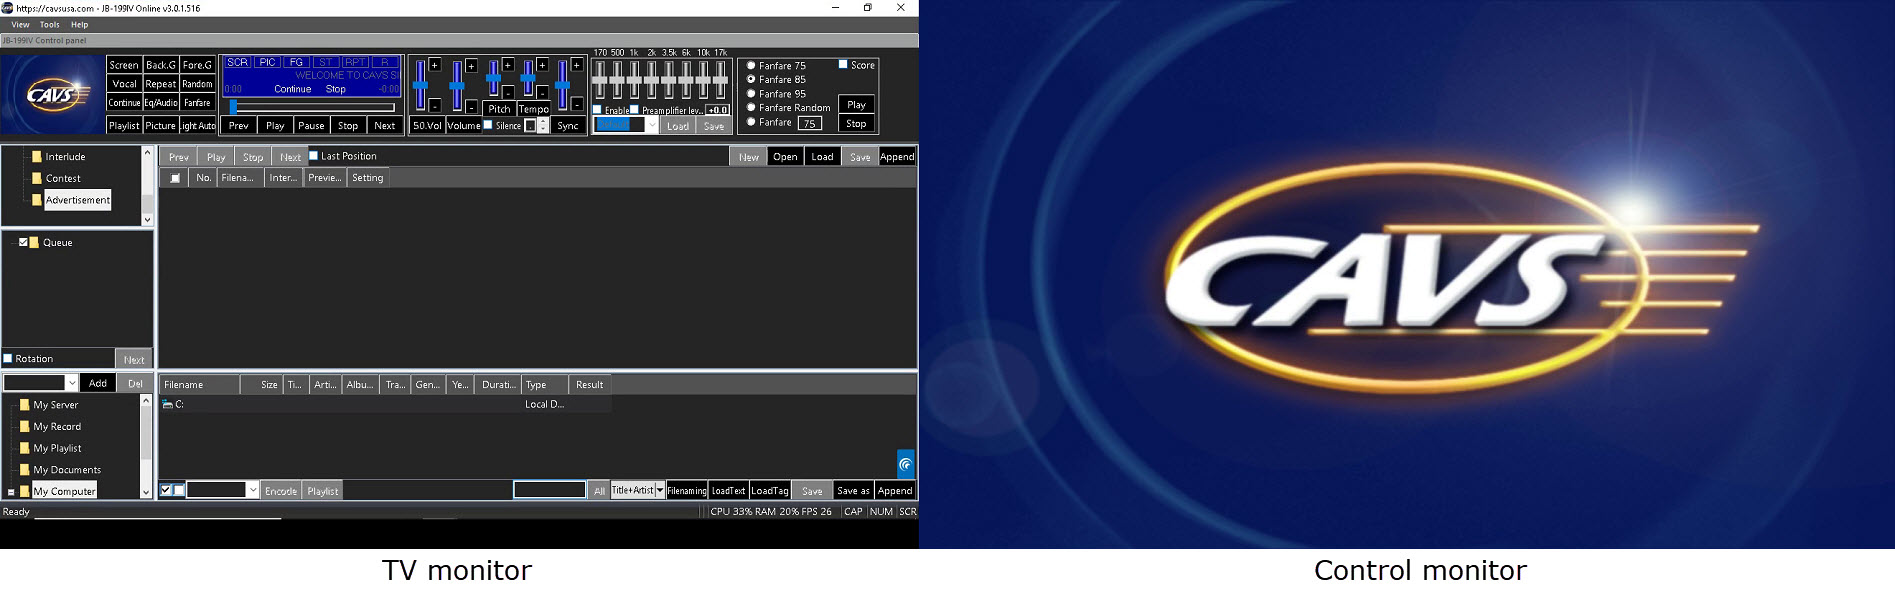
Shrink the CD+G screen by double click.
Shrink the Control Panel by pressing the Restore Down button.
Slide the screens left or right to their respective monitors. -
The CD+G screen and the Control Panel appear together in a single screen.
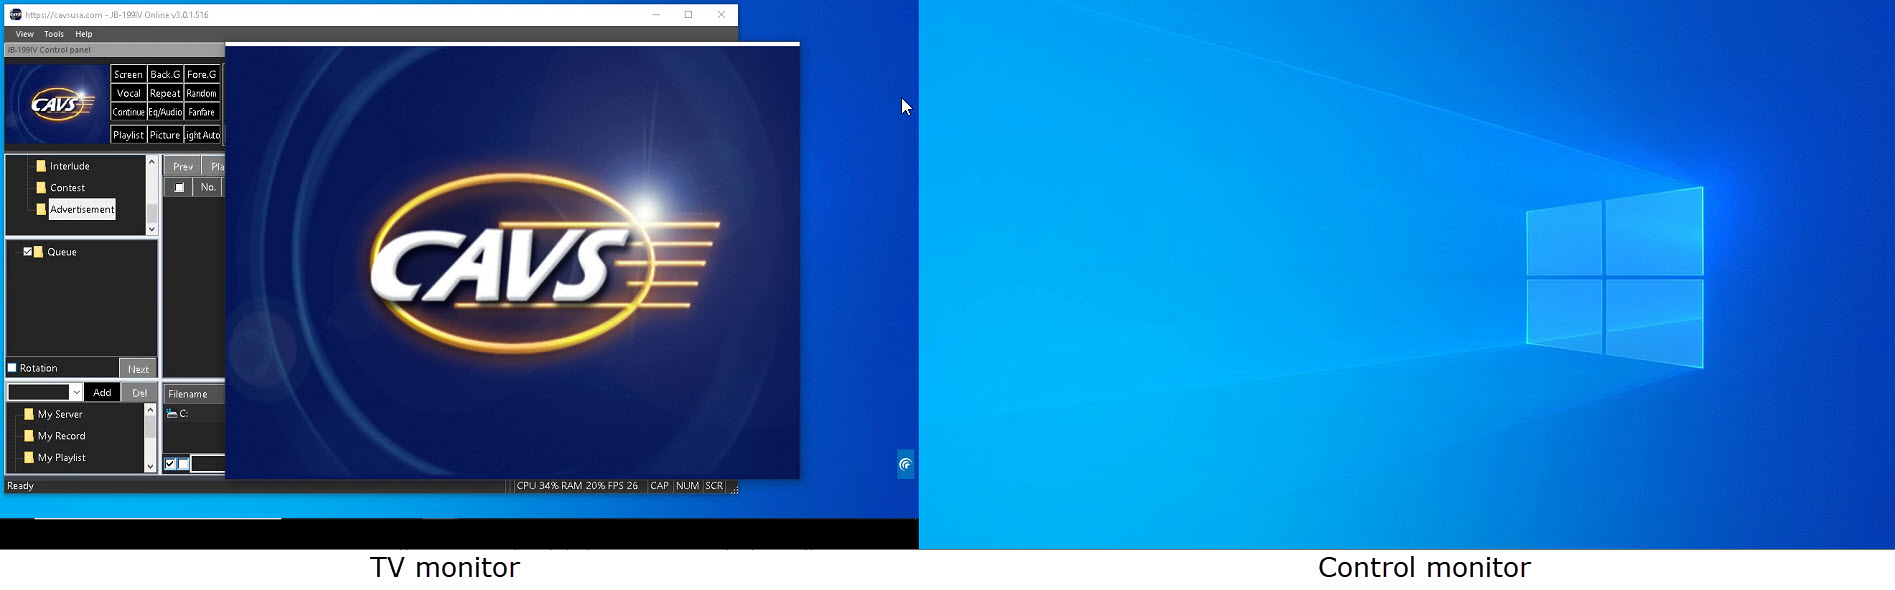
In this example, both screens are appearing in the TV monitor.
Shrink the size of the Control Panel and slide it into the control monitor.
3. Customer Interface
The Customer Interface has an embedded display area which is designed to show the CD+G Screen. This is acheived by making the embedded display area duplicate the monitor that shows the CD+G Screen. A correct setting will show the Customer Interface with the CD+G Screen inside as follows.
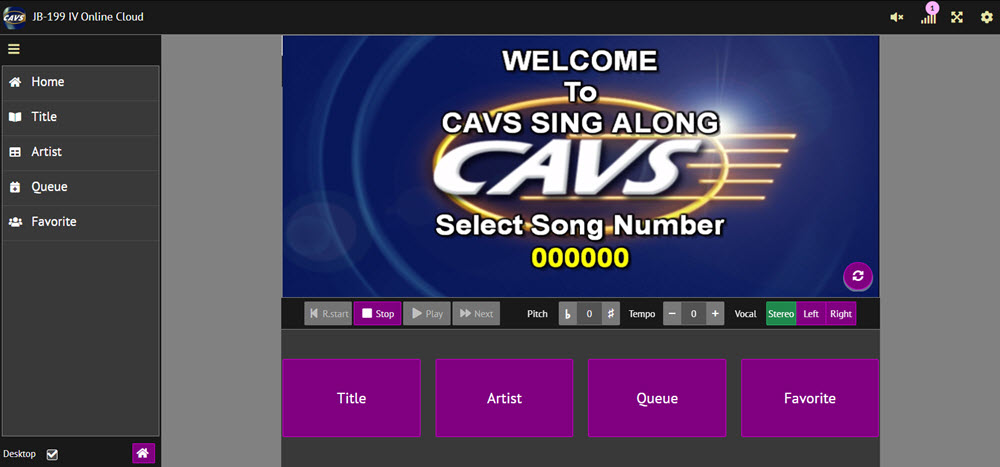
-
The Customer Interface shows repeated reflections.
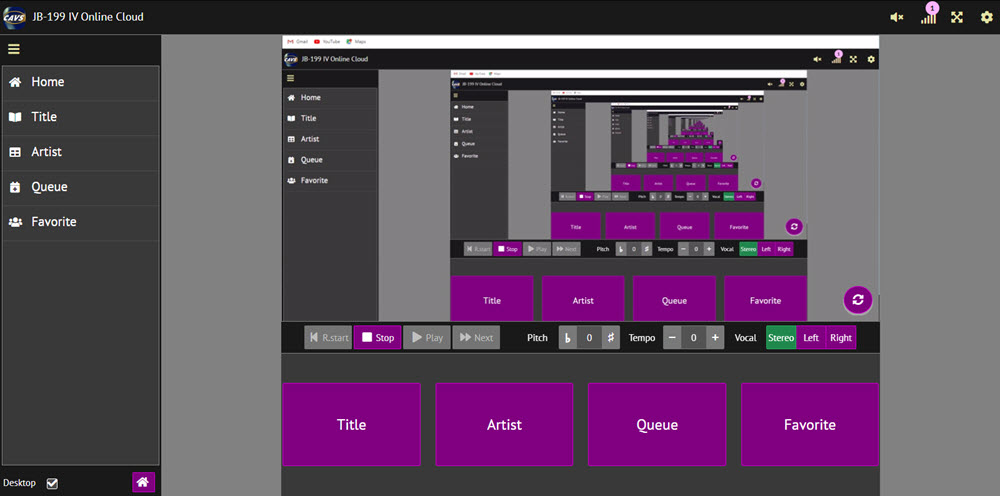
This happens when the monitor showing the Customer Interface is the same monitor showing the CD+G Screen. The Customer Interface will then show itself within the embedded display area and lead to repeated reflections.
-
In case of Single monitor, the Customer Interface should be disabled. The single monitor should be showing the CD+G Screen at all time.
Go to the Control Panel > Tools > Setting > Server & Browser.
Uncheck the "Enable Customer Interface".
Refresh the Customer Interface showing in E-Songbooks. -
In case of Dual monitors, the Customer Interface and the CD+G Screen should be showing in separate monitors.
The CD+G Screen should be on the TV showing the lyrics at all time.
The Customer Interface should be in the control monitor which also shows the Control Panel.
After moving the screens, restart the JB-199 IV Online karaoke program.
Refresh the Customer Interface showing in E-Songbooks.
-
-
The Customer Interface shows off-center CD+G Screen.
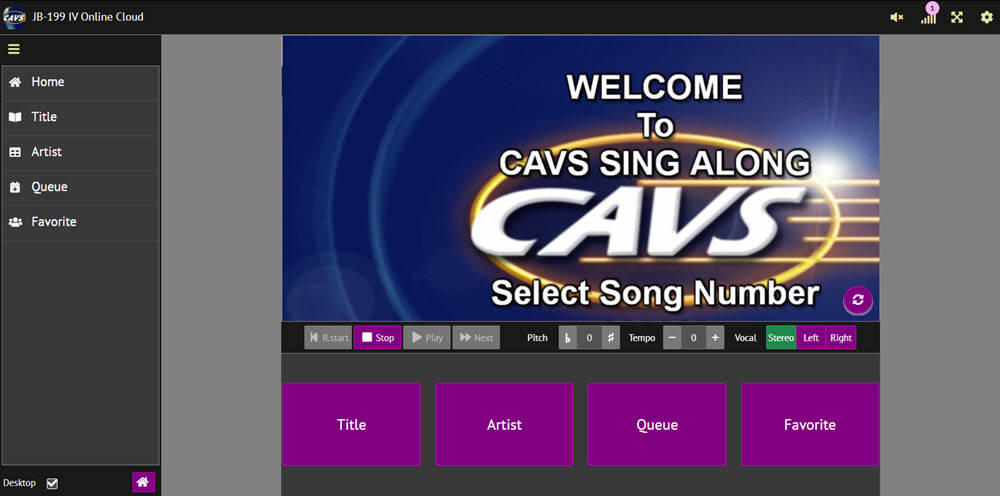
This happens when the Windows scale and resolution settings of the monitor showing the CD+G Screen are not compatible.
Right click on any empty spot in the Windows desktop, outside of any screens.
Select Display Settings.
The Display settings window will appear.
In the display drawing at the top, select the monitor showing the CD+G screen. You can find the monitor by clicking on Identify.
Scroll down to Scale and Layout.
Select the Scale to be 100% and the Display resolution to be the minimum that fills the CD+G screen to the monitor.
Close the Display settings.
Refresh the Customer Interface.
This section describes how to operate the JB-199 IV. It begins with how to load and play karaoke songs from discs and files. It next shows how to operate the main functions such as the background pictures, message, advertisement, singing lesson, etc. It next describes how to use the new E-Songbook which can play music and lyrics as well select songs. It then concludes with how to conduct online karaoke events using the new Customer Interface.
The JB-199 IV plays the following formats of karaoke songs.
- CD+G discs
- Super CD+G discs
- DVD discs
- MP3 + CDG files
- MP3 + MCG files
- MP3 + NCG files (from JB-199 players)
- ZIP files (compressed MP3 + CDG files)
- ZIP files (compressed MP3 + MCG files)
- DAT files (Super CD+G)
- AVI files
- WMV files
- MP4 files
- MIDI files
- KAR files
For file types that are not listed, contact techsupport@cavsusa.com for possible inclusion in a future upgrade.
For playing a disc or extracting song files from a disc, an optional external disc drive is required. Any DVD RW drive that read and write the discs can be used.
1. Start the JB-199 IV and go to the Control Panel.
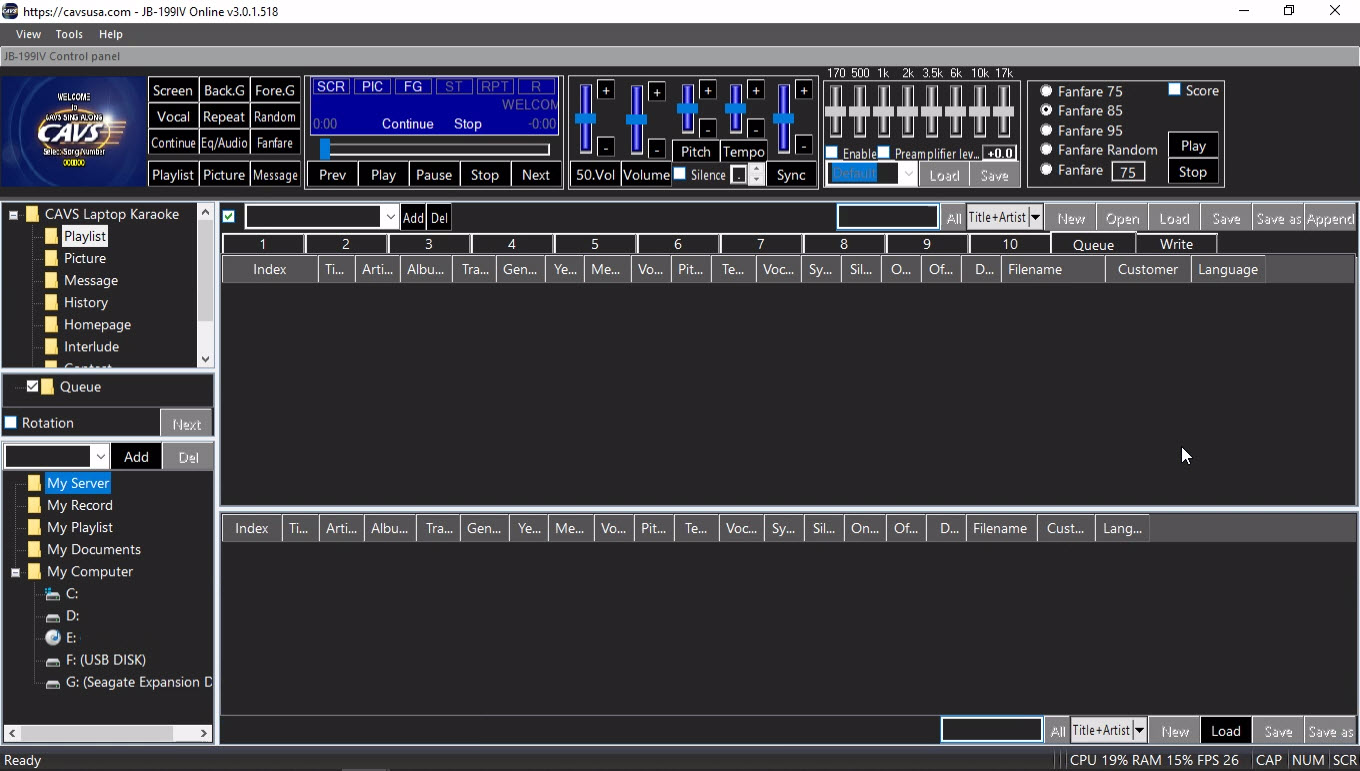
2. Insert the CD+G disc into the disc drive. Wait for the disc to be recognized and then click on the disc drive in the Folder Menu. The track information of the disc will appear as a list of CDA files in the File Browser.
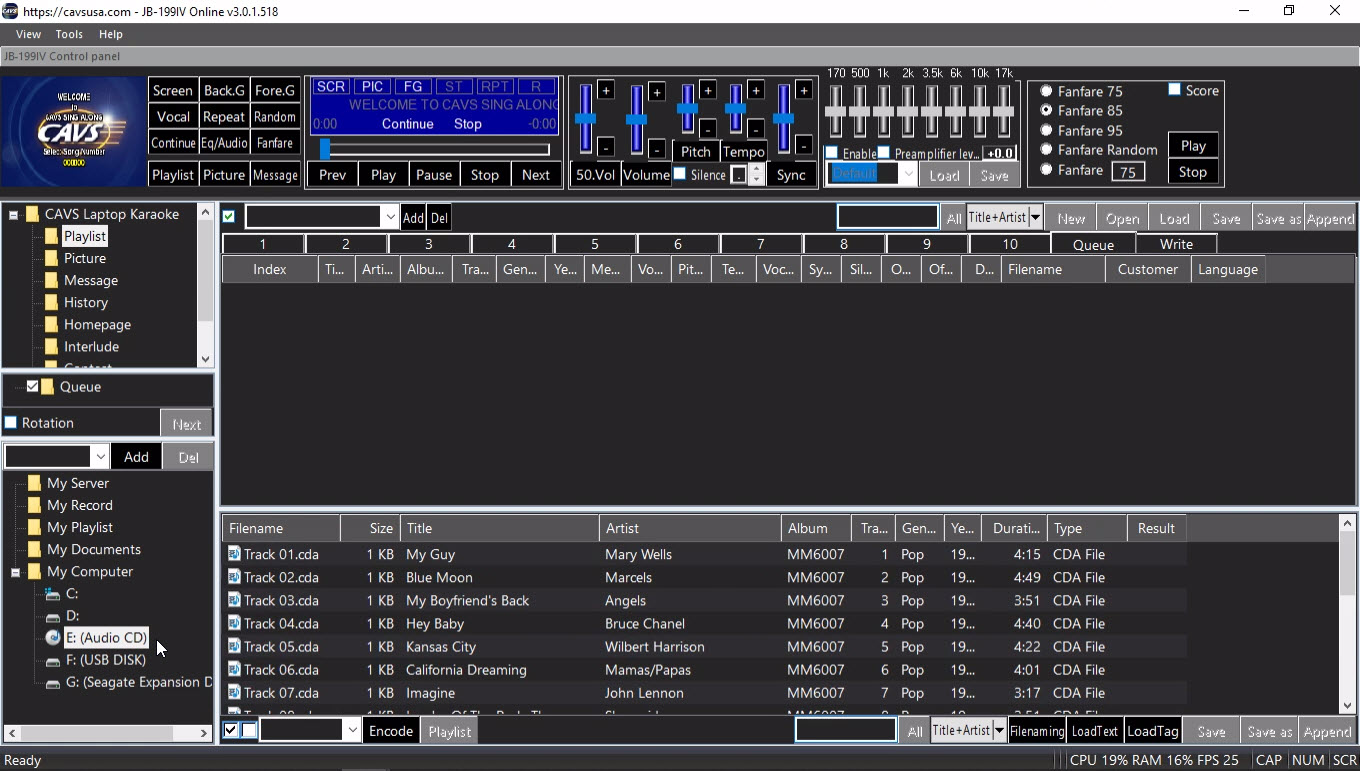
Note that the title and artist information for each track has been added automatically from an online database. Be sure to have the JB-199 IV connected to Internet to use this feature. To manually input the title and artist information, double click on each field, type in a title or artist name, and press Enter to save.
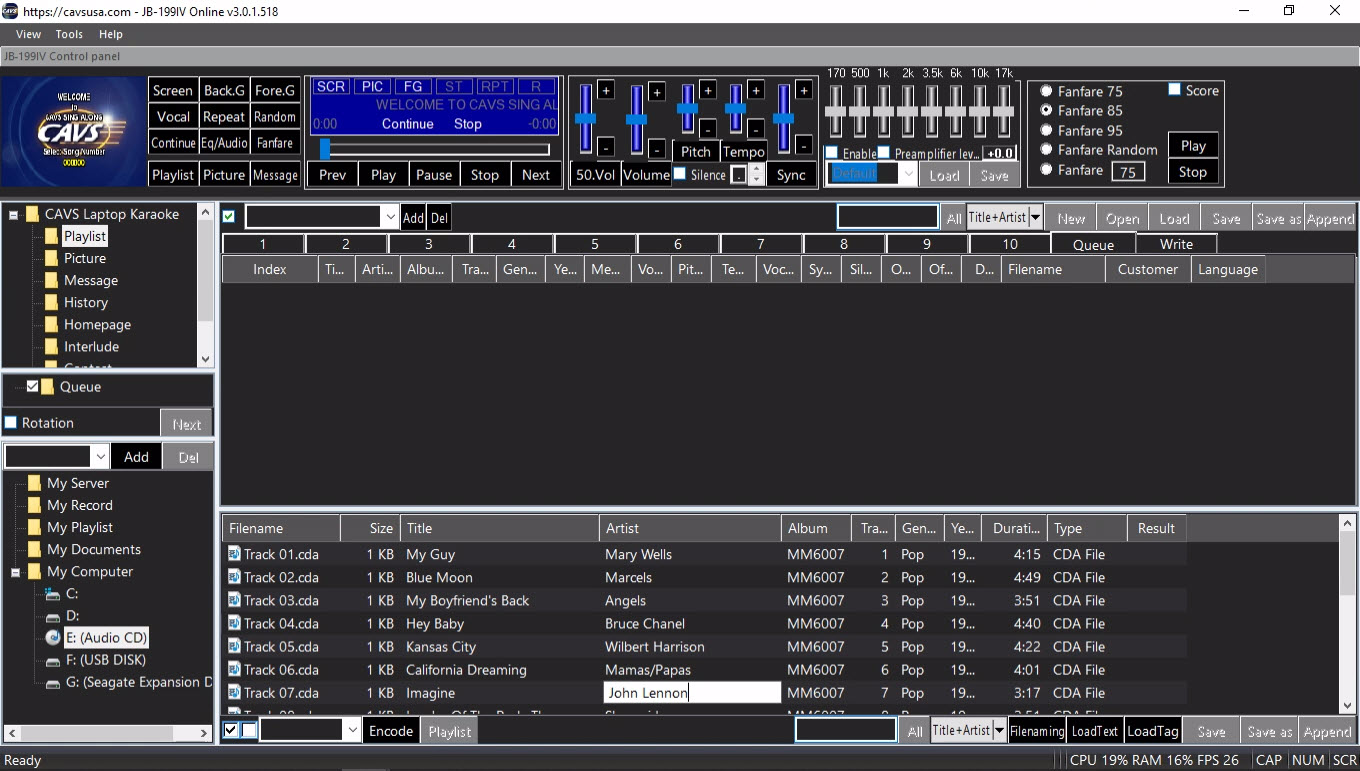
3. To play a song, right click on the song and select Playlist-Queue to load the song into the Queue in the List Browser. The song can also be drag & drop into the Queue.
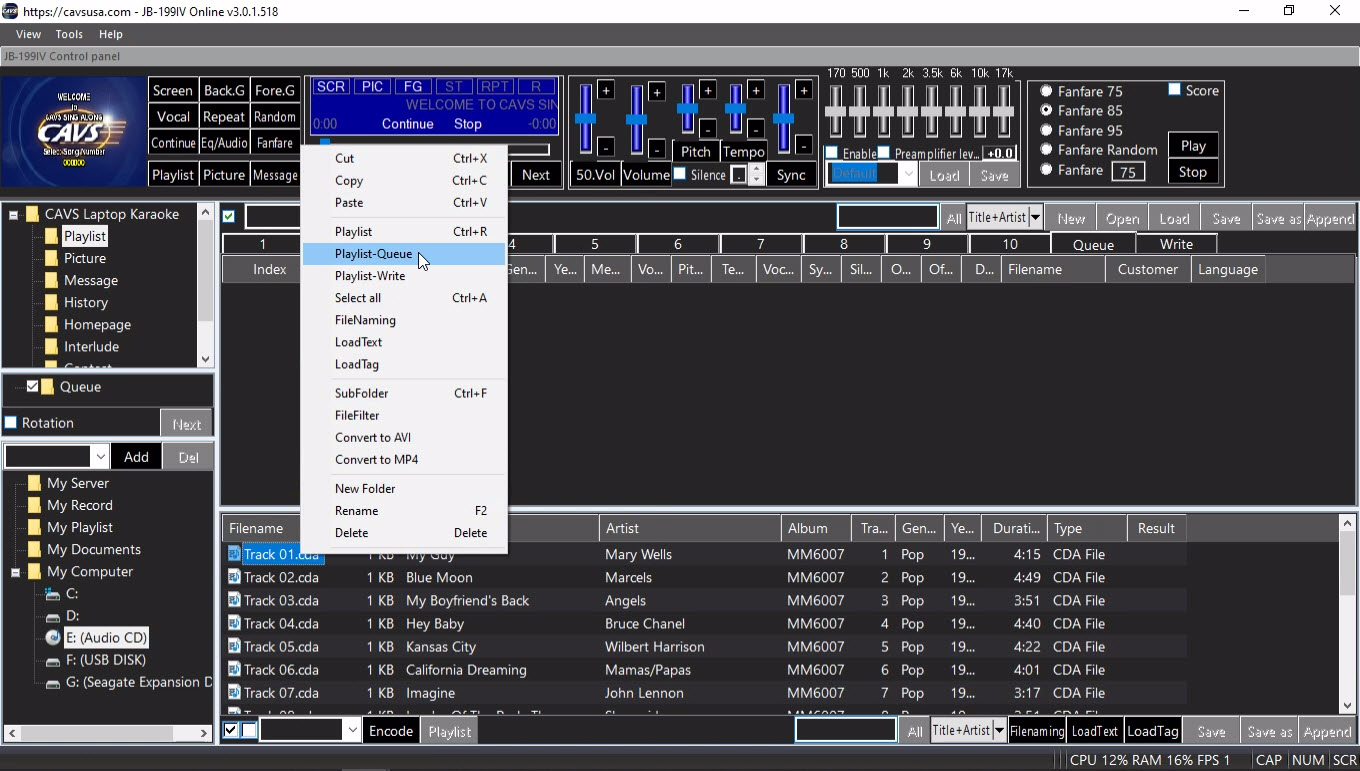
Next press Play.
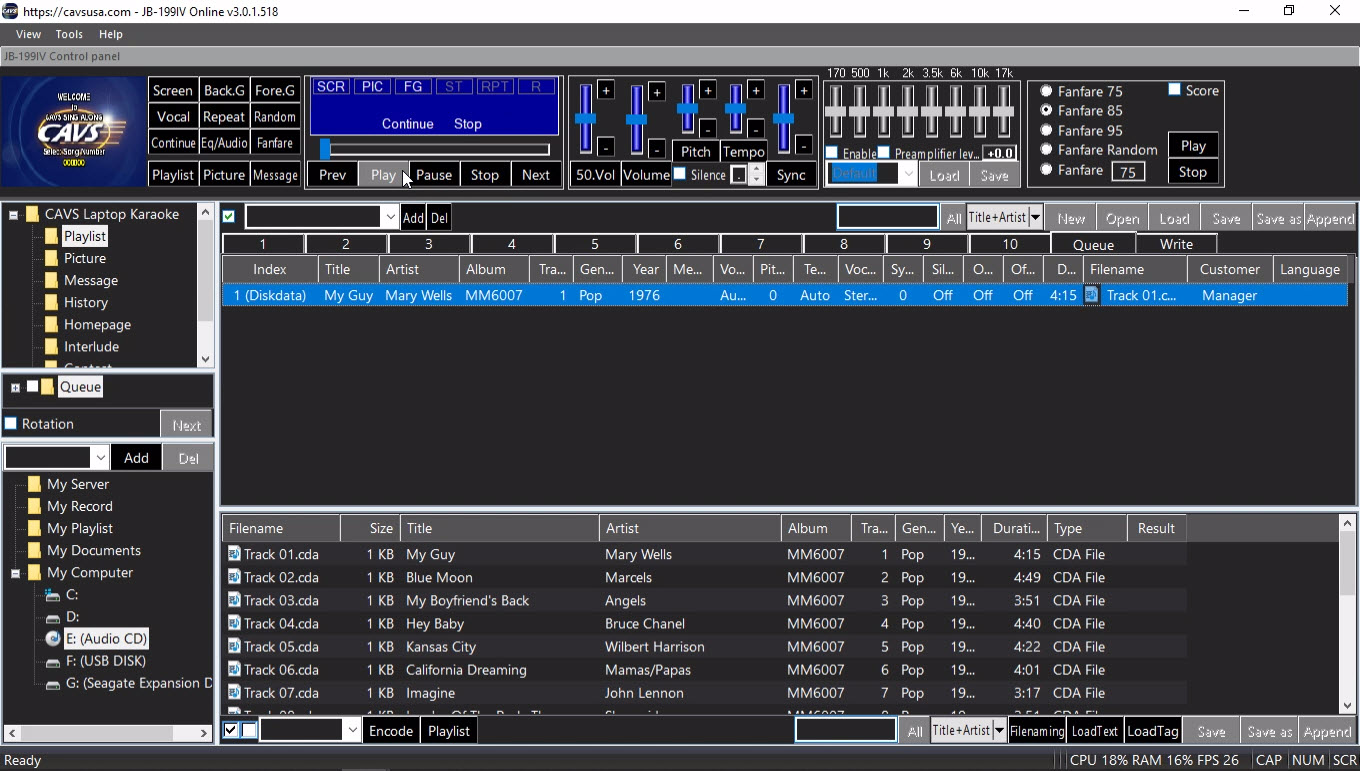
4. An alternate way to play a song is to extract the song files from the disc into the JB-199 IV hard drive, make a playlist, and then play from the playlist.
An advantage of extracting is that when hundreds or thousands of discs are extracted, all their songs become available simultaneously, unlike in discs which requires constant switching of discs.
An advantage of using a playlist is that the playlist is efficient to scroll, sort, and search.
It is a text file containing the song information such as file names, formats, titles, artists, etc. and is tagged with the locations of song files.
It can be merged or appended without ever touching the song files and can combine all the song files seamlessly across the formats and locations into a single master playlist.
To see how to extract the song files and make a playlist, go to 7.1.2.1 Extracting disc: CD+G disc.
1. Start the JB-199 IV and go to the Control Panel.
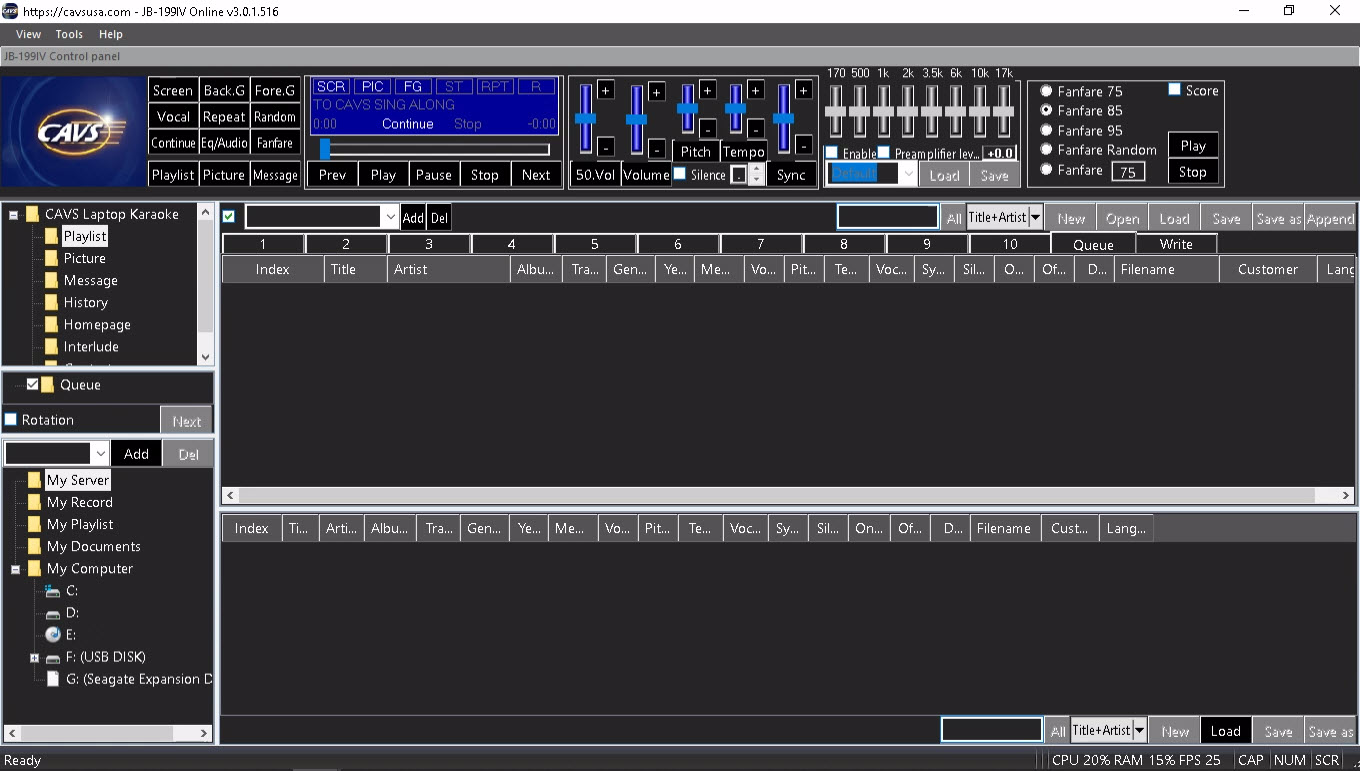
2. Insert the Super CD+G disc into the disc drive. Wait for the disc to be recognized and then click on the disc drive in the Folder Menu. The track information will appear as a list of SCDG files in the File Browser.

The title and artist information for each track is added automatically from the disc.
3. To play a song, right click on the song and select Playlist-Queue to load the song into the Queue in the List Browser. The song can also be drag & drop into the Queue.
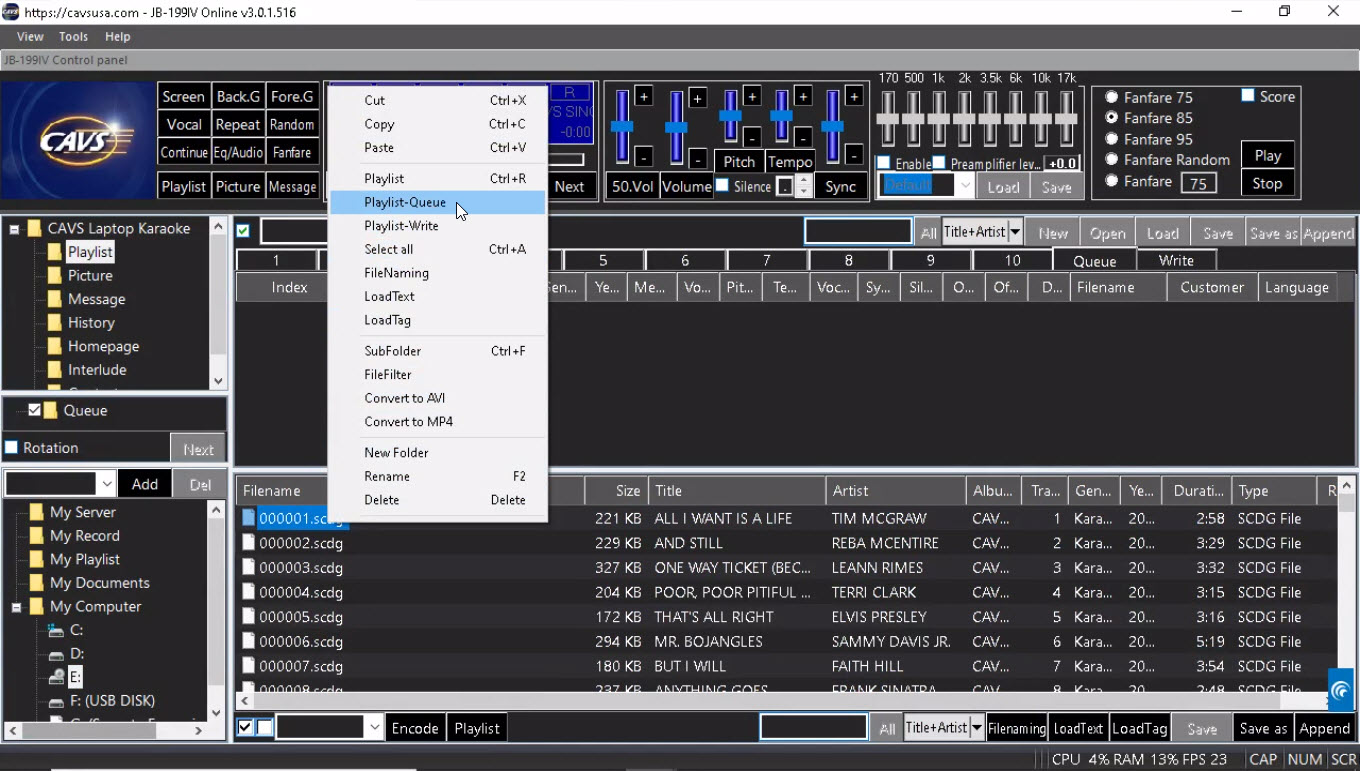
Next press Play
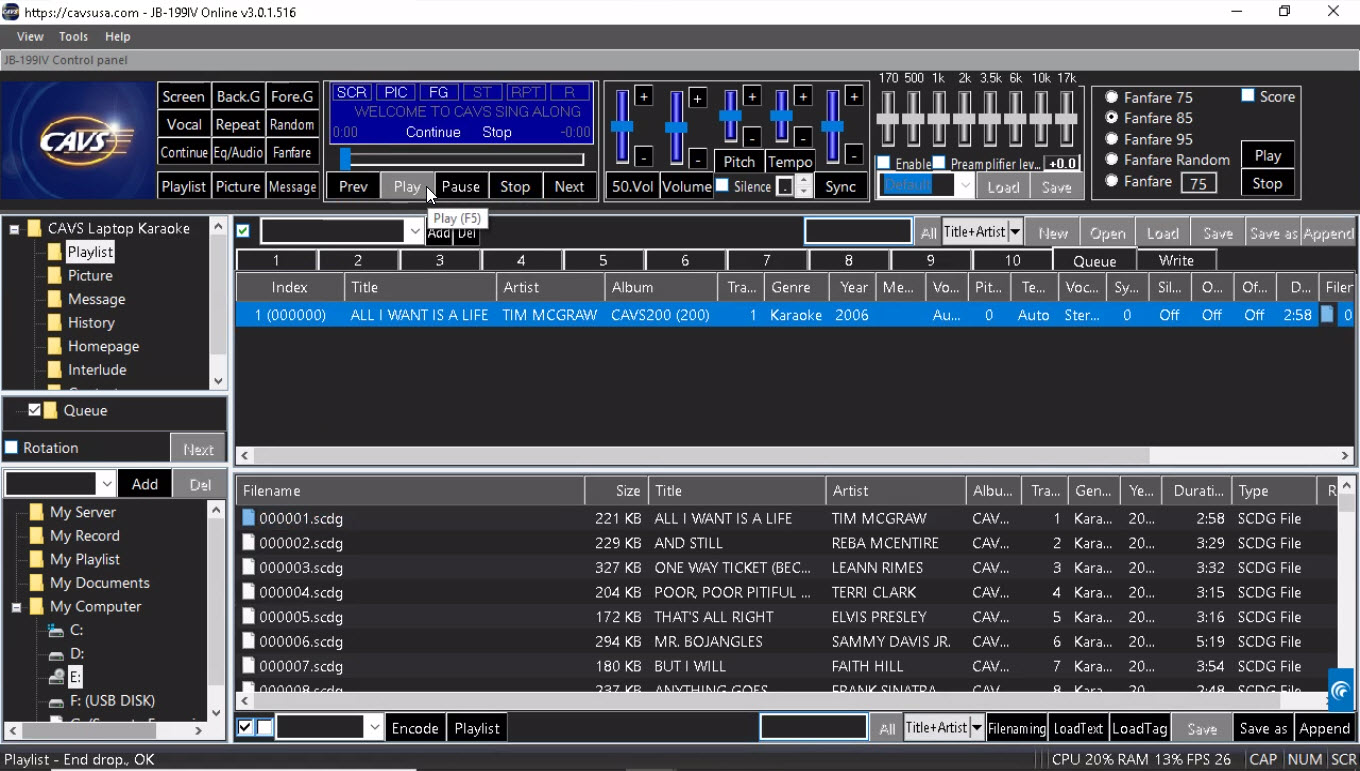
4. An alternate way to play a song is to extract the song files from the disc into the JB-199 IV hard drive, make a playlist, and then play from the playlist.
An advantage of extracting is that when hundreds or thousands of discs are extracted, all their songs become available simultaneously, unlike in discs which requires constant switching of discs.
An advantage of using a playlist is that the playlist is efficient to scroll, sort, and search.
It is a text file containing the song information such as file names, formats, titles, artists, etc. and is tagged with the locations of song files.
It can be merged or appended without ever touching the song files and can comrbine all the song files seamlessly across the formats and locations into a single master playlist.
To see how to extract the song files and make a playlist, go to 7.1.2.2 Extracting disc: Super CD+G disc.
1. Start the JB-199 IV and go to the Control Panel.

2. Insert the DVD disc into the disc drive. Wait for the disc to be recognized and then click on the disc drive in the Folder Menu. The track information will appear as a list of DVD files in the File Browser.
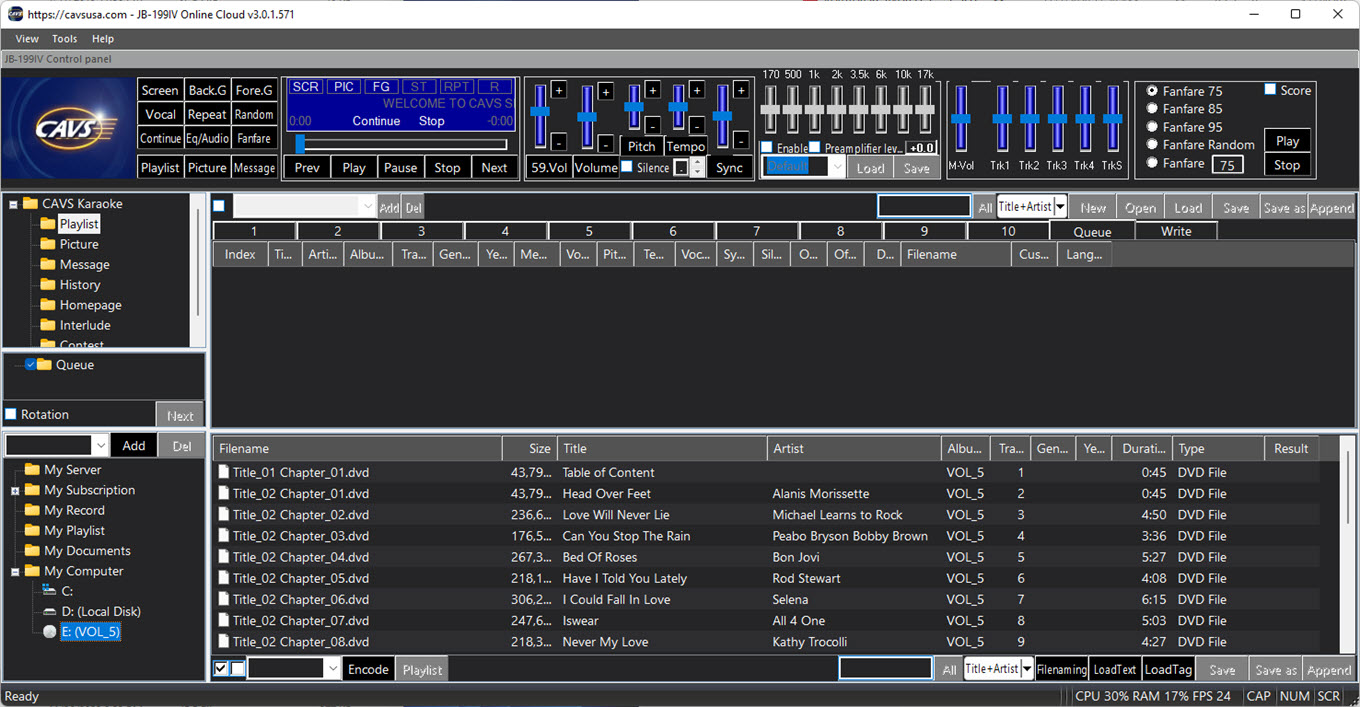
Note that the title and artist information for each track has been added automatically from an online database. Be sure to have the JB-199 IV connected to Internet to use this feature. To manually input the title and artist information, double click on each field, type in a title or artist name, and press Enter to save.
3. To play a song, right click on the song and select Playlist-Queue to load the song into the Queue in the List Browser. The song can also be drag & drop into the Queue.
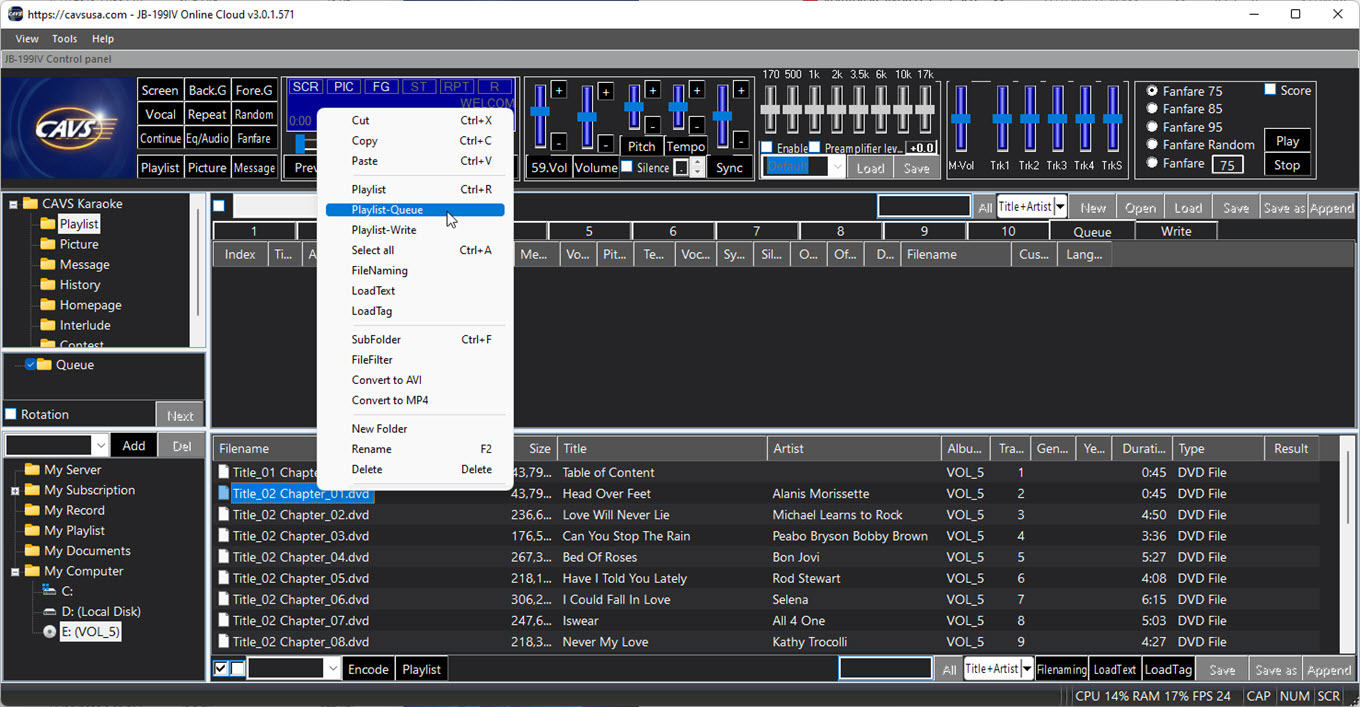
Next press Play
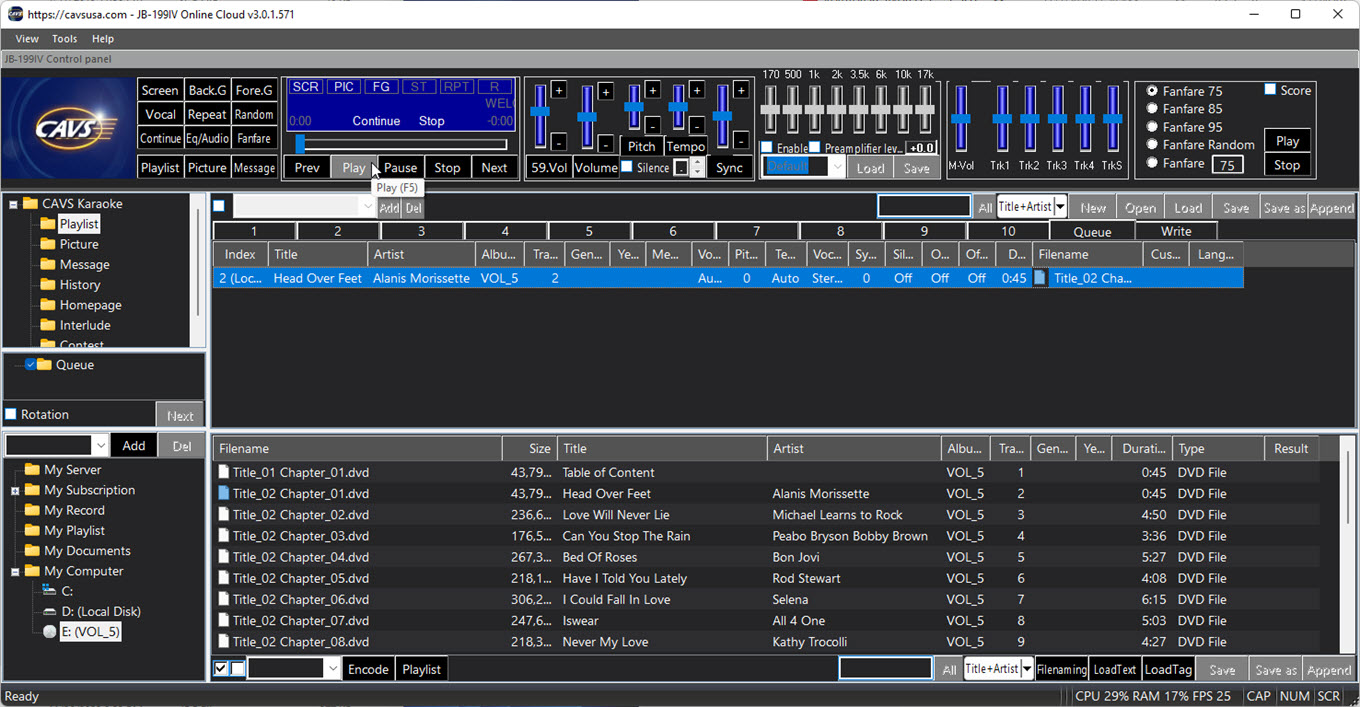
4. An alternate way to play a song is to extract the song files from the disc into the JB-199 IV hard drive, make a playlist, and then play from the playlist.
An advantage of extracting is that when hundreds or thousands of discs are extracted, all their songs become available simultaneously, unlike in discs which requires constant switching of discs.
An advantage of using a playlist is that the playlist is efficient to scroll, sort, and search.
It is a text file containing the song information such as file names, formats, titles, artists, etc. and is tagged with the locations of song files.
It can be merged or appended without ever touching the song files and can comrbine all the song files seamlessly across the formats and locations into a single master playlist.
To see how to extract the song files and make a playlist, go to 7.1.2.3 Extracting disc: DVD disc.
When extracting discs, it is recommended to use one folder per disc guideline. The folders can then be easily identified with a disc and replaced when song files within become corrupt and problematic. In the example, D:\Karaoke Songs is created as a main folder for all karaoke song files and further divided into sub-folders CDG 001, CDG 002, CDG 003, etc. for each CD+G disc.
1. Start the JB-199 IV and go to the Control Panel.
2. Insert the CD+G disc into the disc drive. Wait for the disc to be recognized and then click on the disc drive in the Folder Menu. The tracks will appear as a list of CDA files in the File Browser.

The title and artist information for each track has been added automatically from an online database. Be sure to have the JB-199 IV connected to Internet to use this feature. To manually input the title and artist information, double click on each field, type in a title or artist name, and press Enter to save.
3. Click on the check mark at the bottom of the screen to select all songs . Press the Encode button.

4. A pop-up window of Disc Capture will appear.
Select a folder into which the extracted song files will be stored.
In this example, the folder D:\Karaoke Songs\CDG 001 is selected.
It can be further divided by checking the Date, Artist name, or Album name options.
Next select a way to name the extracted files by checking the Album, Track, Title, Artist, and Filename options.
Be sure to name them such that the extracted files will not share a same name and overwrite each other.
At the minimum, the files can be named as Track 01, Track 02, etc. by checking the Advanced option.
Next choose the Bitrate and Speed of the extraction.
Be sure to place a check mark on CD+G option for CD+G discs.
Press OK.
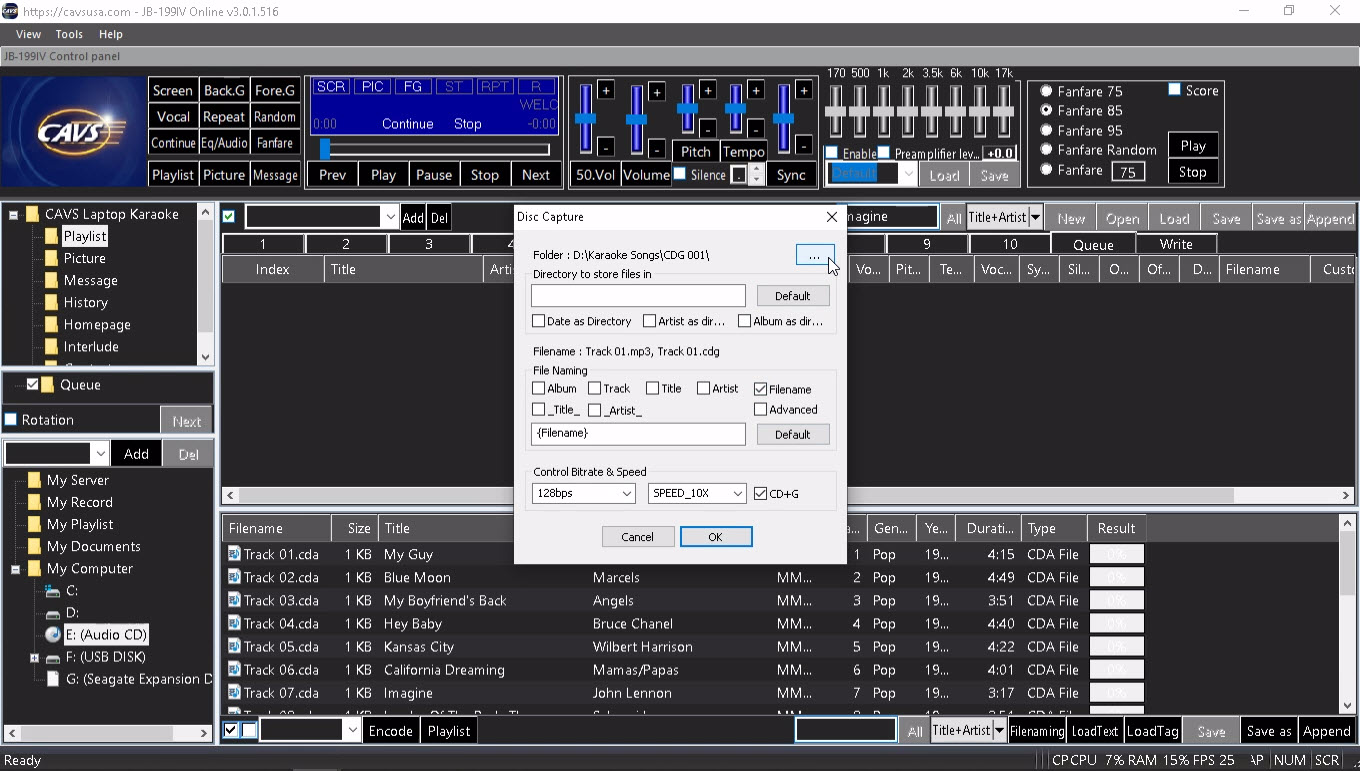
5. The extraction will begin and show the progress in each track. It is important that the disc itself is clean and without scratches to expedite the extraction process. For problems in extracting certain discs or tracks, contact techsupport@cavsusa.com.

Note that at the bottom of the screen the progress of the total extraction process is shown.
6. When the extraction is complete, open the folder with the extracted files in the Folder Menu. In this example, the folder is D:\Karaoke Songs\CDG 001. The extracted files will appear in the File Browser.
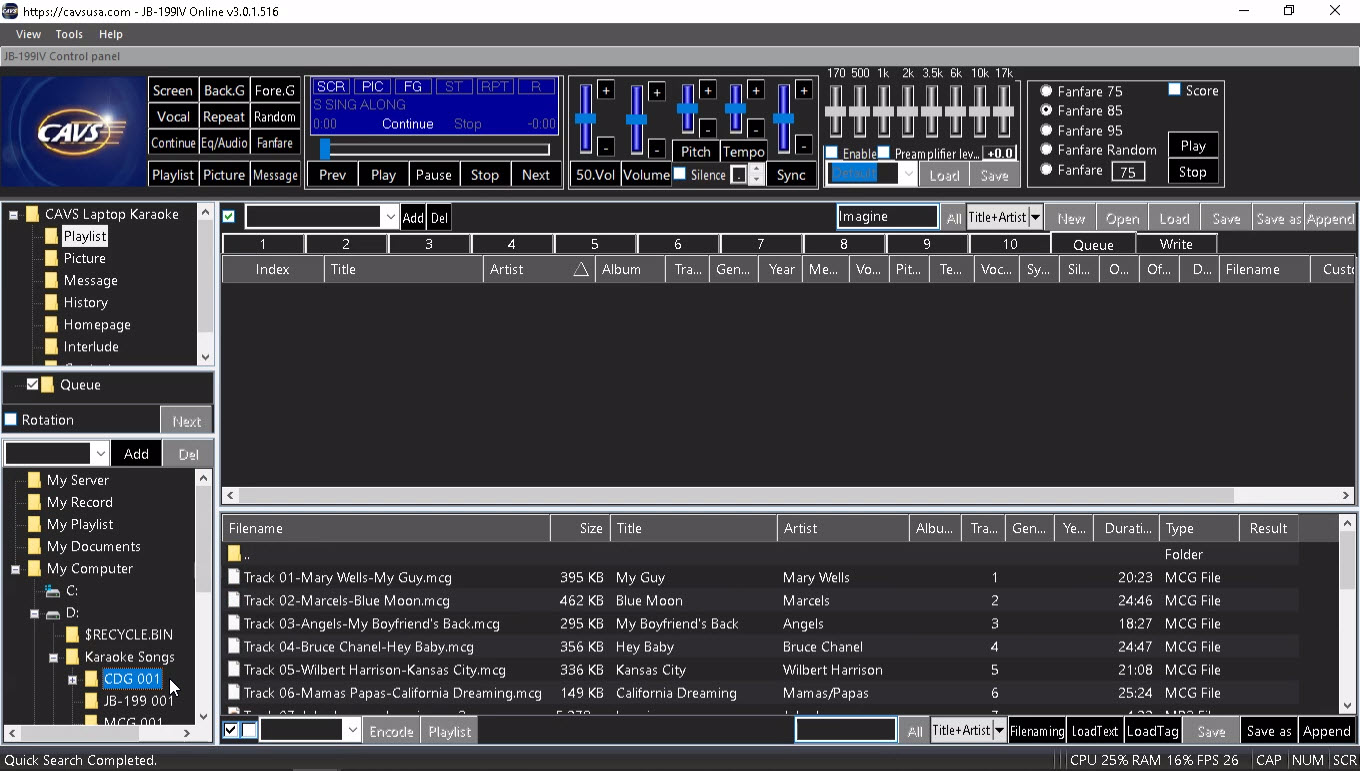
Note that the CD+G disc in the disc drive can be taken out now or anytime hereafter.
7. To make a playlist, select a playlist slot 1 - 10 in the List Browser. In this example, the playlist 1 slot is selected. Select all songs in the File Browser by pressing the Check mark at the bottom of the screen. Next press the Playlist button at the bottom of the screen to load the song files from the File Browser to the playlist 1 slot.
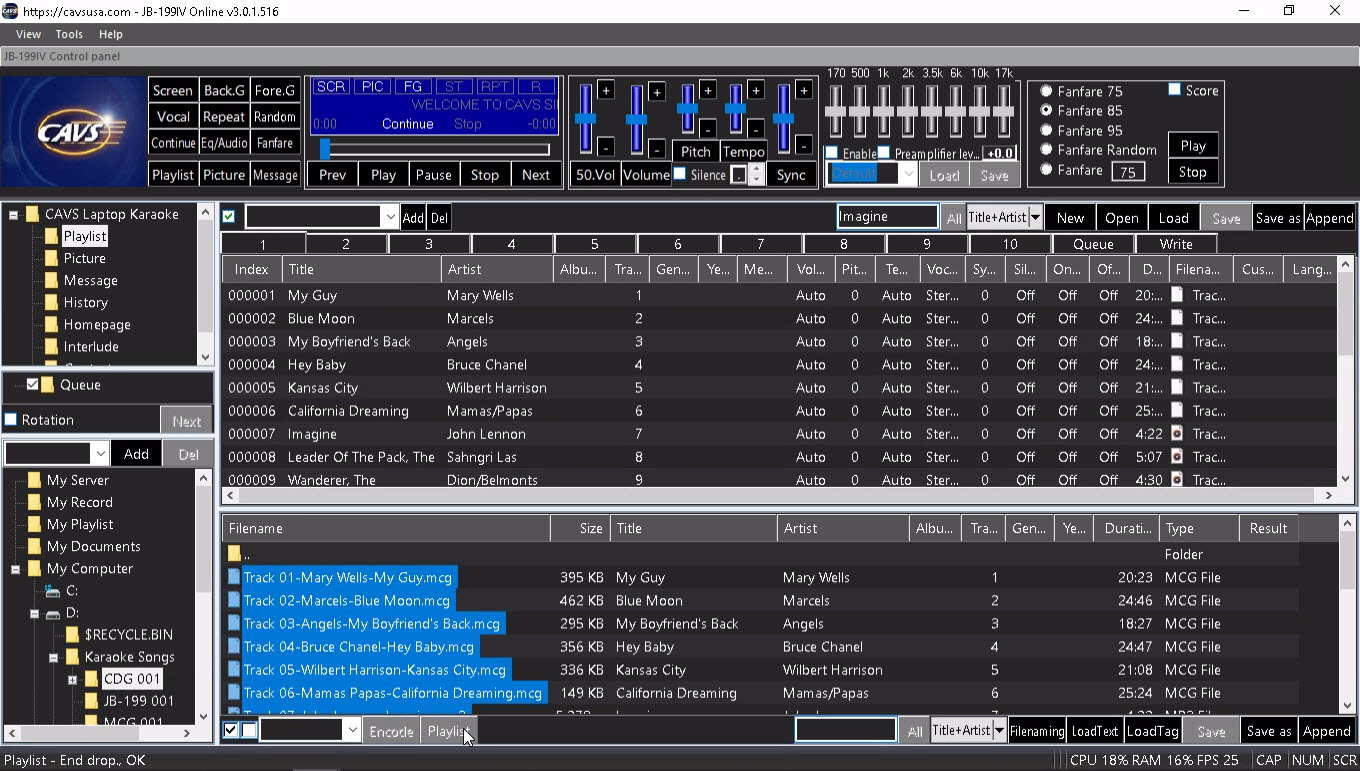
The list created in the playlist 1 slot is the playlist. It has all the song information, such as file names, formats, titles, artists, etc., copied from the File Browser. Also unseen to the viewers, it is tagged with the location of the actual song files. In this example, the location is the folder D:\Karaoke Songs\CDG 001.
Press the Save as button and name the playlist. In this example, the playlist is named as CDG 001. Press Save.

8. Next step is to load the playlist and play from the playlist. First reset the Control Panel to its default form by clearing the File Browser and the List Browser. Press New to clear the playlist 1 slot and press Queue to set the List Browser. Press My Server in the Folder Menu and clear the File Browser.
The playlist CDG 001 can be loaded into any playlist slot 1 - 10, 11 - 20, or My Server.
Note that My Server is a playlist slot with a difference that a playlist loaded into My Server is shared with online guests and E-Songbooks.
In this example, the playlist is loaded into My Server.
Press to highlight My Server.
Press the Load button in the bottom right corner of the File Browser.
Select CDG 001 playlist and press Open.

The CDG 001 playlist will load into the File Browser.
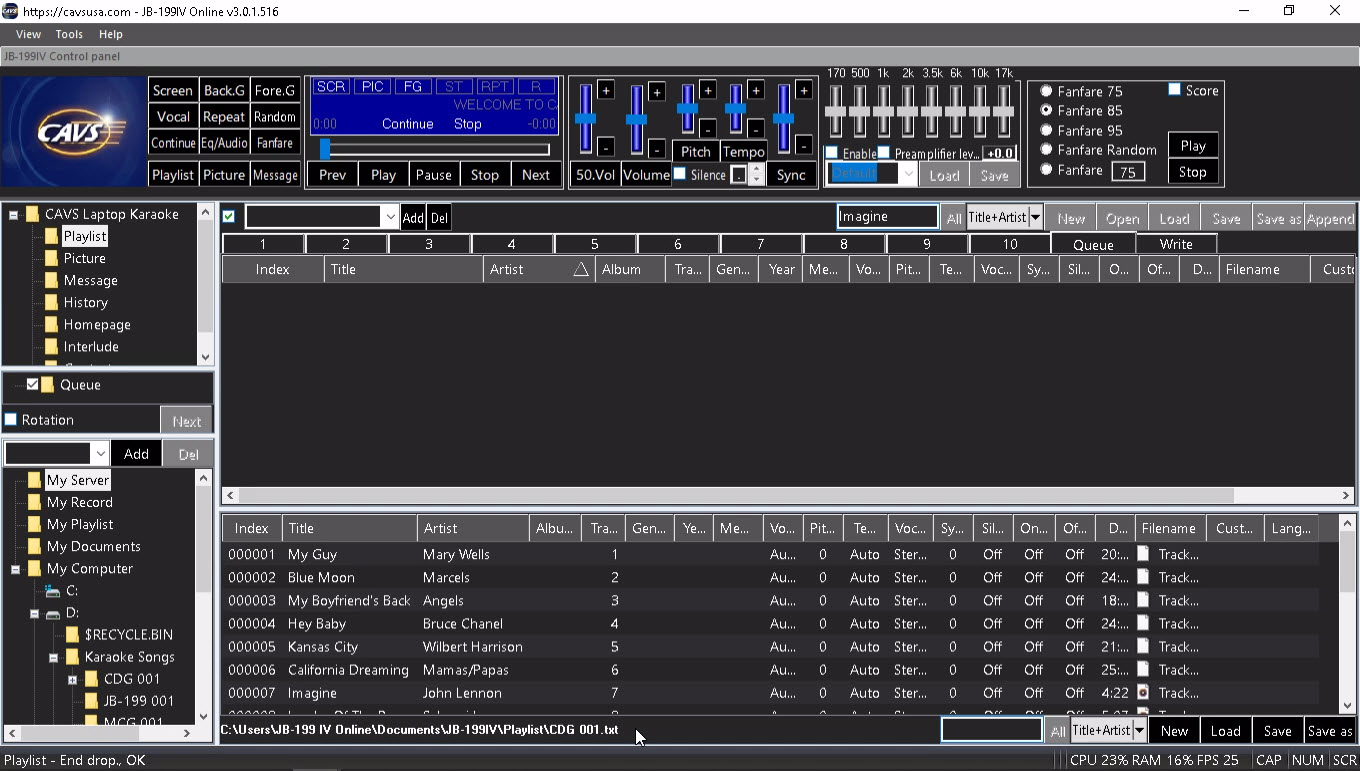
To play, right click on a song in My Server and select Queue. The song can also be drag & drop into the Queue. Press Play to begin playing.

A playlist can be sorted or searched by title, artist, album, filename, etc. It can also be cut, merged, and appended to add or remove songs. For detail instruction on how to edit a playlist, go to 7.1.4 Playlist.
When extracting a disc, it is recommended to use one folder per disc guideline. The folders can then be easily identified with a disc and replaced when the song files within become corrupt and problematic. In the example, D:\Karaoke Songs is created as a main folder for all karaoke song files and further divided into subfolders SCDG 001, SCDG 002, SCDG 003, etc. for each Super CD+G disc.
1. Close the JB-199 IV karaoke program by pressing the X mark at the top right corner of the Control Panel. The JB-199 IV will exit out to Windows Desktop. Insert the Super CD+G disc into the disc drive. Wait for the disc to be recognized and open the Windows File Explorer.
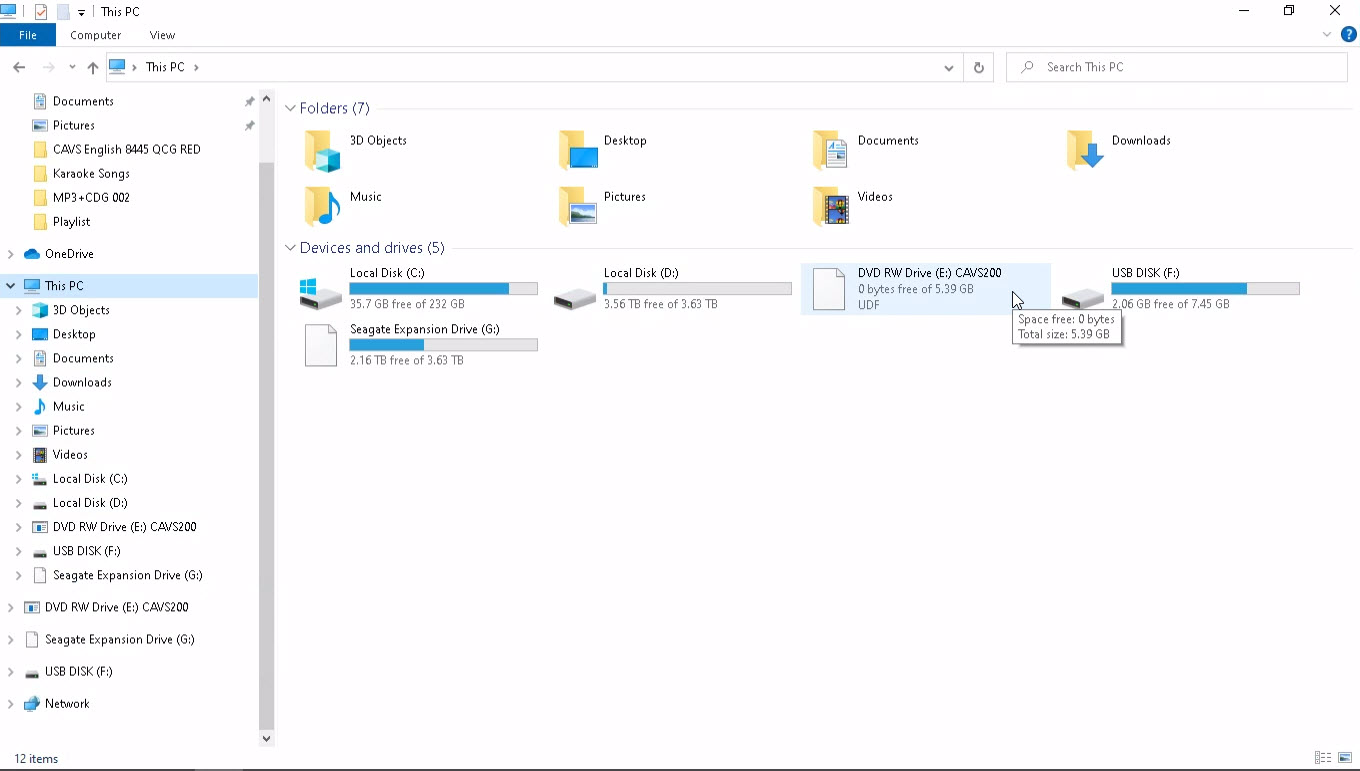
2. Click on the disc drive in the left column and right click on the CAVS_MCG folder shown inside the disc drive. Select Copy.

Go to D:\Karaoke Songs and right click on an empty area. Select Paste to copy the CAVS_MCG folder from the disc drive.

When done copying, right click on the folder CAVS_MCG in the D:\Karaoke Songs. Select Rename and change the name of the folder. In this example, the folder is renamed as SCDG 001.

3. Restart the JB-199 IV karaoke program and go to the Control Panel. In the Folder Menu, go to D:\Karaoke Songs\SCDG 001. The songs of the Super CD+G disc will appear on the File Browser. The title and artist information of each song will also appear automatically in the File Browser.
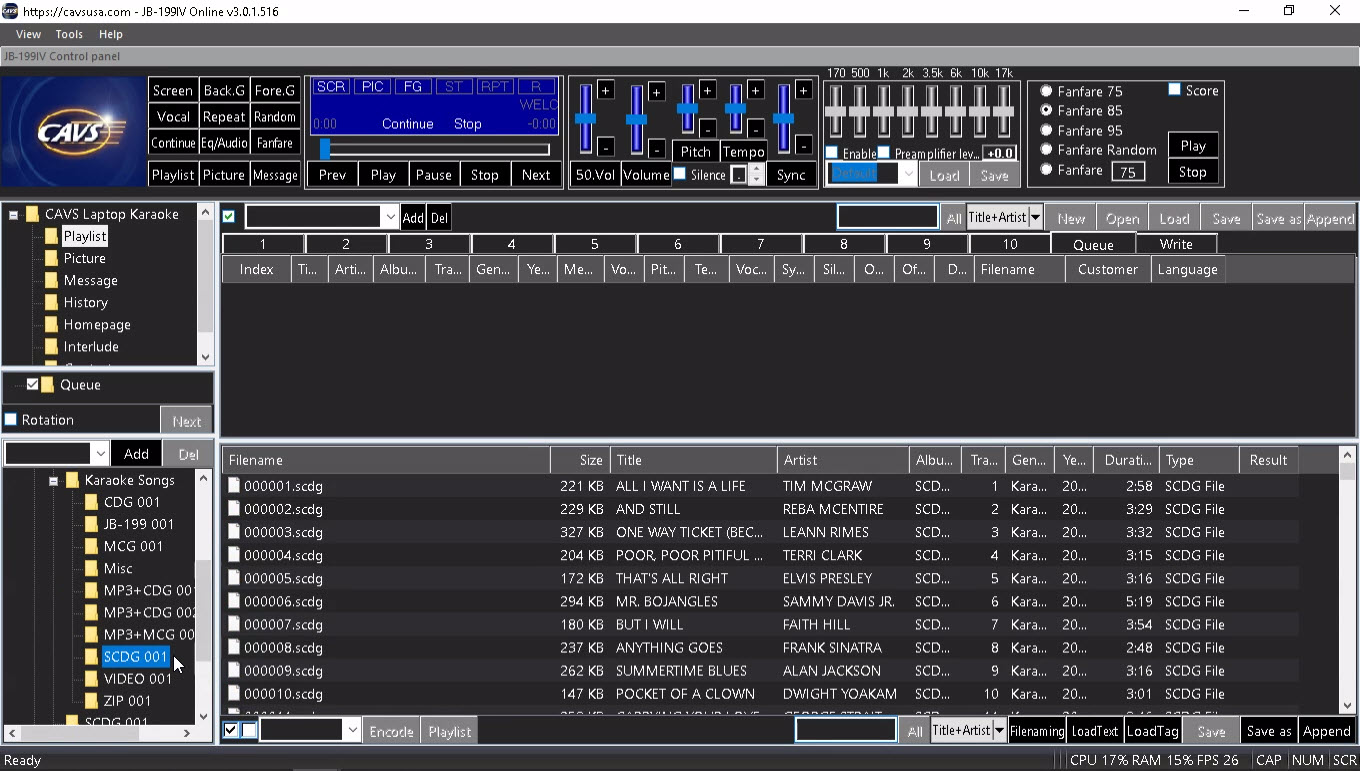
4. Select a playlist slot 1- 10 in the List Browser. In this example, the playlist 1 is selected. Press the Check mark at the bottom of the screen to select all songs in the File Browser. Press the Playlist button at the bottom of the screen to load all the songs from the File Browser into the playlist 1 slot.

The list created in the playlist 1 is the playlist. It has all the song information, such as file names, formats, titles, artists, etc., copied from the File Browser. Also unseen to the viewers, it is tagged with the location of the song files. In this example, the location is the folder D:\Karaoke Songs\SCDG 001.
Press the Save as button on the top right corner of the List Browser. A popup window will appear. Input a name for the list and press Save. In this example, the playlist is named as SCDG 001.
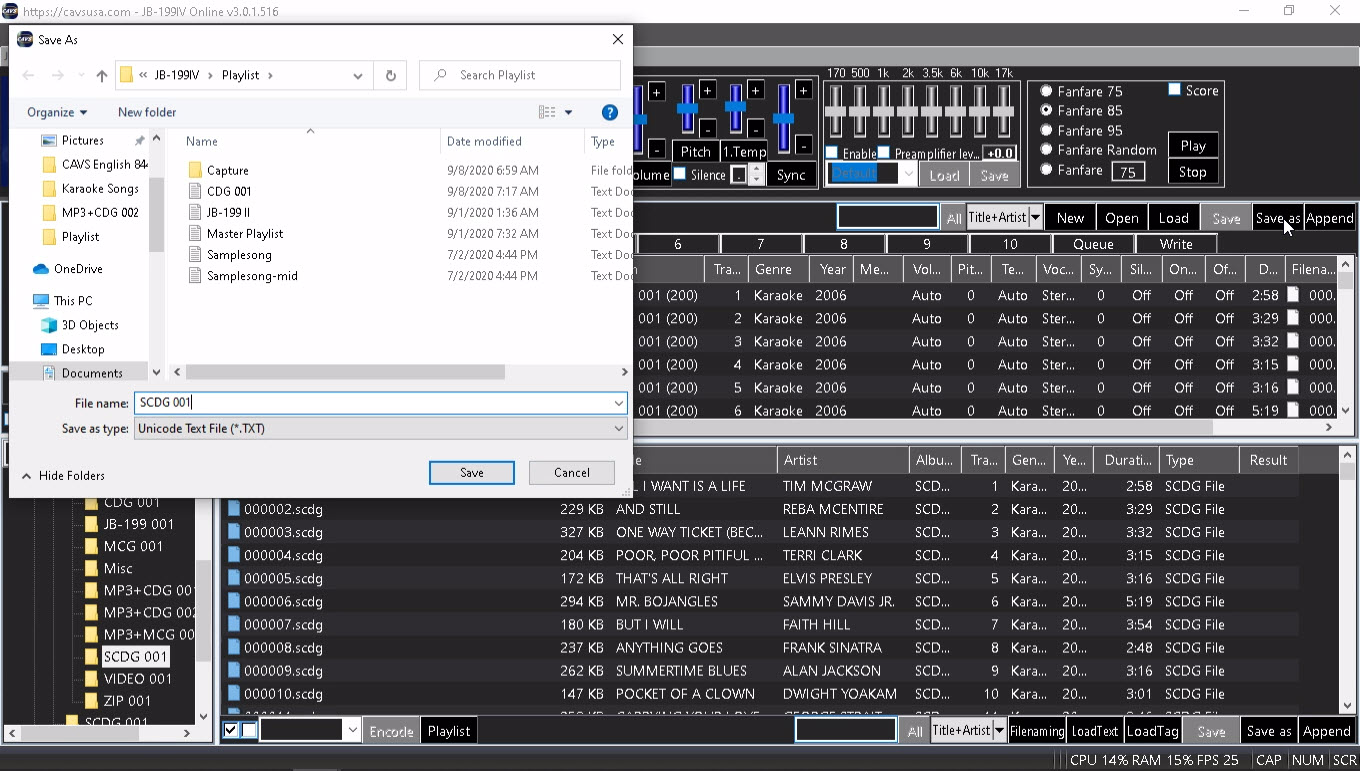
5. Next step is to load the playlist and play from the playlist. First reset the Control Panel to its default form by clearing the File Browser and the List Browser. Press New to clear the playlist 1 slot and press Queue to set the List Browser. Press My Server in the Folder Menu and clear the File Browser.
The playlist SCDG 001 can be loaded into any playlist slot 1 - 10, 11 - 20, or My Server.
Note that My Server is a playlist slot with a difference that a playlist loaded into My Server is shared with online guests and E-Songbooks.
In this example, the playlist is loaded into My Server.
Press to highlight My Server.
Press the Load button in the bottom right corner of the File Browser.
Select SCDG 001 playlist and press Open.

6. Right click on a song and select Queue to send it to the Queue. Alternatively drag & drop the song into the Queue.
Press Play to begin playing.
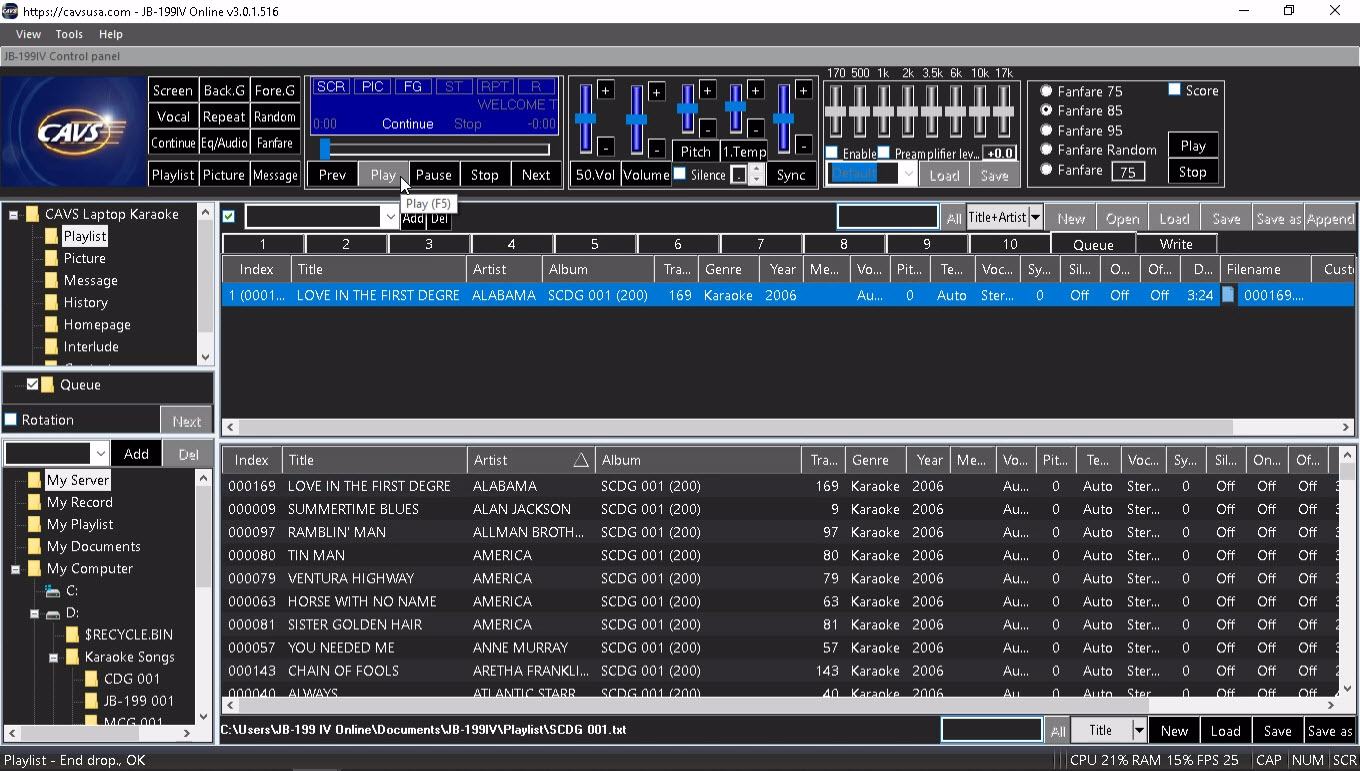
A playlist can be sorted or searched by title, artist, album, filename, etc. It can also be cut, merged, and appended to add or remove songs. For detail instruction on how to edit a playlist, go to 7.1.4 Playlist.
When extracting discs, it is recommended to use one folder per disc guideline. The folders can then be easily identified with a disc and replaced when song files within become corrupt and problematic. In the example, D:\Karaoke Songs is created as a main folder for all karaoke song files and further divided into sub-folders DVD 001, DVD 002, DVD 003, etc. for each DVD disc.
1. Start the JB-199 IV and go to the Control Panel.
2. Insert the DVD disc into the disc drive. Wait for the disc to be recognized and then click on the disc drive in the Folder Menu. The tracks will appear as a list of dvd files in the File Browser.
The title and artist information for each track has been added automatically from an online database. Be sure to have the JB-199 IV connected to Internet to use this feature. To manually input the title and artist information, double click on each field, type in a title or artist name, and press Enter to save.
3. Click on the check mark at the bottom of the screen to select all songs . Press the Encode button.
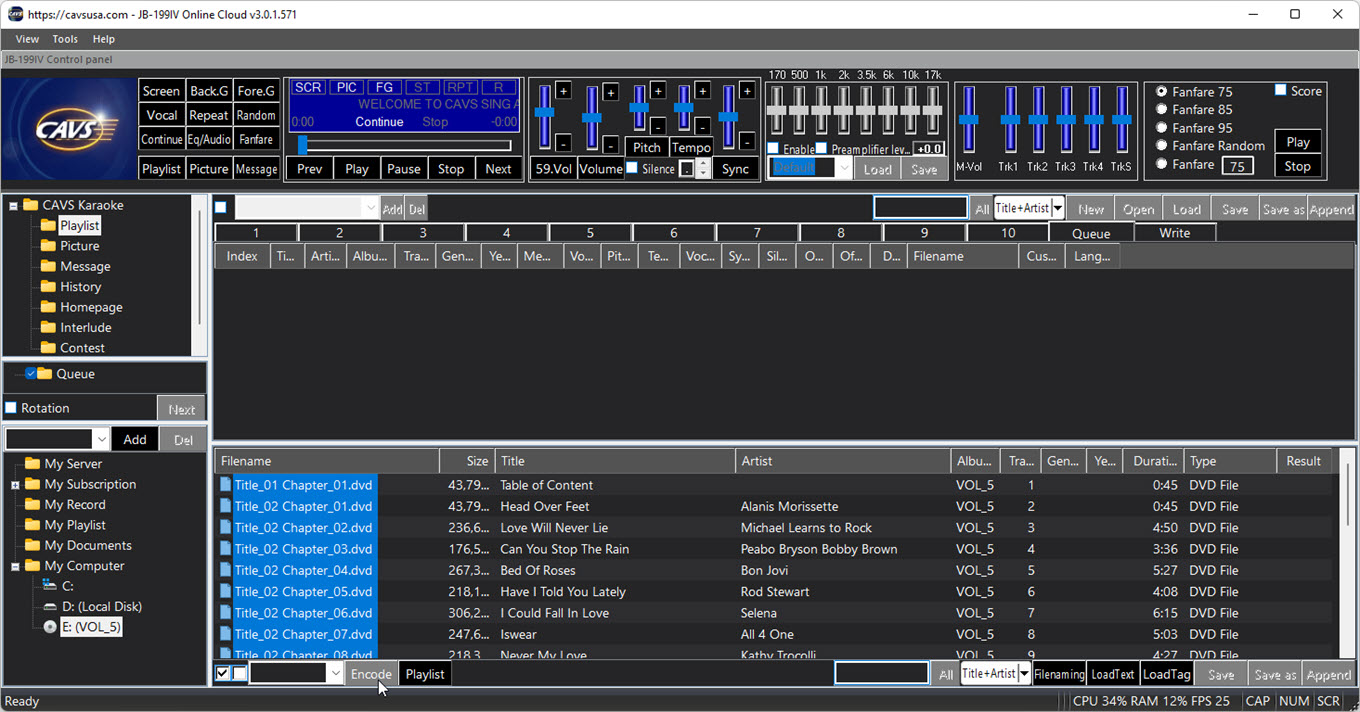
4. A pop-up window of Disc Encoder will appear.
Select a folder into which the extracted song files will be stored.
In this example, the folder D:\Karaoke Songs\DVD 001\ is selected.
It can be further divided by checking the Date, Artist name, or Album name options.
Next select a way to name the extracted files by checking the Album, Track, Title, Artist, and Filename options.
Note that when extracting a DVD disc, the resulting files, AVI or MP4, may not have the tags to contain information such as title and artist.
So it is important to attach the relevant information to the file names.
Here we attach the title and artist to the file names.
Next choose the Audio channel for the extraction.
There may be multiple channels in DVD song files from which you need to select one. You can check each channel by using the Test button to find the correct instrumental background music for karaoke.
Press OK.
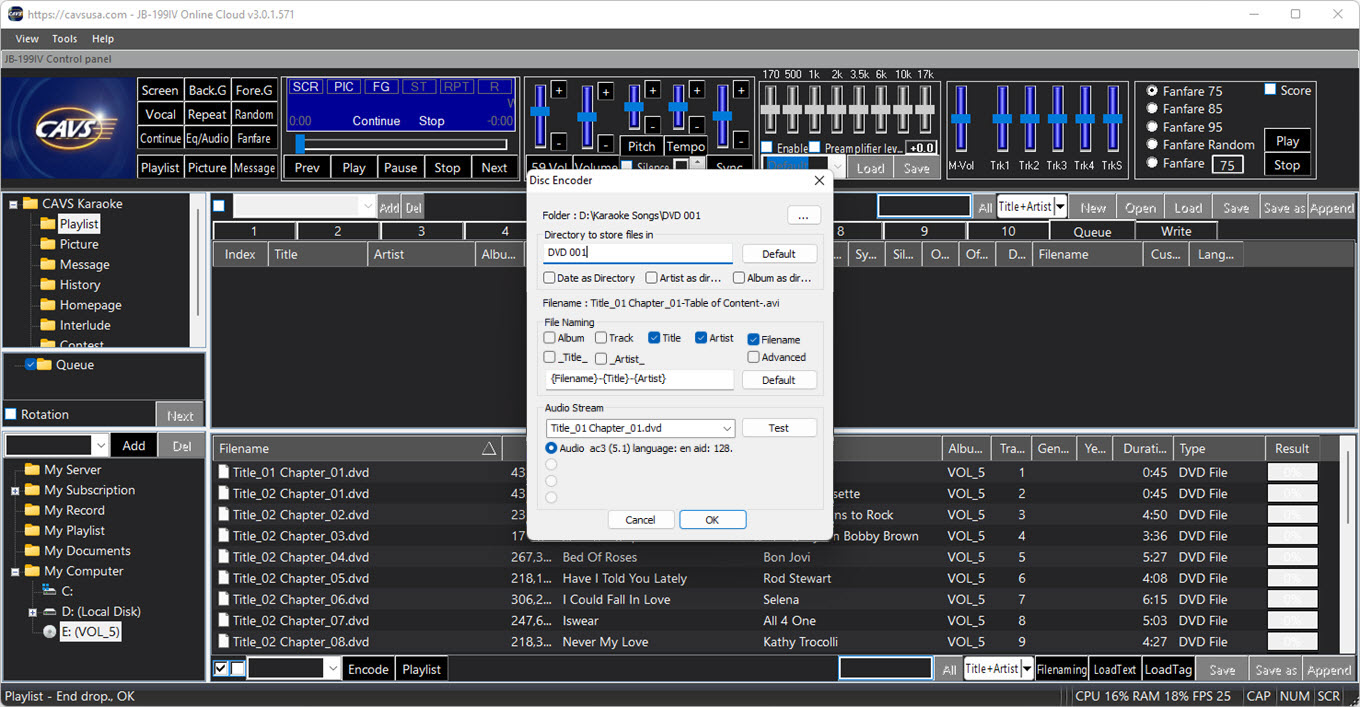
5. The extraction of the songs will produce AVI files and show the progress in each song. It is important that the disc itself is clean and without scratches to expedite the extraction process. For problems in extracting certain discs or tracks, contact techsupport@cavsusa.com.

Note that at the bottom of the screen the progress of the extraction for the disc as a whole is shown.
6. When the extraction is complete, open the folder with the extracted files in the Folder Menu. In this example, the folder is D:\Karaoke Songs\DVD 001. The extracted files will appear in the File Browser.
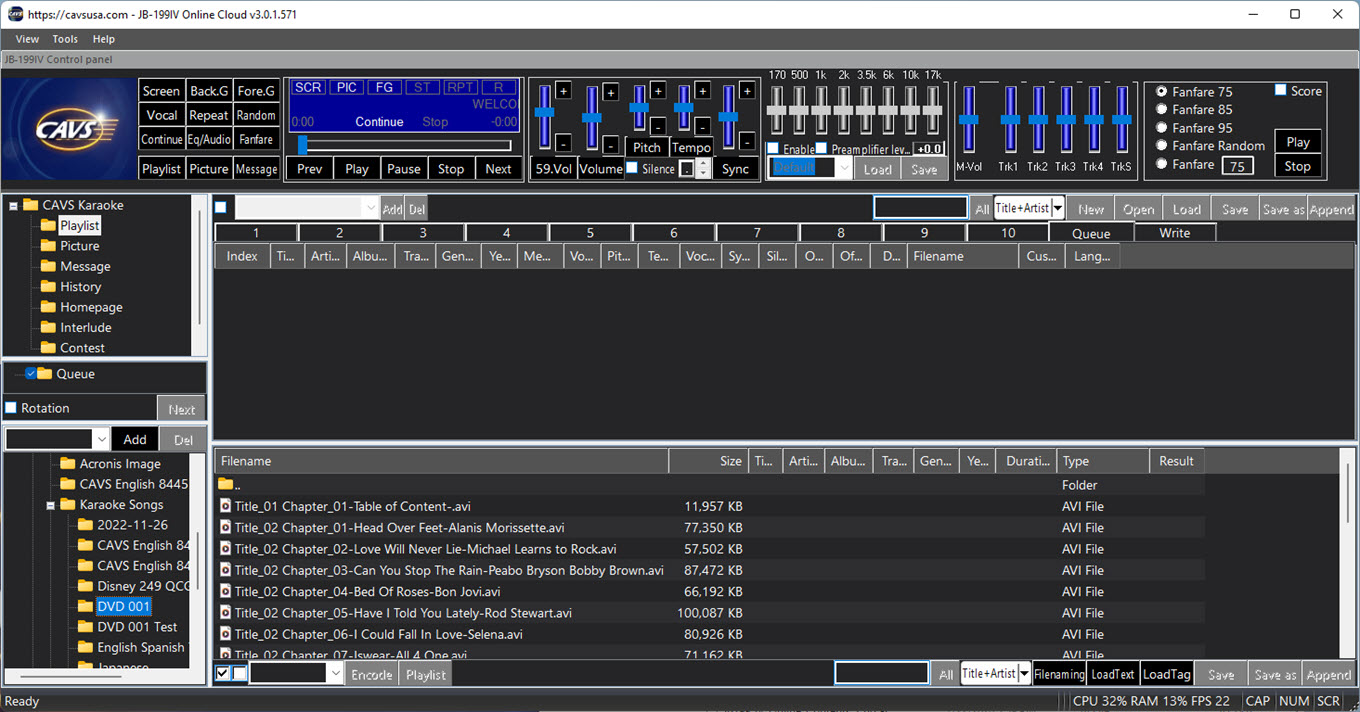
Note that the DVD disc in the disc drive can be taken out now or anytime hereafter.
7. The extracted files in DVD 001 folder show the filenames but not the title or artist in their separate fields.
Using the Filenaming function as shown in Section 7.1.3.3.3, parse the title and artist informtion from the Filenames.
Note that the extracted AVI files can be treated in the exact same manner as the MP4 files in the 7.1.3.3.3 section.
Here we describe breifly the Filenaming procedure using the current example. Highlight all the song files, right click, and select Filenaming.
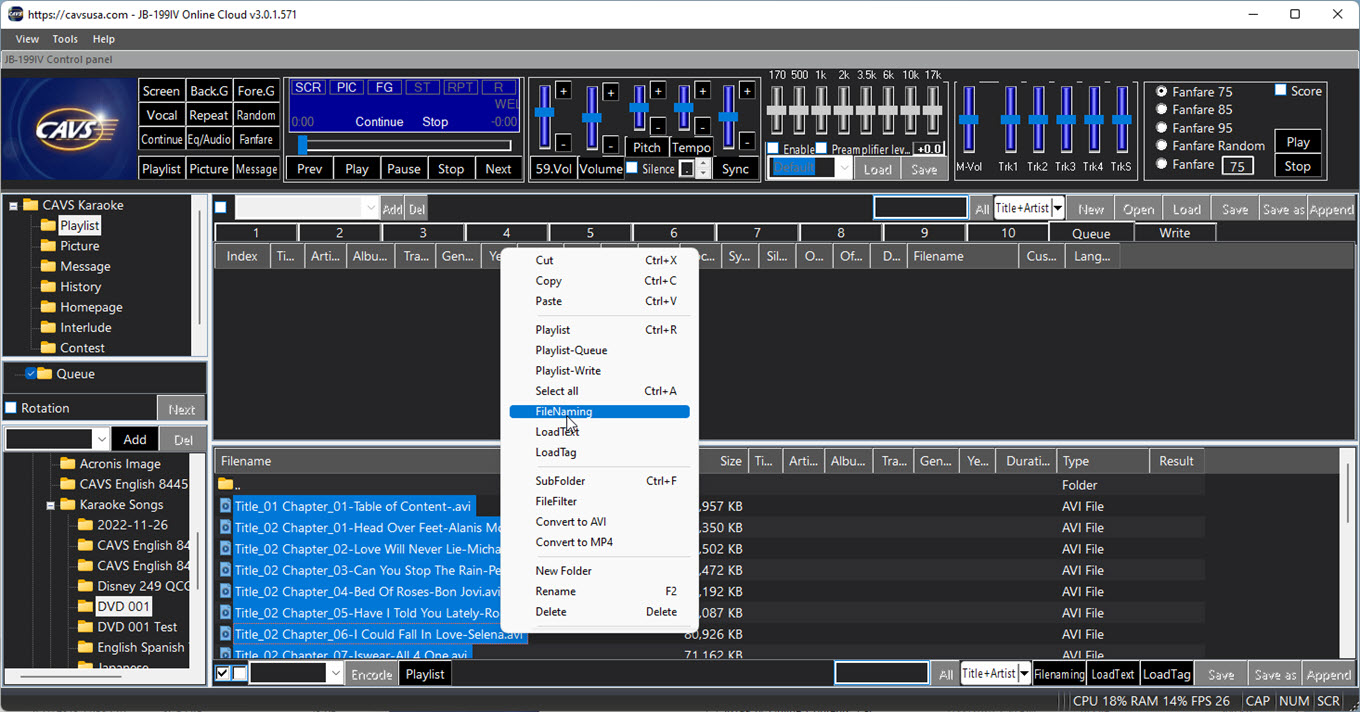
The window for Filenaming function will appear. Click on Skip, Title, and Artist buttons in order. The basis for the selection is that the Skip corresponds to the first part of the extracted file names such as "Title_02 Chapter_01". The Title corresponds to the second part such as "Head Over Feet". The Artist corresponds to the third part such as "Alanis Morissette". And each part is divided by a separator which in this exmaple is a dash "-". Also if needed, click on Clear button to clear the selection and start new.

Next click OK. The title and artist fields will fill in.
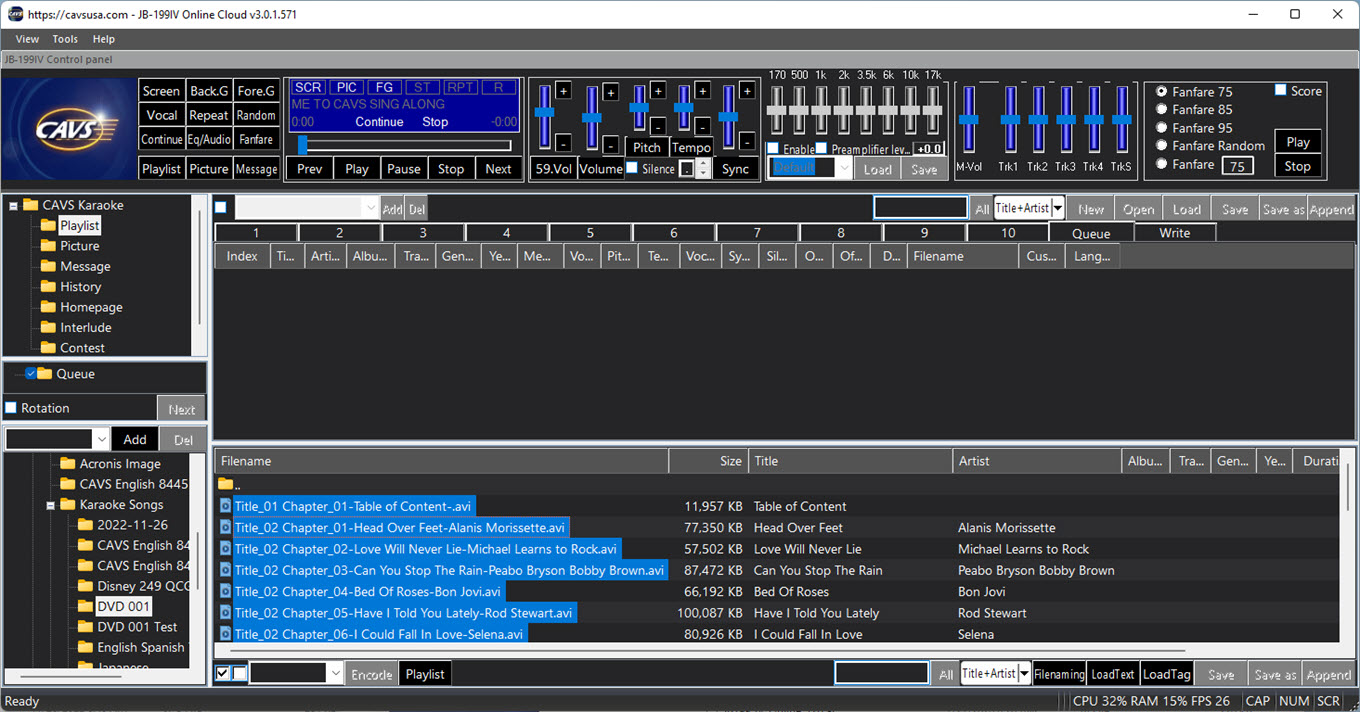
8. Next, to make a playlist, select a playlist slot 1 - 10 in the List Browser. In this example, the playlist 1 slot is selected. Select all extracted files in the File Browser by pressing the Check mark at the bottom of the screen. Next press the Playlist button at the bottom of the screen to load the song files from the File Browser to the playlist 1 slot.
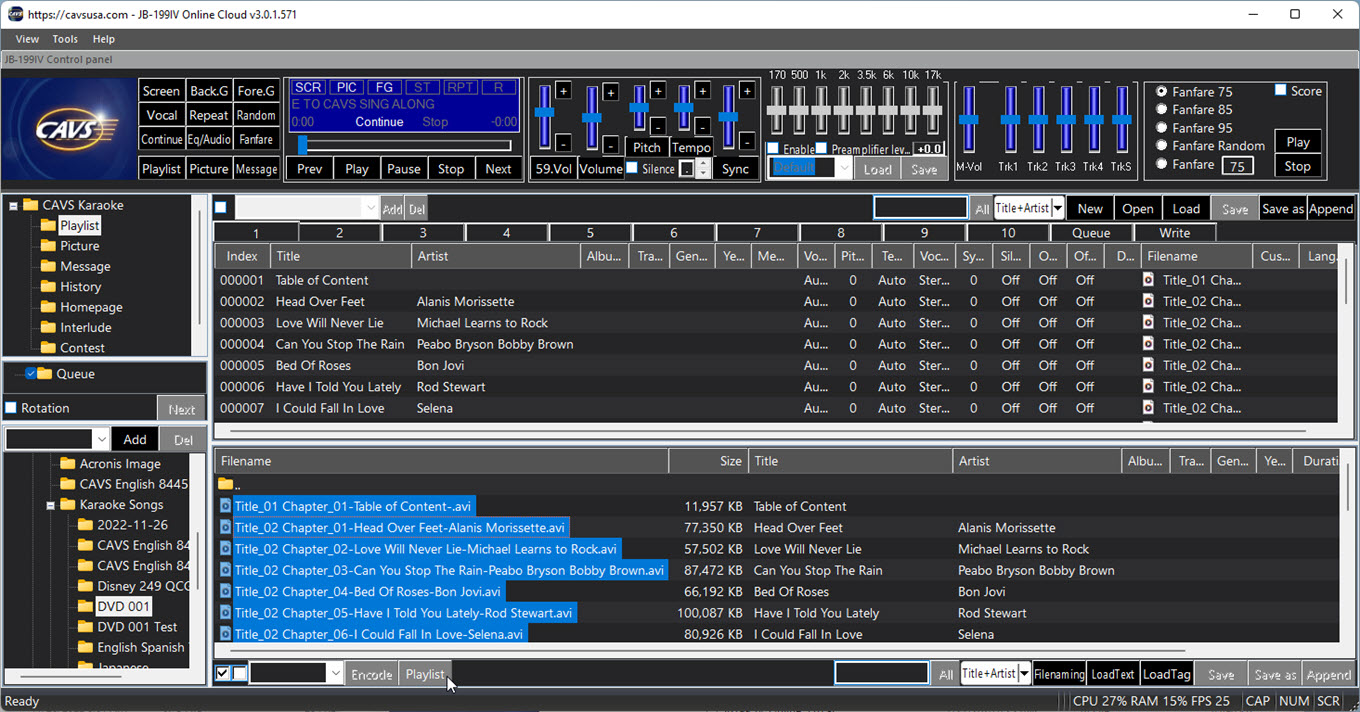
The list created in the playlist 1 slot is the playlist. It has all the song information, such as file names, formats, titles, artists, etc., copied from the File Browser. Also unseen to the viewers, it is tagged with the location of the actual song files. In this example, the location is the folder D:\Karaoke Songs\DVD 001.
Press the Save as button and name the playlist. In this example, the playlist is named as DVD 001. Press Save.
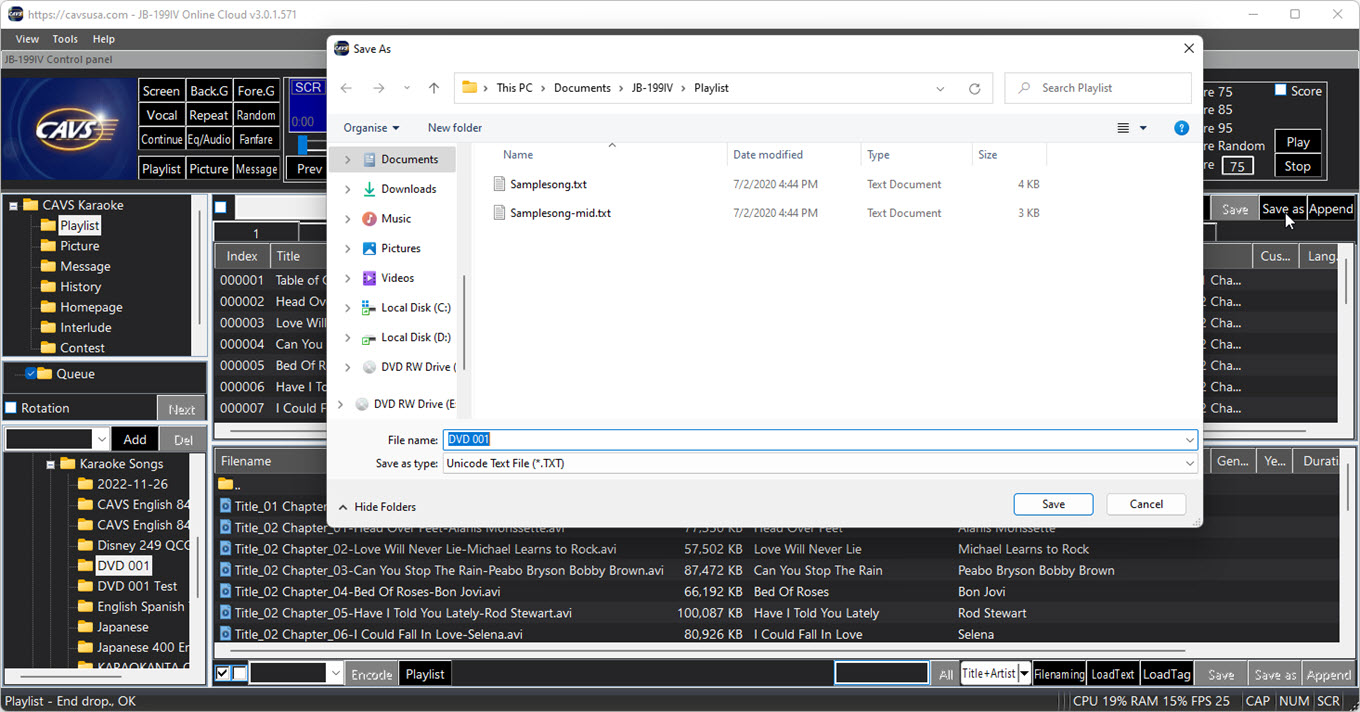
9. Next step is to load the playlist and play from the playlist. First reset the Control Panel to its default form by clearing the File Browser and the List Browser. Press New to clear the playlist 1 slot and press Queue to set the List Browser. Press My Server in the Folder Menu and clear the File Browser.
The playlist DVD 001 can be loaded into any playlist slot 1 - 10, 11 - 20, or My Server.
Note that My Server is a playlist slot with a difference that a playlist loaded into My Server is shared with online guests and E-Songbooks.
In this example, the playlist is loaded into My Server.
Press to highlight My Server.
Press the Load button in the bottom right corner of the File Browser.
Select DVD 001 playlist and press Open.
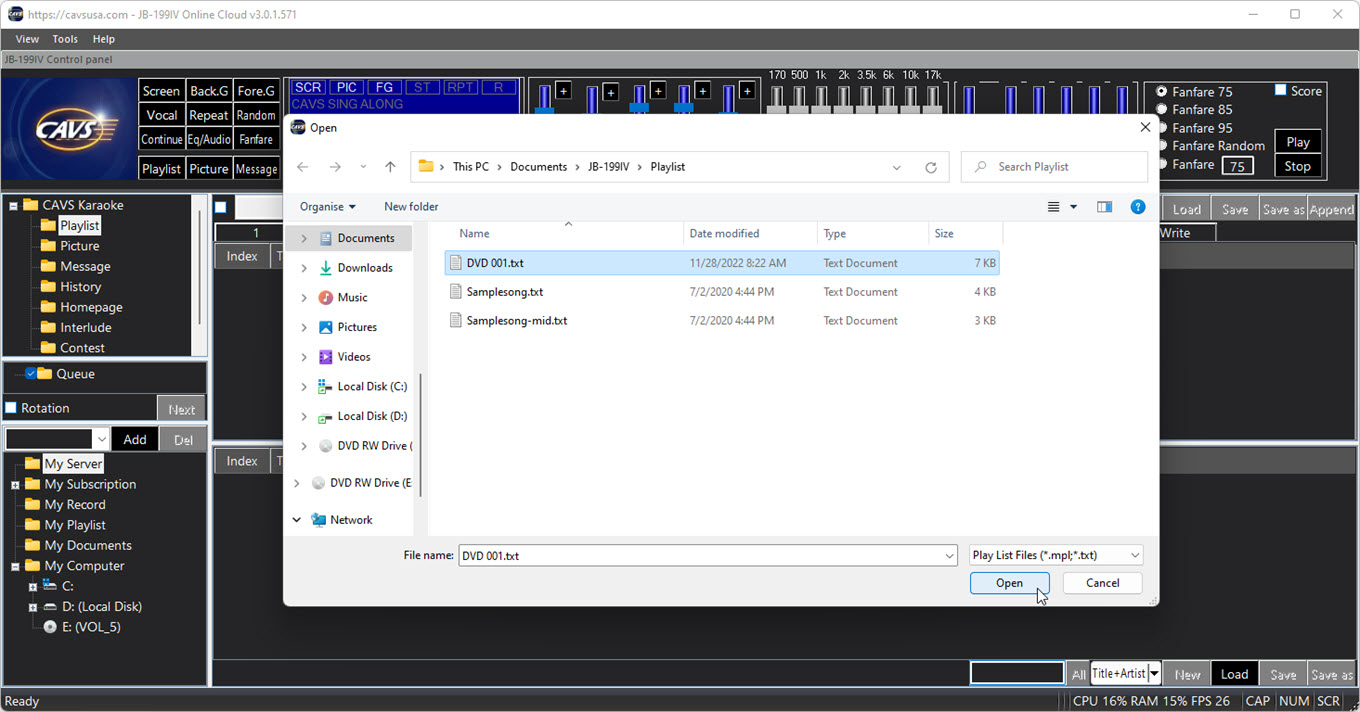
The DVD 001 playlist will load into the File Browser.

To play, right click on a song in My Server and select Queue. The song can also be drag & drop into the Queue. Press Play to begin playing.
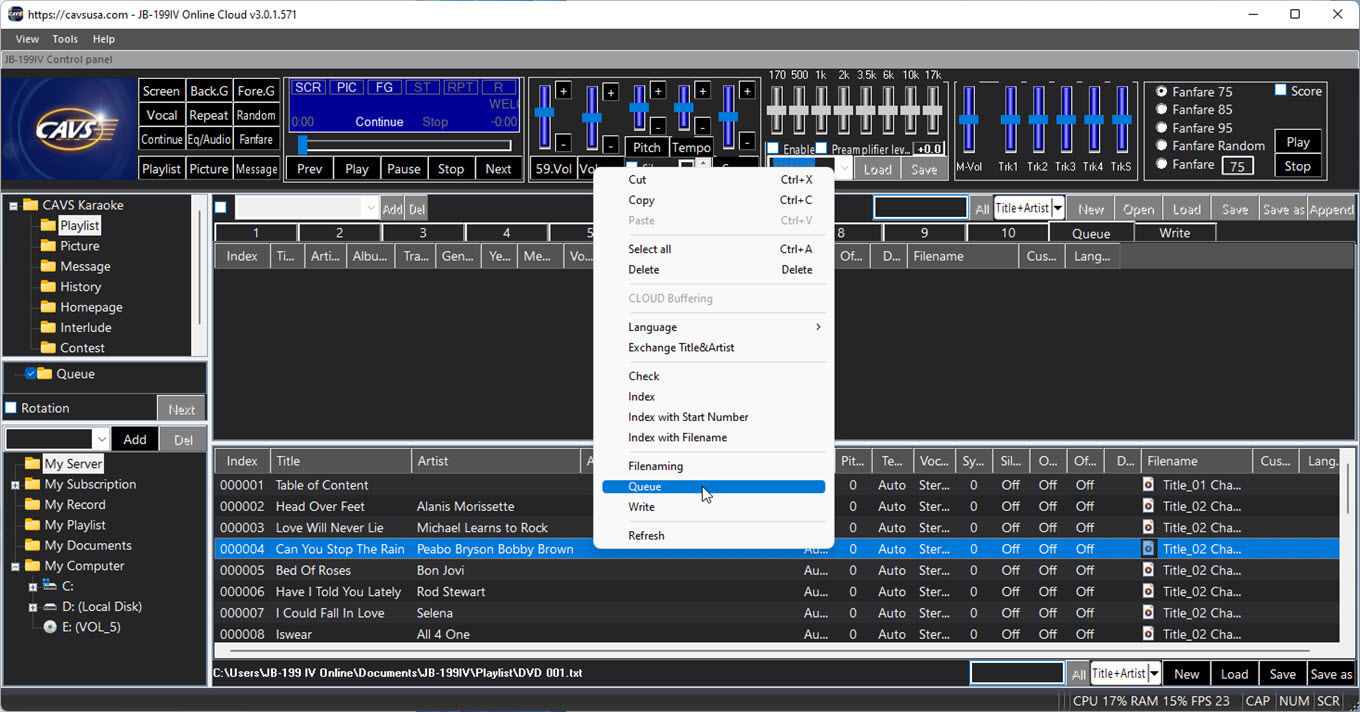
A playlist can be sorted or searched by title, artist, album, filename, etc. It can also be cut, merged, and appended to add or remove songs. For detail instruction on how to edit a playlist, go to 7.1.4 Playlist.
This section describes how to load song files from external hard drive, flash drive, SD card, or any database into the JB-199 IV.
Following three file types are considered. They are representative of many different file types that are supported in the JB-199 IV.
-
MP3 + CDG (MP3+G)
- This section also applies to MP3 + MCG files.
-
ZIP of MP3 + CDG
- This section also applies to ZIP files of MP3 + MCG files.
-
MP4
- This section also applies to AVI, MPG, and WMV files
There are also special cases considered for loading song files.
-
JB-199 I and II song files
- How to transfer song files from JB-199 I and II
-
CAVS DVD player song files
- How to transfer song files from CAVS DVD-105G, 203G, 205G, 303G, 305G players
MP3 + CDG is the most common format of karaoke song files.
But not all MP3 + CDG files have the same way of storing the song information such as title and artist.
For example, the files may have generic names as
- 00001.mp3, 00001.cdg
- 00002.mp3, 00002.cdg
- ...
These files are likely keeping the song information in a separate song list or ID tags.
The files may also have names as
- CA13816-0-Usher-There Goes My Baby.mp3, CA13816-0-Usher-There Goes My Baby.cdg
- CA00003-0-Tritt, Travis-Country Club.mp3, CA00003-0-Tritt, Travis-Country Club.mp3
- ...
These files have the song information right on their file names.
Below, the MP3 + CDG files are considered in four different cases.
- Song information is stored in a song list (for example, songlist.txt)
- Song information is stored in the ID tag
- Song information is stored on the file names (for example, CA13816-0-Usher-There Goes My Baby.xxx)
- Song information is not available
Note that the song information is considered to be title and artist in this section. It can be narrowed, for example, to title or artist only or expanded, for example, to album, genre, etc. Note also that all instruction in this section applies to MP3 + MCG files of CAVS.
1. Song information is stored in a song list (for example, songlist.txt)
Close the JB-199 IV karaoke program by pressing the X mark at the top right corner of the Control Panel. Exit out to Windows Desktop and open the folder in which the song files are stored. In this example, the folder is G:\MP3+CDG SONGLIST. There are MP3 files, CDG files and songlist.txt.
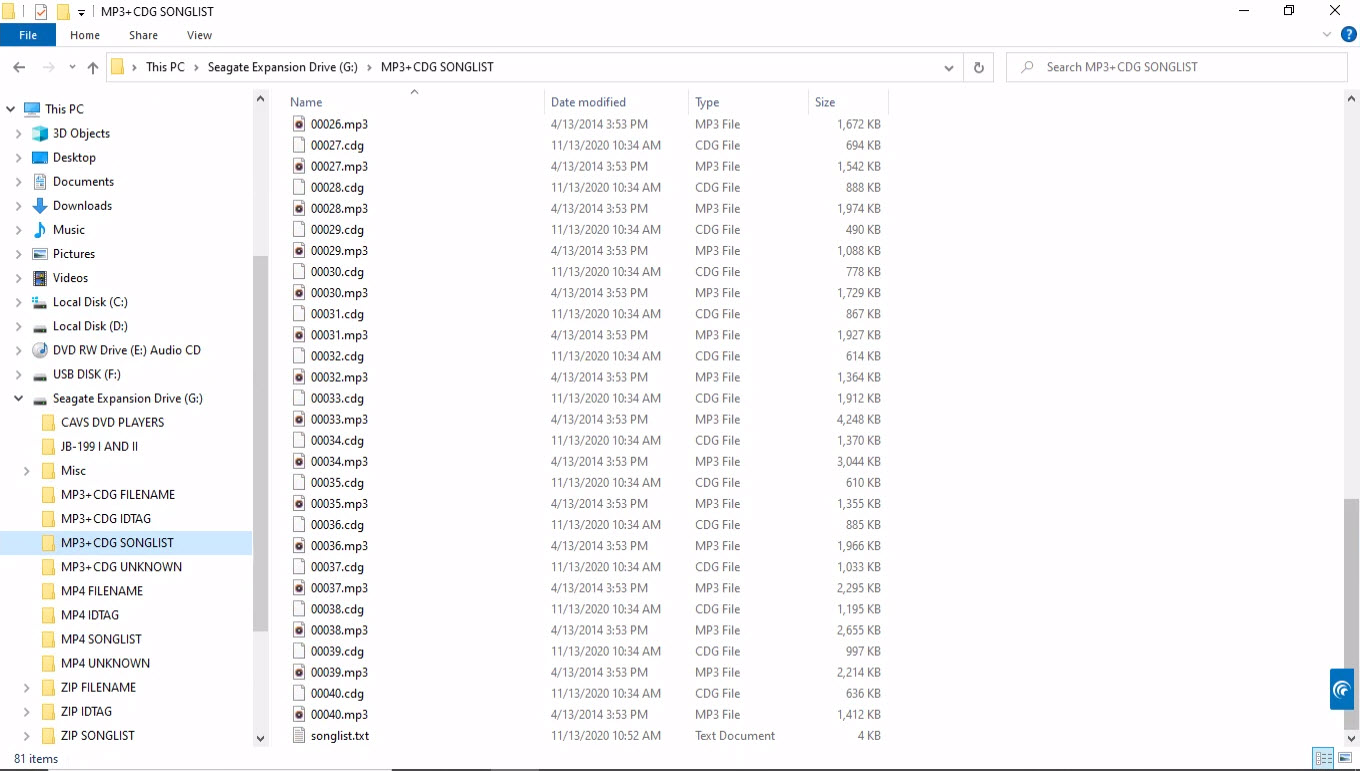
Double click on the songlist.txt to open it in a text editor. In this example, the file is opened in Windows Notepad. Notice that the information for each song file is organized as the filename, title, and artist, each separated by "|" sign. "|" is called the pipe sign which is typed by keystrokes Shift-\.

For song lists that have different forms, use the text editor to change accordingly.
Next right click on the G:\MP3+CDG SONGLIST folder and select Copy.
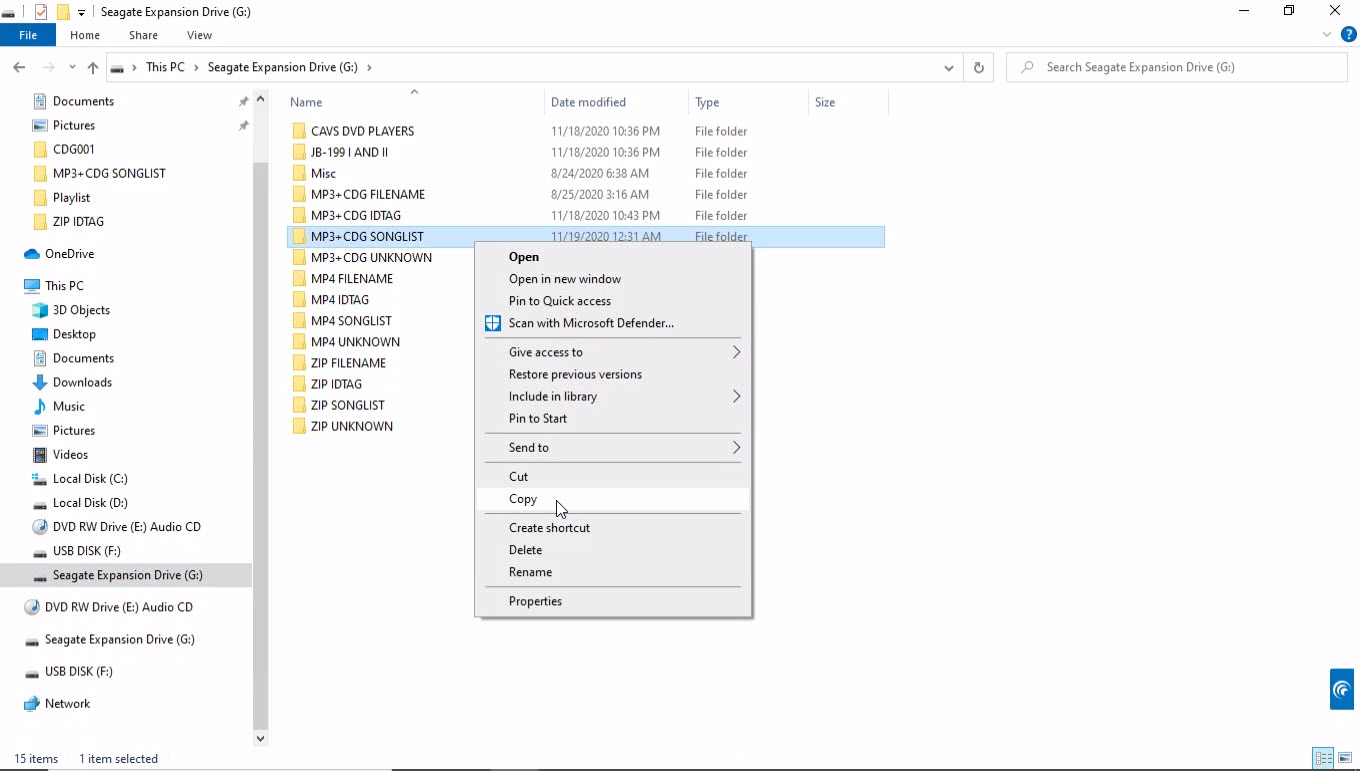
Go to a folder in the JB-199 IV, for example D:\Karaoke Songs, right click, and select Paste. The folder G:\MP3+CDG SONGLIST will begin copying.
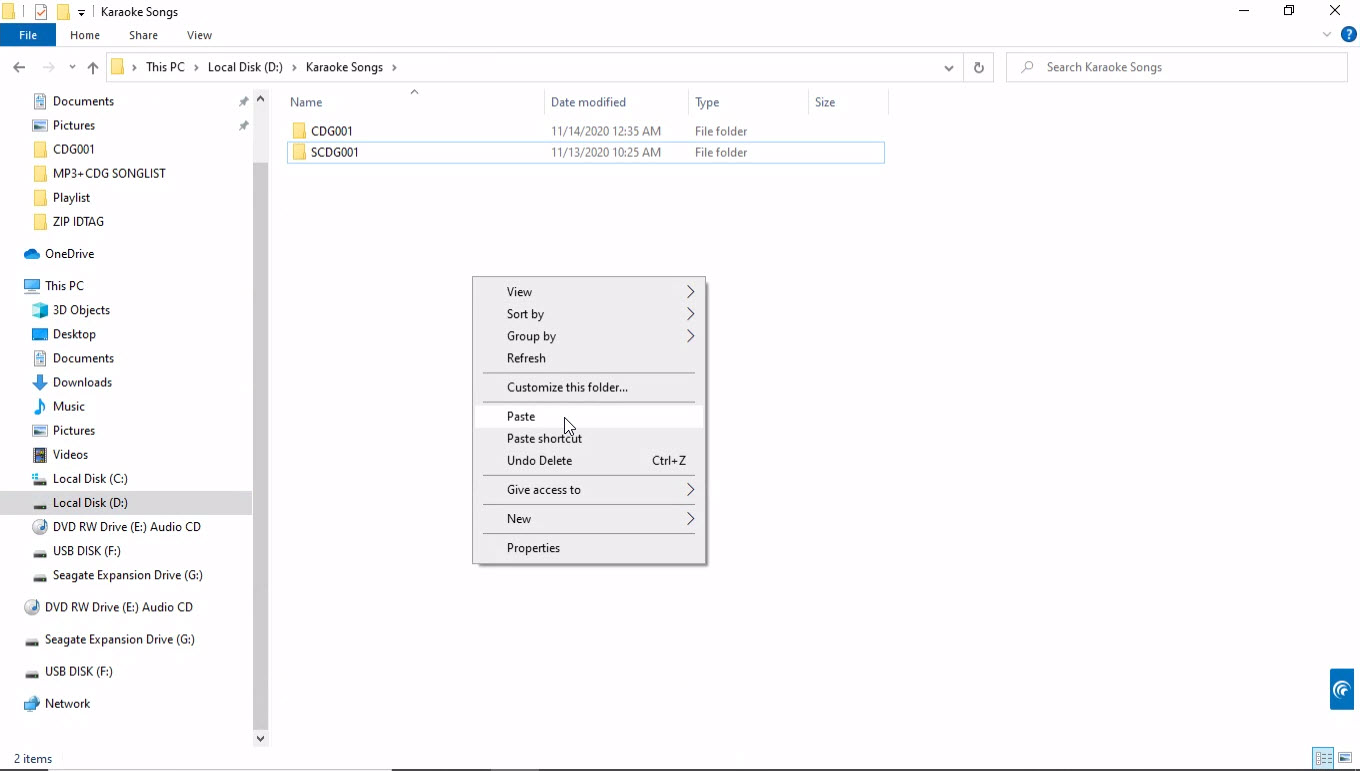
When the copying is done, the pasted folder may be renamed. In this example, the folder name is unchanged.
Next, start the JB-199 IV karaoke program. Open the folder D:\Karaoke Songs\MP3+CDG SONGLIST in the Folder Menu.
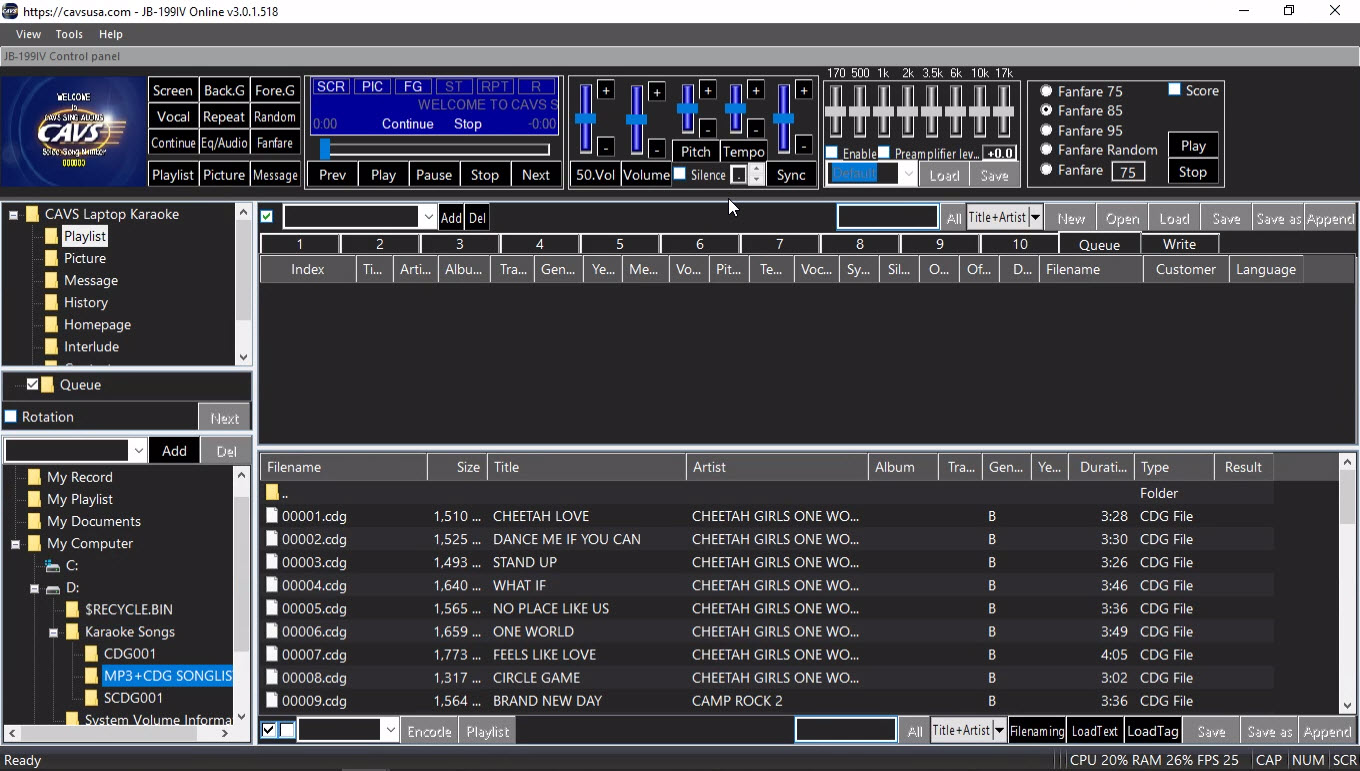
The song files MP3 and CDG will load into the File Browser showing as a list of CDG files.
The title and artist information in the songlist.txt file will also load automatically.
If the title and artist information does not loaded automatically, press LoadText button at the bottom right corner of the File Browser. A pop-up window will appear.

Select the file songlist.txt and press Open. Another pop-up window will appear confirming how many songs are to be updated with title and artist information. Confirm the number of the songs to be updated and press Yes.
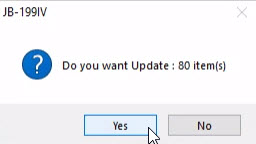
The title and artist information will load into the File Browser.
2. Song information is stored in the ID Tag
Close the JB-199 IV karaoke program by pressing the X mark at the top right corner of the Control Panel. Exit out to Windows Desktop and open the folder in which the files are stored. In this example, the folder is G:\MP3+CDG IDTAG which contains the MP3 + CDG song files with embedded ID Tags. The ID Tags in particular are embedded in the MP3 files with title and artist information.
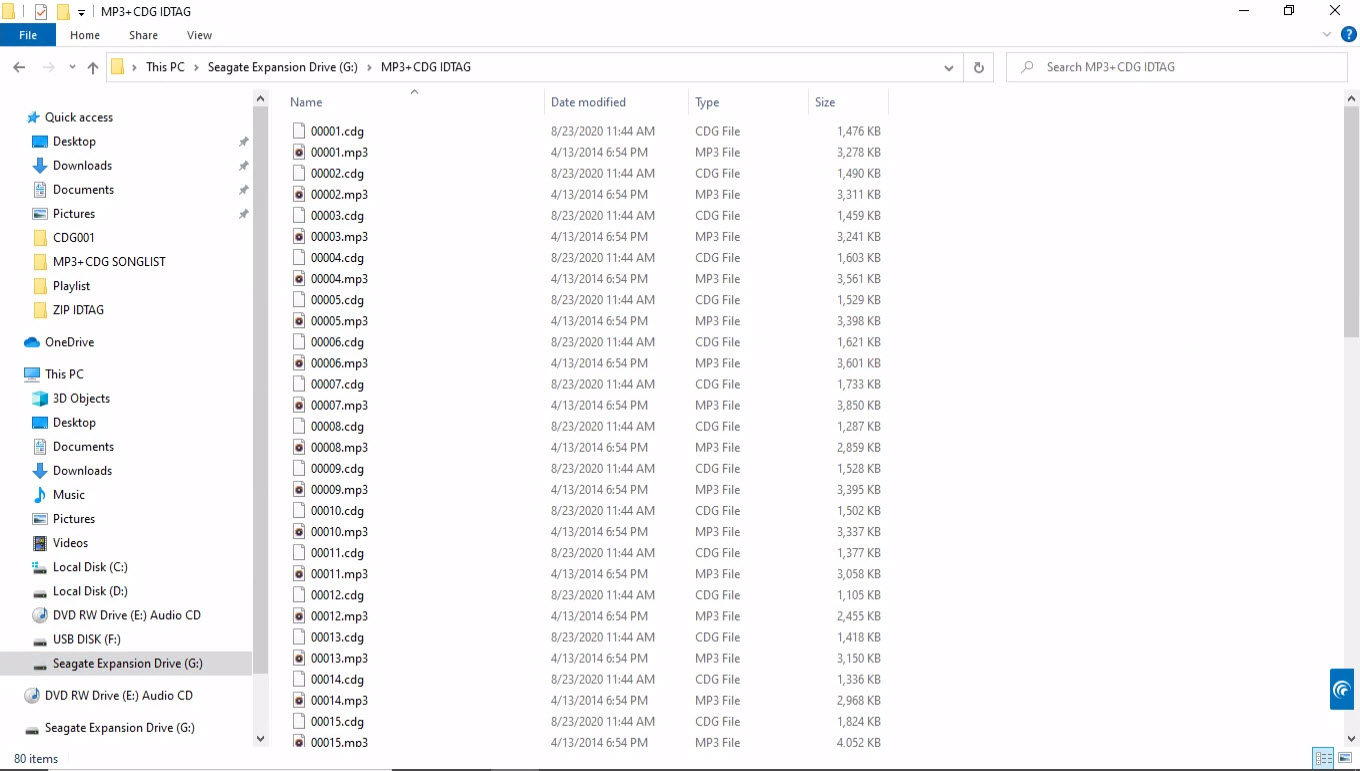
Right click on the G:\MP3+CDG IDTAG folder and select Copy.

Go to a folder in the JB-199 IV, for example D:\Karaoke Songs. Right click on an empty spot and select Paste. The folder will begin copying.

When the copying is done, the pasted folder may be renamed. In this example, the folder name is unchanged.

Next, start the JB-199 IV karaoke program. Open the folder D:\Karaoke Songs\MP3+CDG IDTAG in the Folder Menu. The song files MP3 + CDG will load into the File Browser showing as a list of CDG files. Next the title and artist information will automatically fill in from the ID tags.
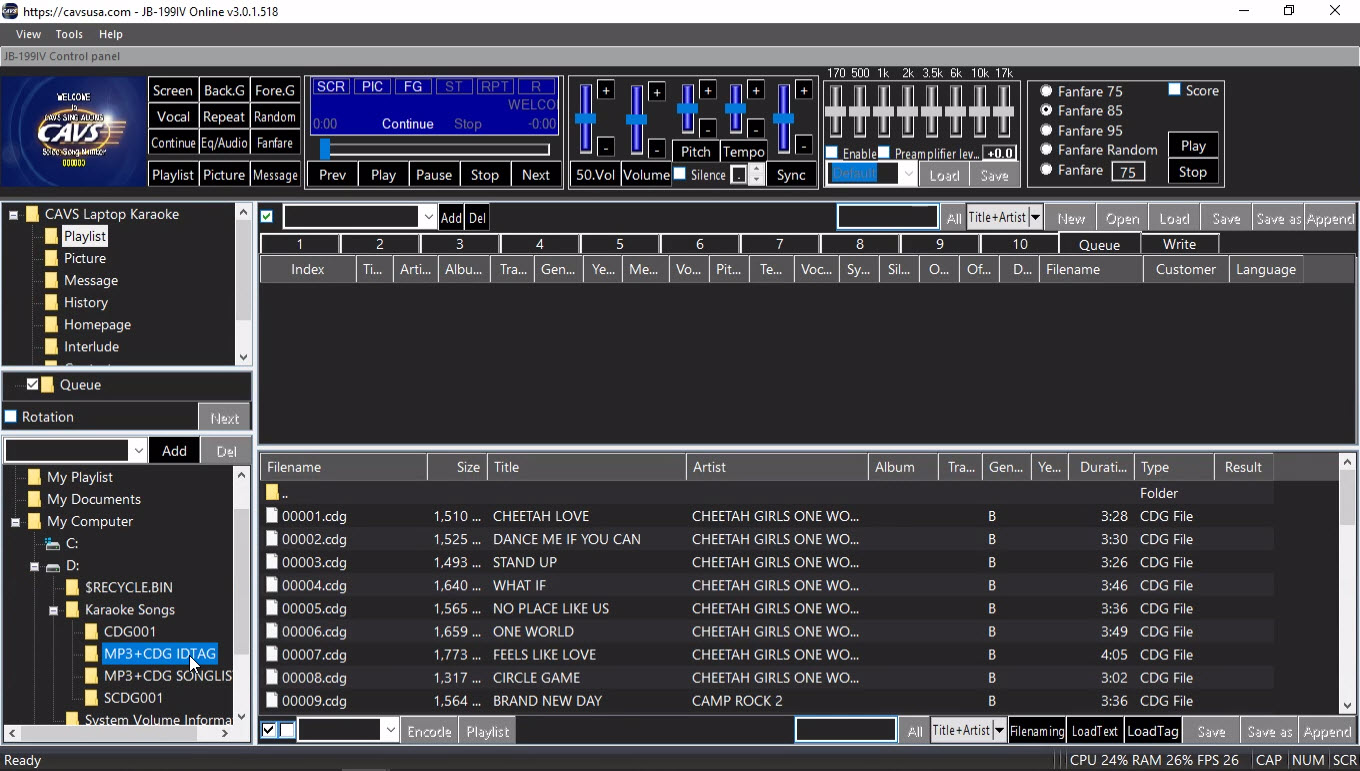
If the title and artist information does not fill in automatically, select all song files in the File Browser by pressing the X mark at the bottom of the screen.
Press the LoadTag button at the bottom right corner of the File Browser.
It will begin the ID Tag reading.
The progress of the ID Tags reading will be shown by the green bar at the bottom of the screen.
Double click on Cancel at the bottom to stop the ID Tag reading.
When done, the title and artist information will appear in the File Browser.
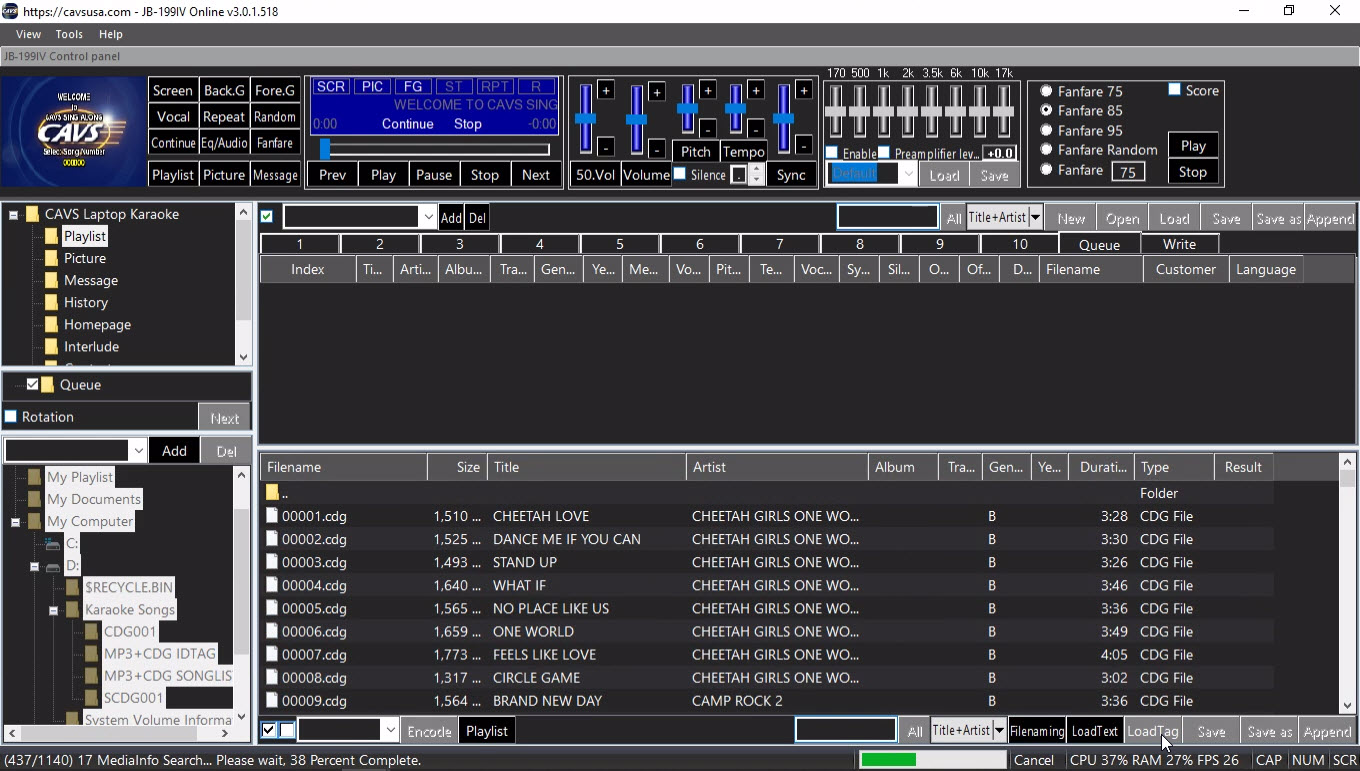
3. Song information is stored in the song filenames (for example, CA13816-0-Usher-There Goes My Baby.xxx)
Close the JB-199 IV karaoke program by pressing the X mark at the top right corner of the Control Panel. Exit out to Windows Desktop and open the folder in which the files are stored. In this example, the folder is G:\ZIP FILENAME. There are ZIP files with the file names consisting of title and artist. There are also ZIP files with the file names consisting of album, track, artist, and title. Song files with such file name styles are common in the external hard drives and website downloads.
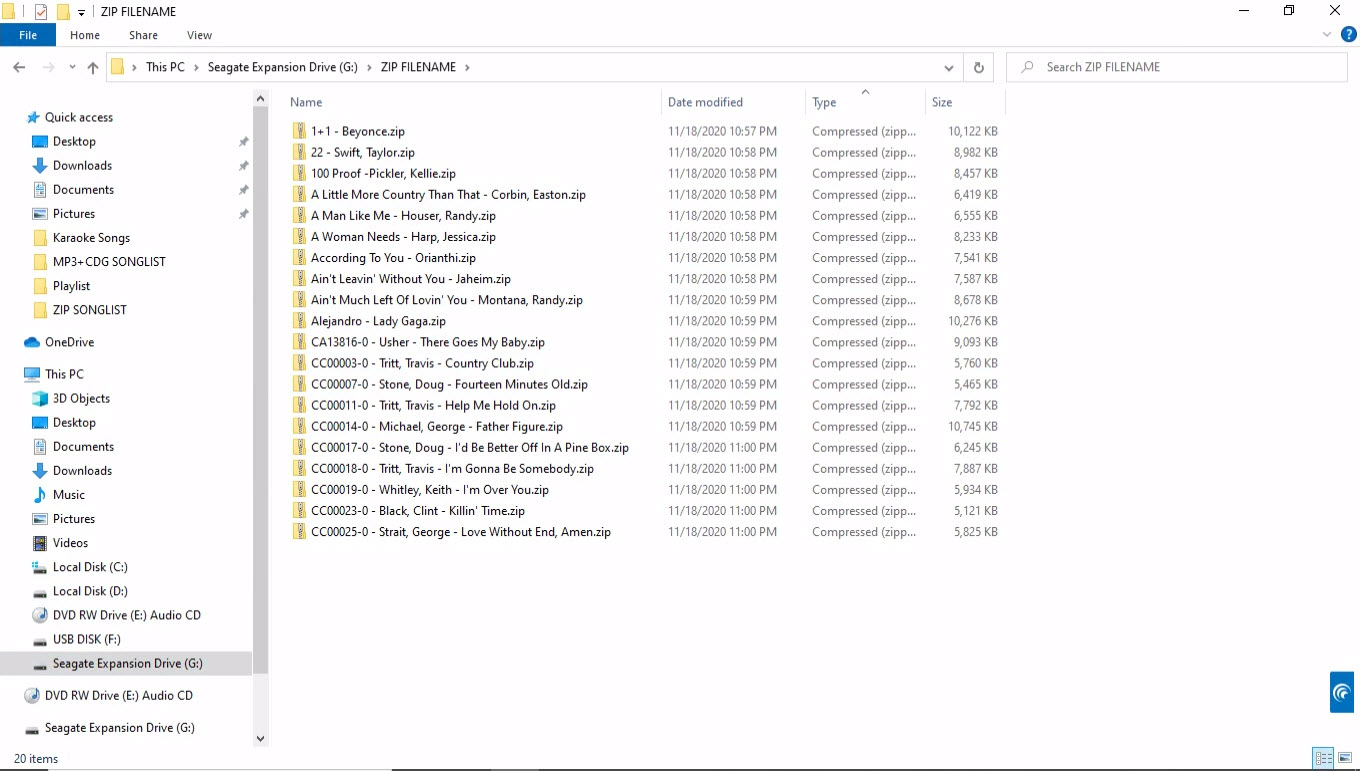
Right click on G:\ZIP FILENAME folder and select Copy.
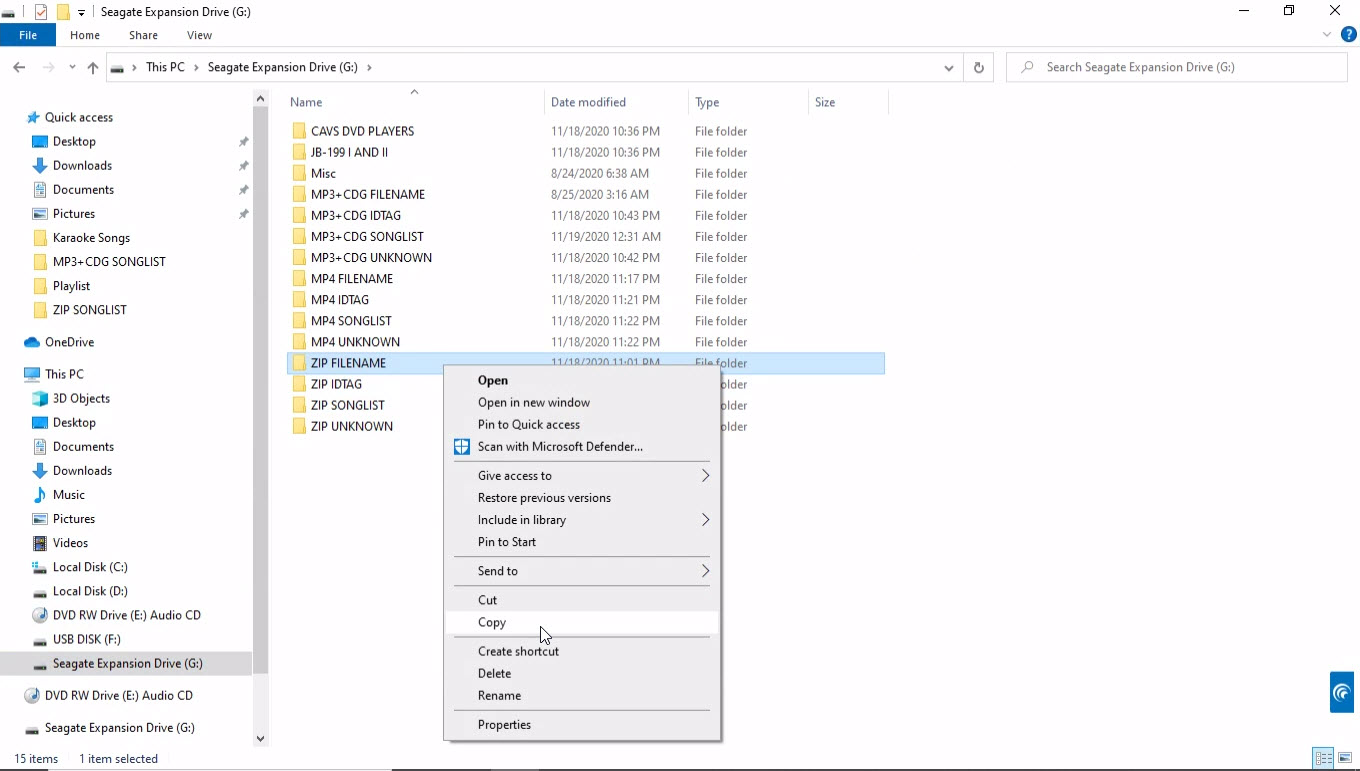
Go to a folder in the JB-199 IV, for example D:\Karaoke Songs. Right click on an empty spot and select Paste. The folder will begin copying.
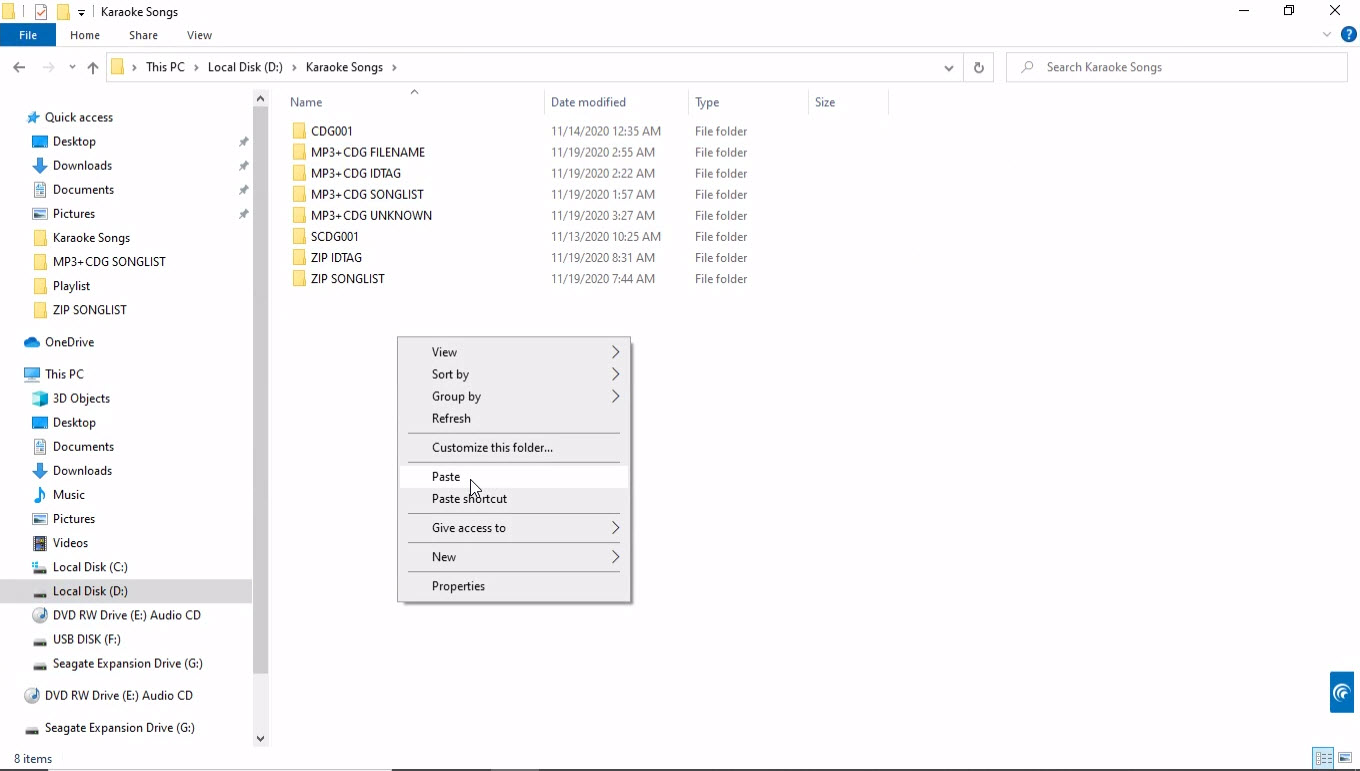
When the copying is complete, the pasted folder may be renamed. In this example, the folder name is unchanged.
Next, start the JB-199 IV karaoke program. Open the folder D:\Karaoke Songs\ZIP FILENAME in the Folder Menu. The ZIP song files will load into the File Browser showing as a list of ZIP files.
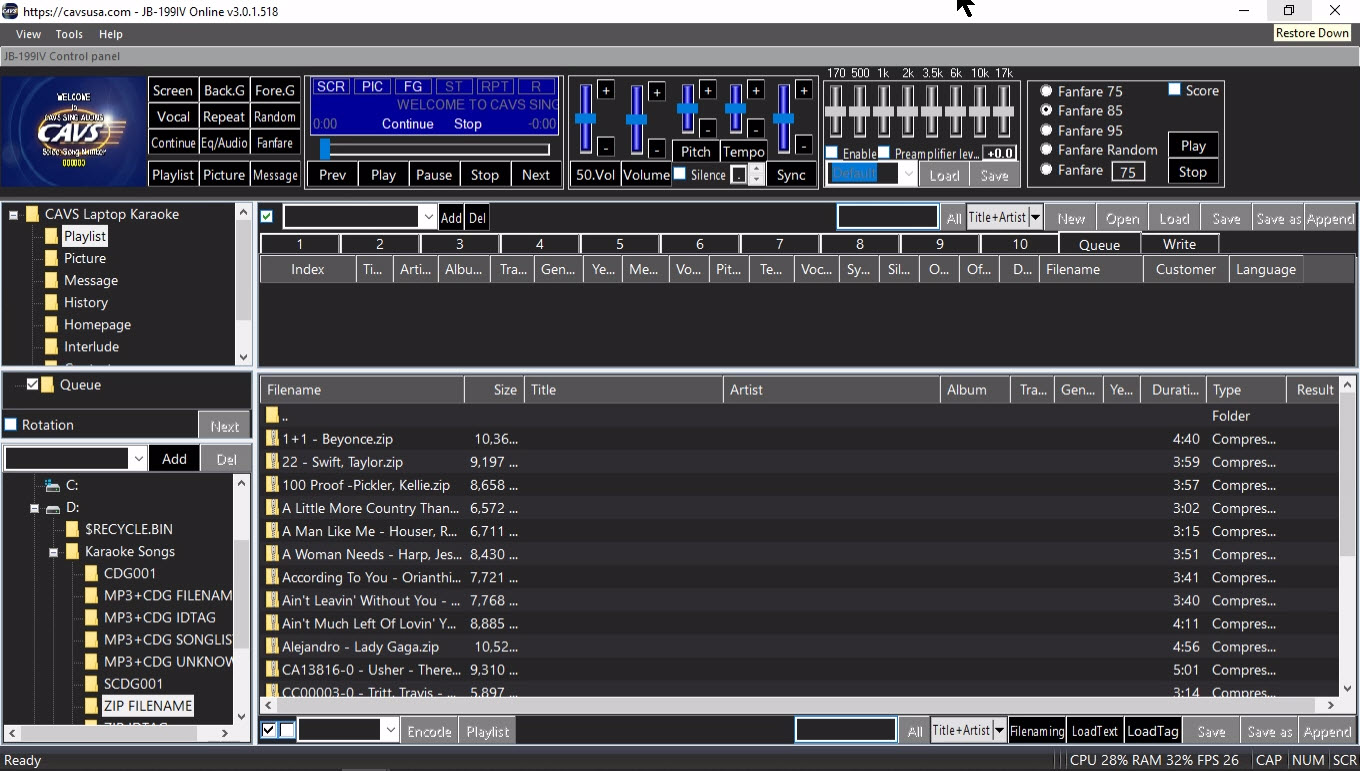
In the files, there are two groups each using a different file name structure. First ten song files are named as {Title} - {Artist}. Second ten song files are named as {Album} - {Track} - {Title} - {Artist}. Both are using "-" as the field separator. Select the first 10 song files by click and shift-click. Press the Filenaming button Right lick on the marked song files and select Filenaming.

The File Naming window will pop up. Click on Title followed by Artist into the Name field. The file name structure at the top will show {Title}-{Artist}. Note that "-" is used as the separator. Any blank spaces before and after each field are automatically ignored.

Click OK. The file names are parsed according to the file name structure and loaded into the title and artist fields.
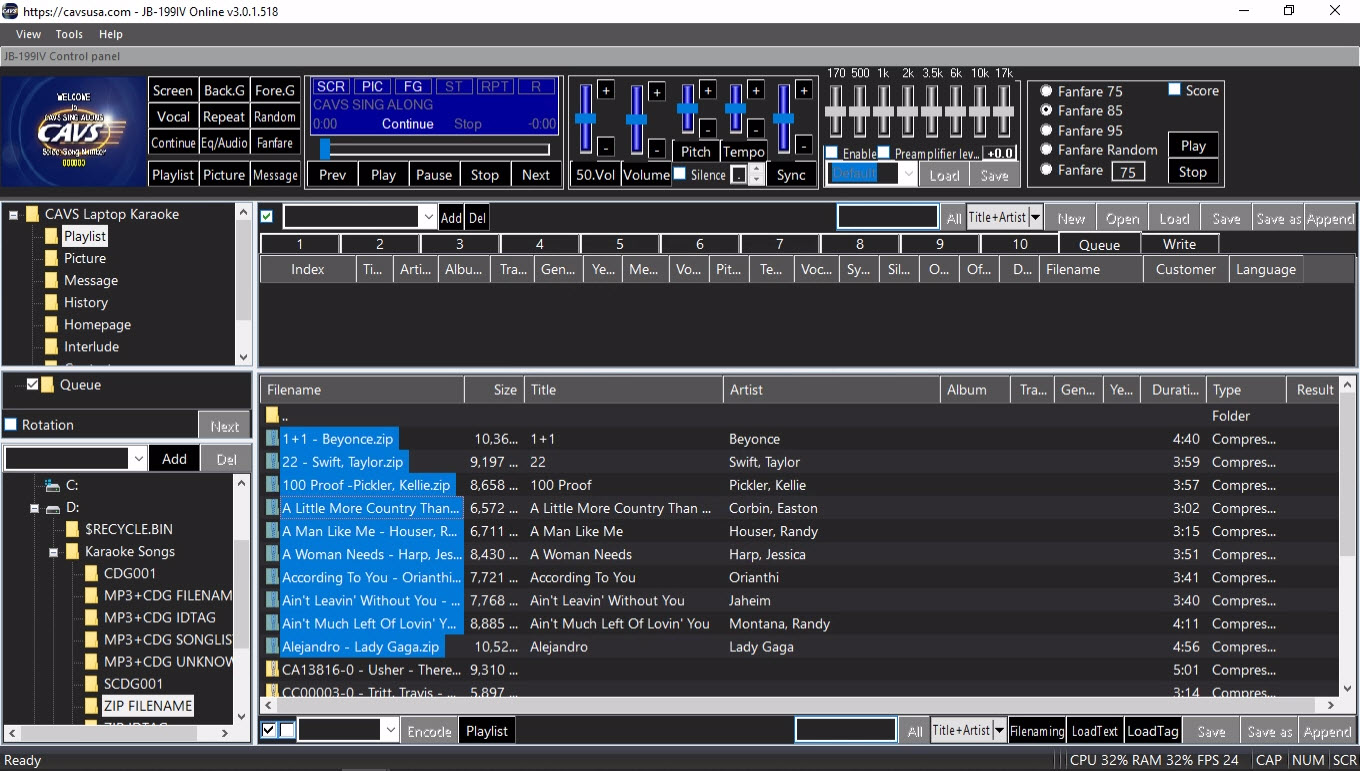
Mark the next group of song files with click and shift-click, right click on the marked song files, and select Filenaming.
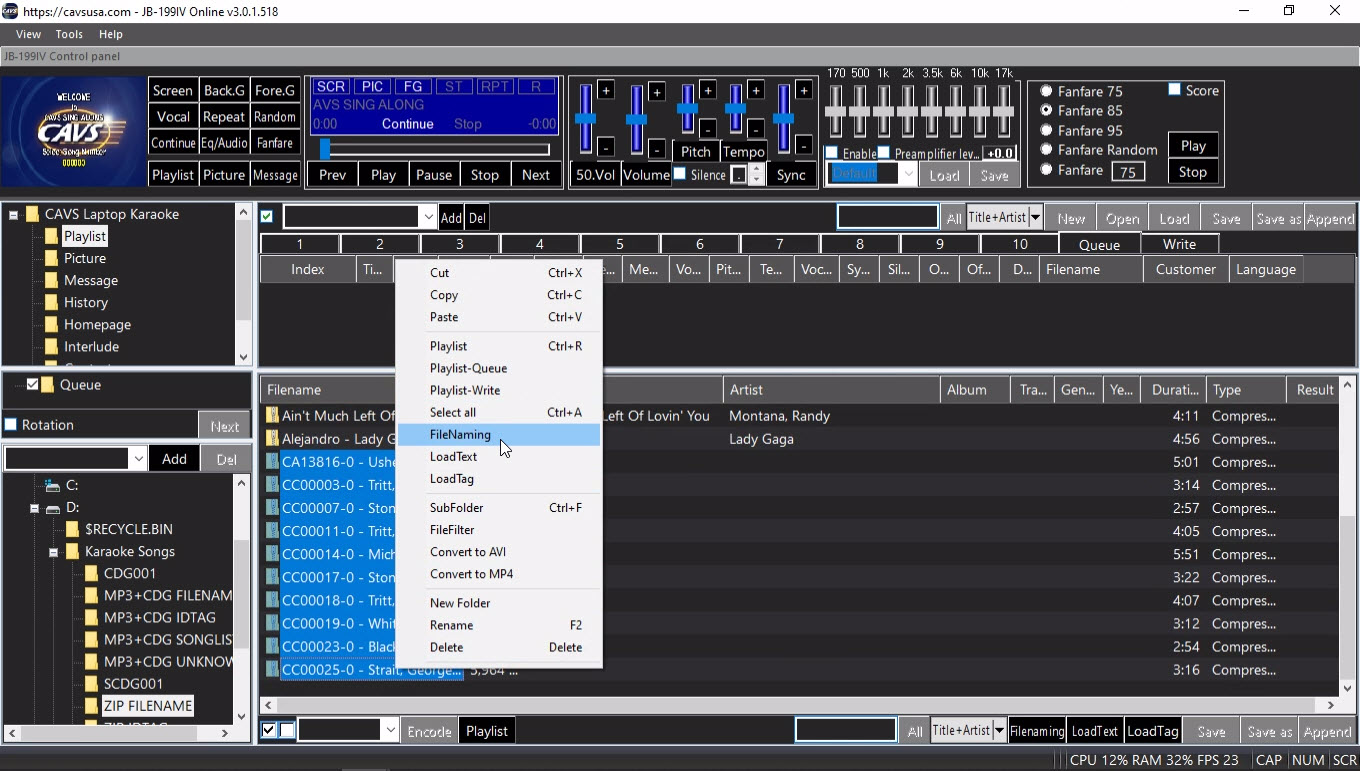
In the File Naming window, press Clear to clear any previously used file name pattern. Click on Skip, Skip, Title, and Artist. The file name pattern at the top will show {Skip}-{Skip}-{Title}-{Artist}. The Skip is used to jump over a field that is not relevant. Alternatively a new file name pattern can be {Album}-{Track}-{Title}-{Artist}. Again the "-" is used as the separator and any spaces before and after each field are automatically ignored.

Click OK. The file names are parsed according to the file name pattern and loaded into the title and artist fields.
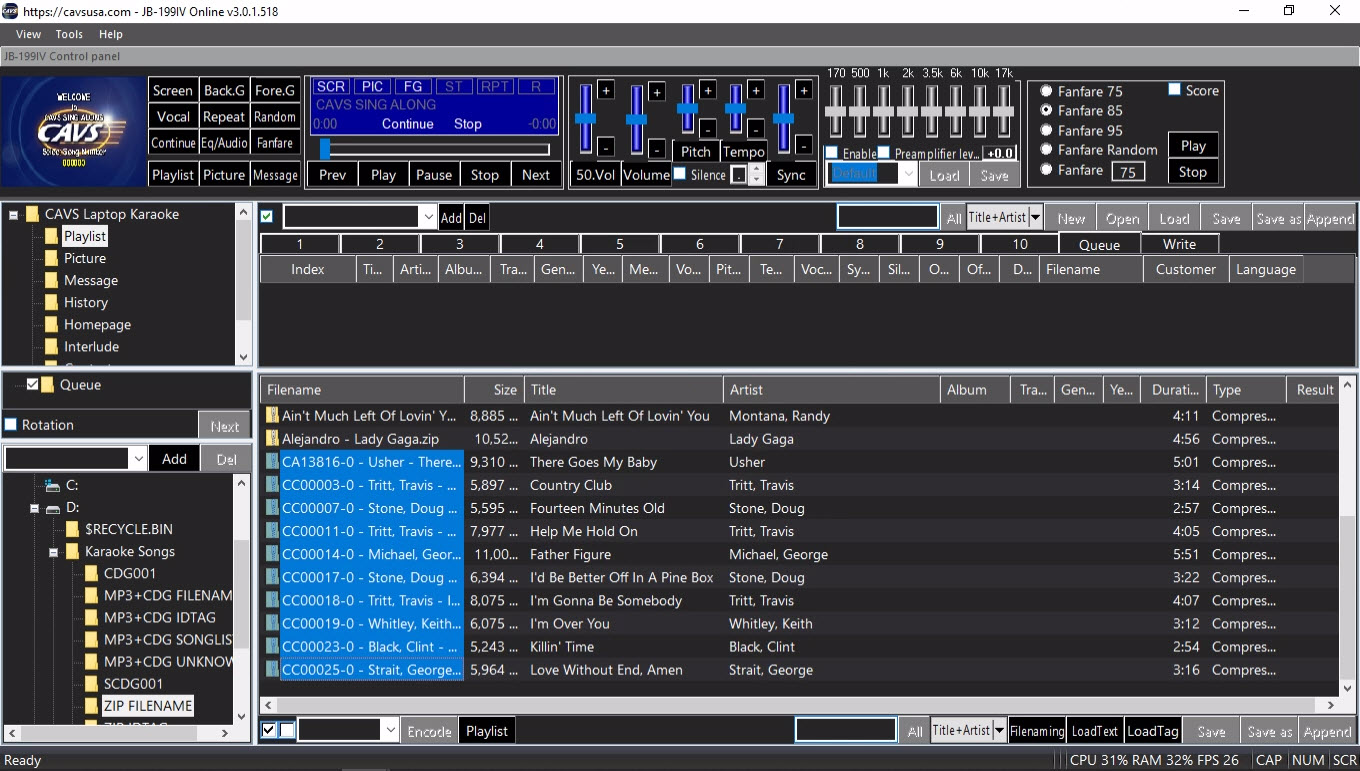
The Filenaming is a powerful tool to pick off the title and artist information from the song file names. In practice, due to lack of a standard in file naming, several or more different file name patterns are likely needed to handle all the song files.
4. Song information is not available with the song files
Close the JB-199 IV karaoke program by pressing the X mark at the top right corner of the Control Panel. Exit out to Windows Desktop and open the folder in which the files are stored. In this example, the folder is G:\MP3+CDG UNKNOWN which has MP3 + CDG song files without the title and artist information.

Right click on the G:\MP3+CDG UNKNOWN folder and select Copy.

Go to a folder in the JB-199 IV, for example, D:\Karaoke Songs. Right click on an empty spot and select Paste. The folder G\MP3+CDG UNKNOWN will begin copying.
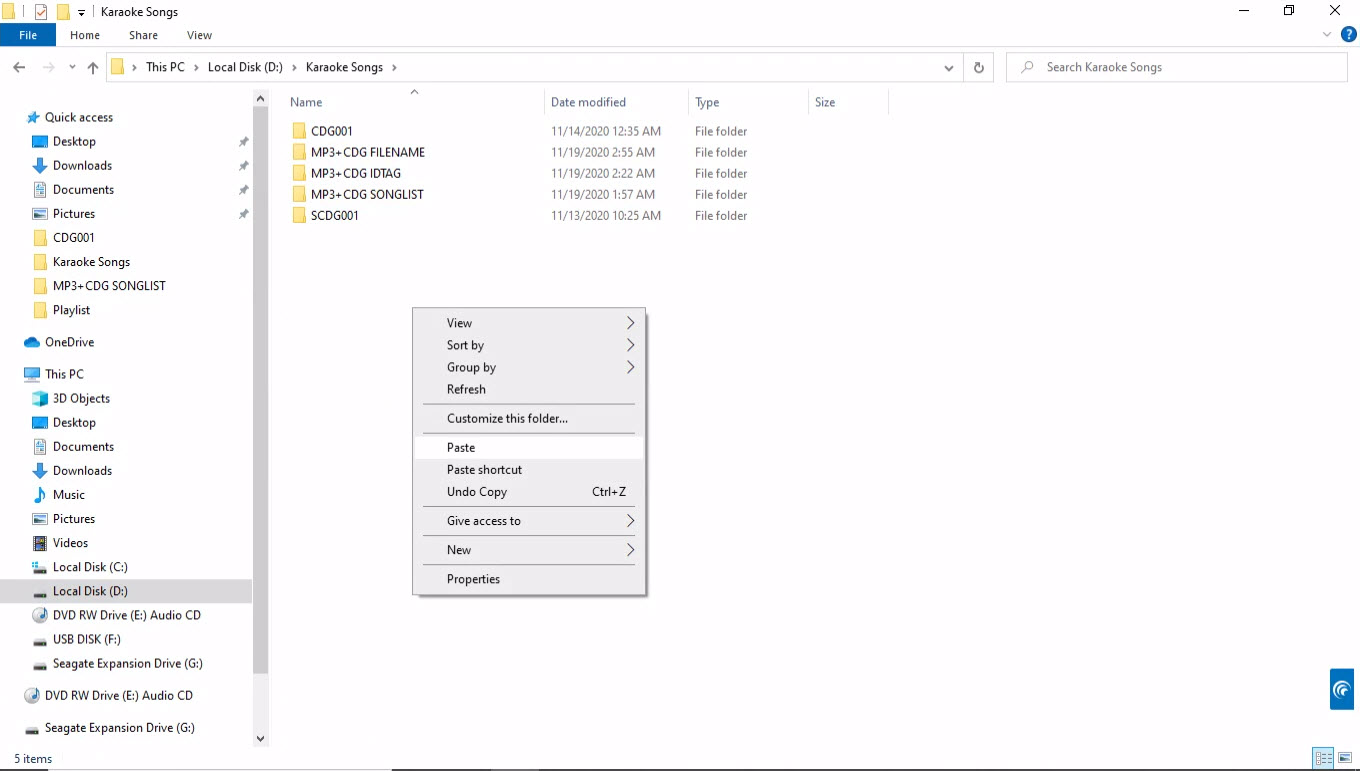
When the copying is done, the pasted folder may be renamed. In this example, the folder name is unchanged.
Next, start the JB-199 IV karaoke program.
Open the folder D:\Karaoke Songs\MP3+CDG UNKNOWN in the Folder Menu.
The song files MP3 + CDG will load into the File Browser showing as a list of CDG files.
Next double click on any title or artist field of a song file.
Type in the title or artist name followed by pressing Enter.
This is the last resort of manually typing in the song information.
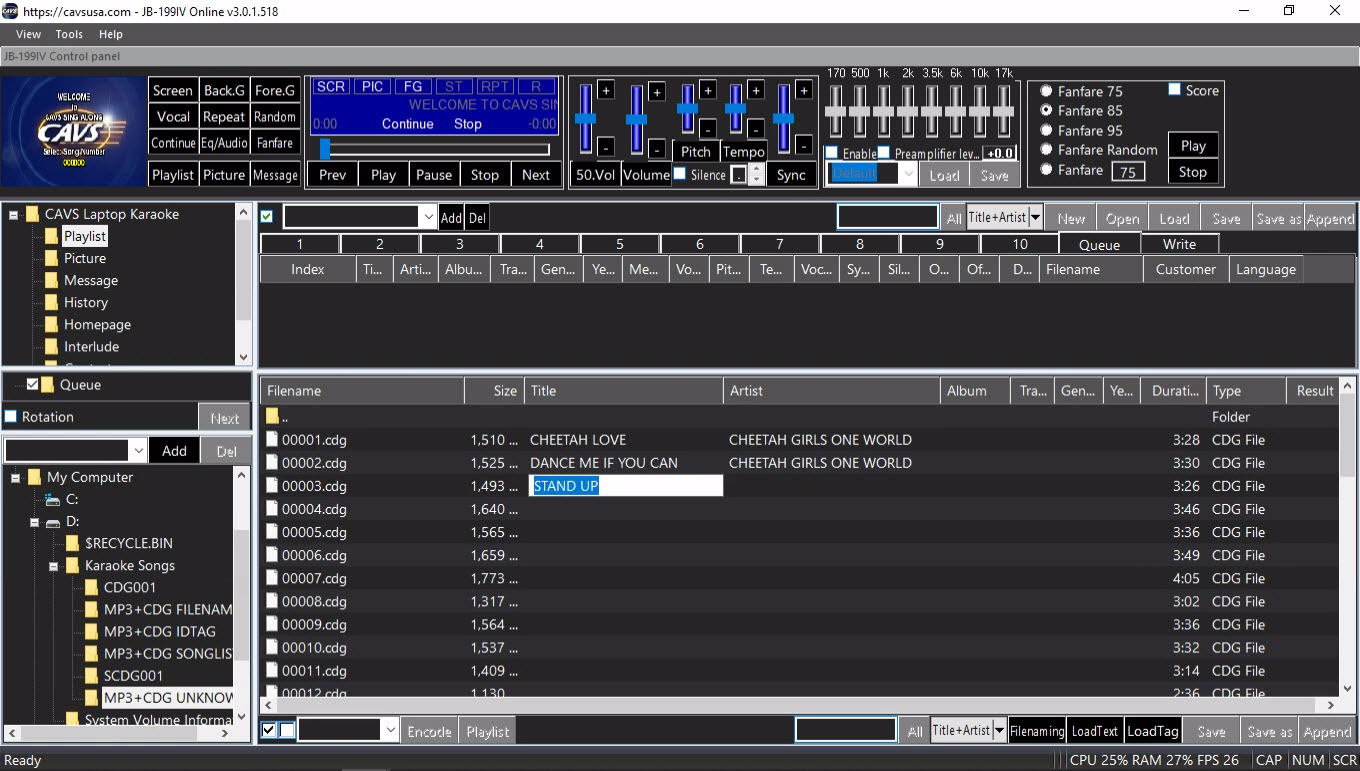
This completes the four cases.
In each case, the MP3 + CDG song files are copied into the JB-199 IV and then opened in the File Browser where the titles and artists are filled in.
Next to make a playlist, click on any playlist 1 - 10 slot in the List Browser.
In this example, the playlist 1 is selected.
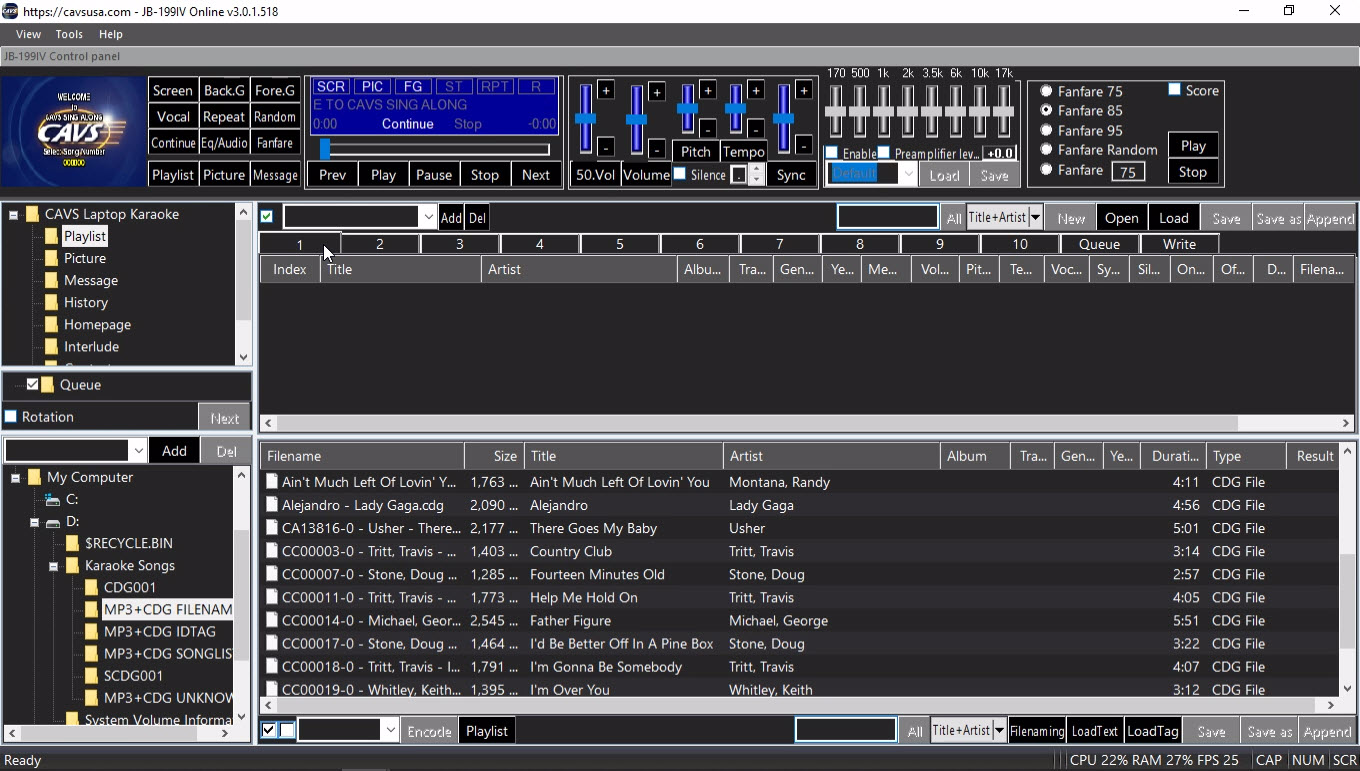
Note that the MP3+CDG FILENAME folder of the case 3 is pictured above. The instruction to make a playlist and play is the same for all four cases.
Select all songs in the File Browser by clicking on the Check mark at the bottom of the screen. Press the Playlist button at the bottom of the screen to load the marked songs into the playlist 1 slot. This is the playlist.
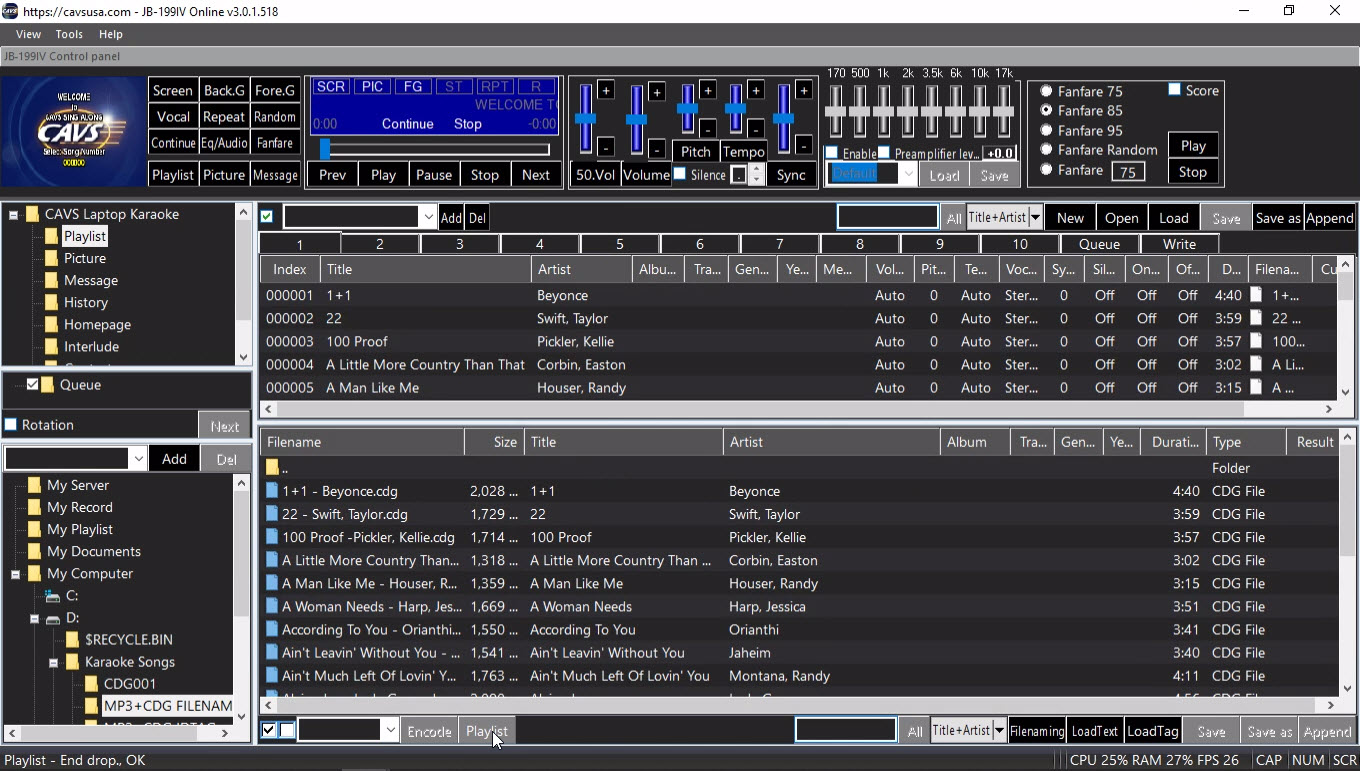
Press Save as button in the upper right corner of the List Browser. A popup window will appear. Name the playlist and click Save. In this example, the playlist is named MP3+CDG FILENAME.
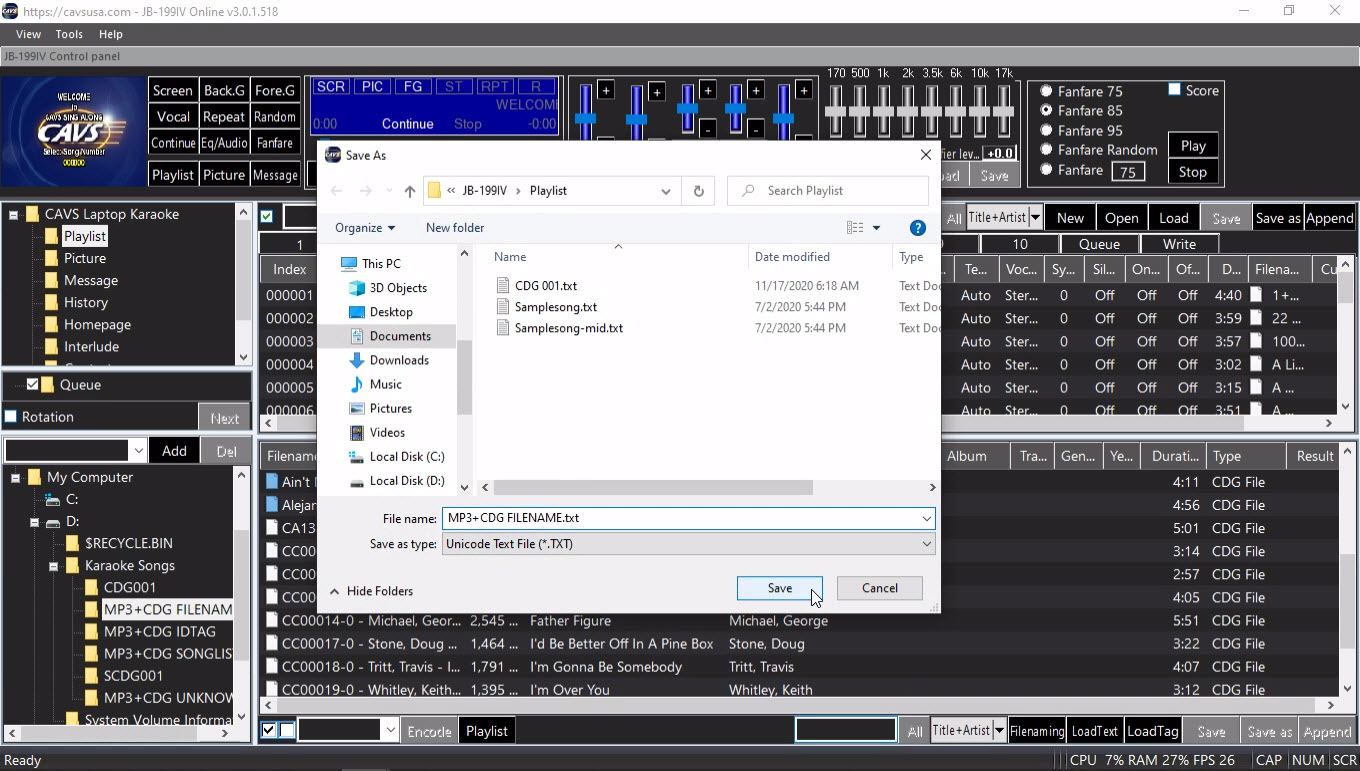
Next step is to load the playlist and play from the playlist. First reset the Control Panel to its default form by clearing the File Browser and the List Browser. Press New to clear the playylist 1 slot and press Queue to set the List Browser. Press My Server in the Folder Menu and clear the File Browser.
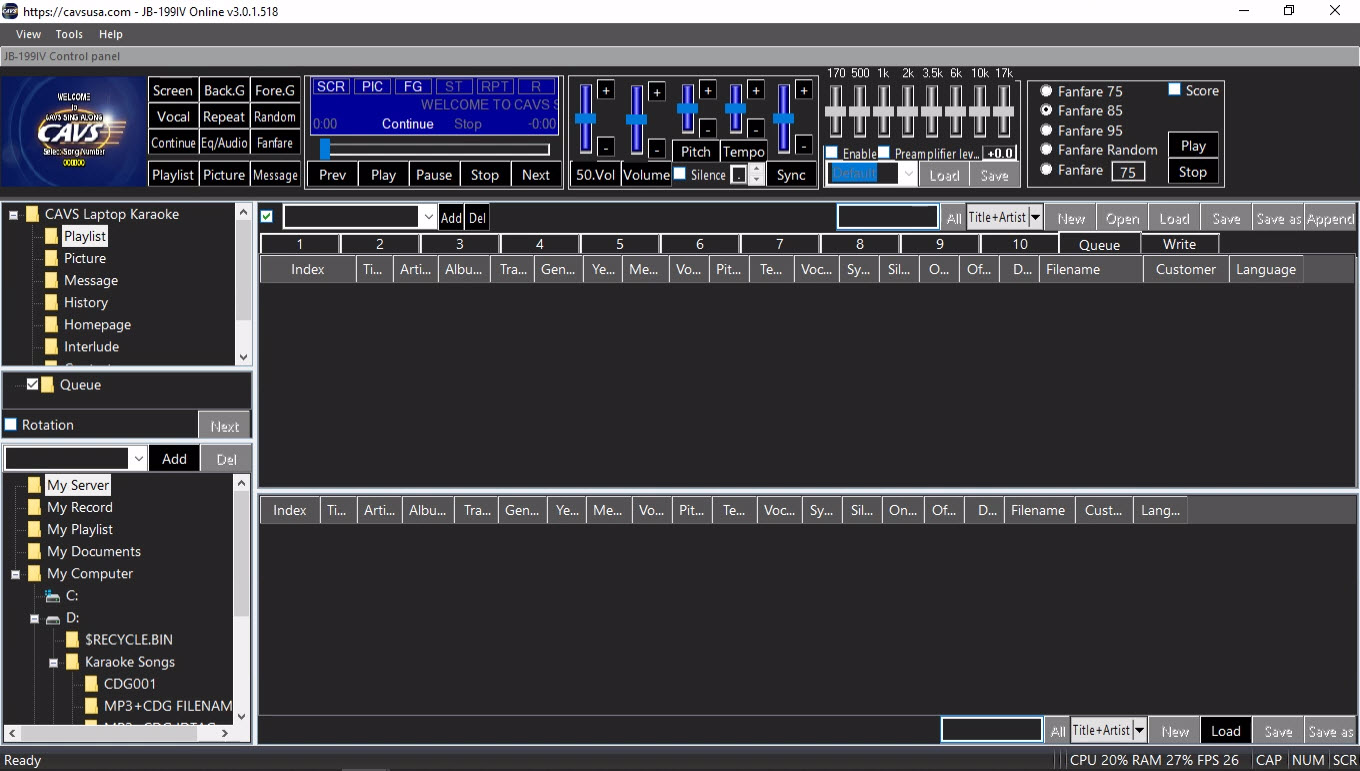
The playlist MP3+CDG FILENAME can be loaded into any playlist slot 1 - 10, 11 - 20, or My Server.
Note that My Server is a playlist slot with a difference that a playlist loaded into My Server is shared with online guests and E-Songbooks.
In this example, the playlist is loaded into My Server.
Press to highlight My Server.
Press the Load button in the bottom right corner of the File Browser.
Select MP3+CDG FILENAME playlist and press Open.
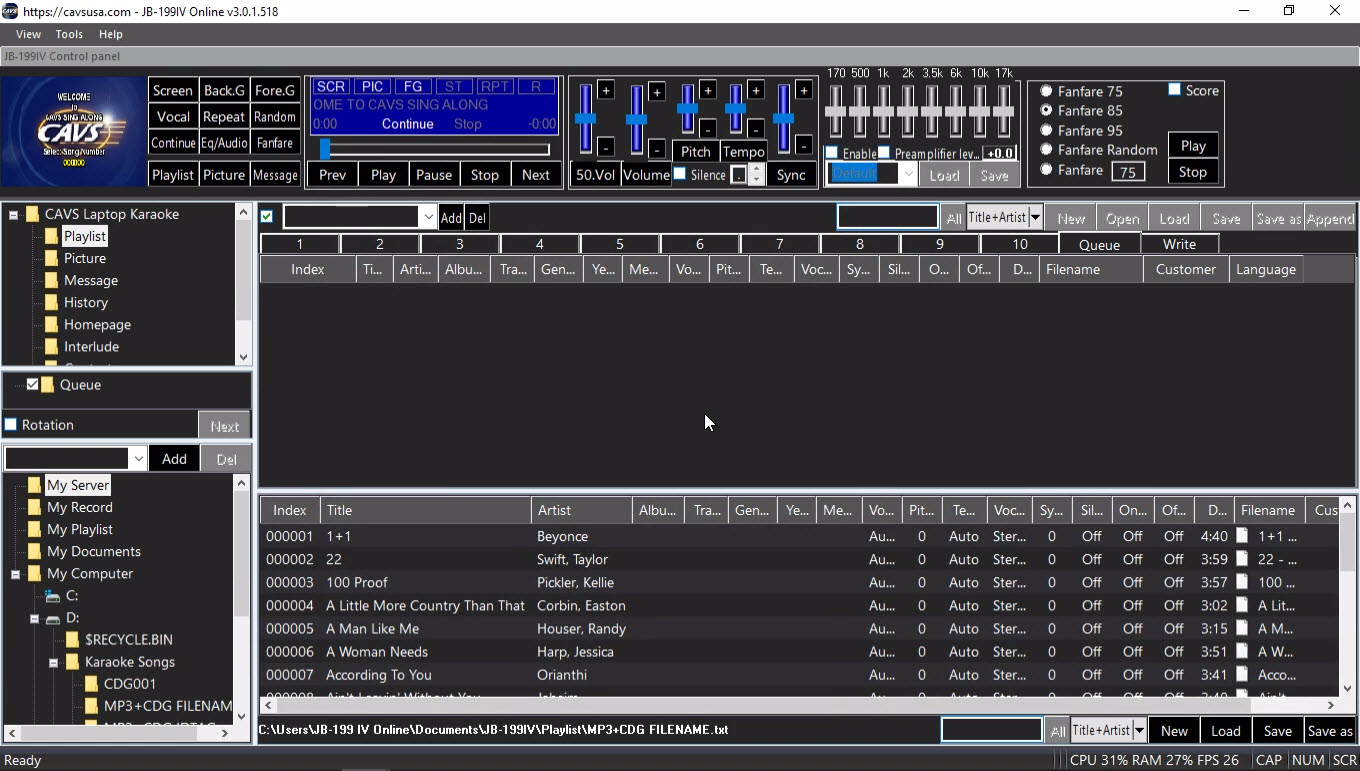
Right click on a song and select Queue to send it to the Queue. Alternatively drag & drop the song into the Queue.

Press Play to begin playing.
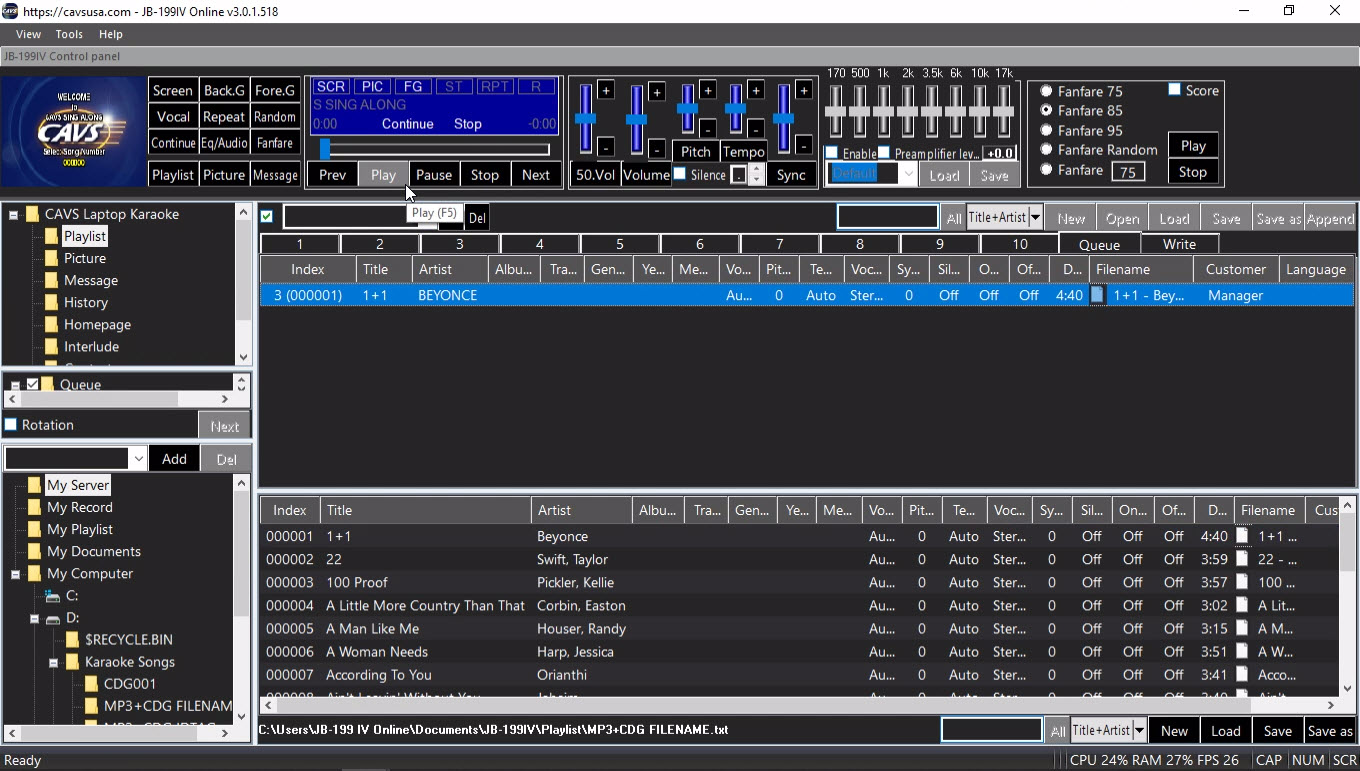
A playlist can be sorted or searched by title, artist, album, filename, etc. It can also be cut, merged, and appended to add or remove songs. For detail instruction on how to edit a playlist, go to 7.1.4 Playlist.
The ZIP files of MP3 + CDG song files are often found in external hard drives and online websites. The ZIP files can be loaded and played in the JB-199 IV as they are without unzipping. The ZIP files can also be of MP3 + MCG files loading and playing in the exact same way.
Not all ZIP files have the same way of storing the song information such as title and artist. For example, the files may have generic names as
- 00001.zip
- 00002.zip
- ...
These files are likely keeping the song information in a separate song list or ID tags.
The files may also have names as
- CA13816-0-Usher-There Goes My Baby.zip
- CA00003-0-Tritt, Travis-Country Club.zip
- ...
These files have the song information right on their file names.
Below, the ZIP files are considered in four different cases.
- Song information is stored in a song list (for example, songlist.txt)
- Song information is stored in the ID tag
- Song information is stored on the file names (for example, CA13816-0-Usher-There Goes My Baby.zip)
- Song information is not available
Note that the song information is considered to be title and artist in this section. It can be narrowed, for example, to title or artist only or expanded, for example, to album, genre, etc.
1. Song information is stored in a song list (for example, songlist.txt)
Close the JB-199 IV karaoke program by pressing the X mark at the top right corner of the Control Panel. Exit out to Windows Desktop and open the folder in which the song files are stored. In this example, the folder is G:\ZIP SONGLIST. There are ZIP files and songlist.txt.
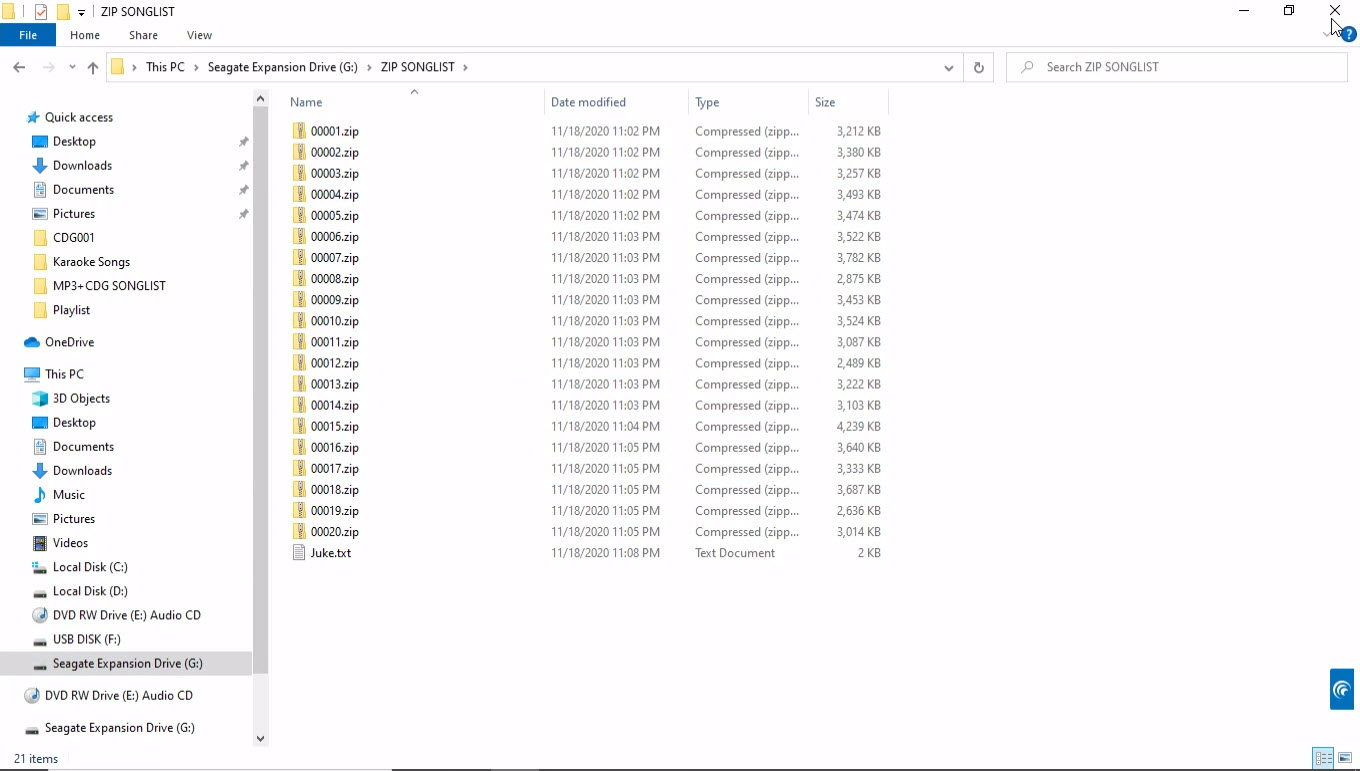
Double click on the songlist.txt to open it in a text editor. In this example, the file is opened in Windows Notepad. Notice that the information for each song file is organized as the filename, title, and artist, each separated by "|" sign. "|" is called the pipe sign which is typed by keystrokes Shift-\.

For song lists that have different forms, use the text editor to change accordingly.
Next right click on the G:\ZIP SONGLIST folder and select Copy.
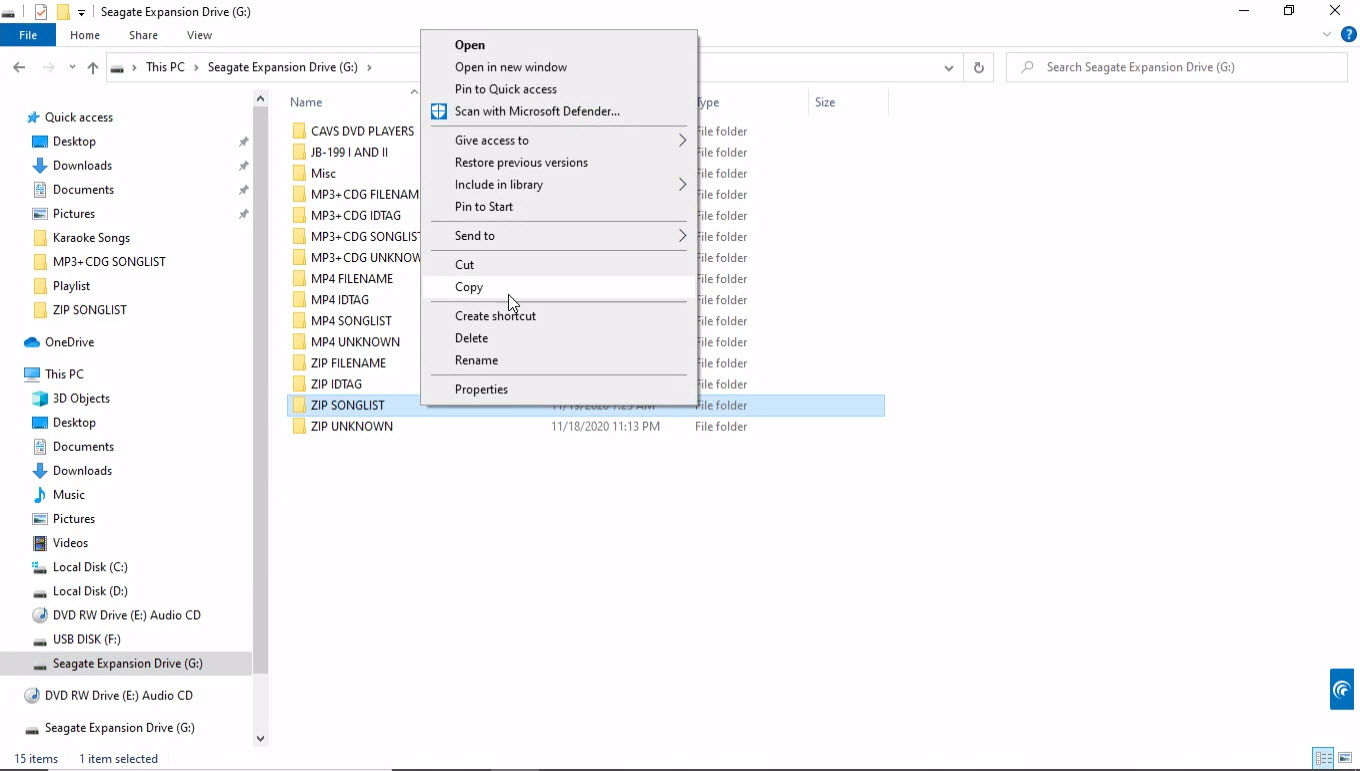
Go to a folder in the JB-199 IV, for example D:\Karaoke Songs, right click, and select Paste. The folder G:\ZIP SONGLIST will begin copying.
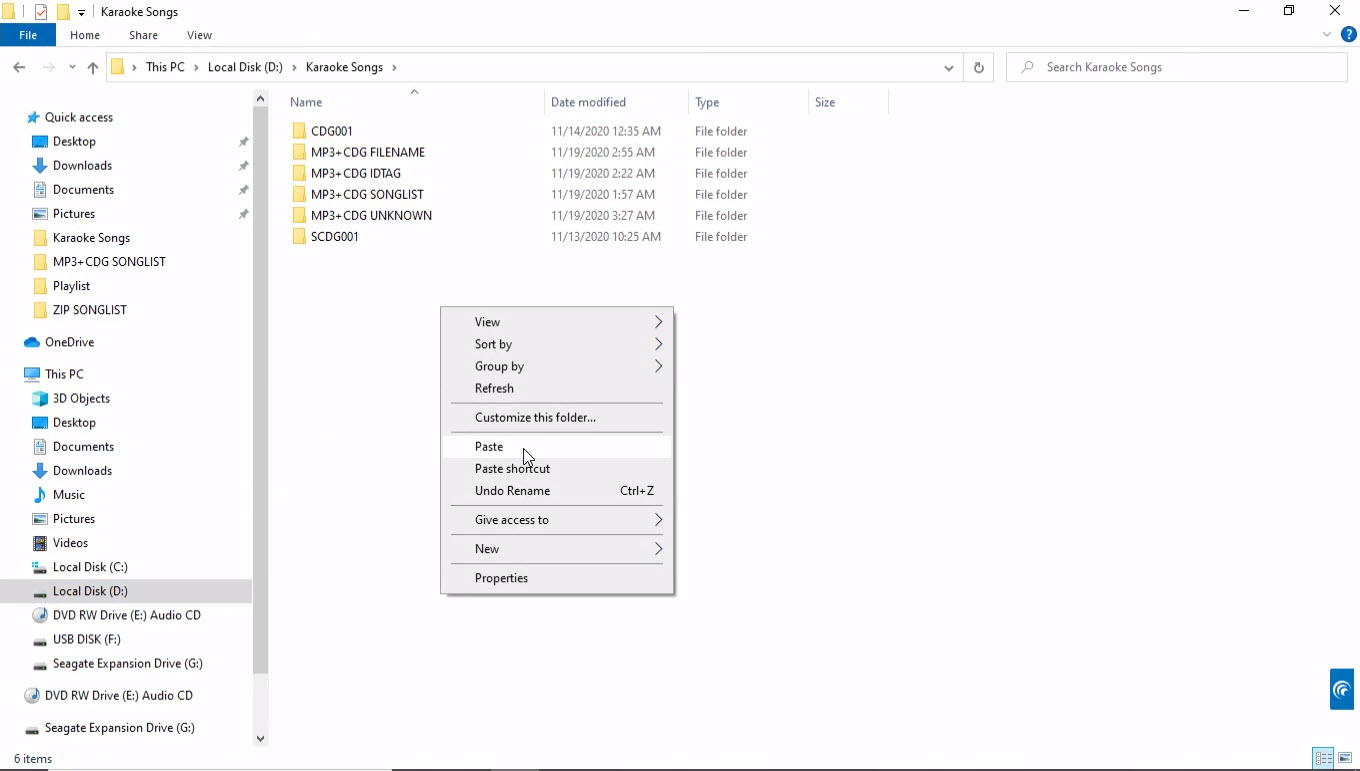
When the copying is done, the pasted folder may be renamed. In this example, the folder name is unchanged.
Next, start the JB-199 IV karaoke program. Open the folder D:\Karaoke Songs\ZIP SONGLIST in the Folder Menu.
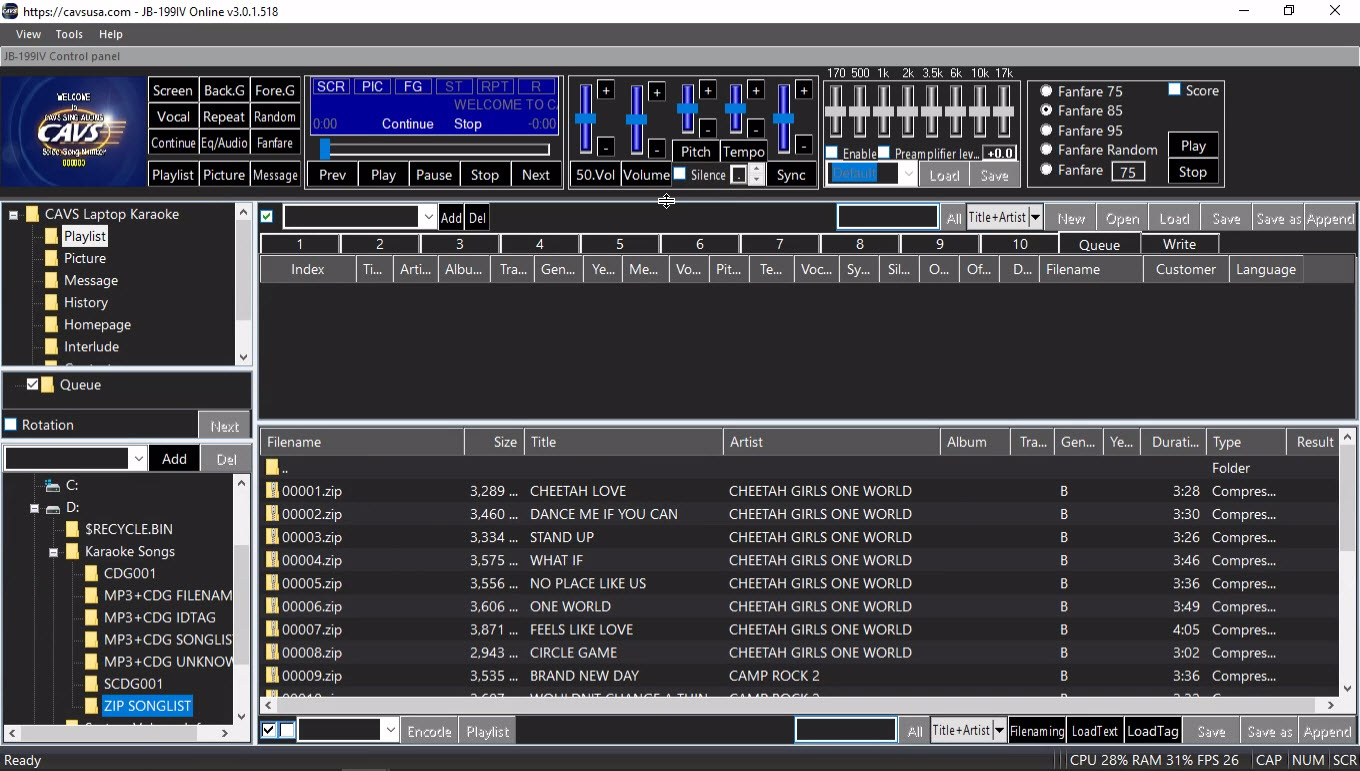
The ZIP song files will load into the File Browser.
The title and artist information in the songlist.txt file will also load automatically.
If the title and artist information does not loaded automatically, press LoadText button at the bottom right corner of the File Browser. A pop-up window will appear.
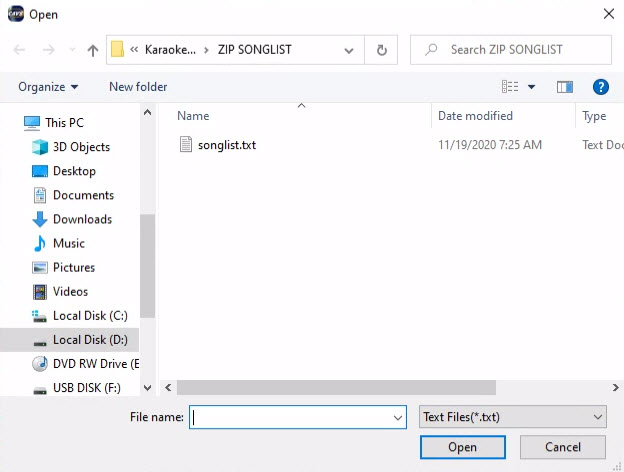
Select the file songlist.txt and press Open. Another pop-up window will appear confirming how many songs are to be updated with title and artist information. Confirm the number of the songs to be updated and press Yes.
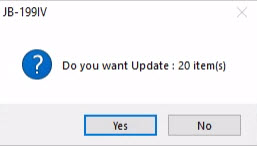
The title and artist information will load into the File Browser.
2. Song information is stored in the ID Tag
Close the JB-199 IV karaoke program by pressing the X mark at the top right corner of the Control Panel. Exit out to Windows Desktop and open the folder in which the files are stored. In this example, the folder is G:\ZIP IDTAG which contains the ZIP song files with embedded ID Tags. The ID Tags in particular are embedded with title and artist information in the MP3 files within the ZIP files.
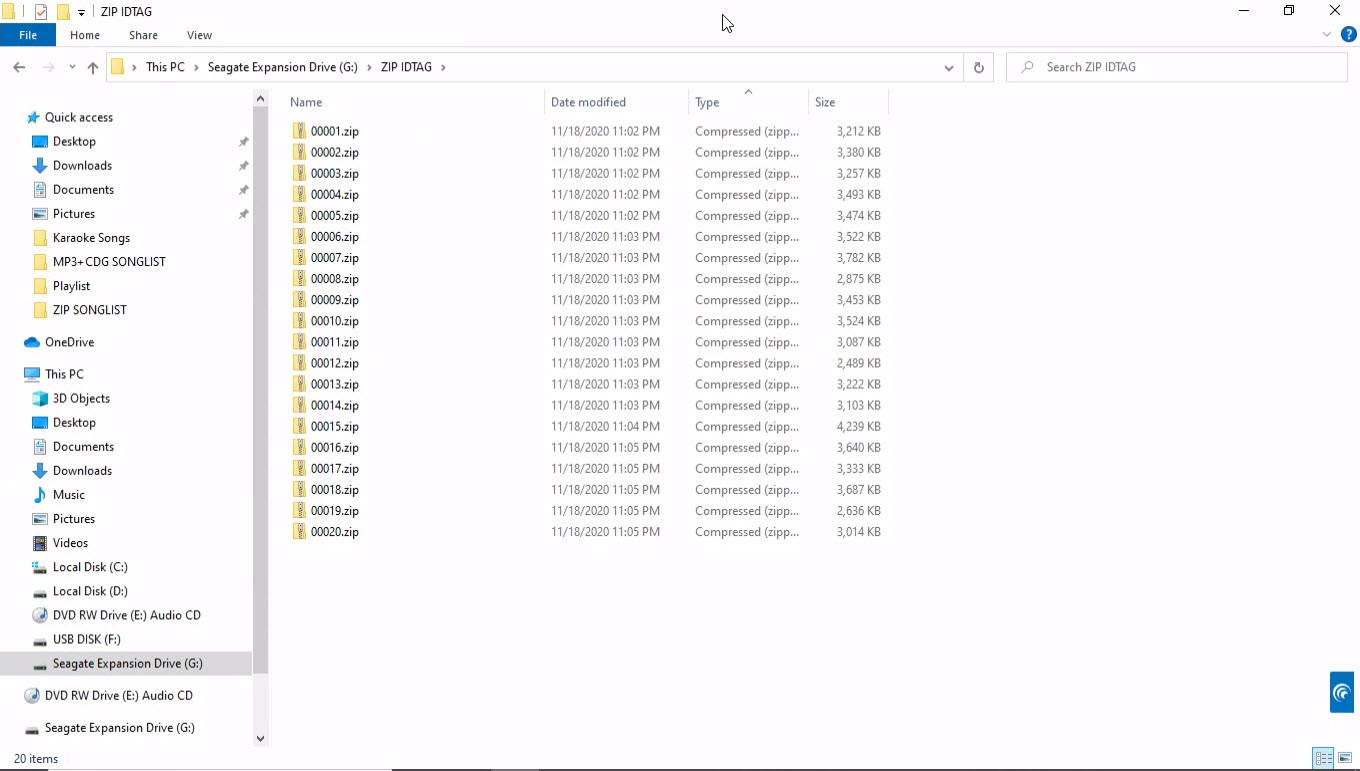
Right click on the G:\ZIP IDTAG folder and select Copy.
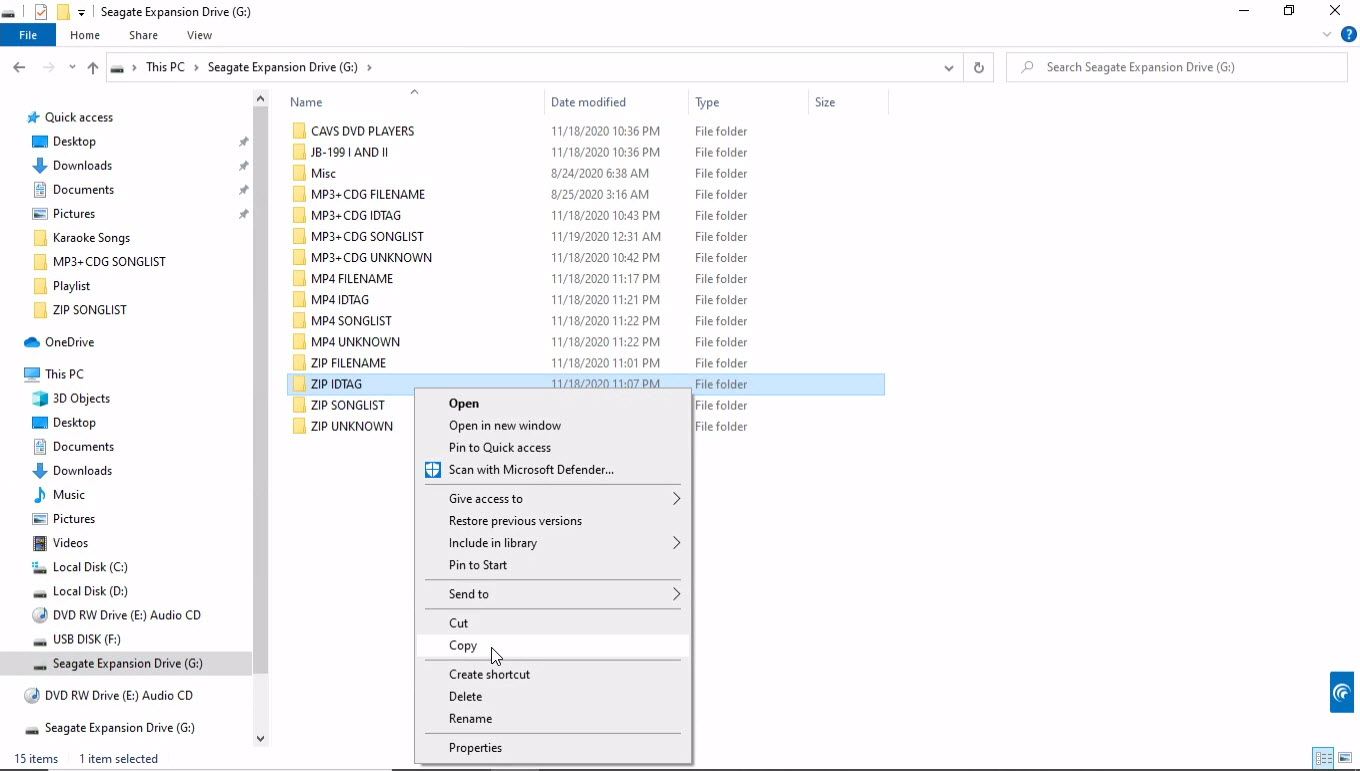
Go to a folder in the JB-199 IV, for example D:\Karaoke Songs. Right click on an empty spot and select Paste. The folder will begin copying.
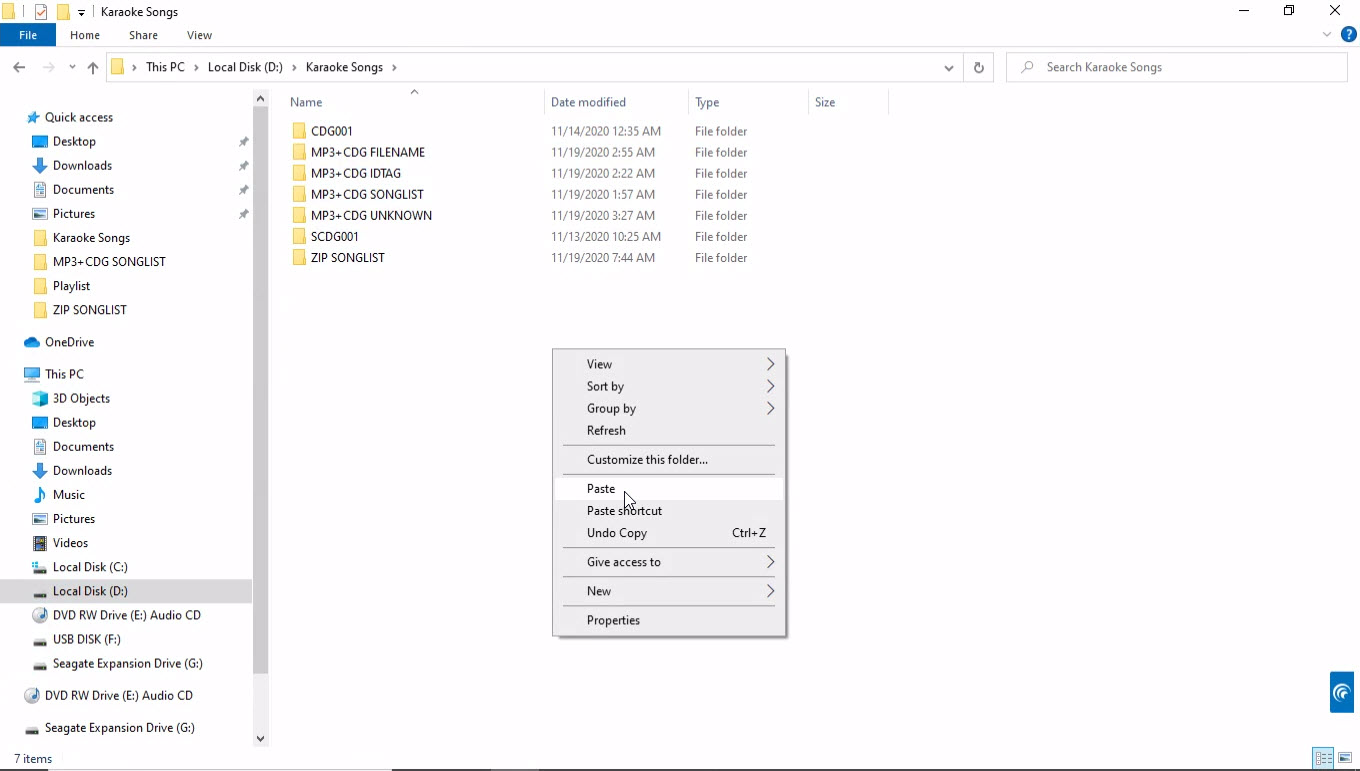
When the copying is done, the pasted folder may be renamed. In this example, the folder name is unchanged.
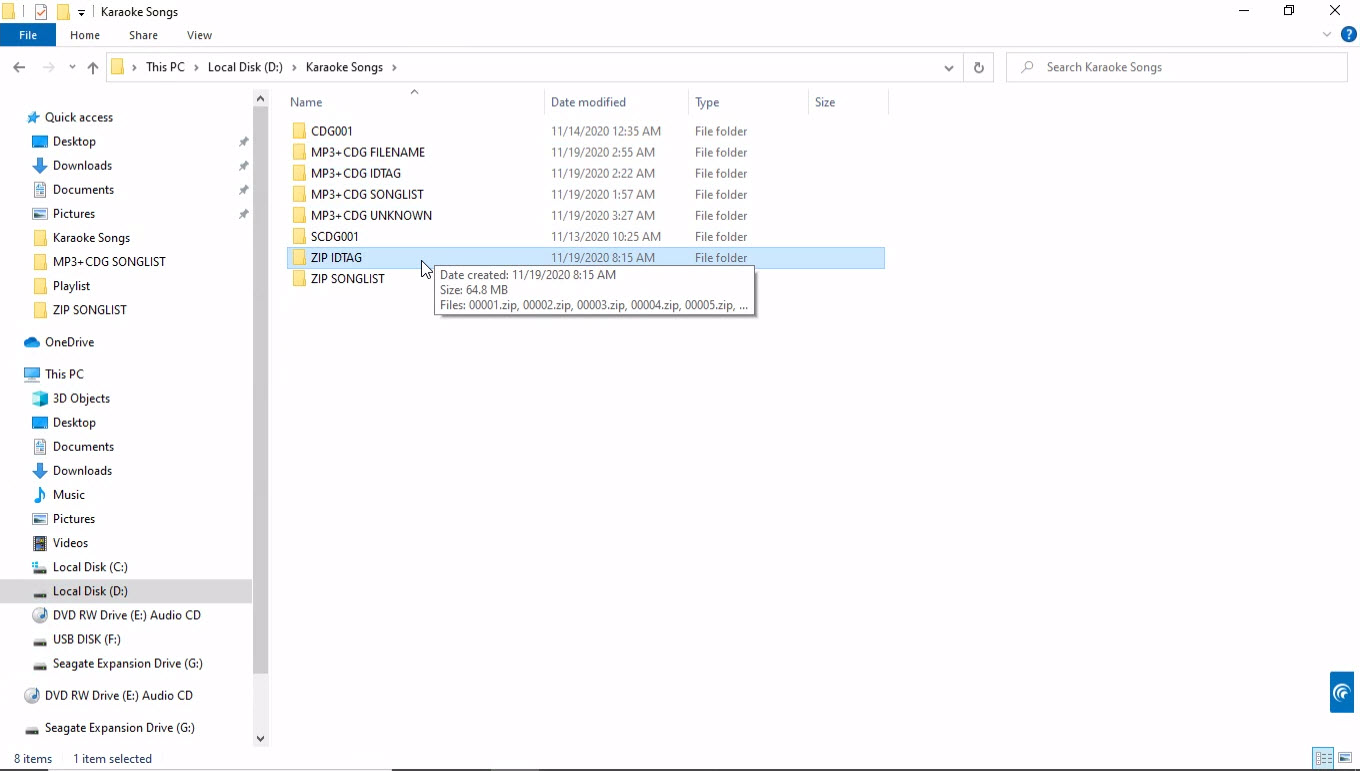
Next, start the JB-199 IV karaoke program. Open the folder D:\Karaoke Songs\ZIP IDTAG in the Folder Menu. The ZIP song files will load into the File Browser. Next the title and artist information will automatically fill in from the ID tags.
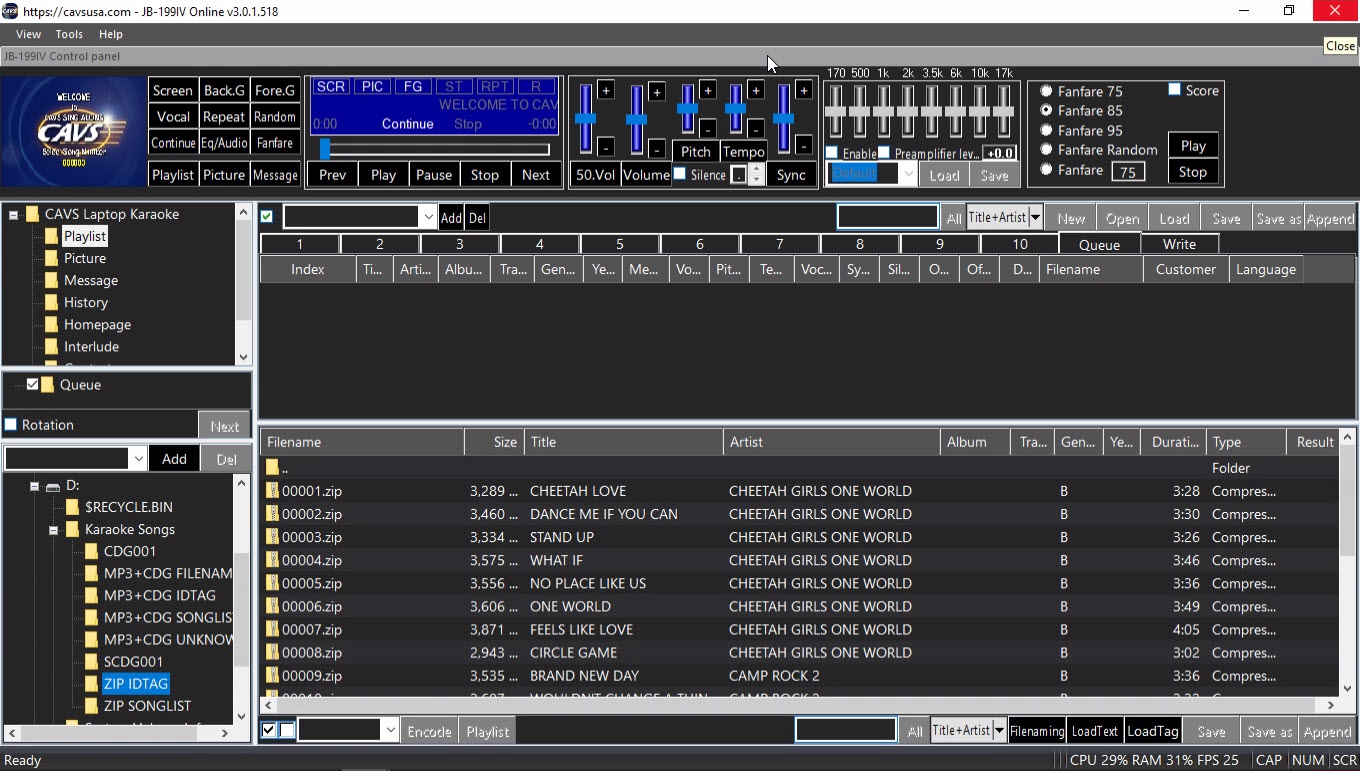
If the title and artist information does not fill in automatically, select all song files in the File Browser by pressing the X mark at the bottom of the screen.
Press the LoadTag button at the bottom right corner of the File Browser.
It will begin the ID Tag loading.
The progress of the ID Tags loading will be shown in the green bar at the bottom of the screen.
Double click Cancel at the bottom to stop the ID Tag loading.
When done, the title and artist information will appear in the File Browser.
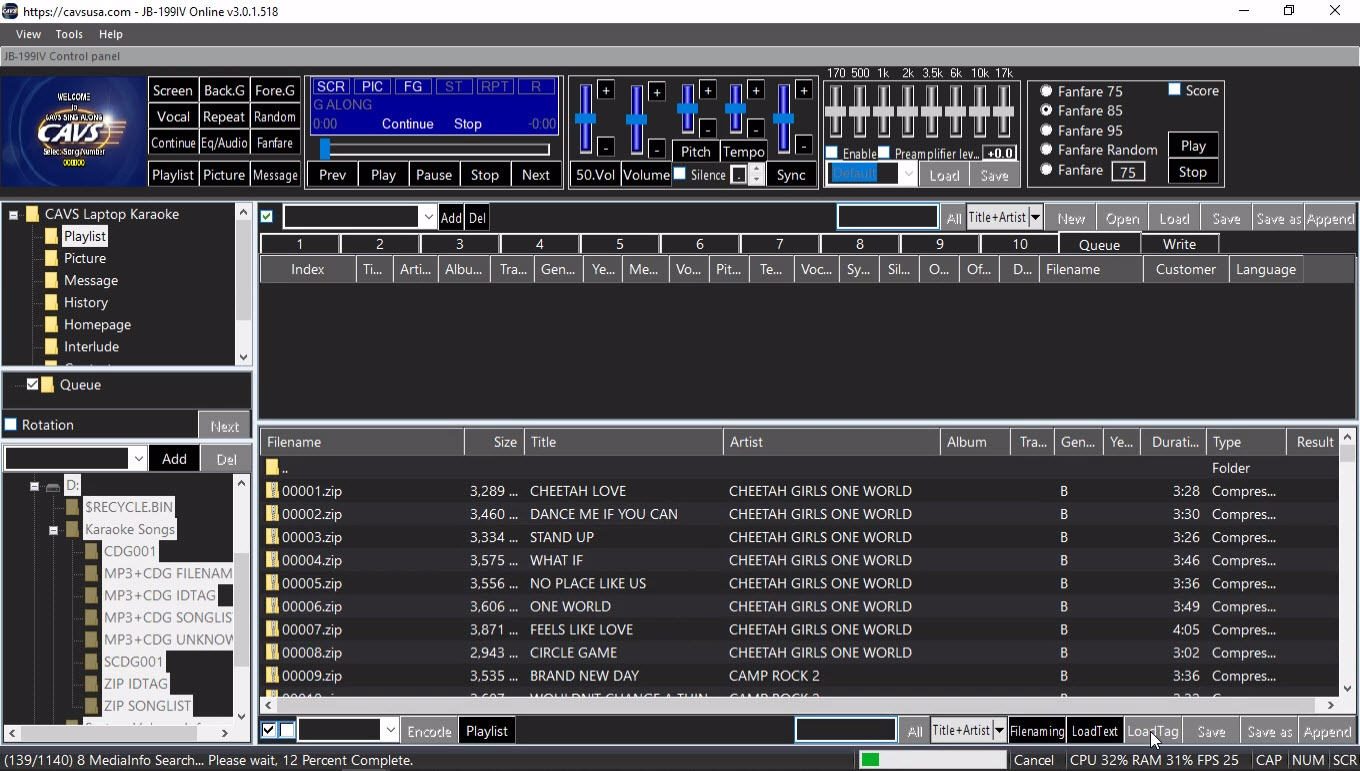
3. Song information is stored in the song filenames (for example, CA13816-0-Usher-There Goes My Baby.zip)
Close the JB-199 IV karaoke program by pressing the X mark at the top right corner of the Control Panel. Exit out to Windows Desktop and open the folder in which the files are stored. In this example, the folder is G:\ZIP FILENAME. There are ZIP files with the file names consisting of title and artist. There are also ZIP files with the file names consisting of album, track, artist, and title. Song files with such file name styles are common in the external hard drives and website downloads.
Right click on G:\ZIP FILENAME folder and select Copy.
Go to a folder in the JB-199 IV, for example D:\Karaoke Songs. Right click on an empty spot and select Paste. The folder will begin copying.
When the copying is complete, the pasted folder may be renamed. In this example, the folder name is unchanged.
Next, start the JB-199 IV karaoke program. Open the folder D:\Karaoke Songs\ZIP FILENAME in the Folder Menu. The ZIP song files will load into the File Browser.
In the files, there are two groups each using a different file name structure. First ten song files are named as {Title} - {Artist}. Second ten song files are named as {Album} - {Track} - {Title} - {Artist}. Both are using "-" as the field separator. Select the first 10 song files by click and shift-click. Press the Filenaming button Right lick on the marked song files and select Filenaming.
The File Naming window will pop up. Click on Title followed by Artist into the Name field. The file name structure at the top will show {Title}-{Artist}. Note that "-" is used as the separator. Any blank spaces before and after each field are automatically ignored.
Click OK. The file names are parsed according to the file name structure and loaded into the title and artist fields.
Mark the next group of song files with click and shift-click, right click on the marked song files, and select Filenaming.
In the File Naming window, press Clear to clear any previously used file name pattern. Click on Skip, Skip, Title, and Artist. The file name pattern at the top will show {Skip}-{Skip}-{Title}-{Artist}. The Skip is used to jump over a field that is not relevant. Alternatively a new file name pattern can be {Album}-{Track}-{Title}-{Artist}. Again the "-" is used as the separator and any spaces before and after each field are automatically ignored.
Click OK. The file names are parsed according to the file name pattern and loaded into the title and artist fields.
The Filenaming is a powerful tool to pick off the title and artist information from the song file names. In practice, due to lack of a standard in file naming, several or more different file name patterns are likely needed to handle all the song files.
4. Song information is not available with the song files
Close the JB-199 IV karaoke program by pressing the X mark at the top right corner of the Control Panel. Exit out to Windows Desktop and open the folder in which the files are stored. In this example, the folder is G:\ZIP UNKNOWN which has ZIP song files without the title and artist information.
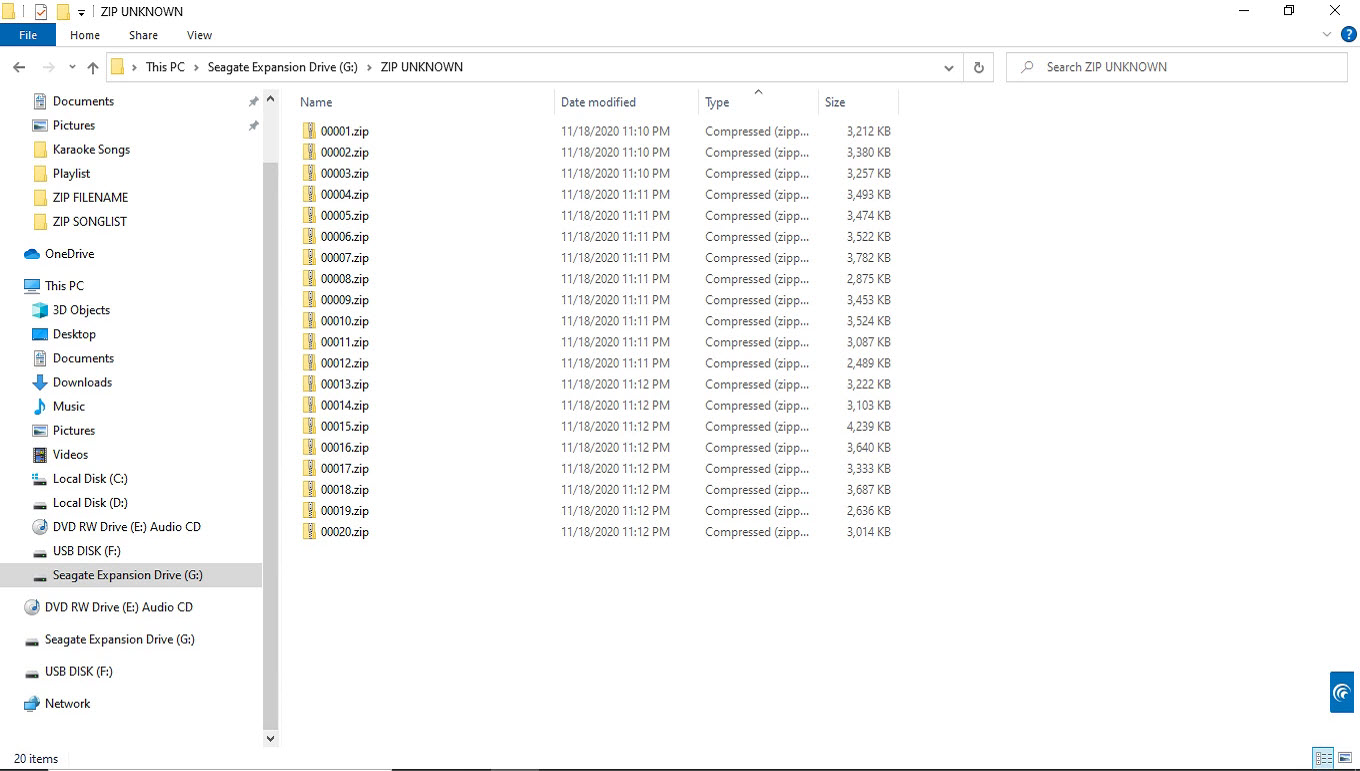
Right click on the G:\ZIP UNKNOWN folder and select Copy.

Go to a folder in the JB-199 IV, for example, D:\Karaoke Songs. Right click on an empty spot and select Paste. The folder G\ZIP UNKNOWN will begin copying.

When the copying is done, the pasted folder may be renamed. In this example, the folder name is unchanged.
Next, start the JB-199 IV karaoke program.
Open the folder D:\Karaoke Songs\ZIP UNKNOWN in the Folder Menu.
The ZIP song files will load into the File Browser.
Next double click on any title or artist field of a song file.
Type in the title or artist name followed by pressing Enter.
This is the last resort of manually typing in the song information.
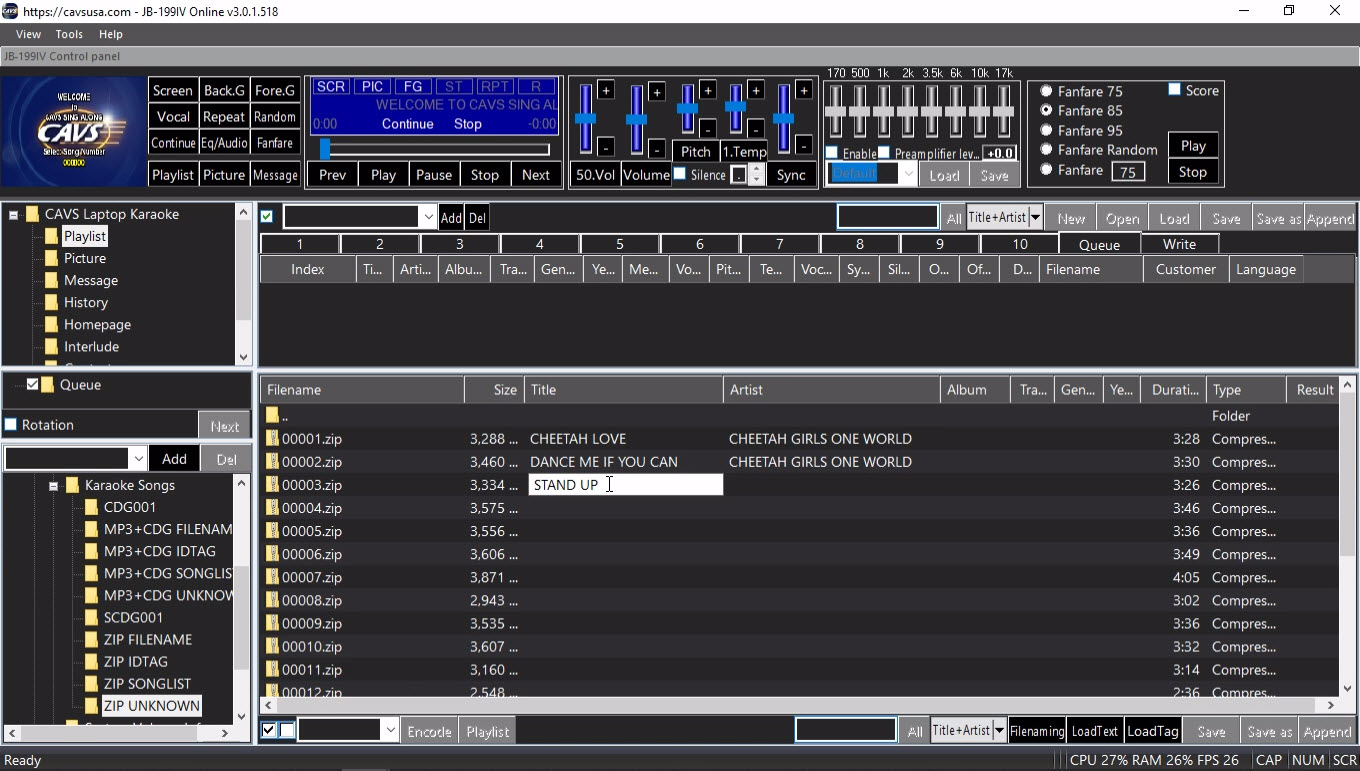
This completes the four cases.
In each case, the ZIP song files are copied into the JB-199 IV and then opened in the File Browser where the titles and artists are filled in.
Next to make a playlist, click on any playlist 1 - 10 slot in the List Browser.
In this example, the playlist 1 is selected.

Note that the ZIP files of the case 3 is pictured above. The instruction to make a playlist and play from the playlist is the same for all four cases.
Select all songs in the File Browser by clicking on the Check mark at the bottom of the screen. Press the Playlist button at the bottom of the screen to load the marked songs into the playlist 1 slot. This is the playlist.

Press Save as button in the upper right corner of the List Browser. A popup window will appear. Name the playlist and click Save. In this example, the playlist is named ZIP FILENAME.

Next step is to load the playlist and play from the playlist. First reset the Control Panel to its default form by clearing the File Browser and the List Browser. Press New to clear the playlist 1 slot and press Queue to set the List Browser. Press My Server in the Folder Menu and clear the File Browser.
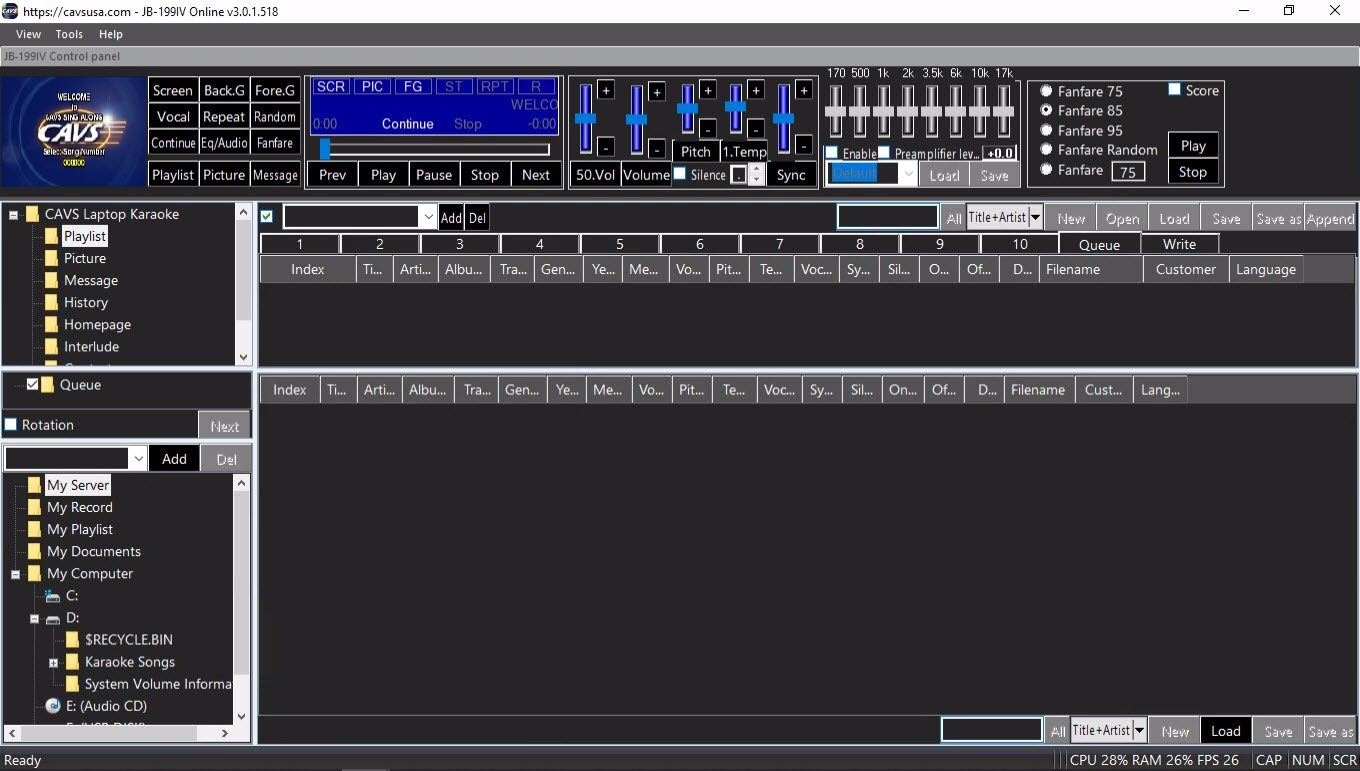
The playlist ZIP FILENAME can be loaded into any playlist slot 1 - 10, 11 - 20, or My Server.
Note that My Server is a playlist slot with a difference that a playlist loaded into My Server is shared with online guests and E-Songbooks.
In this example, the playlist is loaded into My Server.
Press to highlight My Server.
Press the Load button in the bottom right corner of the File Browser.
Select ZIP FILENAME playlist and press Open.
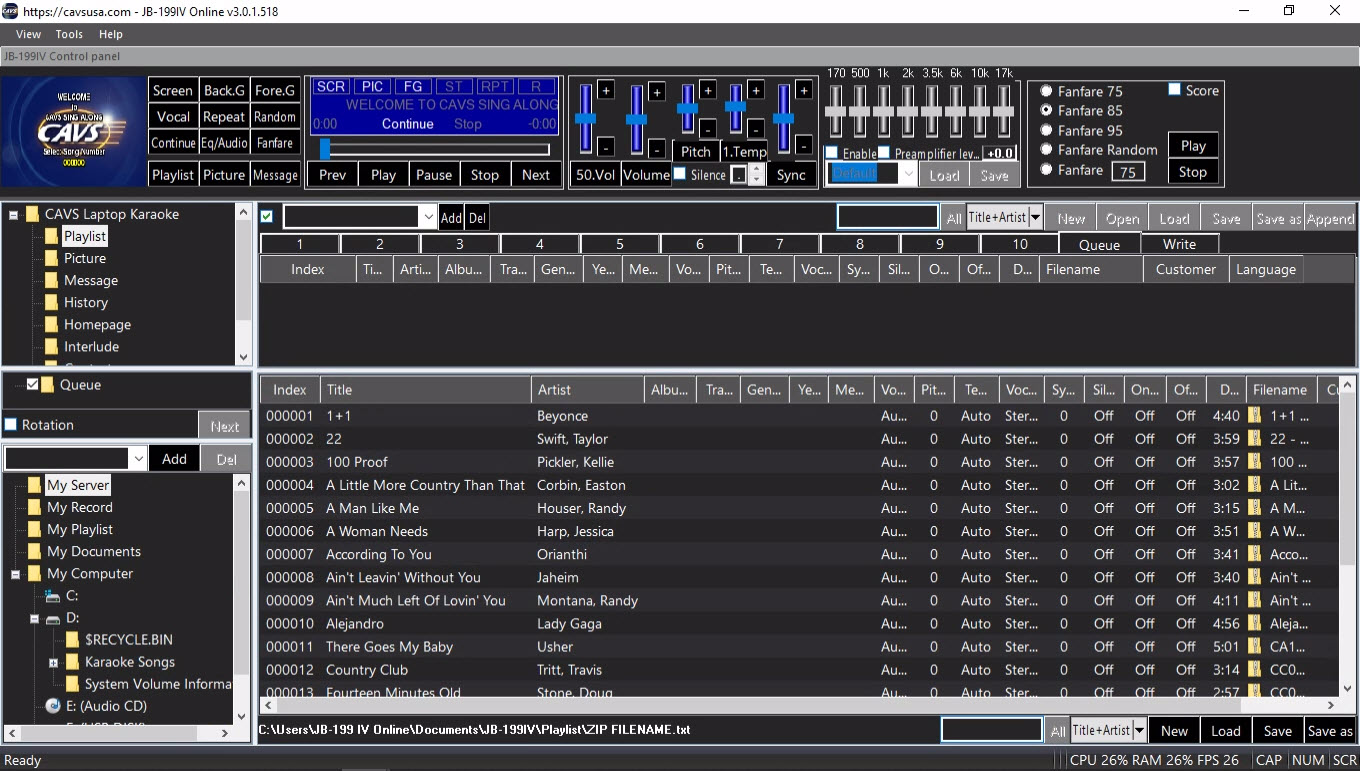
Right click on a song and select Queue to send it to the Queue. Alternatively drag & drop the song into the Queue.

Press Play to begin playing.

A playlist can be sorted or searched by title, artist, album, filename, etc. It can also be cut, merged, and appended to add or remove songs. For detail instruction on how to edit a playlist, go to 7.1.4 Playlist.
The MP4 is a video file format commonly found in Youtube and download websites. They are popular for their live and high resolution background video.
The MP4 song files are however large in file sizes often reaching 20 to 50 times the size of MP3 + CDG files. And the file size is directly proportional to the required bandwidth for streaming. The MP4 files will thus restrict the number of online guests and E-Songbooks that can connect at any one time.
There are many different encoding programs to create the MP4 files. They can be found online under the name MP4 Encoder or Video Encoder. The diversity of the encoding programs however can cause an incompatibility issue that some files play in certain players but some do not. To remedy this, the JB-199 IV has a feature to convert the MP4 file to the FFMPEG standard format of the MP4 files.
Not all MP4 files have the same way of storing the song information such as title and artist. For example, the files may have generic names as
- 00001.mp4
- 00002.mp4
- ...
These files are likely keeping the song information in a separate song list or ID tags.
The files may also have names as
- CA13816-0-Usher-There Goes My Baby.mp4
- CA00003-0-Tritt, Travis-Country Club.mp4
- ...
These files have the song information right on their file names.
Below, the MP4 files are considered in four different cases.
- Song information is stored in a song list (for example, songlist.txt)
- Song information is stored in the ID tag
- Song information is stored on the file names (for example, CA13816-0-Usher-There Goes My Baby.mp4)
- Song information is not available
Note that the song information is considered to be title and artist in this section. It can be narrowed, for example, to title or artist only or expanded, for example, to album, genre, etc.
1. Song information is stored in a song list (for example, songlist.txt)
Close the JB-199 IV karaoke program by pressing the X mark at the top right corner of the Control Panel. Exit out to Windows Desktop and open the folder in which the song files are stored. In this example, the folder is G:\MP4 SONGLIST. There are MP4 files and songlist.txt.
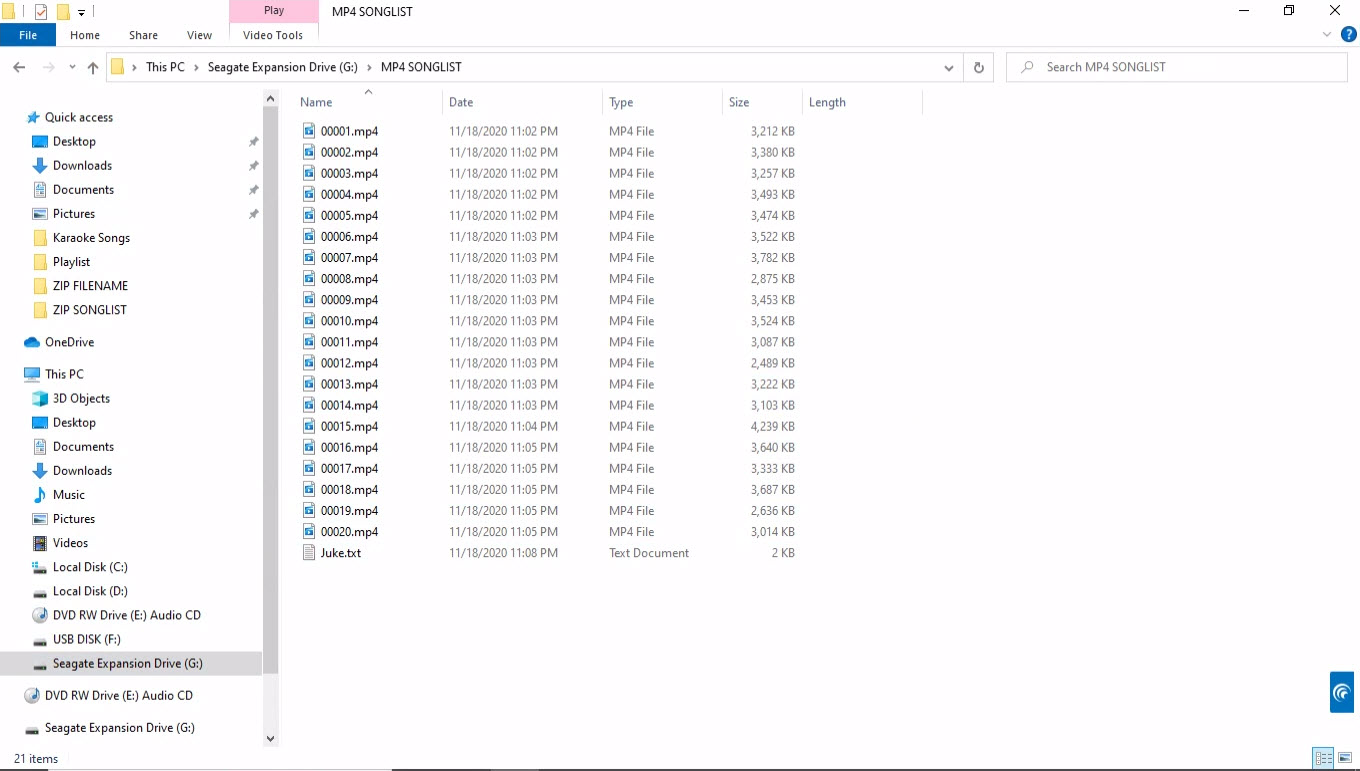
Double click on the songlist.txt to open it in a text editor. In this example, the file is opened in Windows Notepad. Notice that the information for each song file is organized as the filename, title, and artist, each separated by "|" sign. "|" is called the pipe sign which is typed by keystrokes Shift-\.
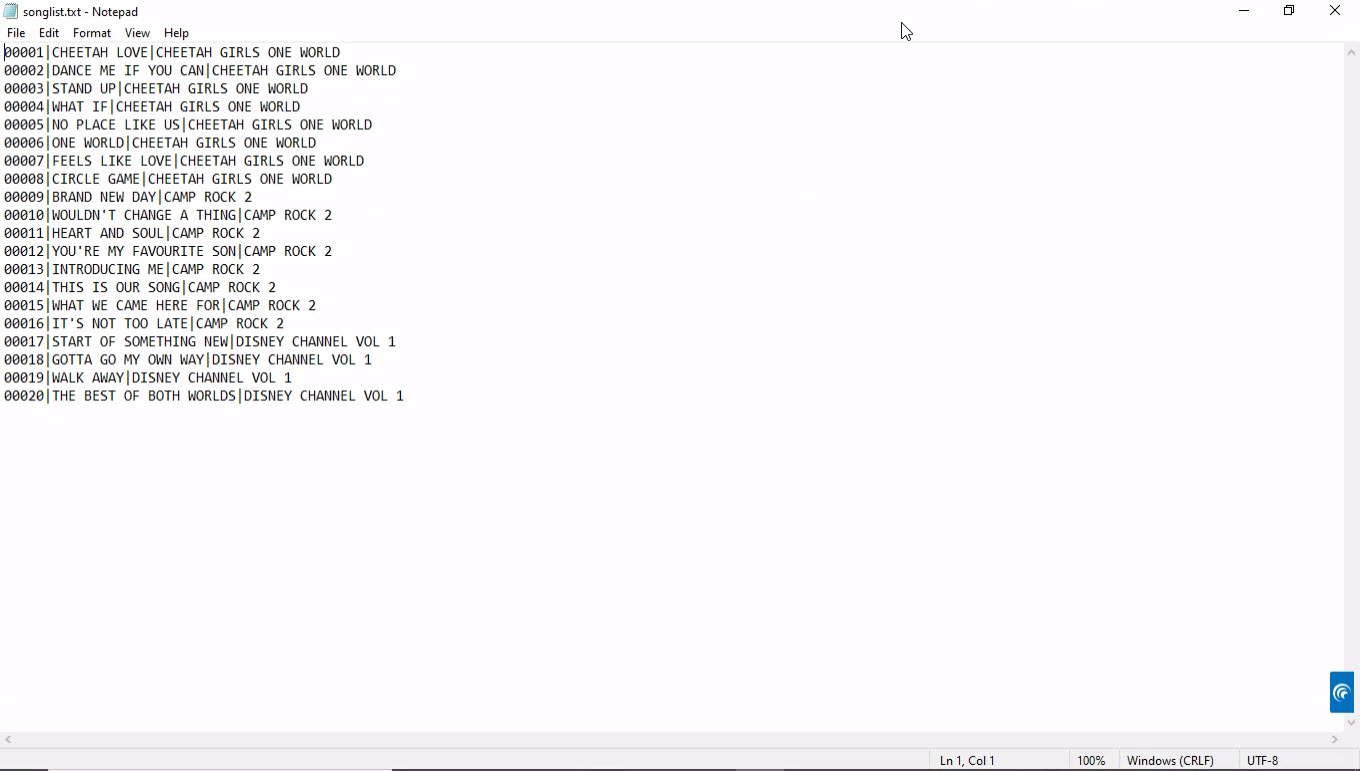
For song lists that have different forms, use the text editor to change accordingly.
Next right click on the G:\MP4 SONGLIST folder and select Copy.
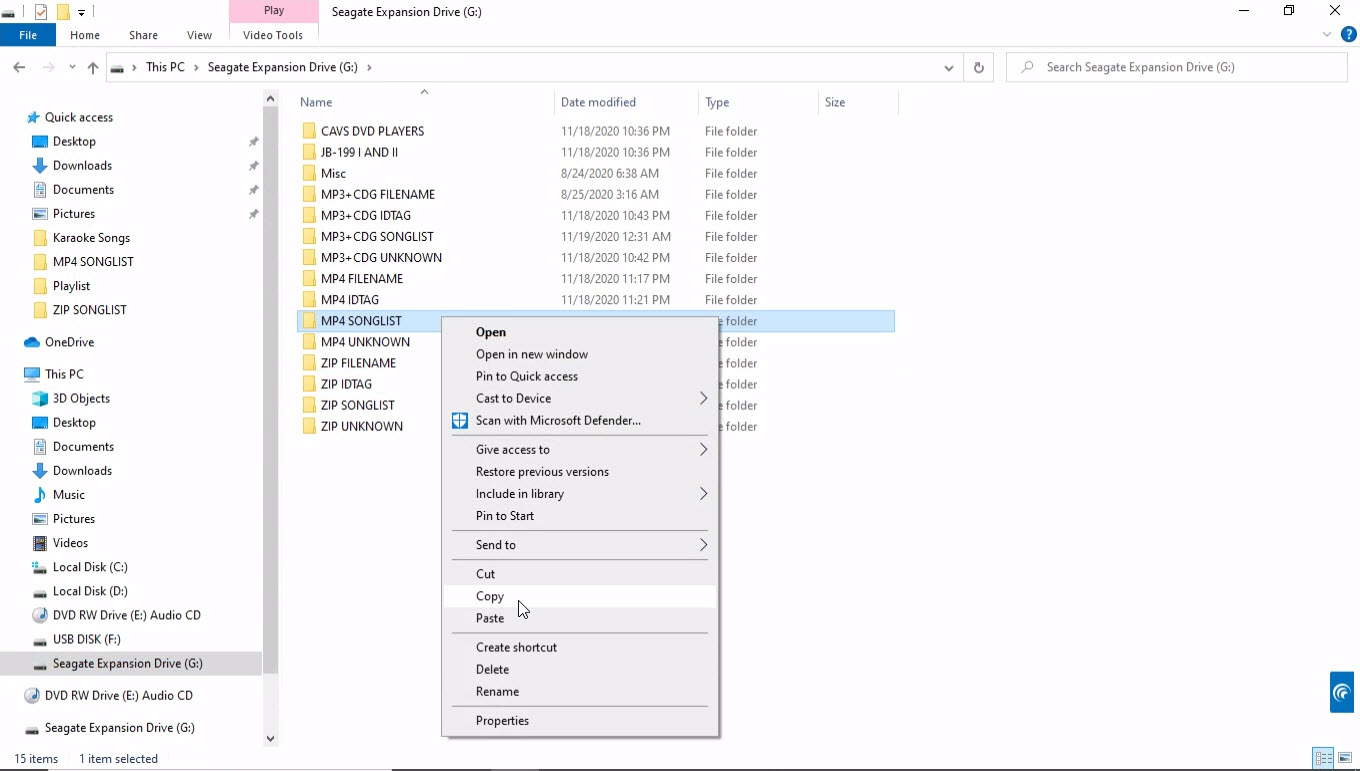
Go to a folder in the JB-199 IV, for example D:\Karaoke Songs, right click, and select Paste. The folder G:\MP4 SONGLIST will begin copying.
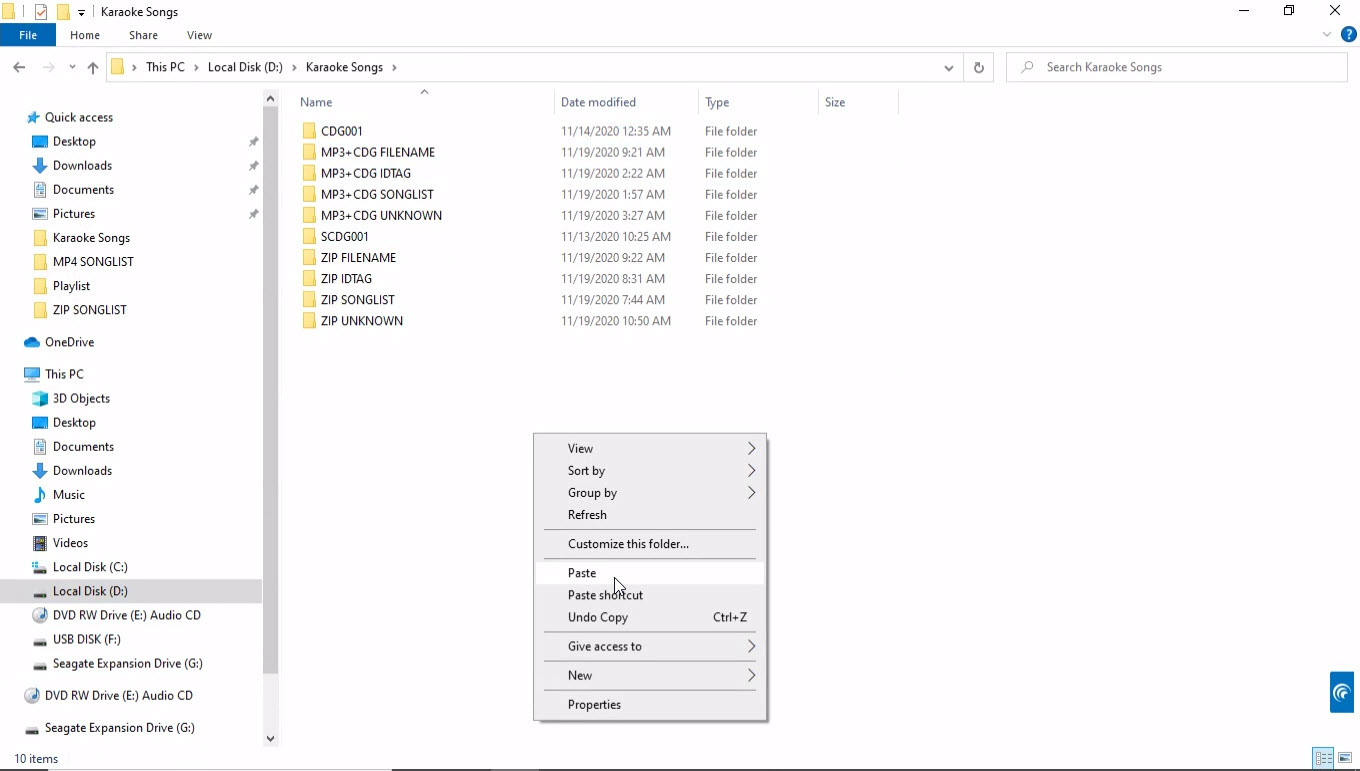
When the copying is done, the pasted folder may be renamed. In this example, the folder name is unchanged.
Next, start the JB-199 IV karaoke program. Open the folder D:\Karaoke Songs\MP4 SONGLIST in the Folder Menu.
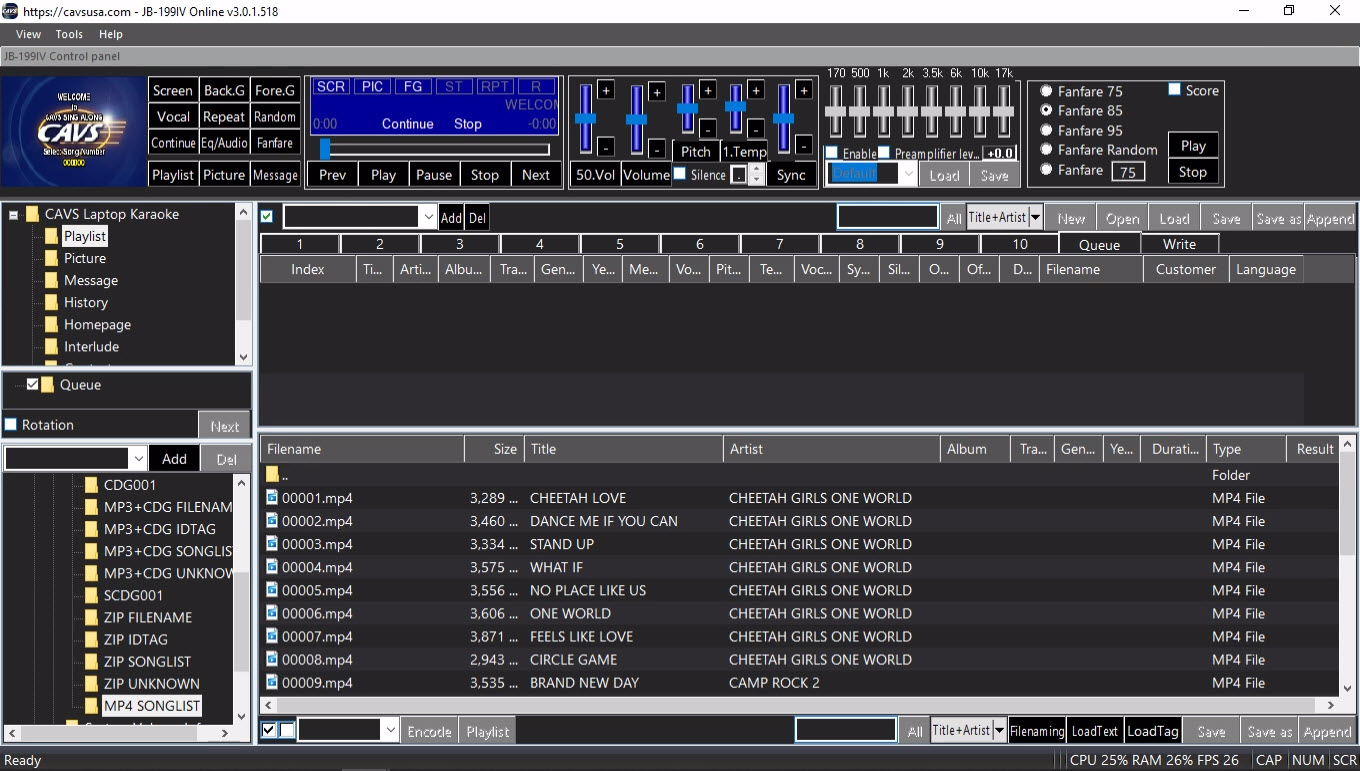
The MP4 song files will load into the File Browser.
The title and artist information in the songlist.txt file will also load automatically.
If the title and artist information does not loaded automatically, press LoadText button at the bottom right corner of the File Browser. A pop-up window will appear.
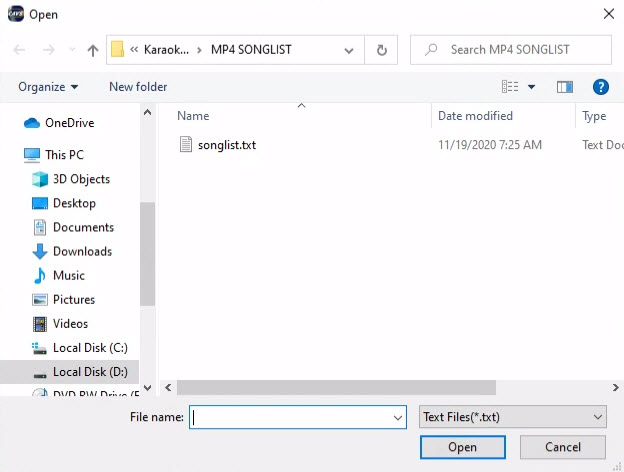
Select the file songlist.txt and press Open. Another pop-up window will appear confirming how many songs are to be updated with title and artist information. Confirm the number of the songs to be updated and press Yes.

The title and artist information will load into the File Browser.
2. Song information is stored in the ID Tag
Close the JB-199 IV karaoke program by pressing the X mark at the top right corner of the Control Panel. Exit out to Windows Desktop and open the folder in which the files are stored. In this example, the folder is G:\MP4 IDTAG which contains the MP4 song files with embedded ID Tags.

Right click on the G:\MP4 IDTAG folder and select Copy.
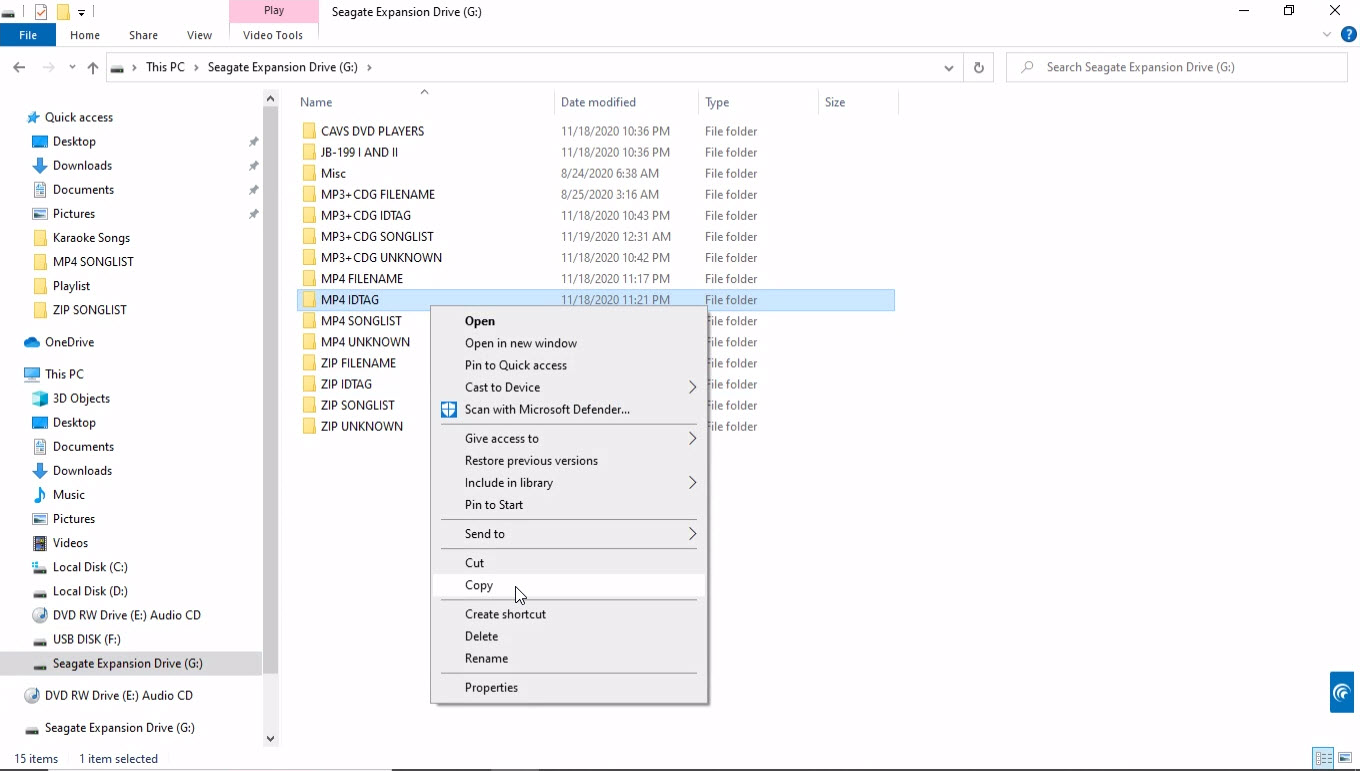
Go to a folder in the JB-199 IV, for example D:\Karaoke Songs. Right click on an empty spot and select Paste. The folder will begin copying.
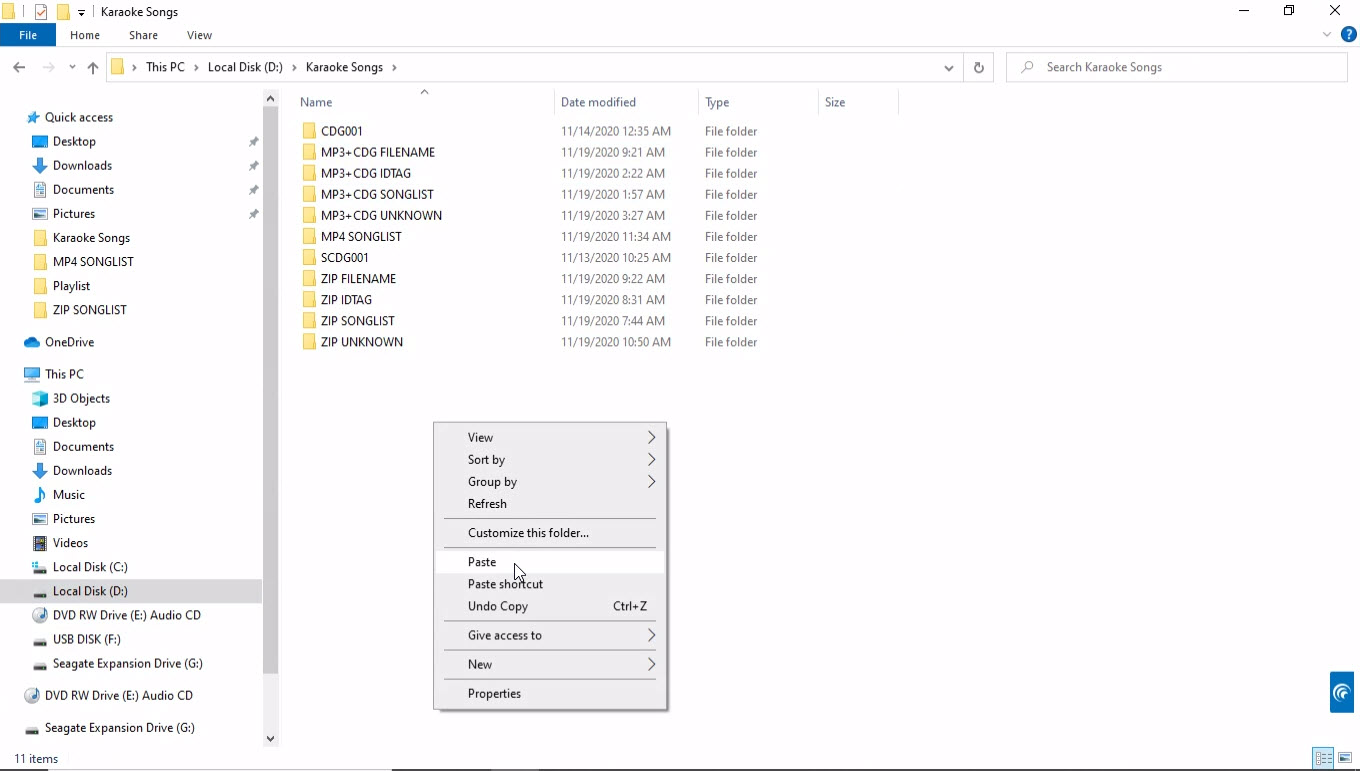
When the copying is done, the pasted folder may be renamed. In this example, the folder name is unchanged.
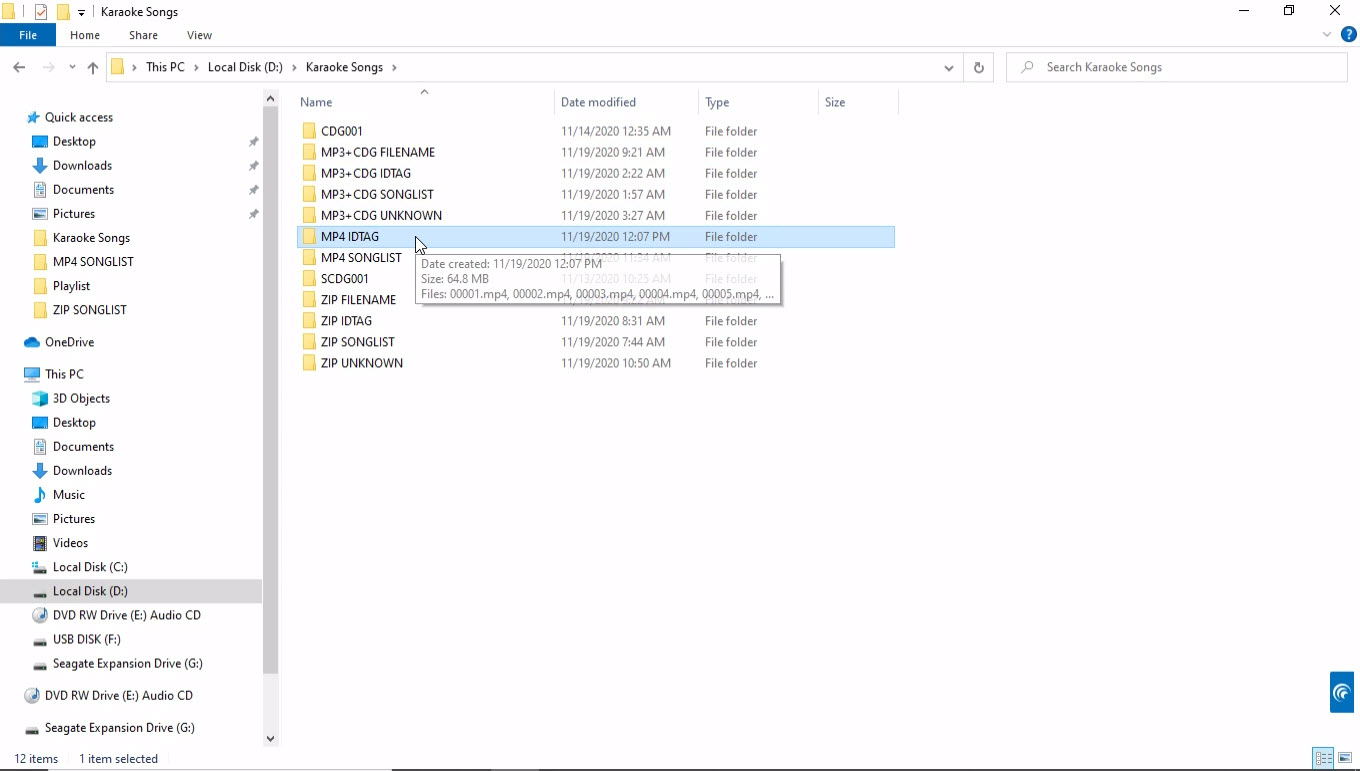
Next, start the JB-199 IV karaoke program. Open the folder D:\Karaoke Songs\ZIP IDTAG in the Folder Menu. The ZIP song files will load into the File Browser. Next the title and artist information will automatically fill in from the ID tags.

If the title and artist information does not fill in automatically, select all song files in the File Browser by pressing the X mark at the bottom of the screen.
Press the LoadTag button at the bottom right corner of the File Browser.
It will begin the ID Tag loading.
The progress of the ID Tags loading will be shown in the green bar at the bottom of the screen.
Double click Cancel at the bottom to stop the ID Tag loading.
When done, the title and artist information will appear in the File Browser.
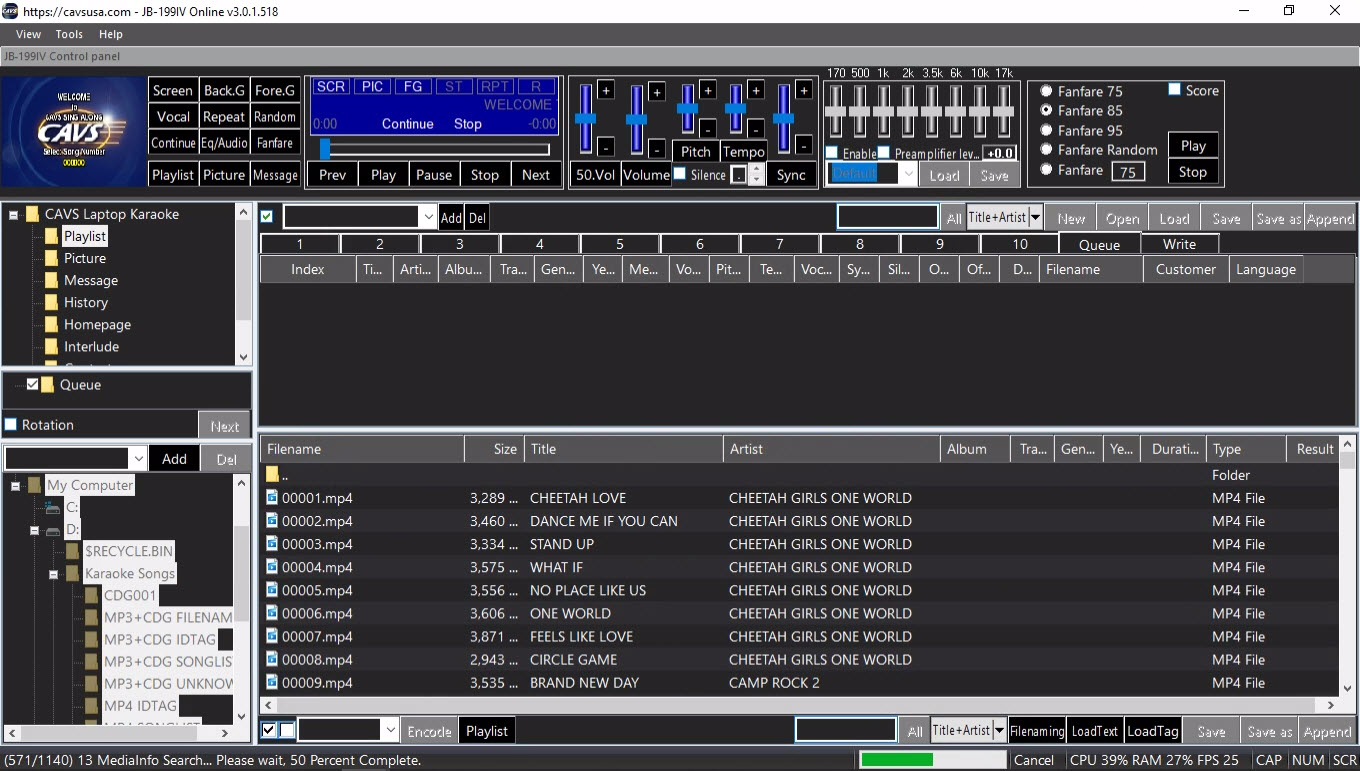
3. Song information is stored in the song filenames (for example, CA13816-0-Usher-There Goes My Baby.mp4)
Close the JB-199 IV karaoke program by pressing the X mark at the top right corner of the Control Panel. Exit out to Windows Desktop and open the folder in which the files are stored. In this example, the folder is G:\MP4 FILENAME. There are MP4 files with the file names consisting of title and artist. There are also MP4 files with the file names consisting of album, track, artist, and title. Song files with such file name styles are common in the external hard drives and website downloads.
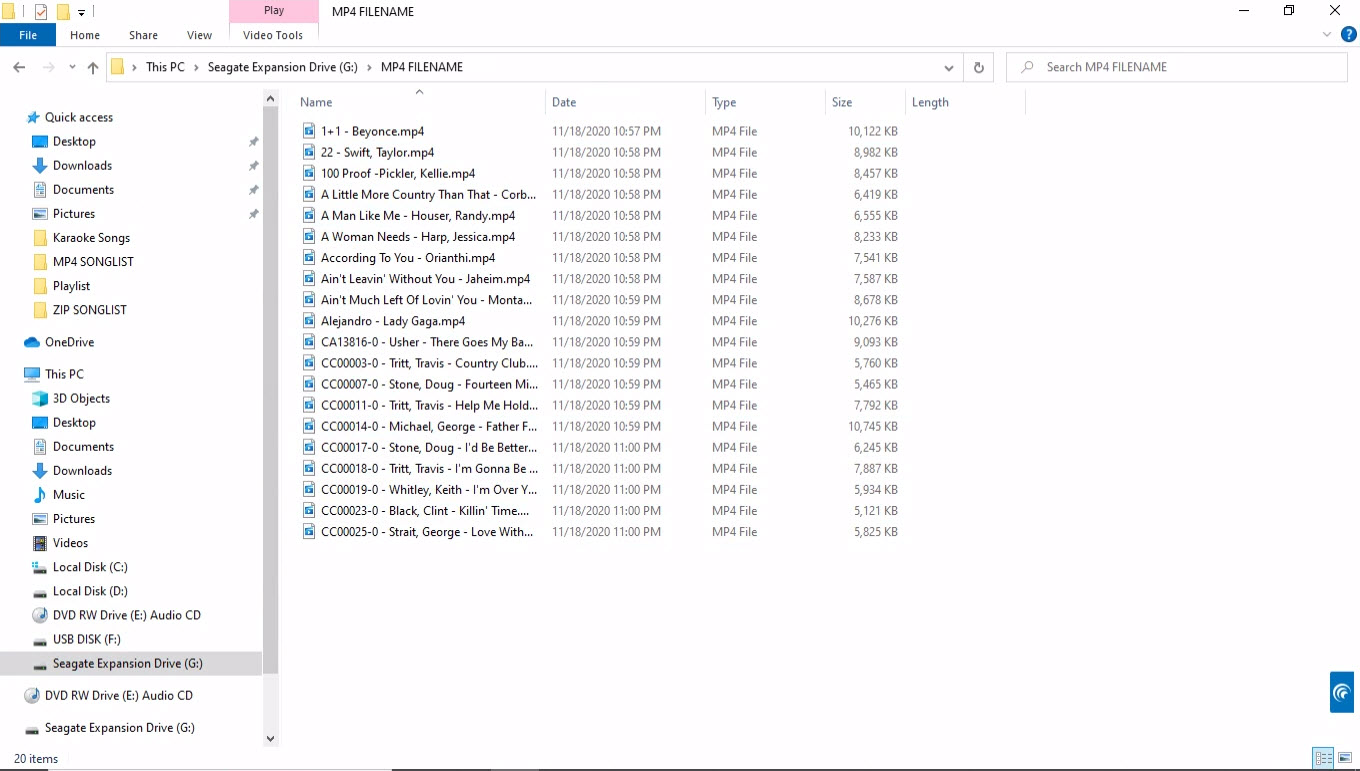
Right click on G:\MP4 FILENAME folder and select Copy.

Go to a folder in the JB-199 IV, for example D:\Karaoke Songs. Right click on an empty spot and select Paste. The folder will begin copying.
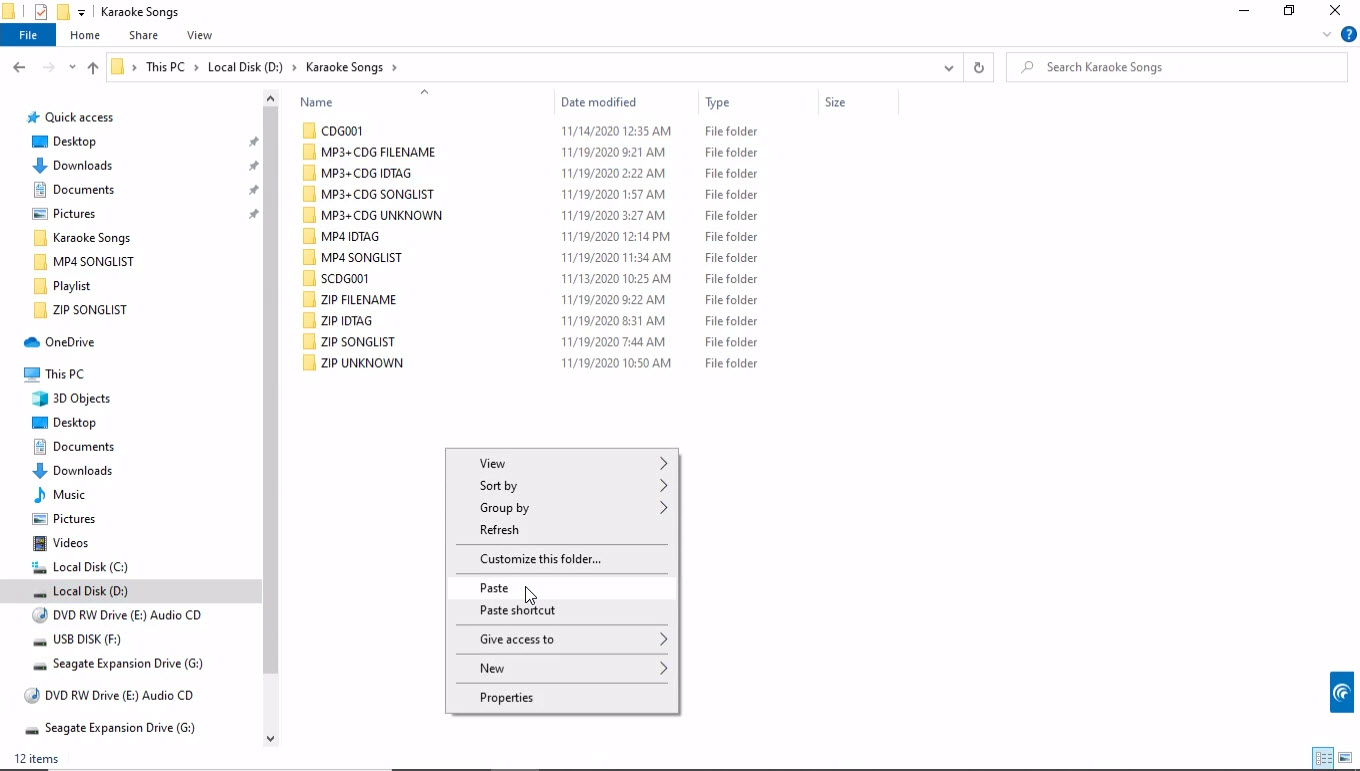
When the copying is complete, the pasted folder may be renamed. In this example, the folder name is unchanged.
Next, start the JB-199 IV karaoke program. Open the folder D:\Karaoke Songs\MP4 FILENAME in the Folder Menu. The MP4 song files will load into the File Browser.
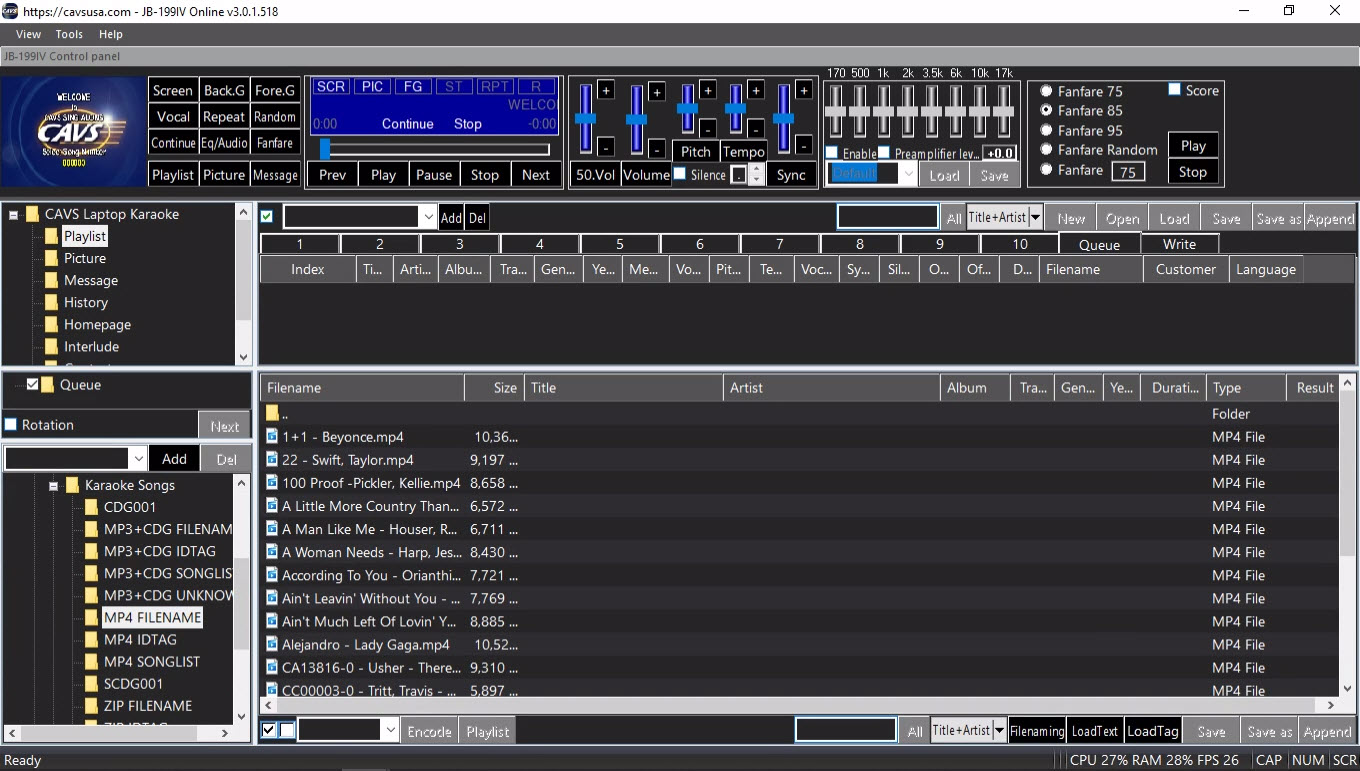
In the files, there are two groups each using a different file name structure. First ten song files are named as {Title} - {Artist}. Second ten song files are named as {Album} - {Track} - {Title} - {Artist}. Both are using "-" as the field separator. Select the first 10 song files by click and shift-click. Press the Filenaming button Right lick on the marked song files and select Filenaming.
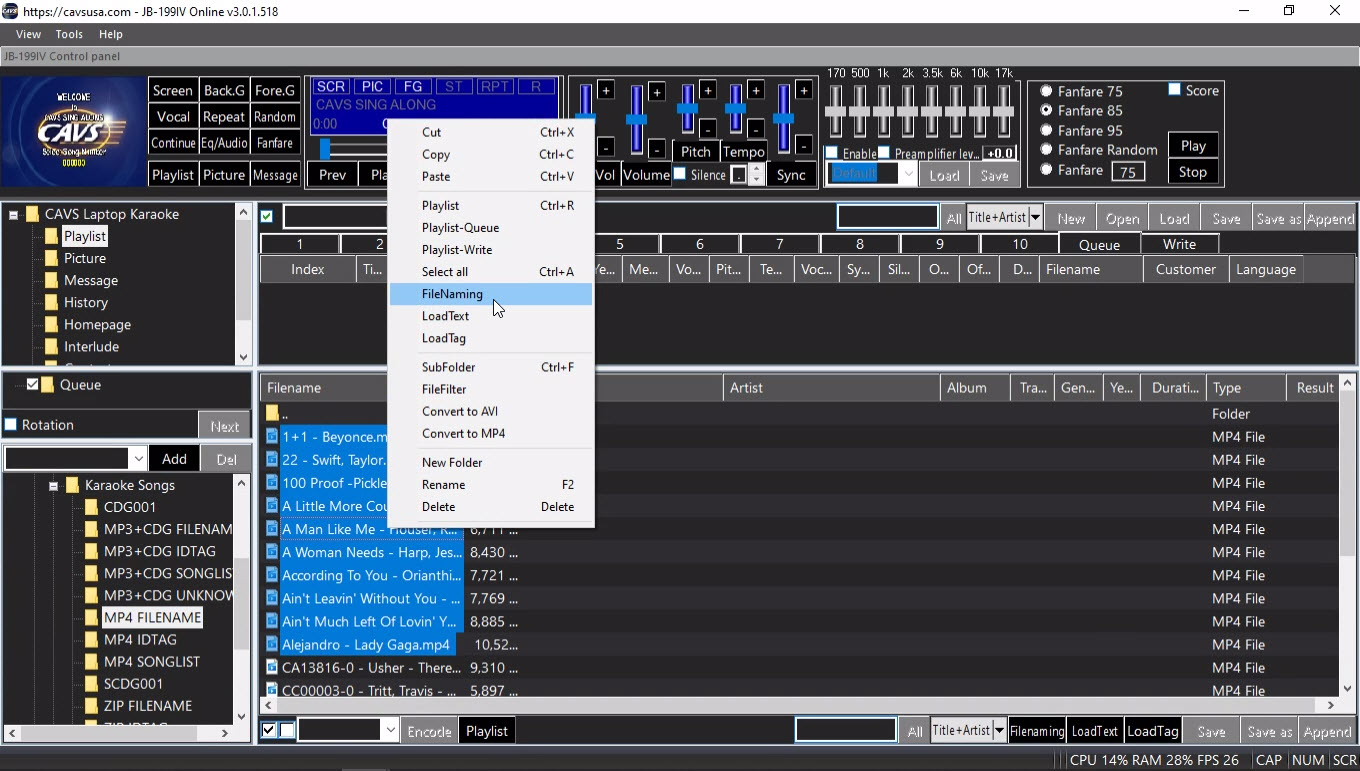
The File Naming window will pop up. Click on Title followed by Artist into the Name field. The file name structure at the top will show {Title}-{Artist}. Note that "-" is used as the separator. Any blank spaces before and after each field are automatically ignored.
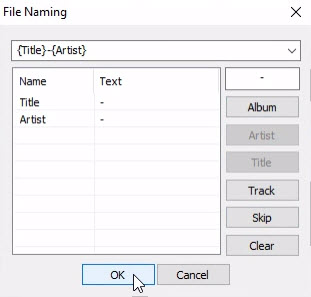
Click OK. The file names are parsed according to the file name structure and loaded into the title and artist fields.

Mark the next group of song files with click and shift-click, right click on the marked song files, and select Filenaming.

In the File Naming window, press Clear to clear any previously used file name pattern. Click on Skip, Skip, Title, and Artist. The file name pattern at the top will show {Skip}-{Skip}-{Title}-{Artist}. The Skip is used to jump over a field that is not relevant. Alternatively a new file name pattern can be {Album}-{Track}-{Title}-{Artist}. Again the "-" is used as the separator and any spaces before and after each field are automatically ignored.
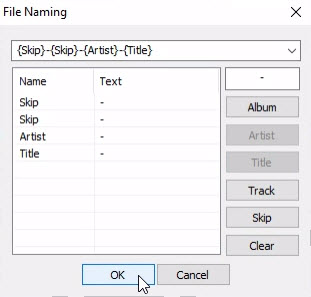
Click OK. The file names are parsed according to the file name pattern and loaded into the title and artist fields.
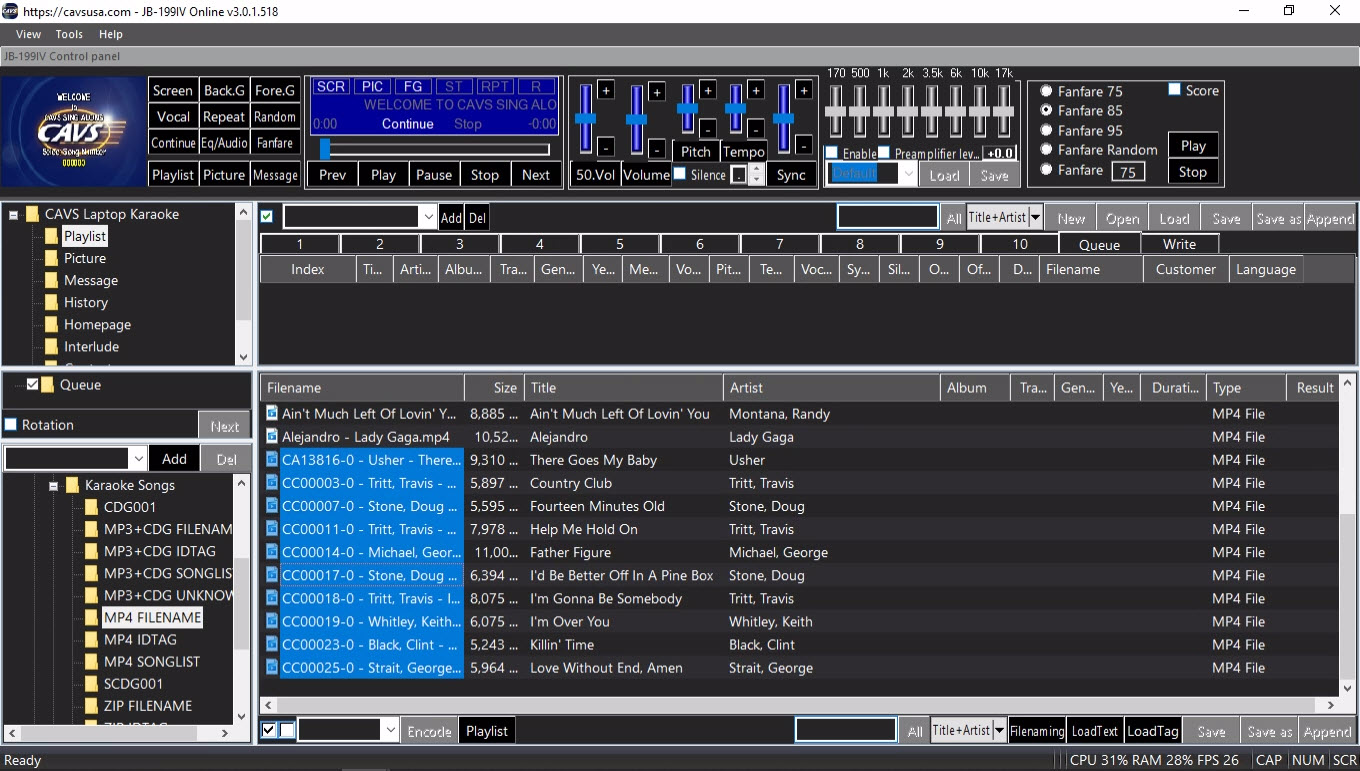
The Filenaming is a powerful tool to pick off the title and artist information from the song file names. In practice, due to lack of a standard in file naming, several or more different file name patterns are likely needed to handle all the song files.
4. Song information is not available with the song files
Close the JB-199 IV karaoke program by pressing the X mark at the top right corner of the Control Panel. Exit out to Windows Desktop and open the folder in which the files are stored. In this example, the folder is G:\MP4 UNKNOWN which has MP4 song files without the title and artist information.

Right click on the G:\MP4 UNKNOWN folder and select Copy.
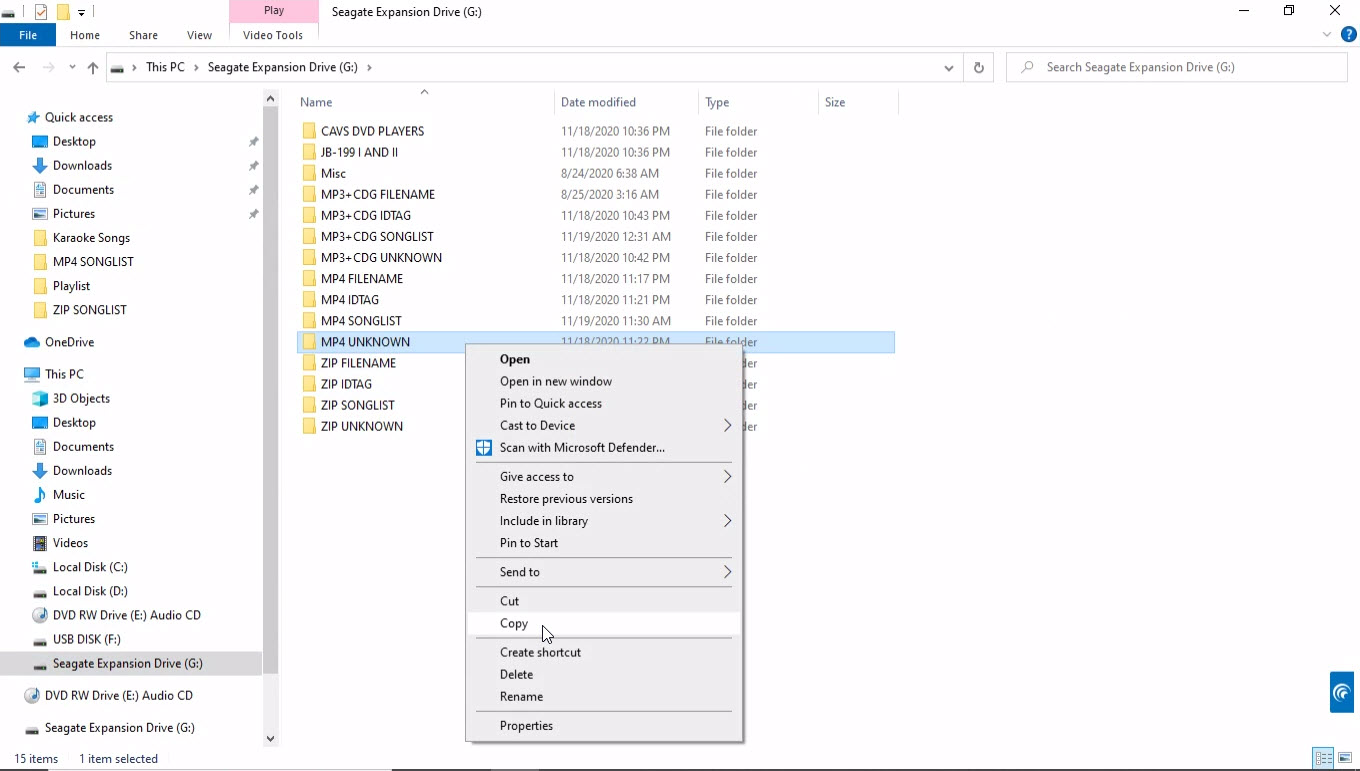
Go to a folder in the JB-199 IV, for example, D:\Karaoke Songs. Right click on an empty spot and select Paste. The folder G\MP4 UNKNOWN will begin copying.

When the copying is done, the pasted folder may be renamed. In this example, the folder name is unchanged.
Next, start the JB-199 IV karaoke program.
Open the folder D:\Karaoke Songs\MP4 UNKNOWN in the Folder Menu.
The MP4 song files will load into the File Browser.
Next double click on any title or artist field of a song file.
Type in the title or artist name followed by pressing Enter.
This is the last resort of manually typing in the song information.
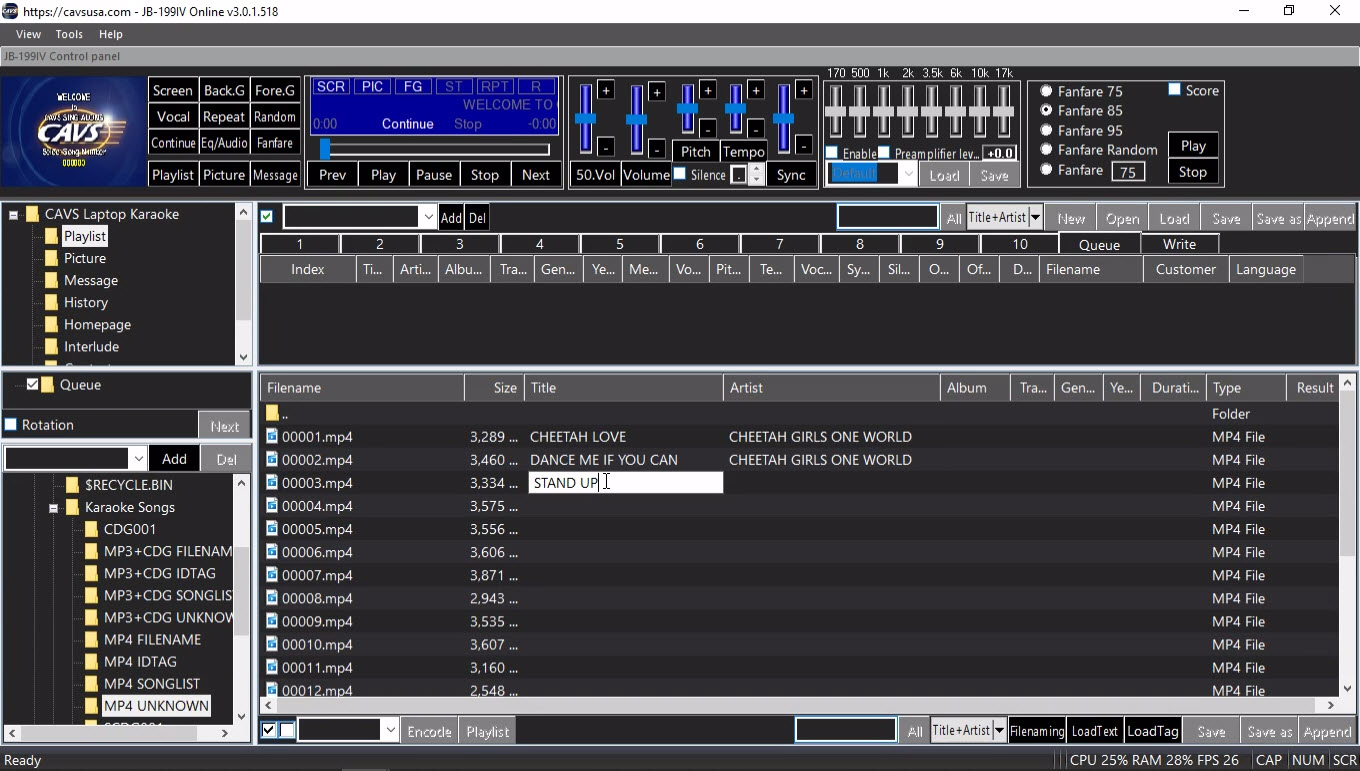
This completes the four cases.
In each case, the MP4 song files are copied into the JB-199 IV and then opened in the File Browser where the titles and artists are filled in.
Next to make a playlist, click on any playlist 1 - 10 slot in the List Browser.
In this example, the playlist 1 is selected.
Note that the MP4 files of the case 4 is pictured above. The instruction to make a playlist and play from the playlist is the same for all four cases.
Select all songs in the File Browser by clicking on the Check mark at the bottom of the screen. Press the Playlist button at the bottom of the screen to load the marked songs into the playlist 1 slot. This is the playlist.
Press Save as button in the upper right corner of the List Browser. A popup window will appear. Name the playlist and click Save. In this example, the playlist is named MP4 UNKNOWN.
Next step is to load the playlist and play from the playlist. First reset the Control Panel to its default form by clearing the File Browser and the List Browser. Press New to clear the playlist 1 slot and press Queue to set the List Browser. Press My Server in the Folder Menu and clear the File Browser.
The playlist MP4 FILENAME can be loaded into any playlist slot 1 - 10, 11 - 20, or My Server.
Note that My Server is a playlist slot with a difference that a playlist loaded into My Server is shared with online guests and E-Songbooks.
In this example, the playlist is loaded into My Server.
Press to highlight My Server.
Press the Load button in the bottom right corner of the File Browser.
Select MP4 FILENAME playlist and press Open.
Right click on a song and select Queue to send it to the Queue. Alternatively drag & drop the song into the Queue.
Press Play to begin playing.
A playlist can be sorted or searched by title, artist, album, filename, etc. It can also be cut, merged, and appended to add or remove songs. For detail instruction on how to edit a playlist, go to 7.1.4 Playlist.
CAVS JB-199 I and II stores the song files in a folder called Songs at C:\NJB99\ or D:\ depending on its release date and the upgrades performed thereafter. Locate the Songs folder and copy it into the JB-199 IV using an external drive as a go-between. That is, connect an external drive to the JB-199 I or II and copy out the Songs folder. Then connect the external drive to the JB-199 IV and copy the Songs folder into the JB-199 IV. In this example, the Songs folder is copied from G:\JB-199 I AND II\ of an external drive into D:\JB-199 I AND II\ of the JB-199 IV.

The Songs folder of JB-199 I or II has multiple subfolders JB000000, JB001000, etc. It is essential to copy the whole folder including all subfolders.
Start the JB-199 IV karaoke program. Open the folder D:\Karaoke Songs\JB-199 I AND II\Songs in the Folder Menu. The song files of the JB-199 I or II will appear in the File Browser as a list of NCG files. The title and artist fields will fill in automatically just as they were in the JB-199 I or II.
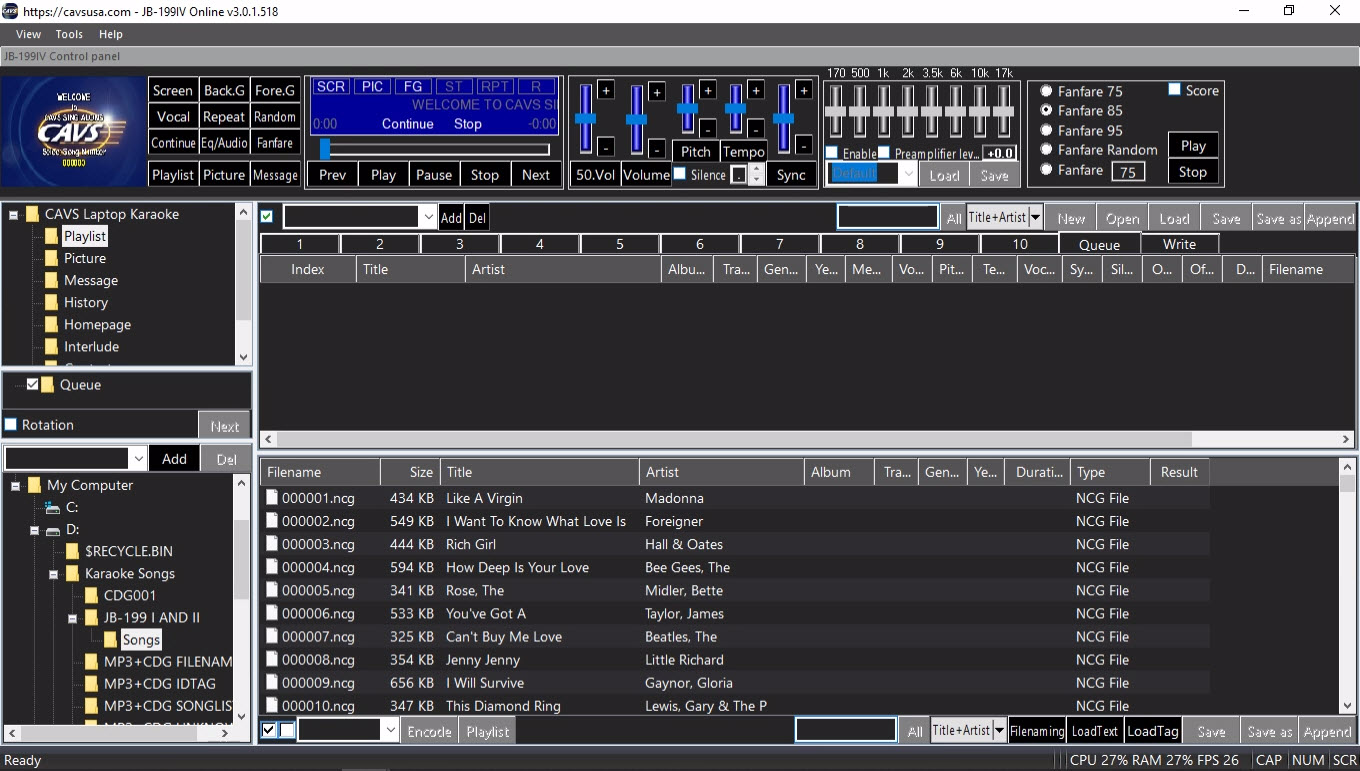
To make a playlist, select any of playlist slots 1 - 10 in the List Browser. In this example, the playlist 1 slot is selected.
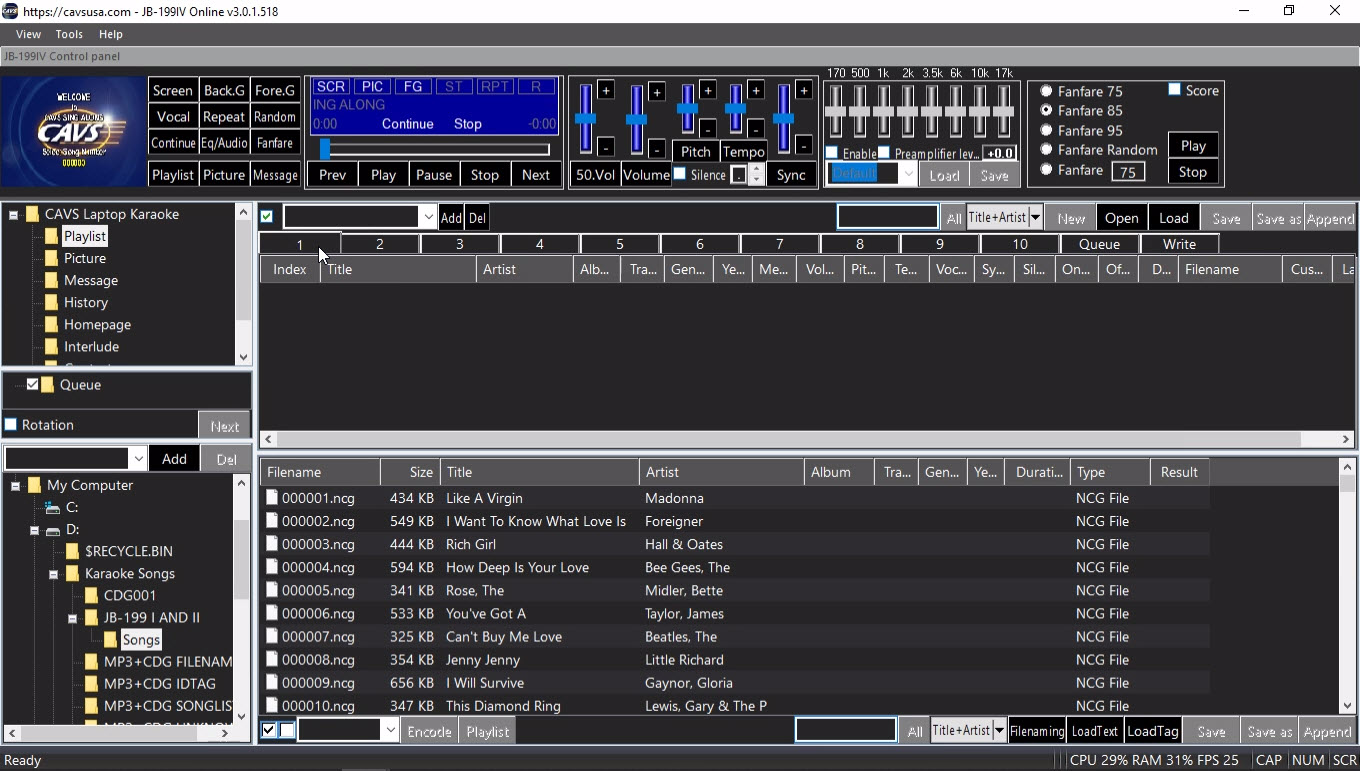
Select all songs in the File Browser by pressing the Check Box at the bottom of the screen.
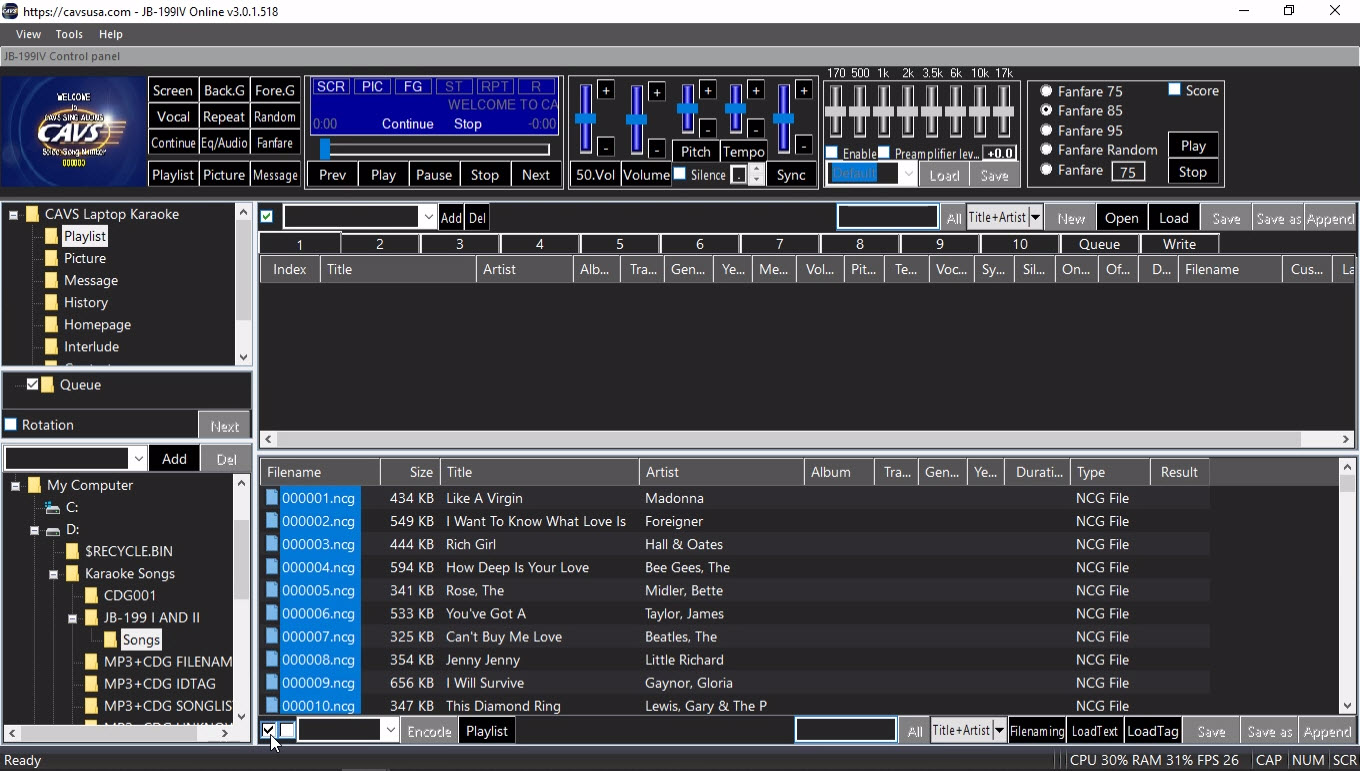
Next press the Playlist button at the bottom of the screen to send a copy of all highlighted songs in the File Browser to the playlist 1. This new list in the playlist 1 slot is the new playlist for the songs of the JB-199 I or II. It contains the song information copied from the File Browser and unseen to the users, is tagged with the location of the song files. In this example, the location is the D:\Karaoke Songs\JB-199 I AND II\Songs.

Before saving the playlist, note that it has new Index numbers that starts from 1 and are sequential.
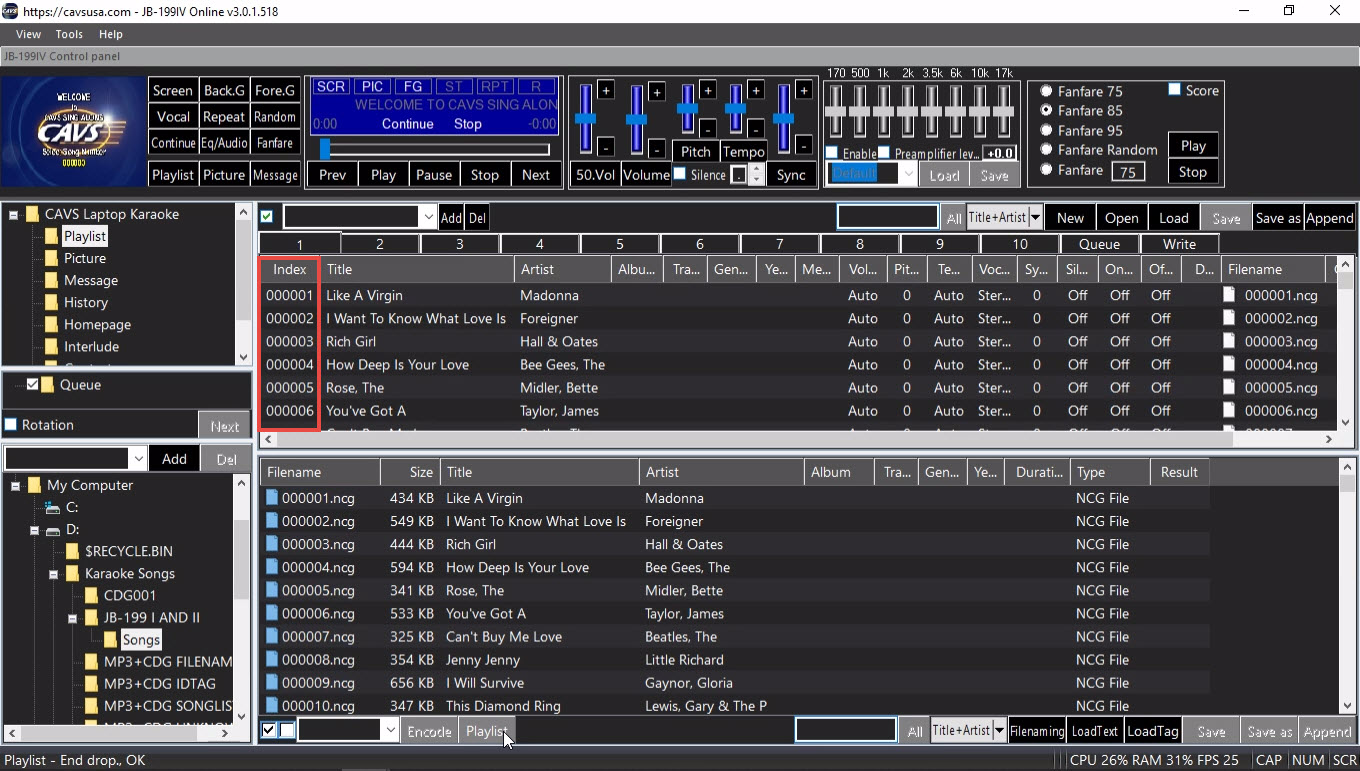
The new Index numbers should match the old song numbers of the JB-199 I or II, which are shown by the filenames on the right.

They do not in this example. The two sets of numbers diverge as the song number increases. This likely happens because some song numbers are skipped in the old JB-199 I or II.
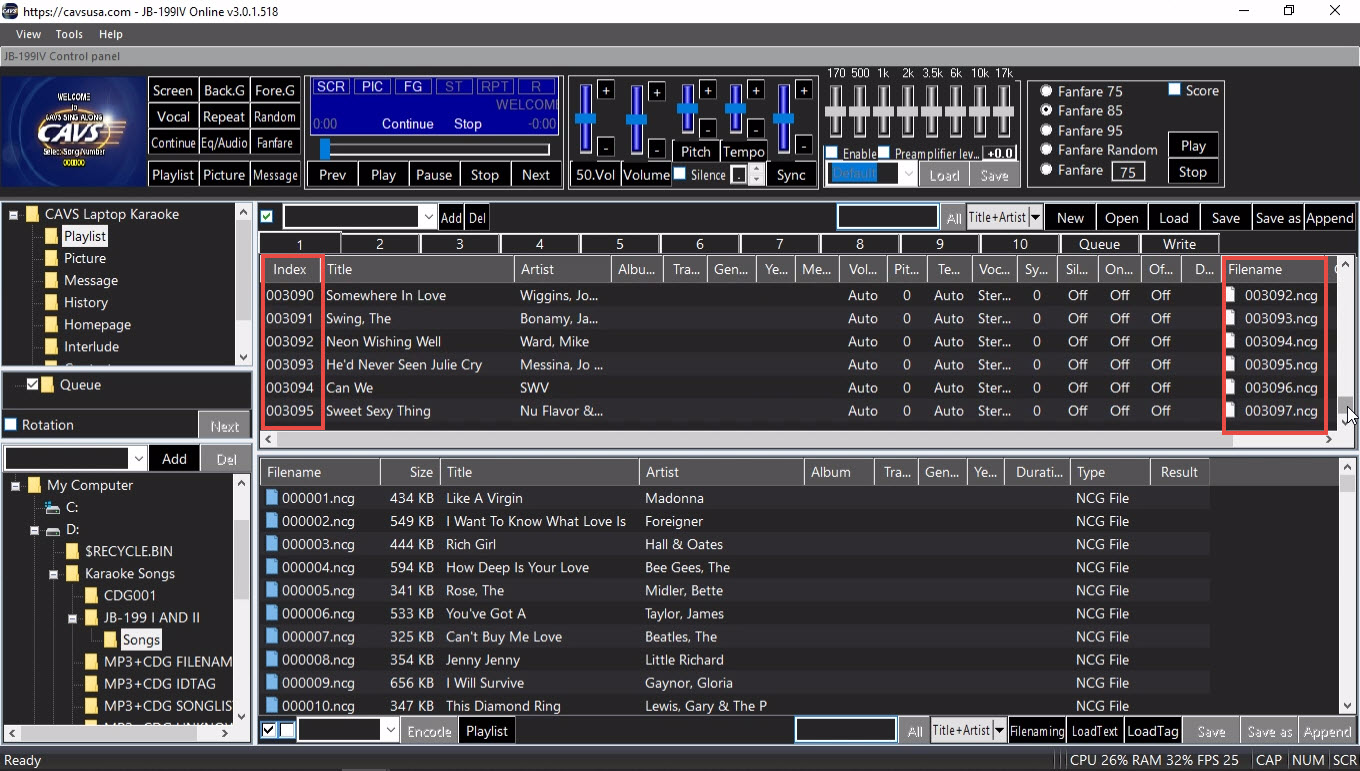
To correct this, mark all the songs in the List Browser by click and shift-click. Right click on the marked songs and select Index with Filename.
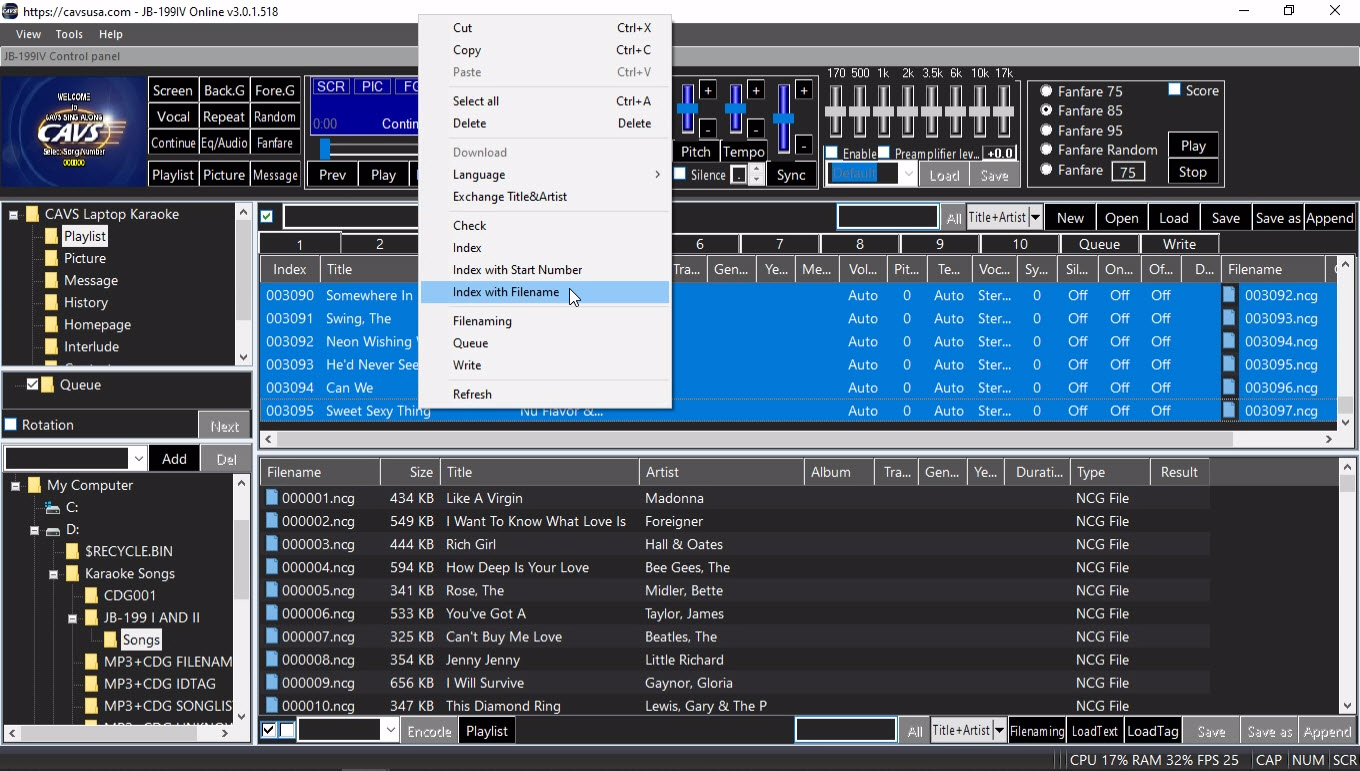
The new Index numbers now match the old. Press the Save as button at the top right corner of the List Browser. Name the playlist and click Save. In this example, the playlist is saved as JB-199 I AND II.
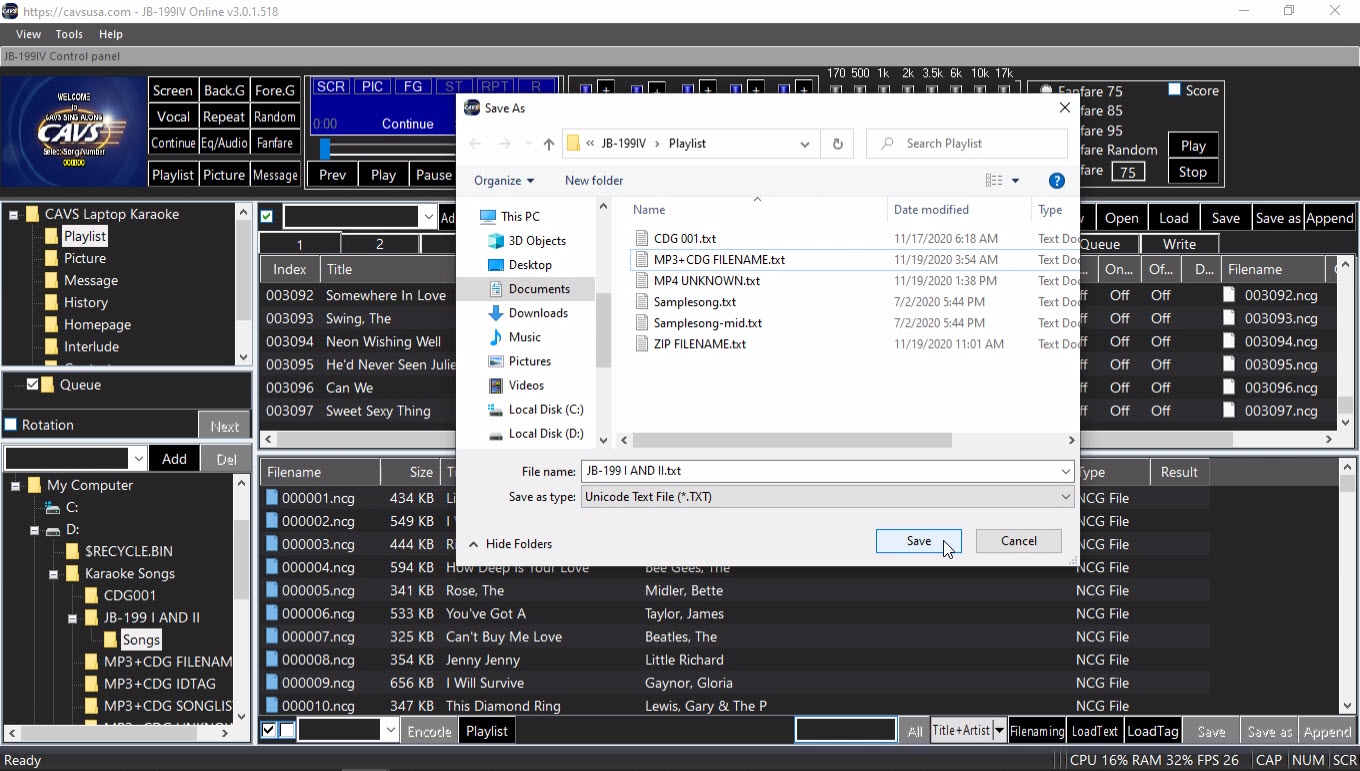
Next step is to load the playlist and play. First reset the Control Panel to its default form by clearing the File Browser and the List Browser. Press New to clear the playlist 1 slot and press Queue to set the List Browser. Press My Server in the Folder Menu and clear the File Browser.
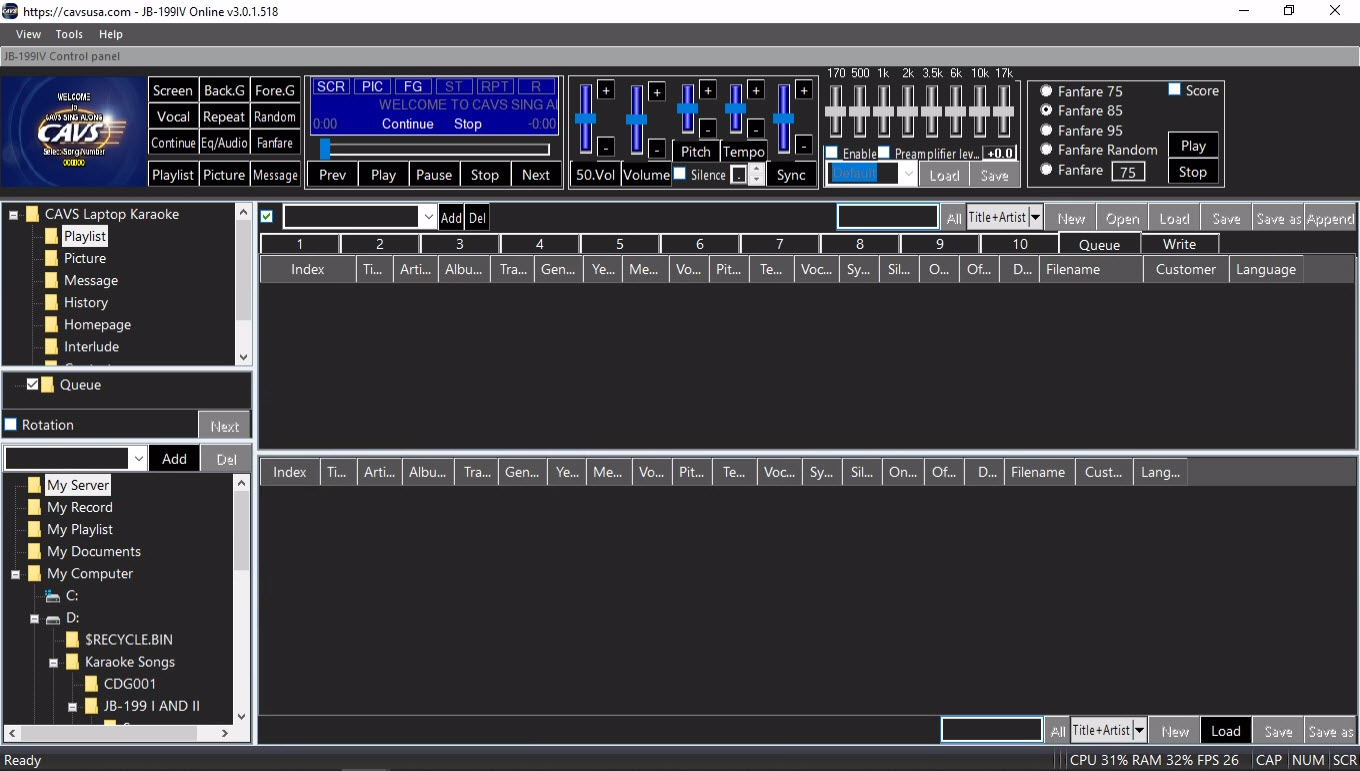
The playlist JB-199 I AND II can be loaded into any playlist slot 1 - 10, 11 - 20, or My Server.
Note that My Server is a playlist slot with a difference that a playlist loaded into My Server is shared with online guests and E-Songbooks.
In this example, the playlist is loaded into My Server.
Press to highlight My Server.
Press the Load button in the bottom right corner of the File Browser.
Select JB-199 I AND II playlist and press Open.
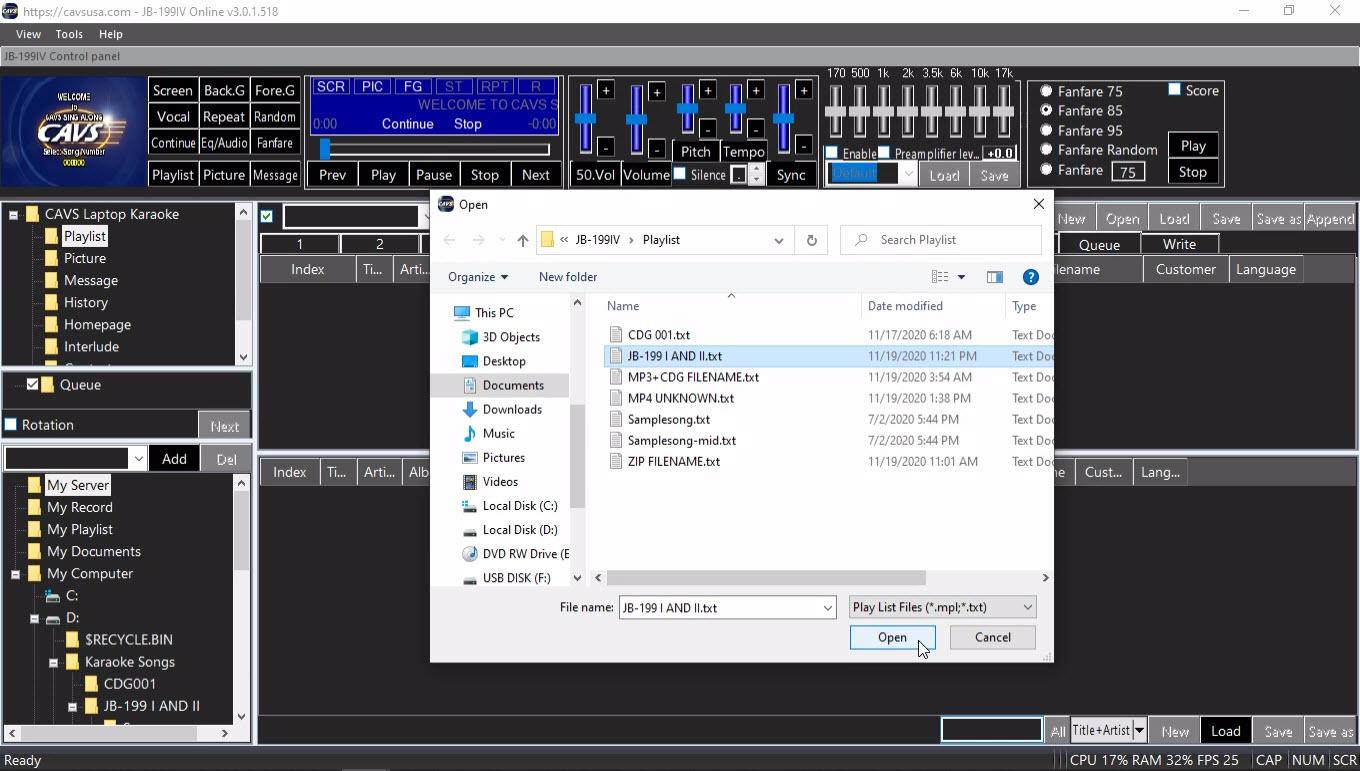
Right click on a song and select Queue to send it to the Queue. Alternatively drag & drop the song into the Queue.

Press Play to begin playing.
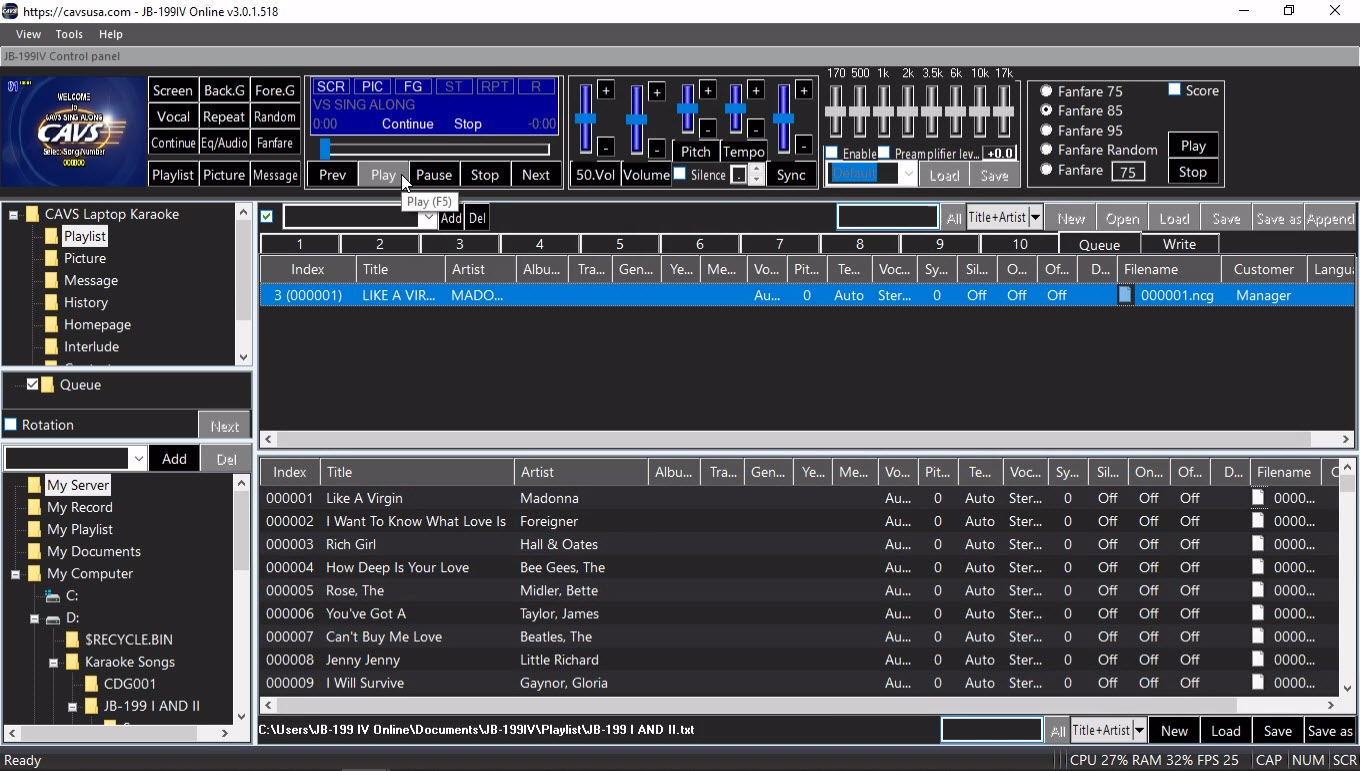
A playlist can be sorted or searched by title, artist, album, filename, etc. It can also be cut, merged, and appended to add or remove songs. For detail instruction on how to edit a playlist, go to 7.1.4 Playlist.
CAVS DVD players, such as 105G-USB, 203G-USB, 305G-USB, and the latest 205G-USB, play MP3 + MCG song files stored in an external USB hard drive or flash drive.
To load the MP3 + MCG song files into the JB-199 IV, connect the USB device to the JB-199 IV. The USB device will show the following file structure.
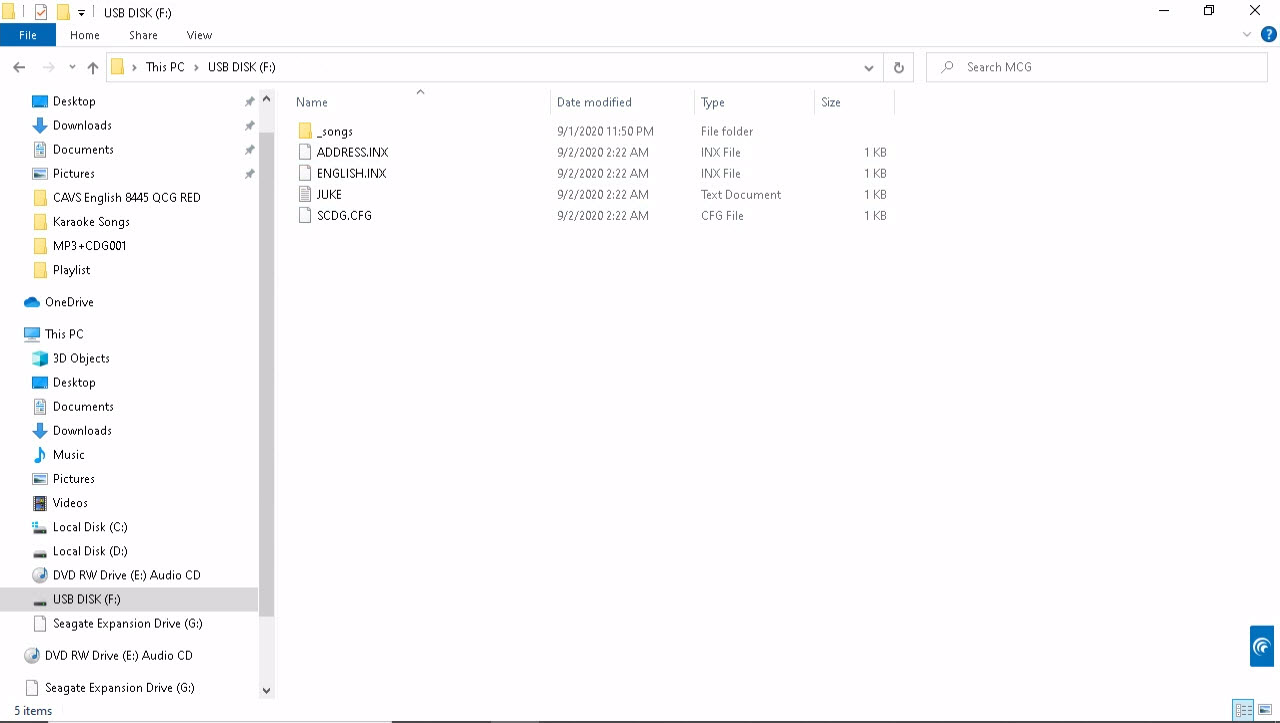
In this example, the F:\ drive is the external USB drive of the CAVS DVD players. Right click on the Juke.txt file and select Copy.

Go inside the _songs folder. Right click on an empty spot and select Paste.

Exit out of the _songs folder. Right click on the _songs folder and select Copy.
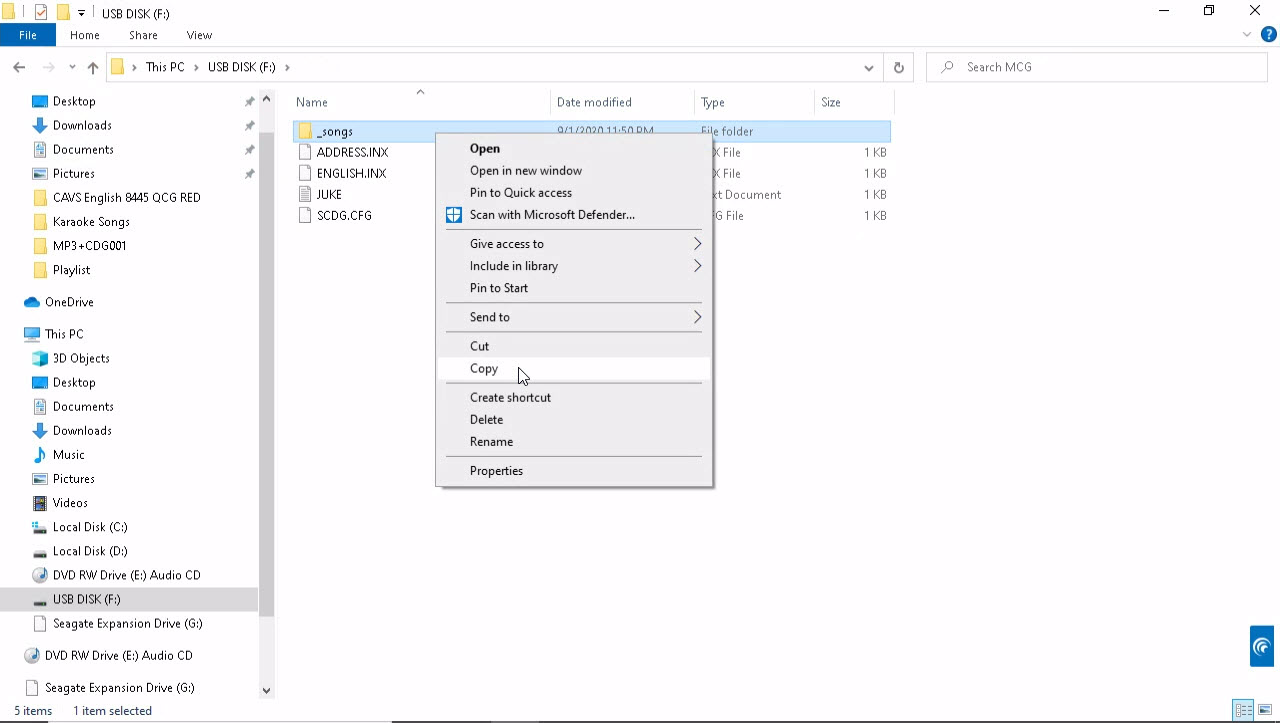
Go to a folder in the JB-199 IV, for example D:\Karaoke Songs. Right click on an empty spot and select Paste.

When the copying is done, rename the _songs folder, for example to CAVS DVD PLAYER.

Next start the JB-199 IV karaoke program and select the CAVS DVD PLAYER folder in the Folder Menu. The songs will appear in the File Browser as a list of MCG files and have title and artist information automatically loaded.
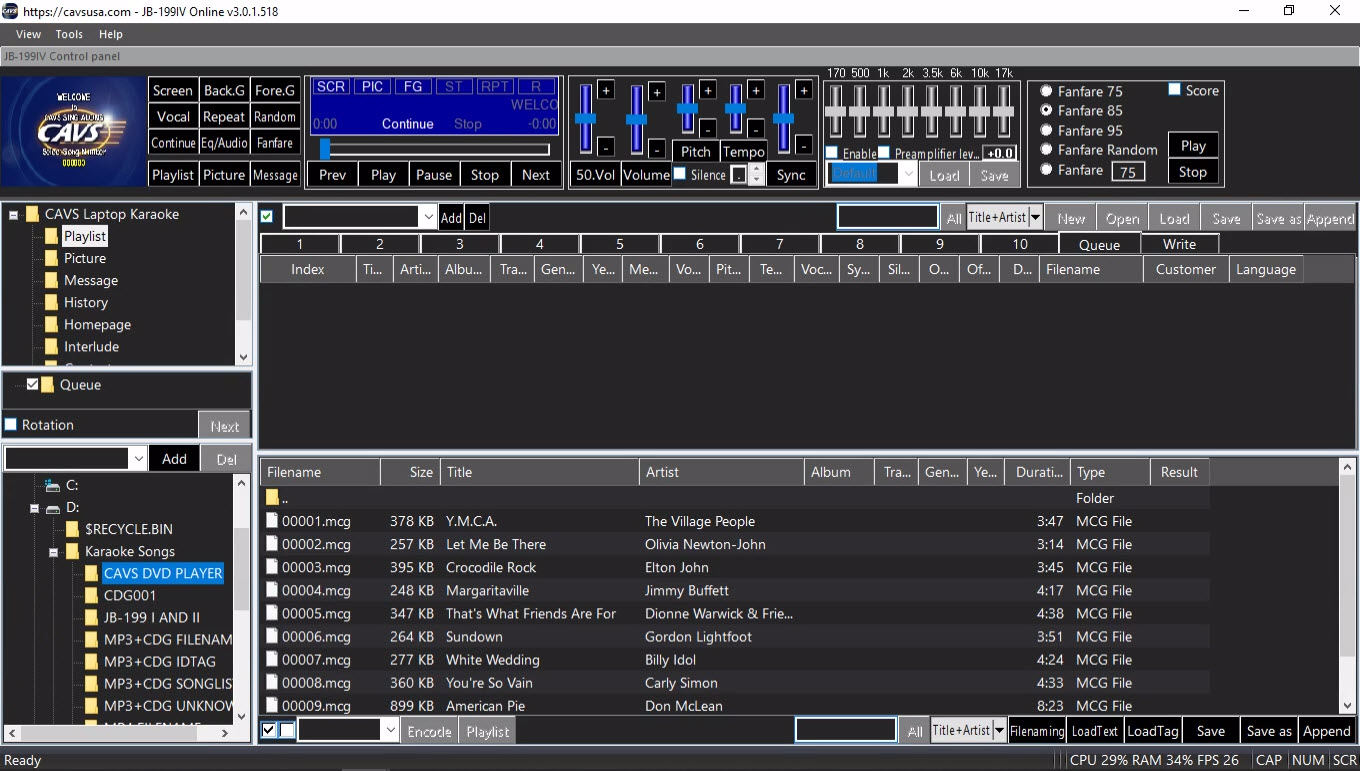
Some USB devices for the CAVS DVD players may show a different file structure as below.

Copy all the files MP3, MCG, and Juke.txt into the folder D:\Karaoke Songs\CAVS DVD PLAYER. Select CAVS DVD PLAYER in the Folder Menu. As before, the MP3 + MCG files will appear in the File Browser as a list of MCG files and have the title and artist fields loaded.
To make a playlist, select any of playlist slots 1 - 10 in the List Browser. In this example, the playlist 1 slot is selected.
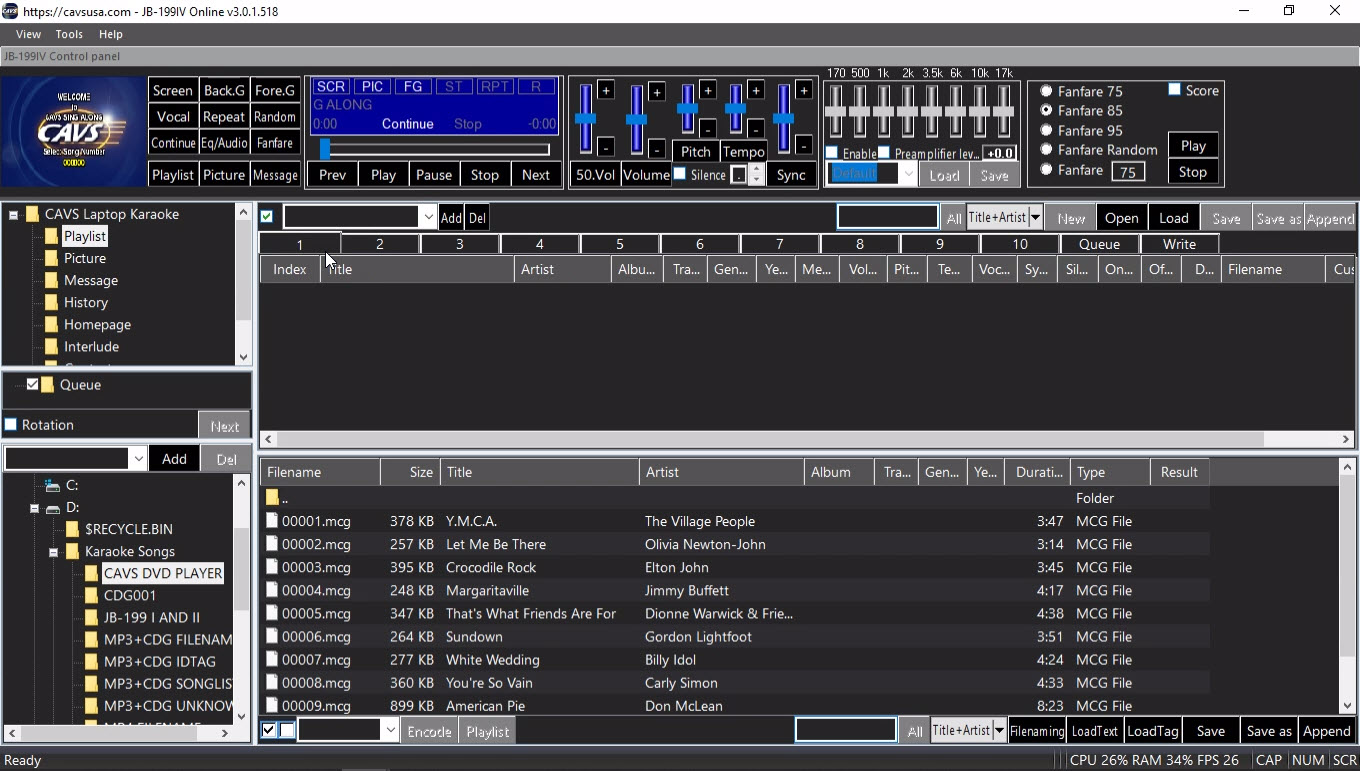
Mark all the songs in the File Browser by pressing the Check mark at the bottom of the screen. Press the Playlist button at the bottom of the screen to copy all songs into the playlist 1 slot.
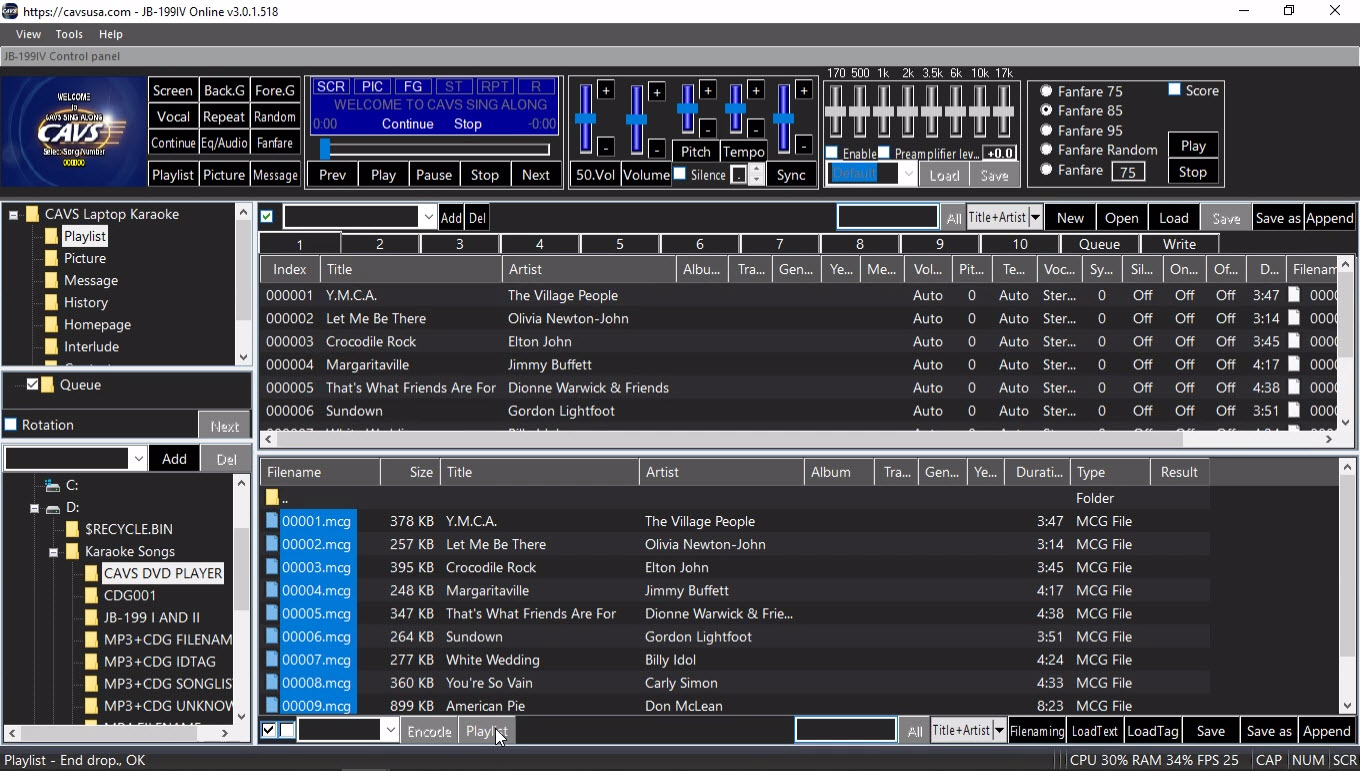
The new copy in the playlist 1 slot is the playlist. It contains all the song information in the File Browser. It also contains, unseen from users, the locations of the song files. In this example, the location is D:\Karaoke Songs\CAVS DVD PLAYER.
Press the Save as button at the top right corner of the List Browser. Name the playlist and click Save. In this example, the playlist is saved as CAVS DVD PLAYER.
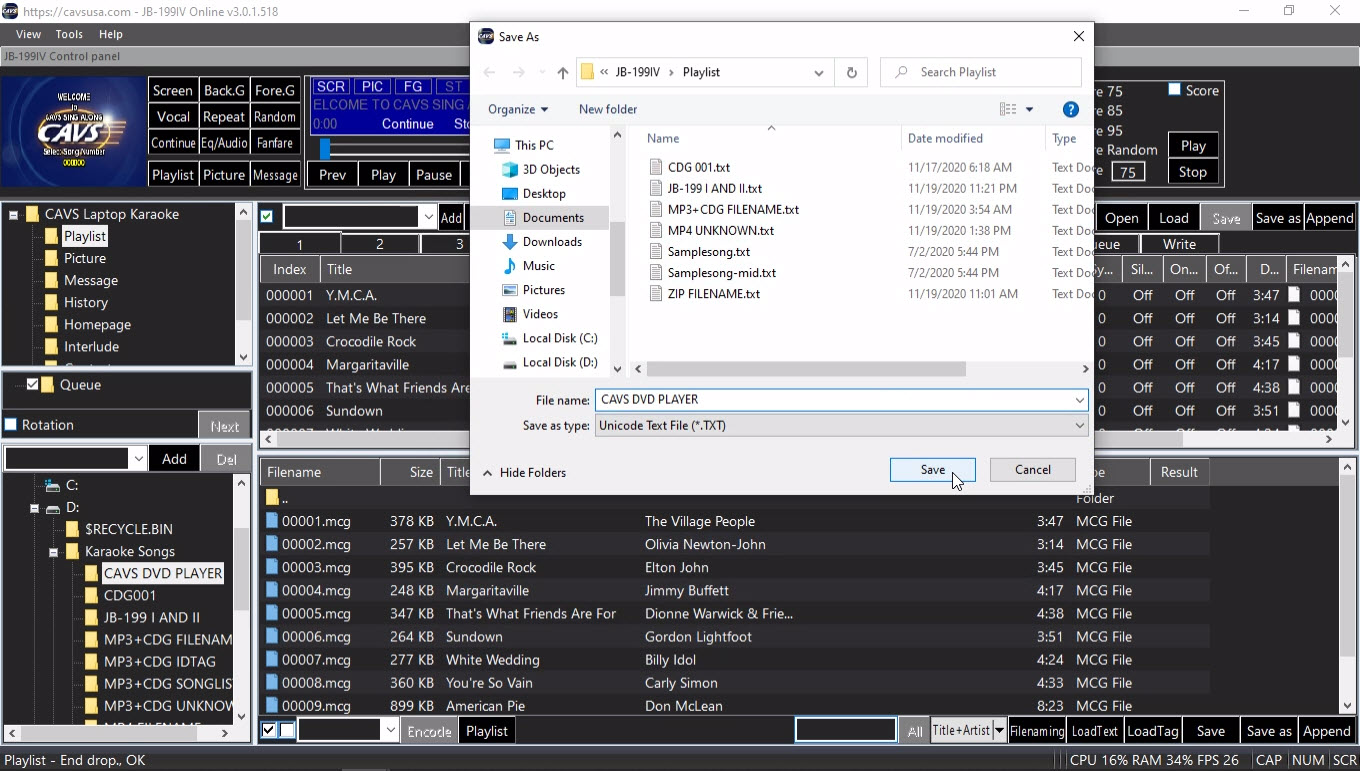
Next step is to load the playlist and play. First reset the Control Panel to its default form by clearing the File Browser and the List Browser. Press New to clear the playlist 1 slot and press Queue to set the List Browser. Press My Server in the Folder Menu and clear the File Browser.

The playlist CAVS DVD PLAYER can be loaded into any playlist slot 1 - 10, 11 - 20, or My Server.
Note that My Server is a playlist slot with a difference that a playlist loaded into My Server is shared with online guests and E-Songbooks.
In this example, the playlist is loaded into My Server.
Press to highlight My Server.
Press the Load button in the bottom right corner of the File Browser.
Select CAVS DVD PLAYER playlist and press Open.
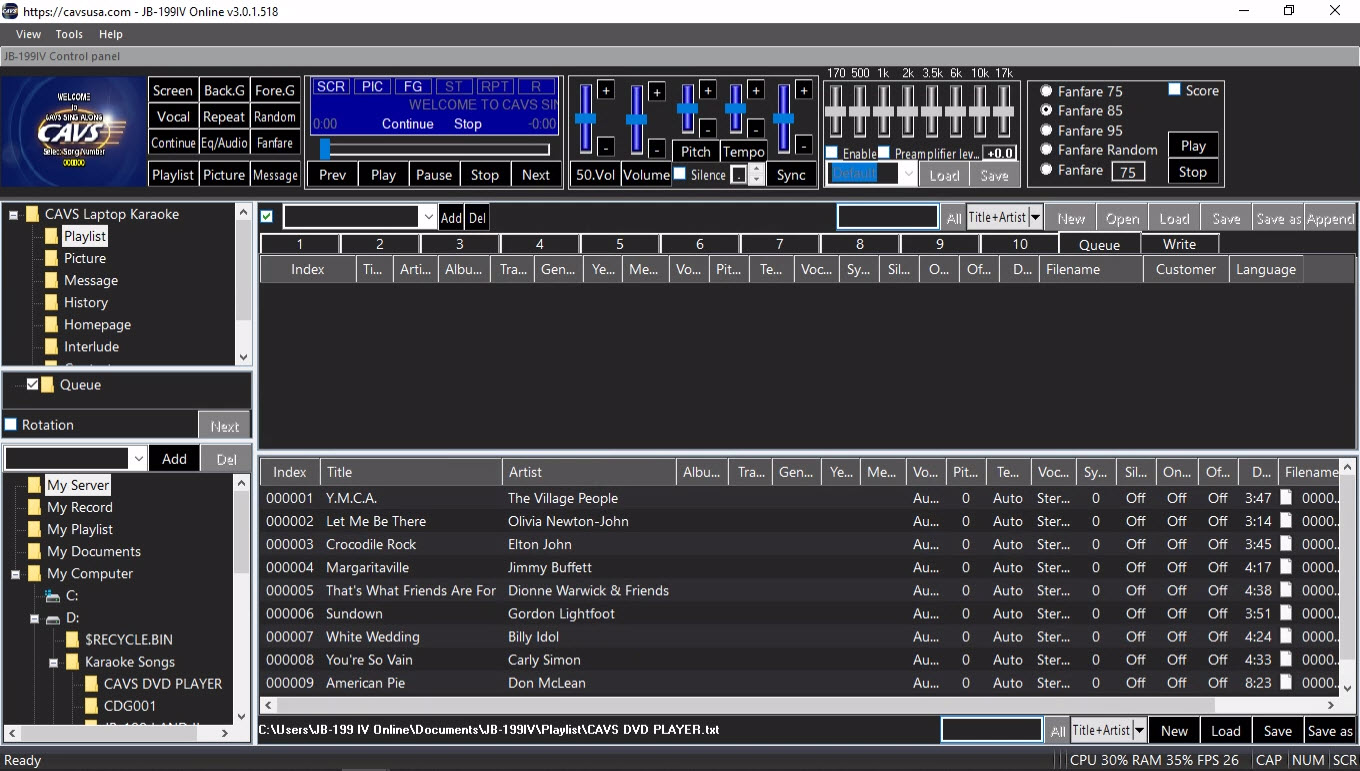
Right click on a song and select Queue to send it to the Queue. Alternatively drag & drop the song into the Queue.
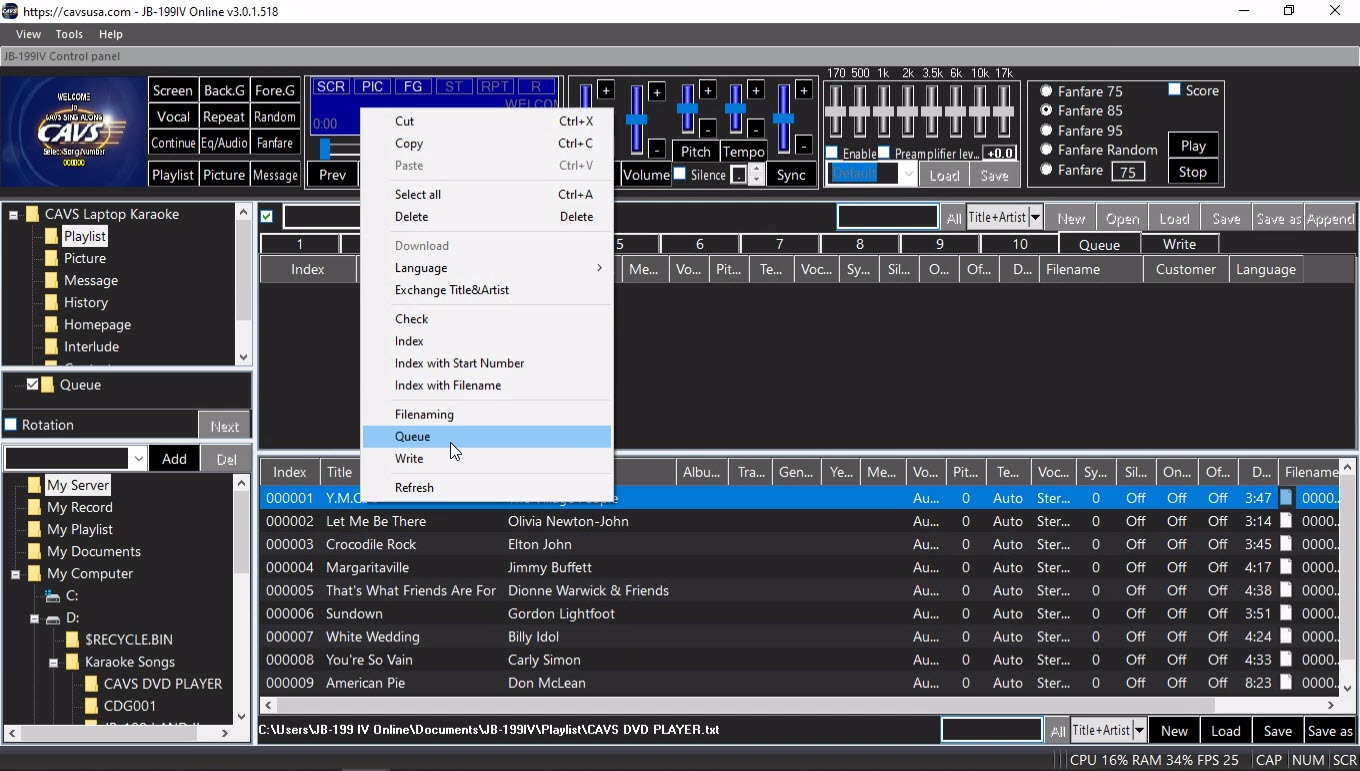
Press Play to begin playing.

A playlist can be sorted or searched by title, artist, album, filename, etc. It can also be cut, merged, and appended to add or remove songs. For detail instruction on how to edit a playlist, go to 7.1.4 Playlist.
The core of the JB-199 IV karaoke program is the use of a playlist which is a text file list of the songs. The playlist is faster and safer in all aspect of file handling than working directly with song files. In particular, the playlist can add or remove a song simply by adding or removing a line in the list. It can sort, search, merge, and append simply by text editing without ever touching actual song files.
The previous sections 7.1.1 - 7.1.3 show how to load and play songs of various formats in the JB-199 IV. There are four steps in the process and can be summarized as follows.
-
Copy the song files into the JB-199 IV
Copy the song files into the JB-199 IV hard drive. If from discs, the song files may require extraction first. Technically this step is not needed as the JB-199 IV can play song files from any external devices. However it is recommended since the external devices can be slow in speed or removed accidentally.
-
Load the song files into the File Browser
In the Folder Menu, navigate to the folder with the song files. The song files will list in the File Browser. Fill in the song information such as title, artist, album, track, genre, etc. Use any technique such as Songlist, ID Tags, Filenaming, or Manual typing available in the JB-199 IV.
-
Create a playlist
Copy the song information collected in the File Browser to a playlist slot. Unseen to the viewers, the copy is tagged with links to the physical location of the song files. The copy is the playlist of the song files. Save the playlist.
-
Play from the playlist
Load the playlist into any of playlist slot 1 - 20 or My Server. Select a song and send it to Queue. Press play.
Next the four steps above are demonstrated using the MP3 + CDG files considered in 7.1.3.1 MP3 + CDG (MP3+G) files.
-
Copy the song files into the JB-199 IV
The MP3 + CDG files are copied from an external device into the JB-199 IV. For the case 1 in particular, the MP3 + CDG files along with songlist.txt are copied from G:\MP3+CDG SONGLIST into the D:\Karaoke Songs\MP3+CDG SONGLIST.
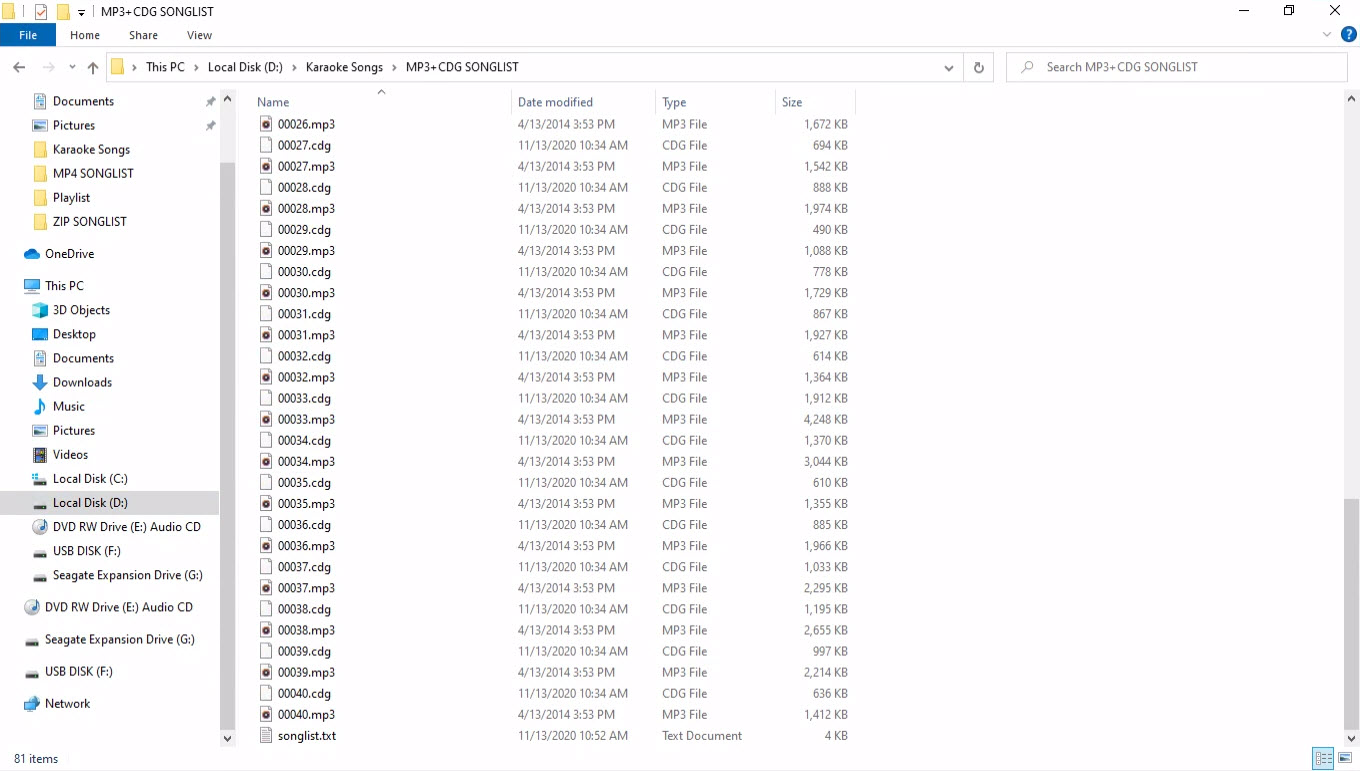
-
Load the song files into the File Browser
In the Folder Menu, the folder D:\Karaoke Songs\Mp3+CDG SONGLIST is selected. The MP3 + CDG files are listed in the File Browser. The title and artist information is filled in automatically from the songlist.
-
Create a playlist
The playlist is created in the playlist 1 slot.

The playlist is saved as MP3+CDG SONGLIST.txt.
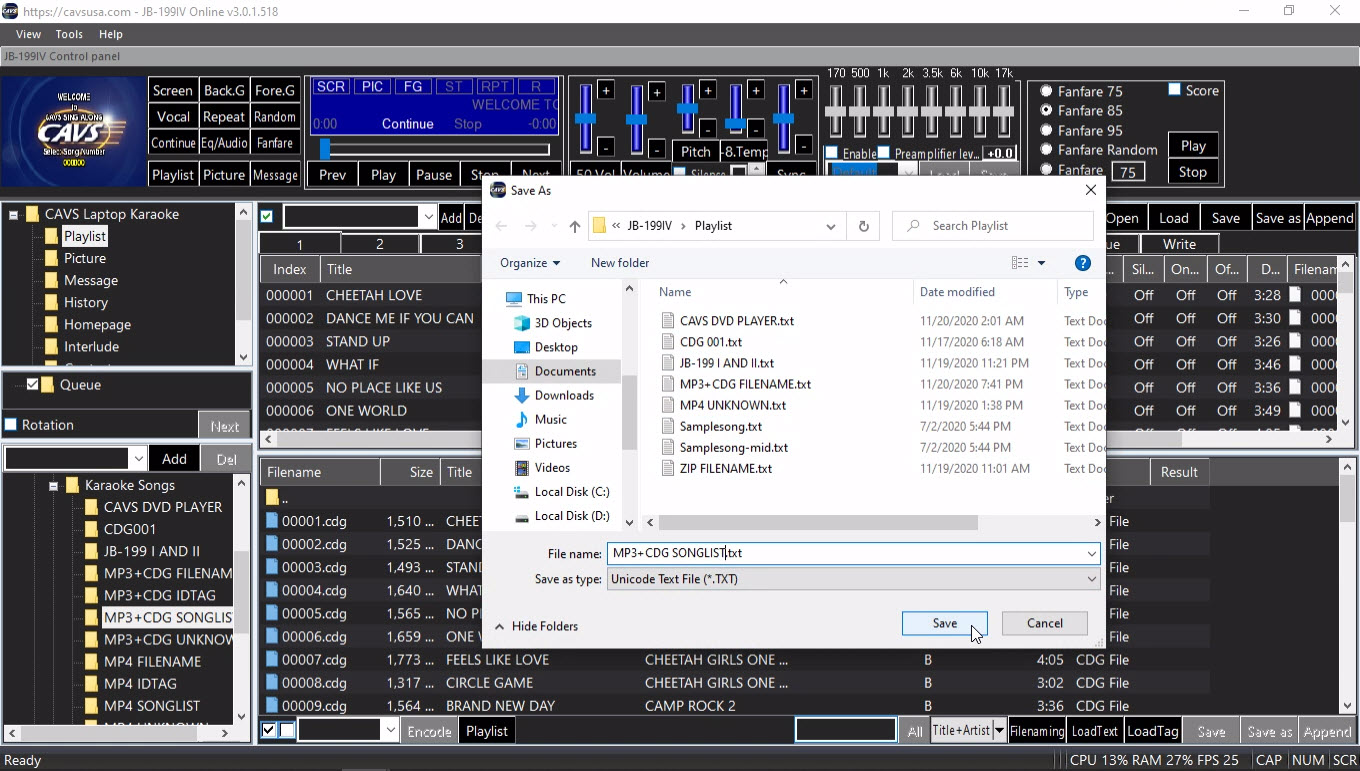
-
Play from the playlist
The playlist is loaded into My Server. Select a song and send it to Queue. Press play.
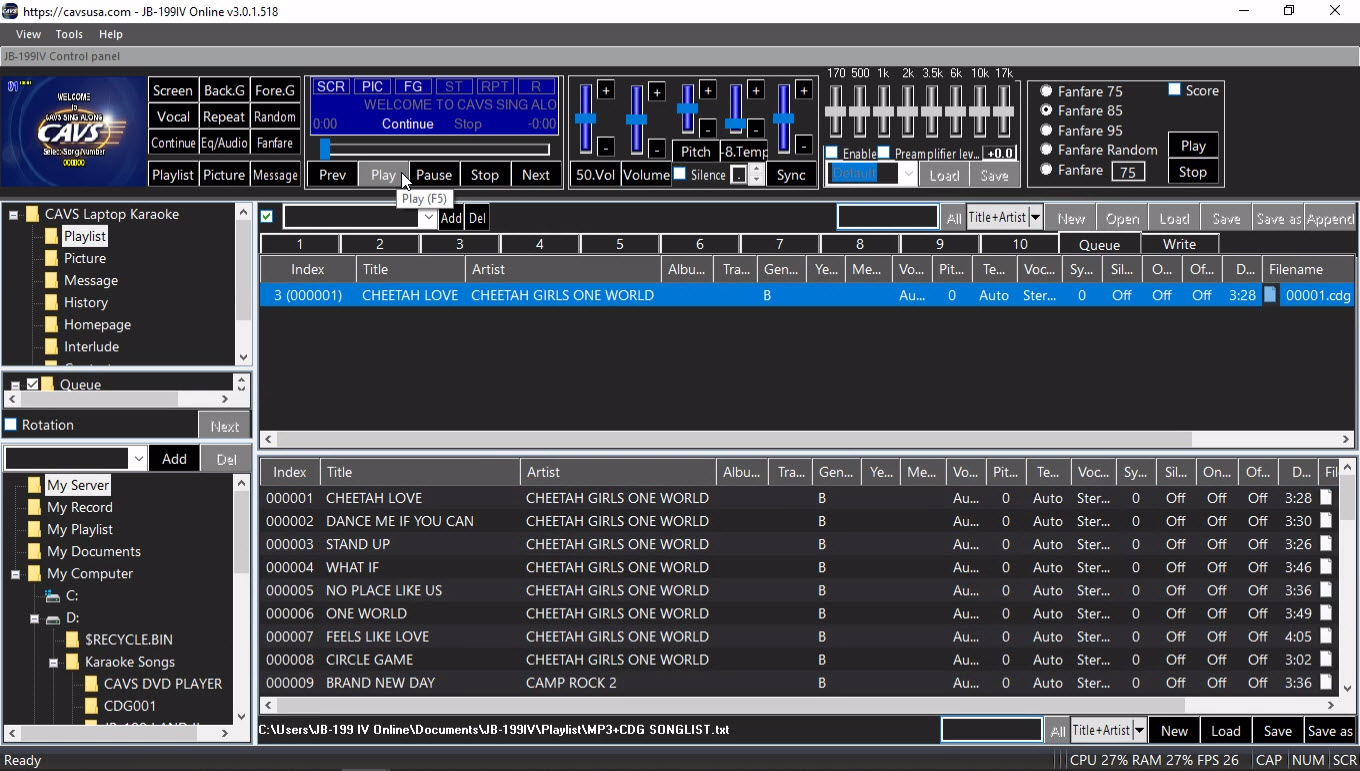
The four steps above to load the song files and make a playlist in the JB-199 IV apply to all supported file formats considered in 7.1 How to load and play karaoke songs.
A playlist can be loaded into any of 21 playlist slots in the JB-199 IV. Or up to 21 playlists such as Wedding, Birthday, Christmas, Pop, Rock, 70's, 80's, etc. can be loaded simultaneously at any one time in the JB-199 IV.
Press Playlist in the Function Menu. The playlist 1 - 10 slots appears in the List Browser

Press My Playlist in the Folder Menu. The playlist 11 - 20 slots appears in the File Browser.
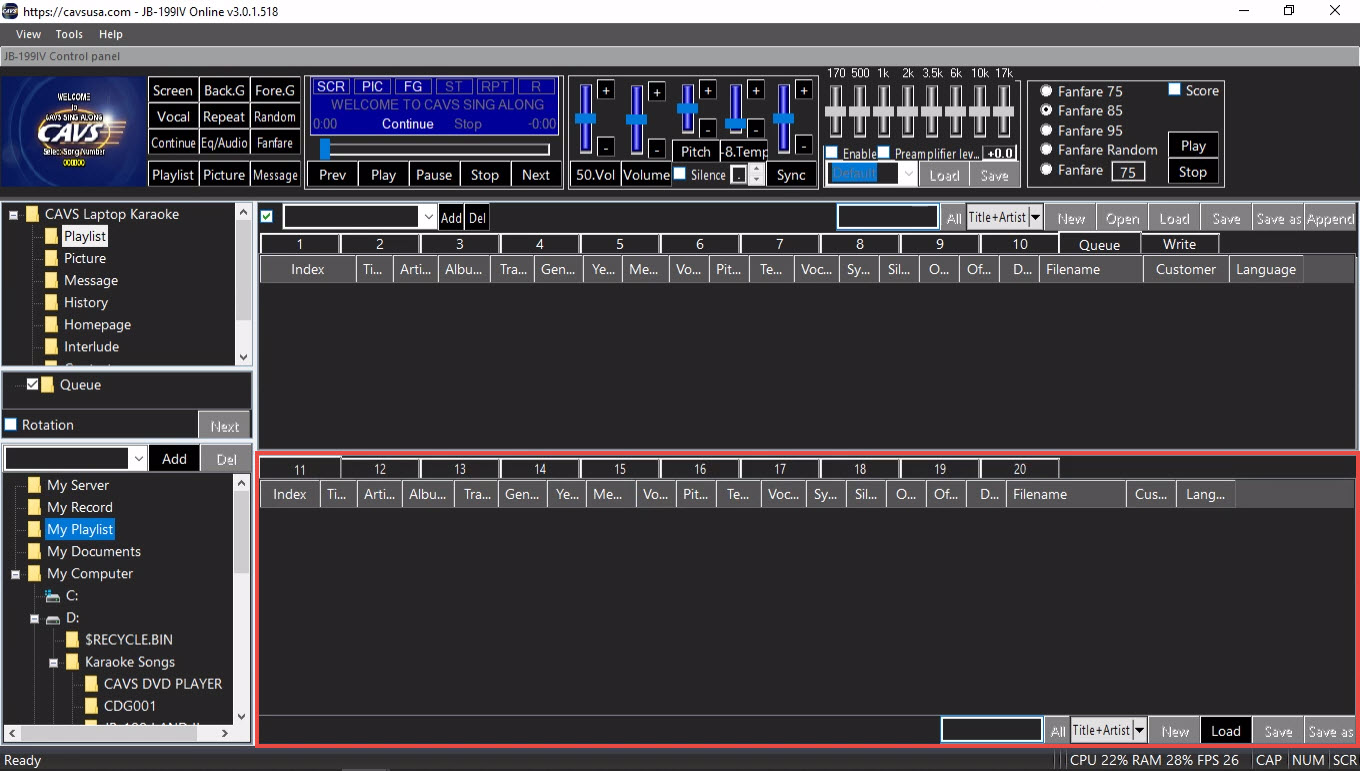
Press My Server in the Folder Menu. A playlist slot appears in the File Browser. This slot is different from others that a playlist when loaded is shared with online guests and E-Songbooks.

This section shows how to edit a playlist to perform the following tasks.
- Delete a song
- Add a song
- Merge songs
- Re-index songs
- Change song information
- Preset controls
- Save changes
- Adjust display
In this example, the MP3+CDG SONGLIST playlist created in 7.1.3.1 MP3 + CDG (MP3+G) files is used. It is loaded into the playlist 1 slot in the List Browser. Note that changes made in the playlist do not affect the song files.
To delete a song, right click on the song and select Delete.
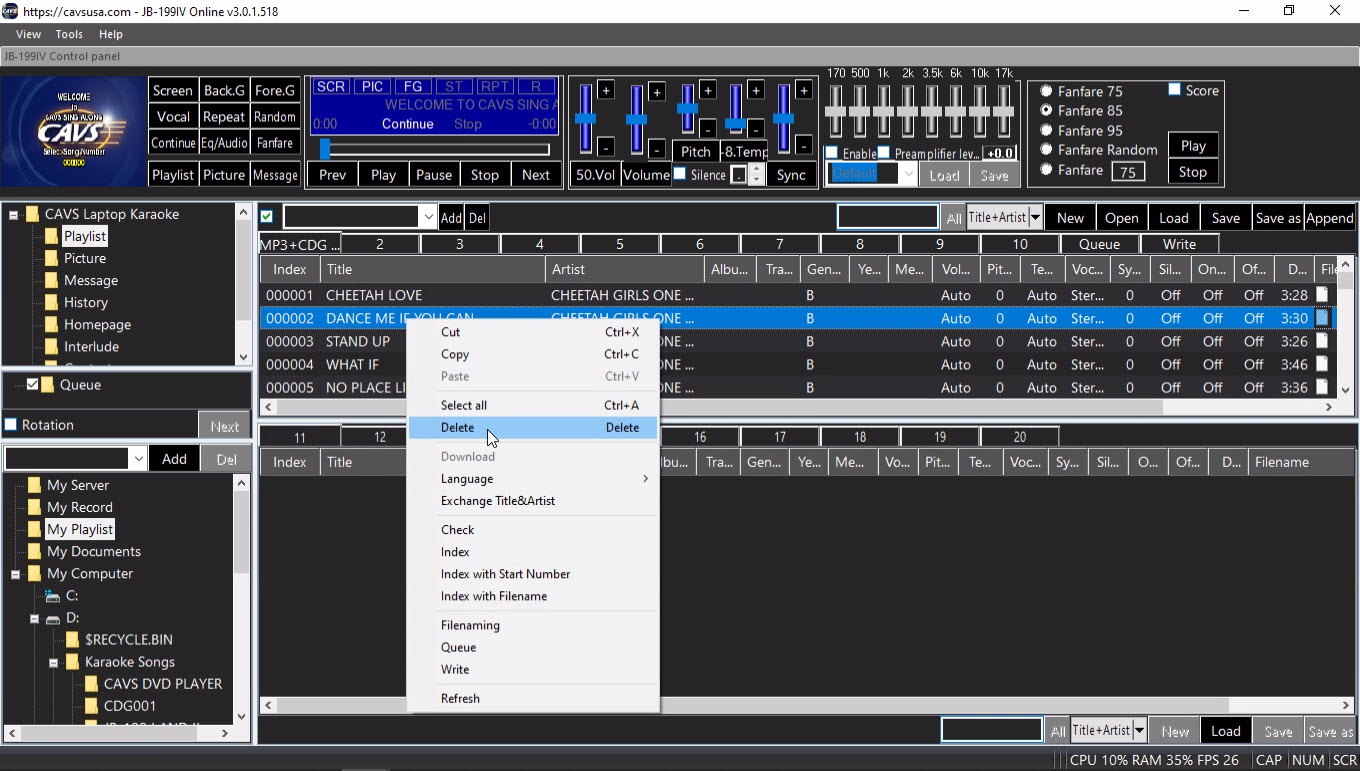
Note that the index number of the deleted song is missing. For instruction on how to re-index the songs, go to 7.1.4.3.3 Re-index songs.
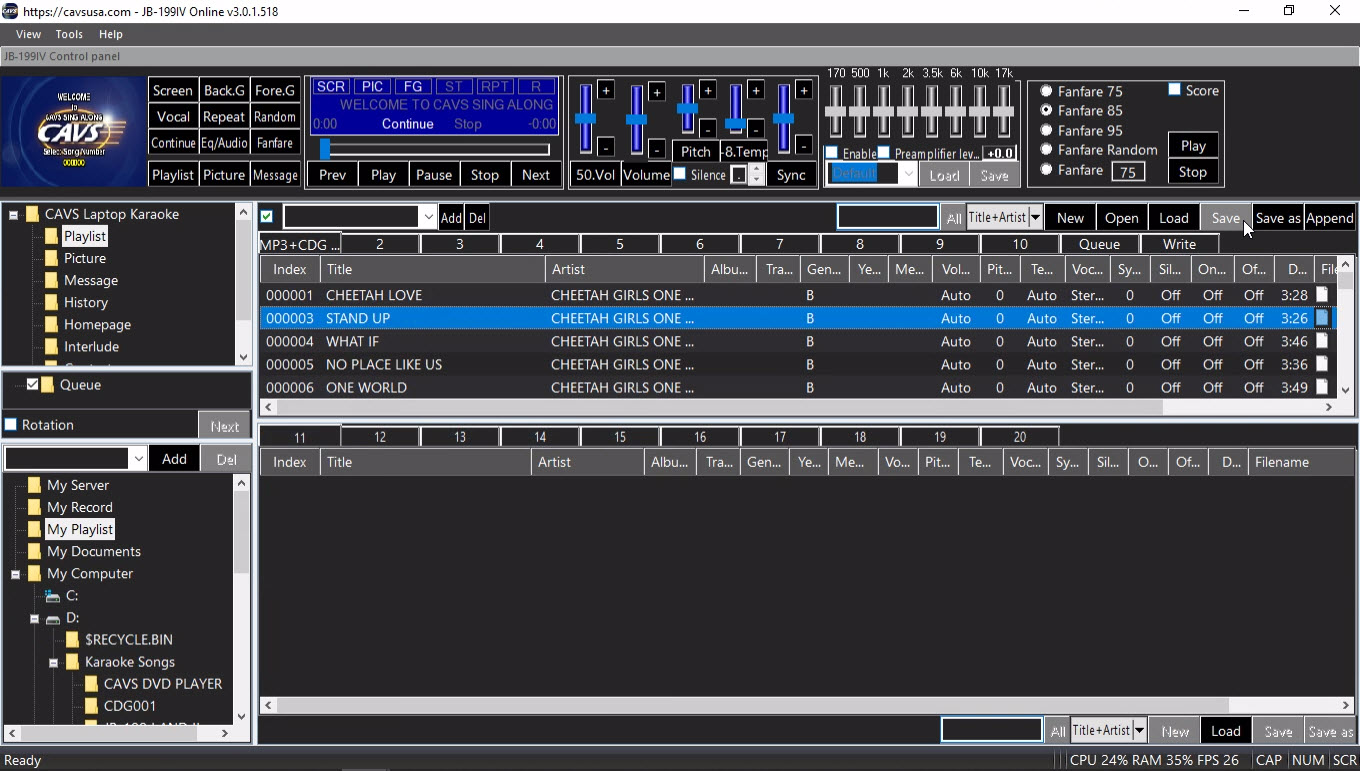
The same procedure is used to delete a group of songs. Use click and shift-click to mark a group of songs. Right click and select Delete..
A song can be added from another playlist or from a song file.
To add from another playlist, open the other playlist in the playlist 11 slot.
In this example, ZIP FILENAME playlist is opened in the playlist 11 slot.
Drag & drop the song from the playlist 11 slot to the playlist 1 slot.
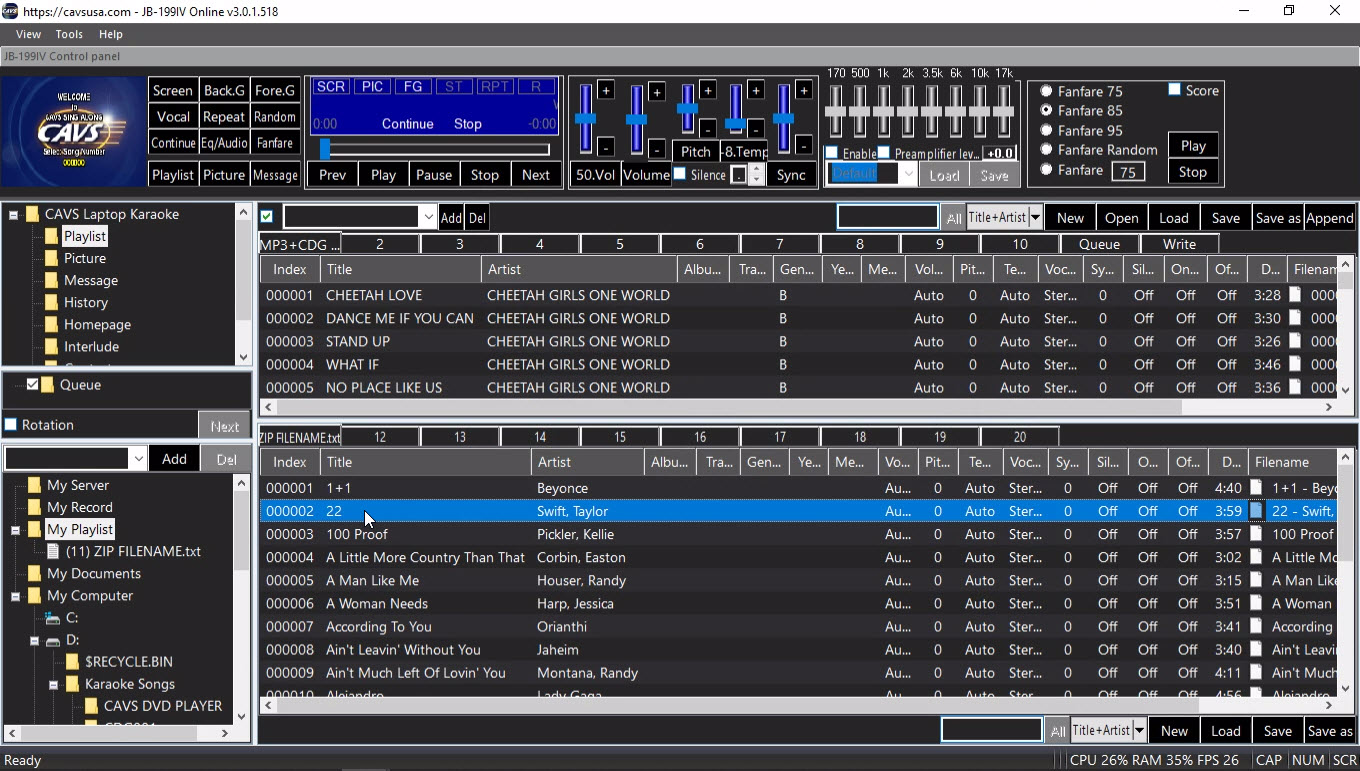
The index number of the added song will be the largest index number in the playlist MP3+CDG SONGLIST plus 1.

To add a song from a song file, navigate in the Folder Menu to the folder containing the song file. The song file will appear in the File Browser. Add the song information such as title and artist for the song in the File Browser. Drag & drop the song from the File Browser to the playlist 1.
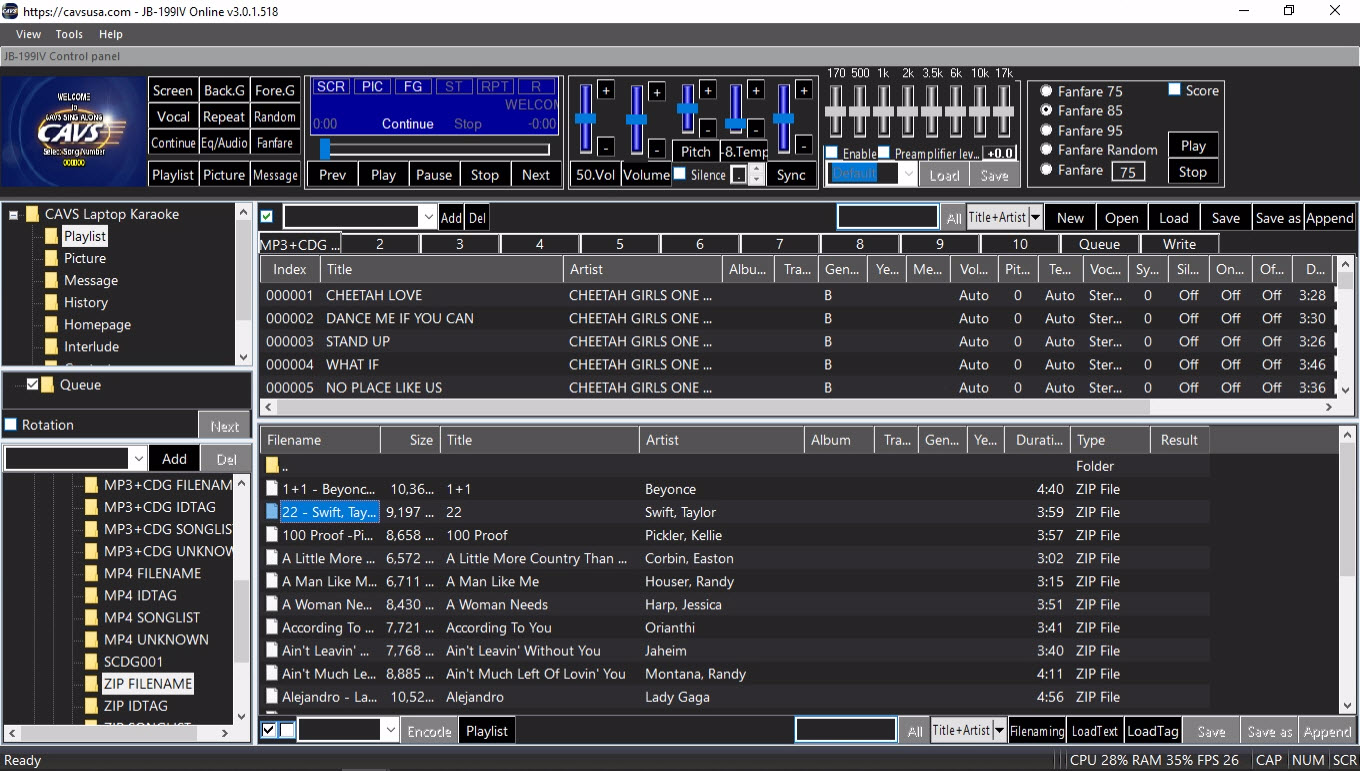
The index number of the added song will be the largest index number in the playlist MP3+CDG SONGLIST plus 1.
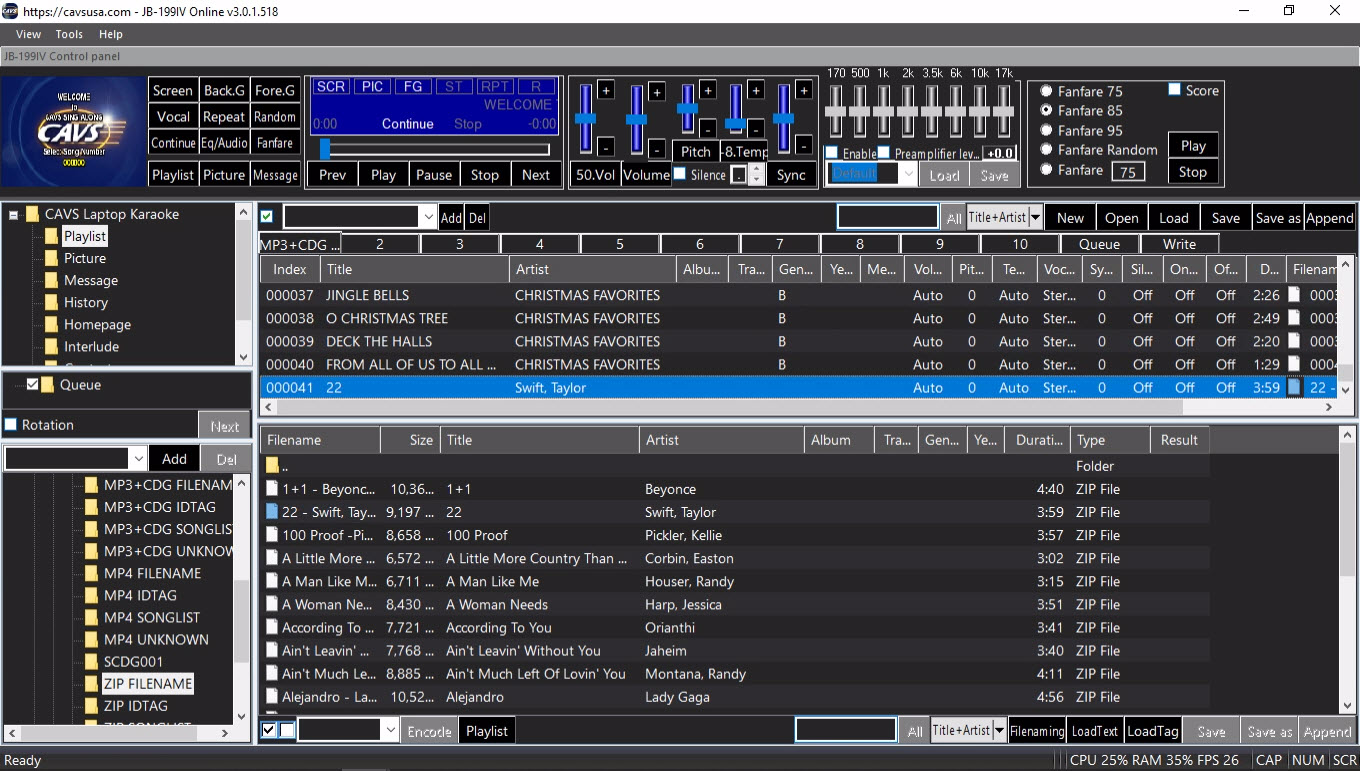
The same procedure can be used to add a group of songs from a playlist or song files. Use click and shift-click to mark multiple songs in a playlist or the File Browser. Drag & drop the marked songs into the playlist 1 to add.
The merging songs is an extension of the procedure shown in 7.1.4.3.2 Add a song. It can also be done by appending one playlist to another. Press the Append button at the upper right corner of the List Browser. Select a playlist to which the current playlist MP3+CDG SONGLIST will be appended.
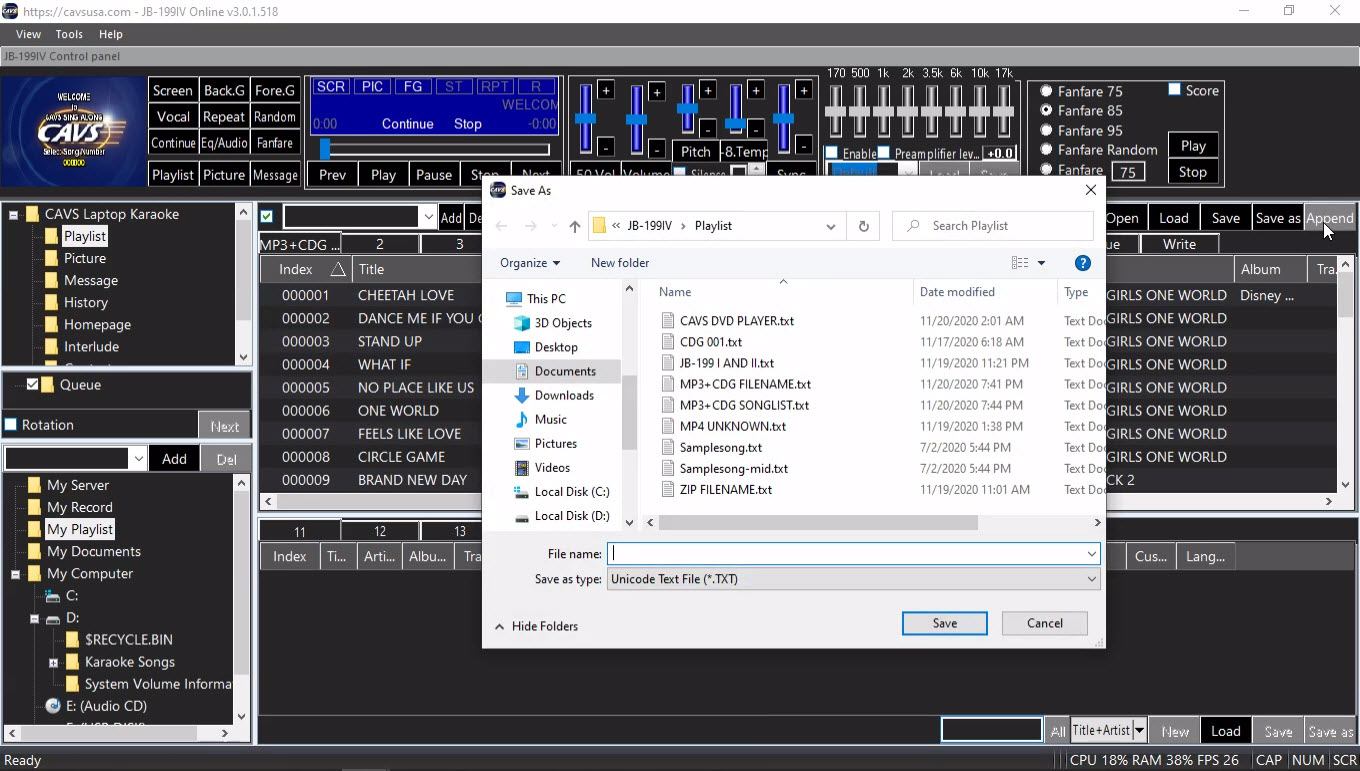
In this example, ZIP FILENAME playlist is selected. Press Save. A confirmation window appears.
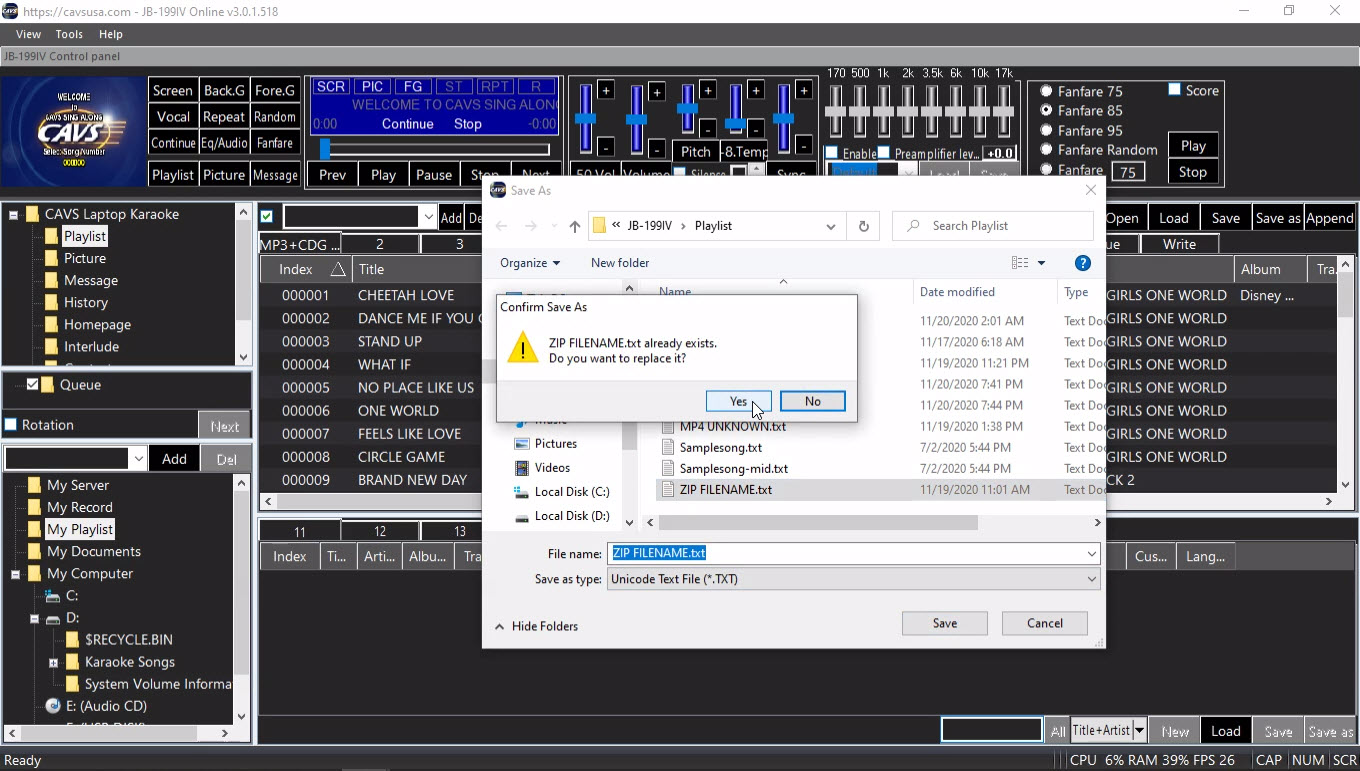
Click Yes.
The MP3+CDG SONGLIST playlist is appended to the ZIP FILENAME playlist.
It means that the ZIP FILENAME playlist now contains the songs of both playlists and the appended songs are indexed sequentially after the original ZIP FILENAME playlist.
The MP3+CDG SONGLIST playlist is not changed.
Note that the Append procedure becomes handy when creating a master playlist containing all songs in the JB-199 IV.
After collecting song files from variety of sources, the multiple playlists can be appended in series to a single master playlist.
The songs in a playlist can be re-indexed in various ways.
-
Re-index sequentially starting from 1 -
Right click on any song in the playlist and select Index. All songs will be re-indexed sequentially starting from 1.
This feature can remove any missing numbers in Index. It can also re-index the songs sorted by title, artist, album, etc.
-
Re-index sequentially starting from a specified number -
Select a song to start a new index. In this example, the song 000004 is selected.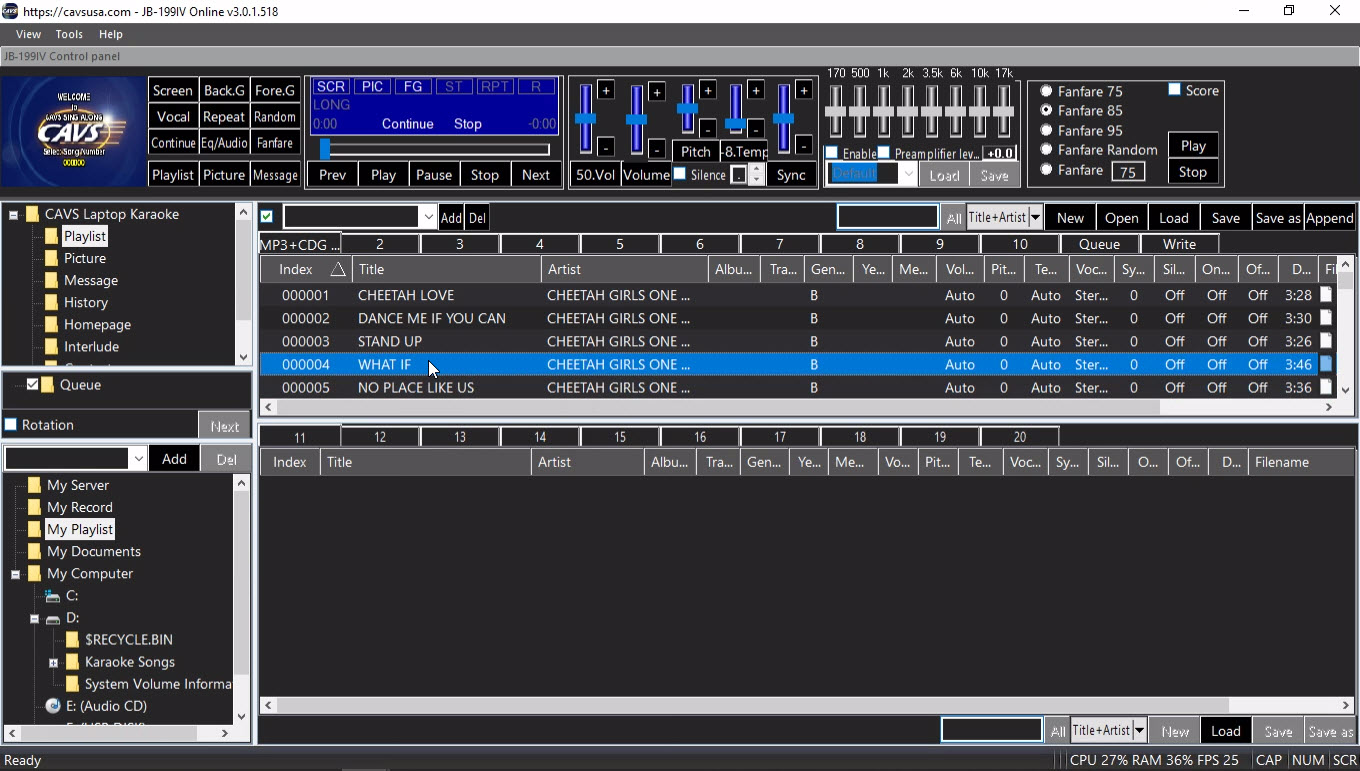
Right click on the song and select Index with Start Number.
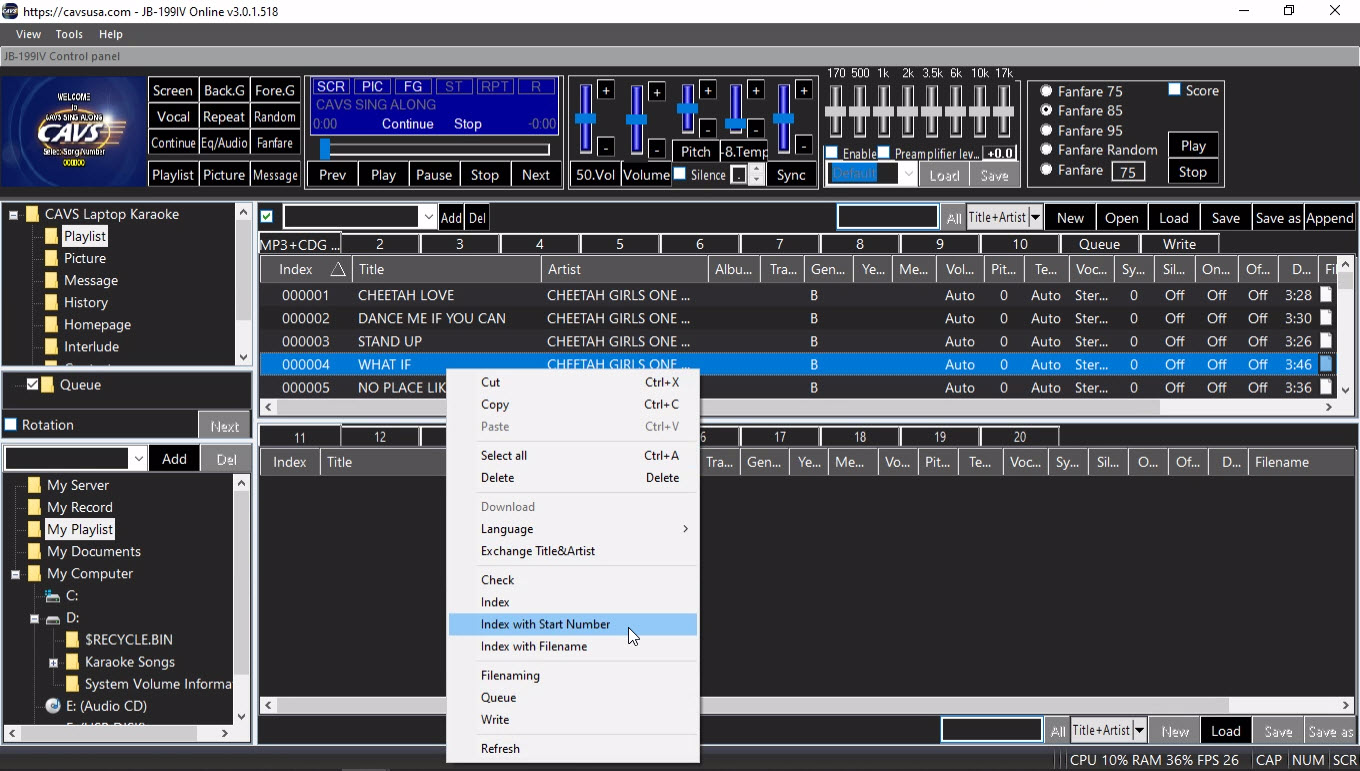
Input a starting number and press Enter. In this example, 000010 is inputted.
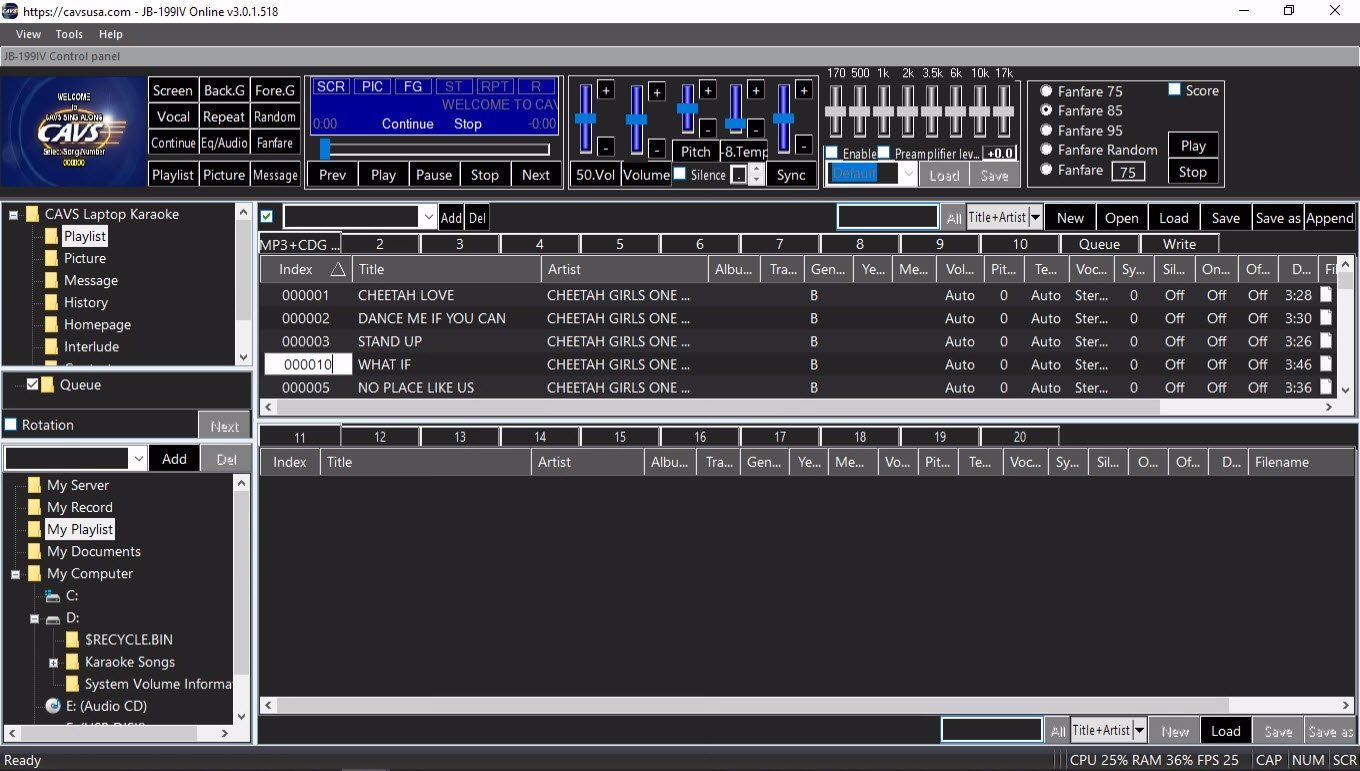
Songs starting from 000004 is re-indexed to start from 000010 and sequentially thereafter. This feature is commonly used to skip a number or a group of numbers in Index. It can also be used to index a particular group of songs in a particular range of song numbers.
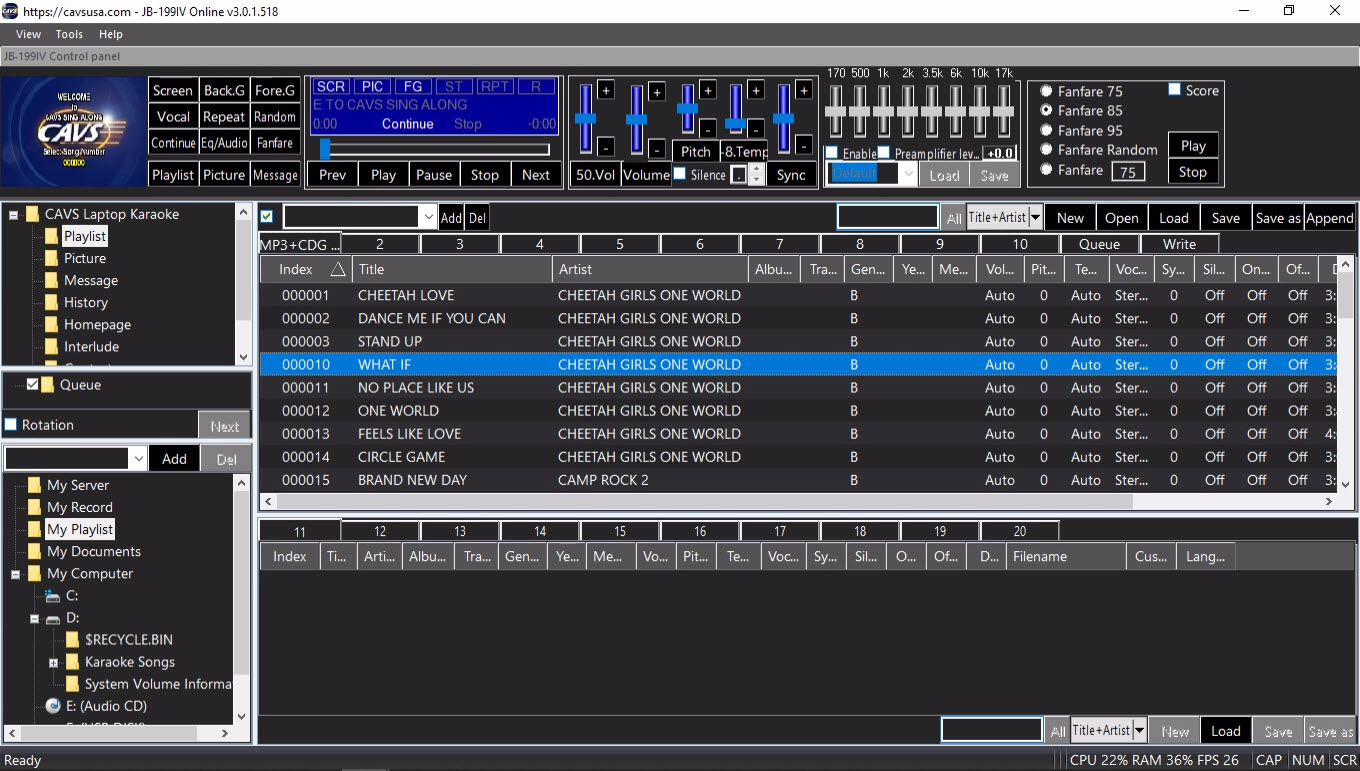
-
Re-index with file names -
Mark all the songs to re-index with file names. Note that the file names in the old JB-199 I or II are numeric and represent their song numbers.
Right click on any marked songs and select Index with Filename.
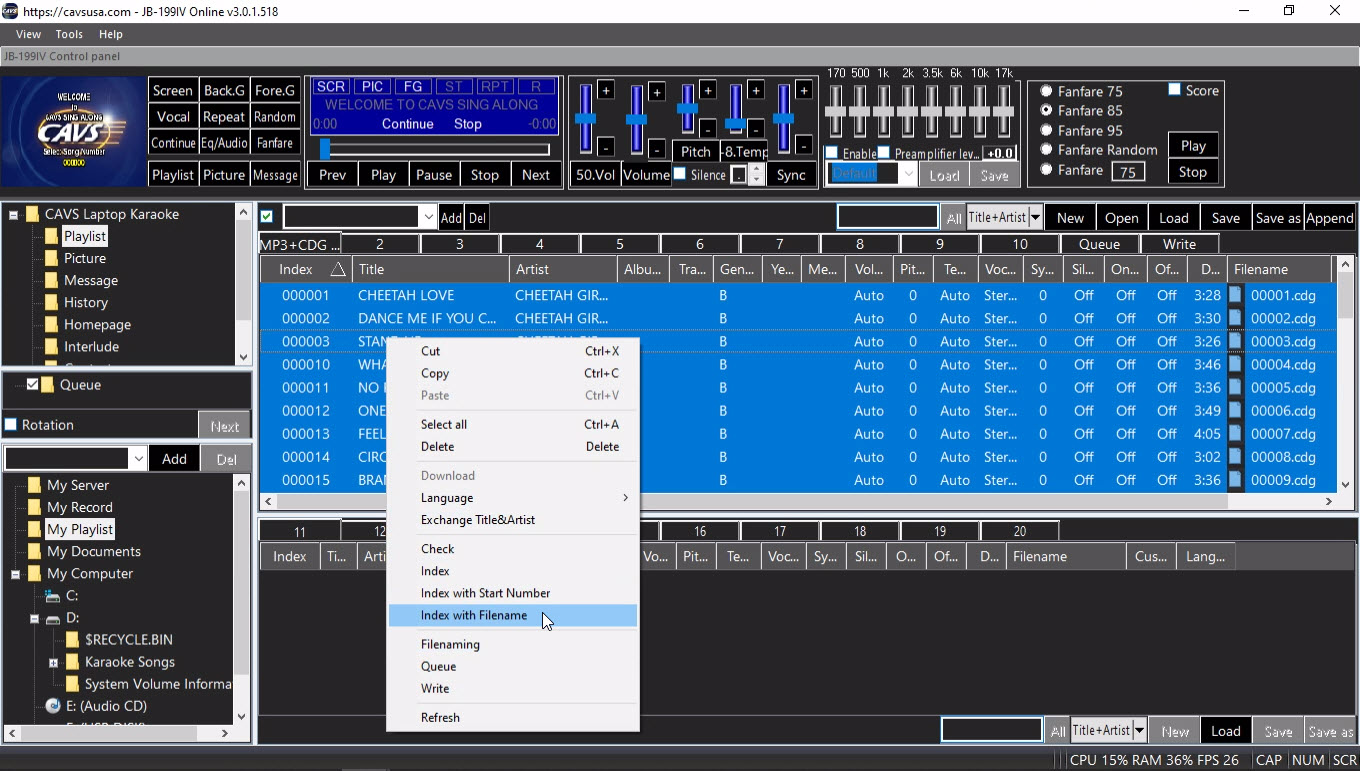
The songs are re-indexed according to the file names.
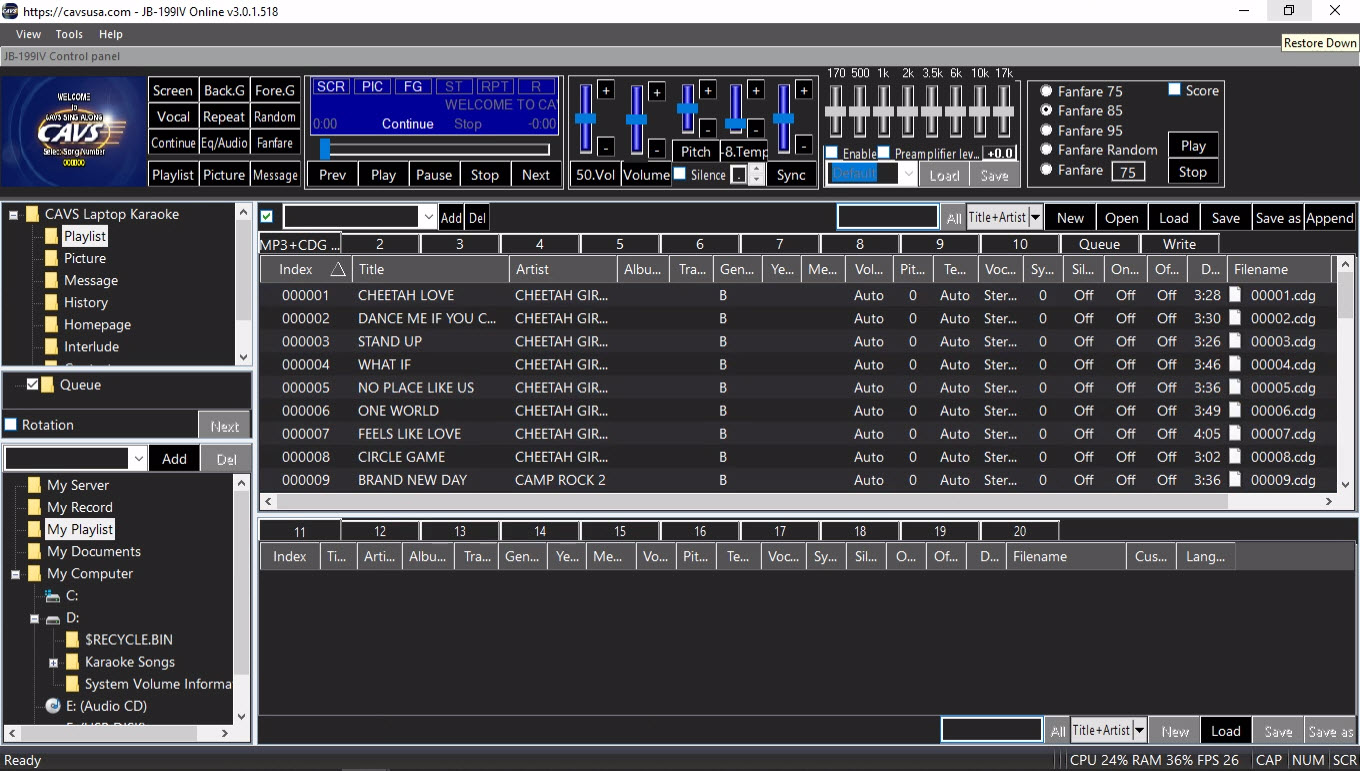
7.1.4.3.4 Change song information
Any song information such as title, artist, album, track, genre, year, and memo can be edited in the playlist. Double click on a field, for example album, and input a new value. Press Enter when done to exit.
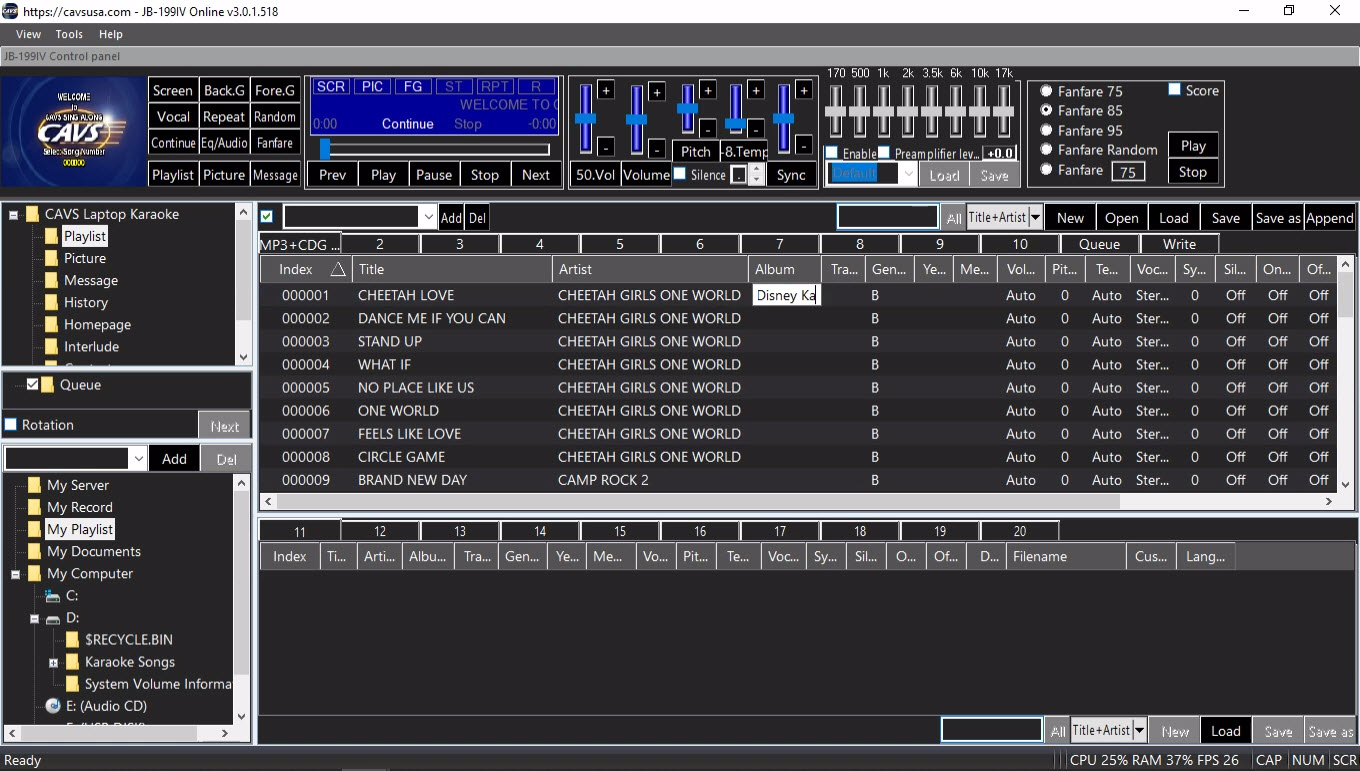
Songs in a playlist can be preset with control values for volume, pitch, tempo, sync, vocal, silence gap, on-time, off-time, and Memo. Double click on any field and input the values in the ranges shown below.

- Volume: (0 : 100)
- Pitch: (-11 : +11) half tone steps
- Tempo: (-10 : +10)
- Vocal: (0-Stereo : 1-Left : 2-Right)
- Sync: (-75 : +75) 75 frames per second
- Silence: (-5 : +5) seconds before/behind music
-
On-time: (0 - ) seconds for starting time
On-time / Off-time can be used to play a song for a single verse, rather than all verses. -
Off-time: (0 - ) seconds for ending time
On-time / Off-time can be used to play a song for a single verse, rather than all verses. - Memo: Text (for example, Concert version, Bad music, Easy to sing, etc.)
To save the change, press the Save button at the upper right corner of the List Browser. A popup window will appear asking for confirmation.
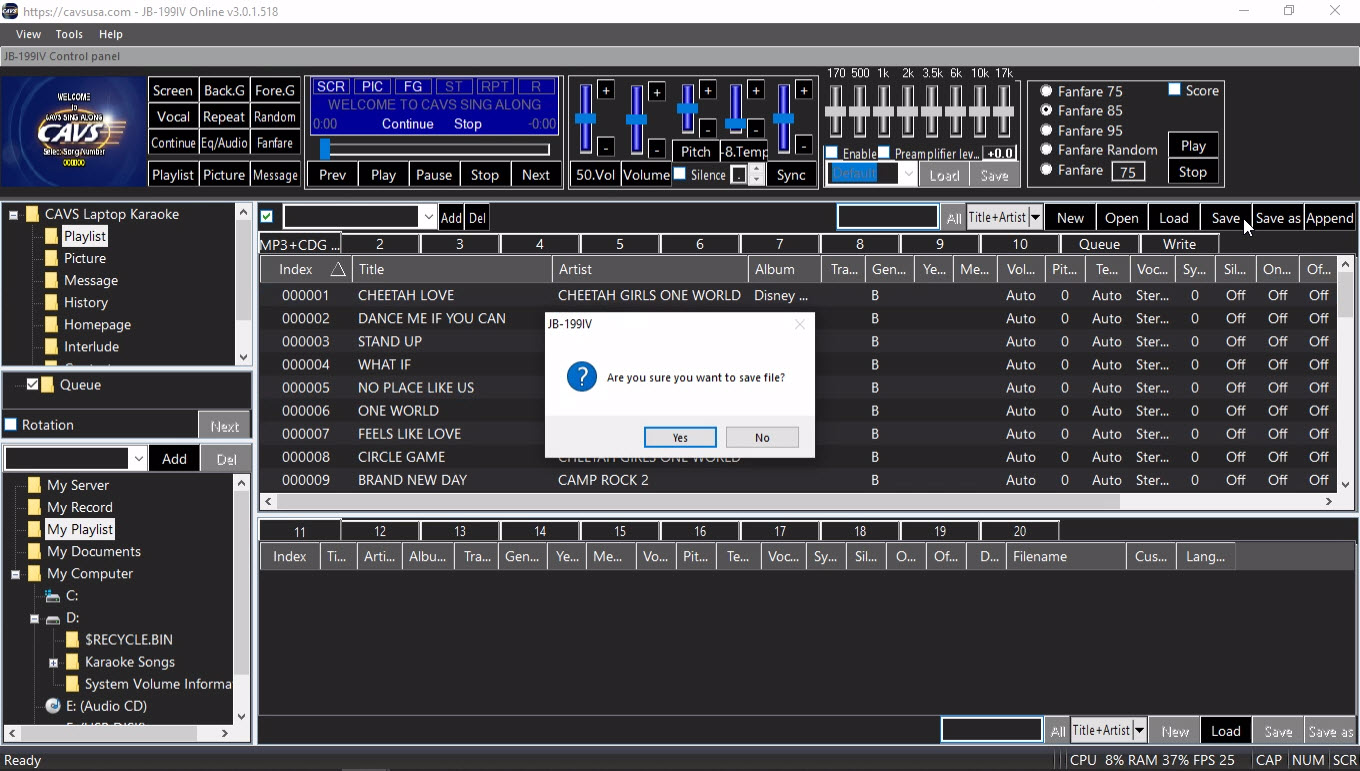
Press Yes. To save using a different name, press the Save as button
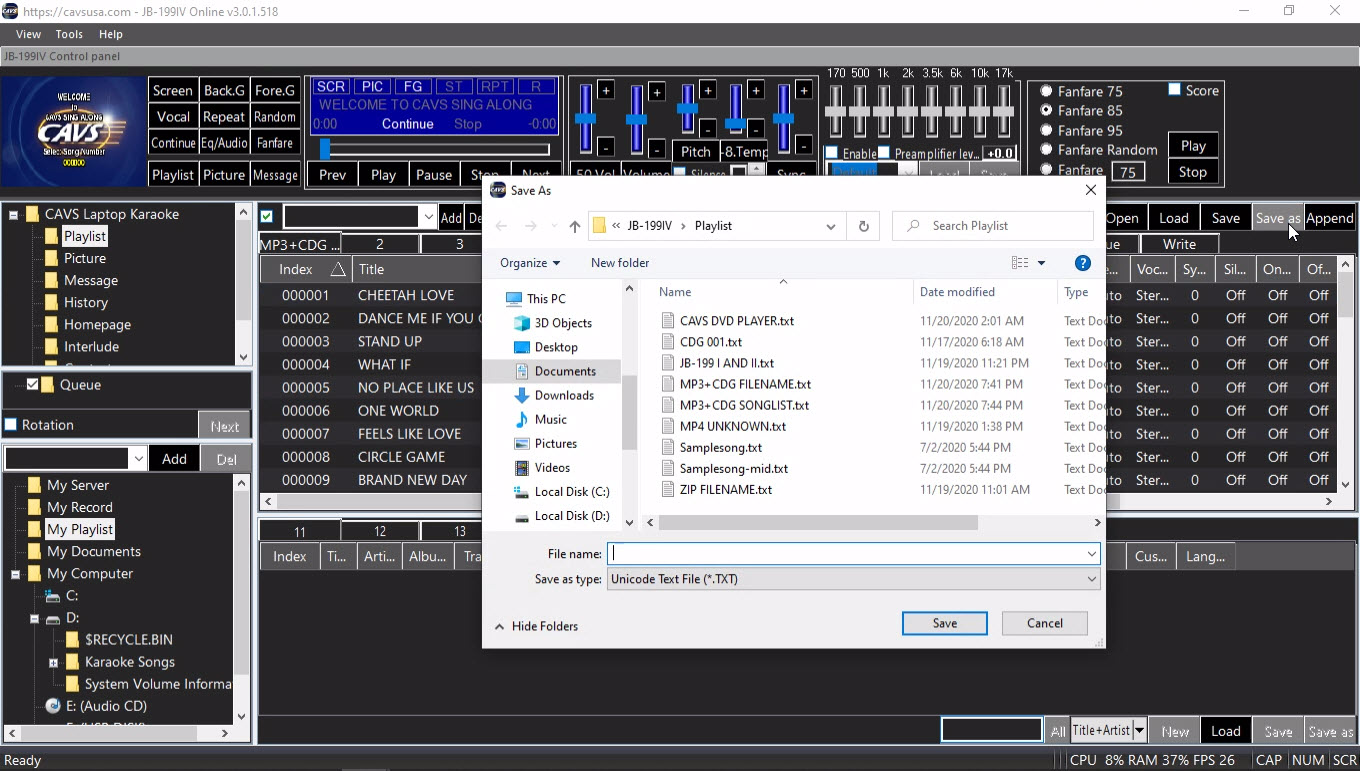
Input a new playlist name and press Save.
7.1.4.3.7 Adjust playlist display
The display window for a playlist can be adjusted in various ways.
-
Adjust the field width -
Place the mouse cursor in between any two field names. Drag the mouse to the left or right to decrease or increase the width of the fields.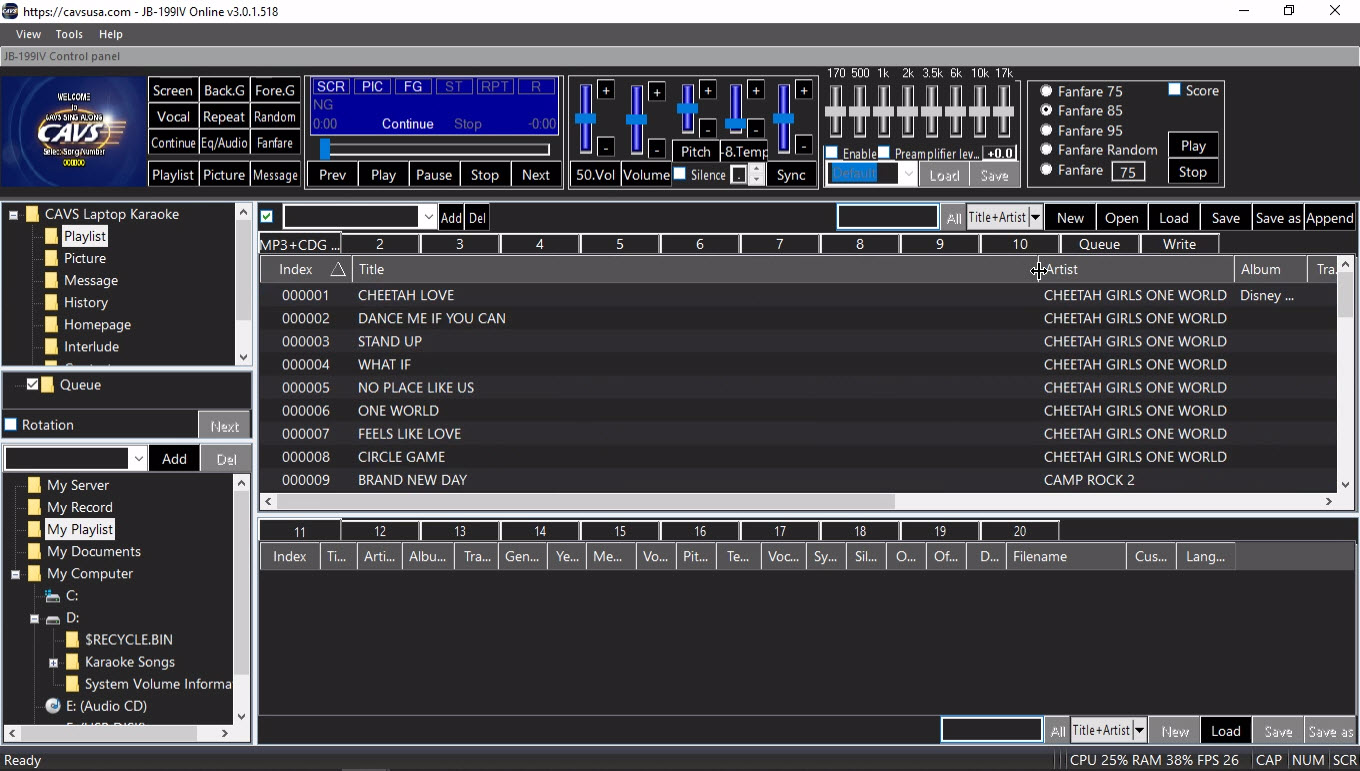
In this example, the cursor is placed in between the Title and Artist.
-
Hide or un-hide the fields -
Right click on any field name. A popup menu appears. Uncheck to hide or check to un-hide any fields. To make the change permanent, uncheck the Column Width Default.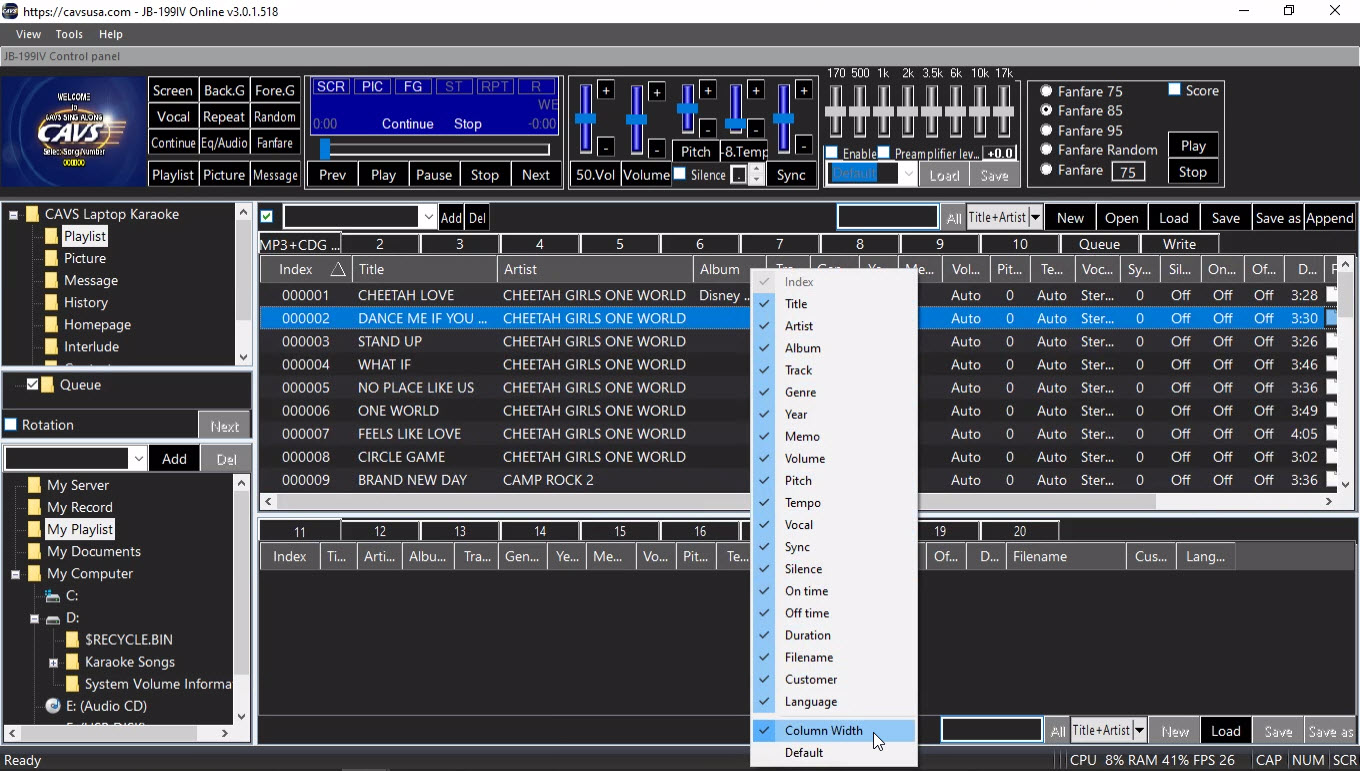
-
Adjust the List Browser/File Browser display windows-
Place the mouse cursor in between the List Browser and the File Browser. Drag the mouse up or down to increase or decrease the height of the List Browser/File Browser.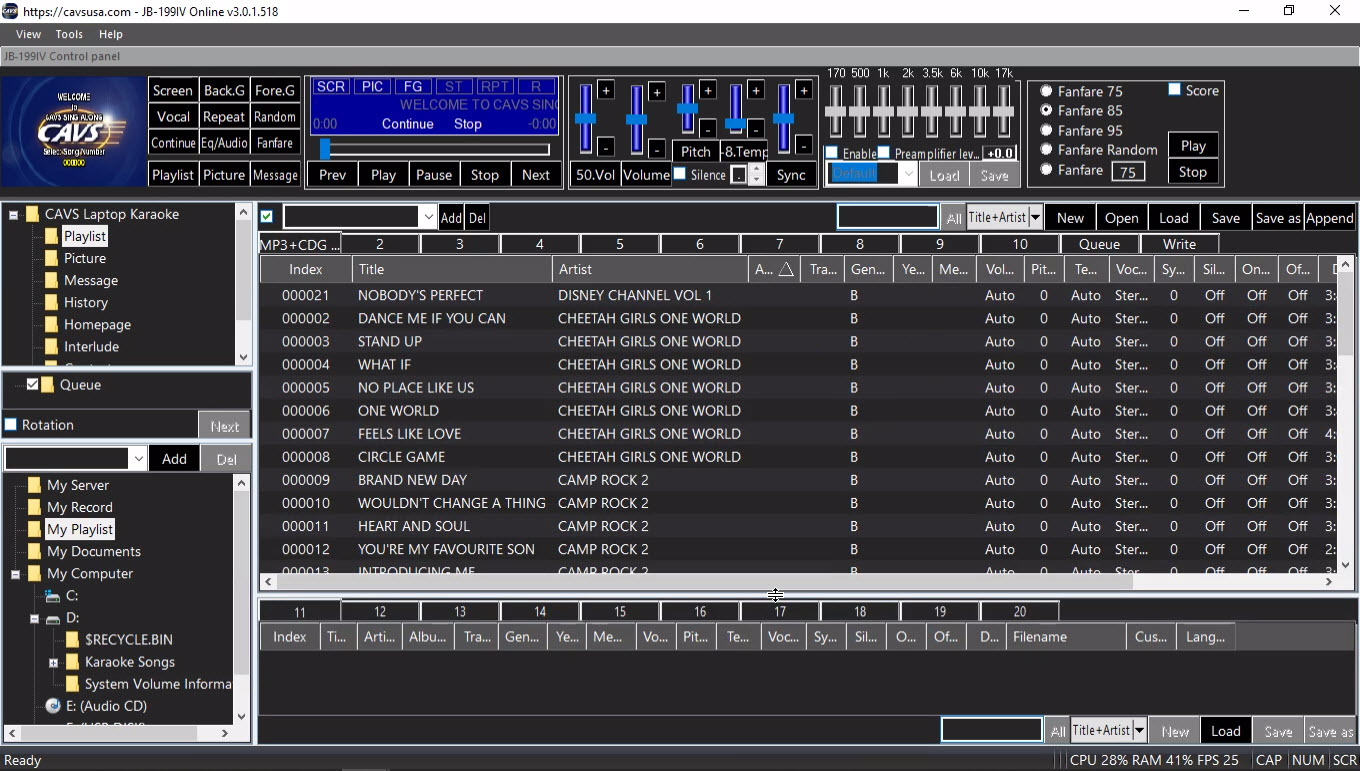
Place the mouse cursor in between the List Browser and the Function Menu. Drag the mouse left or right to increase or decrease the display width of List Browser/File Browser.

-
Adjust the line height of listings in the List Browser/File Browser-
Click on Tools and select Settings. Click on Control Panel and check the Enable Adjusted List Item Height. Increase or decrease the setting to adjust the line height. The default value is 8. Click OK.
To find a song, a playlist can be scrolled, sorted, or searched.
In this example, MP3+CDG SONGLIST playlist is loaded into My Server.
To scroll, drag the scroll bar on the right side of the File Browser up or down.
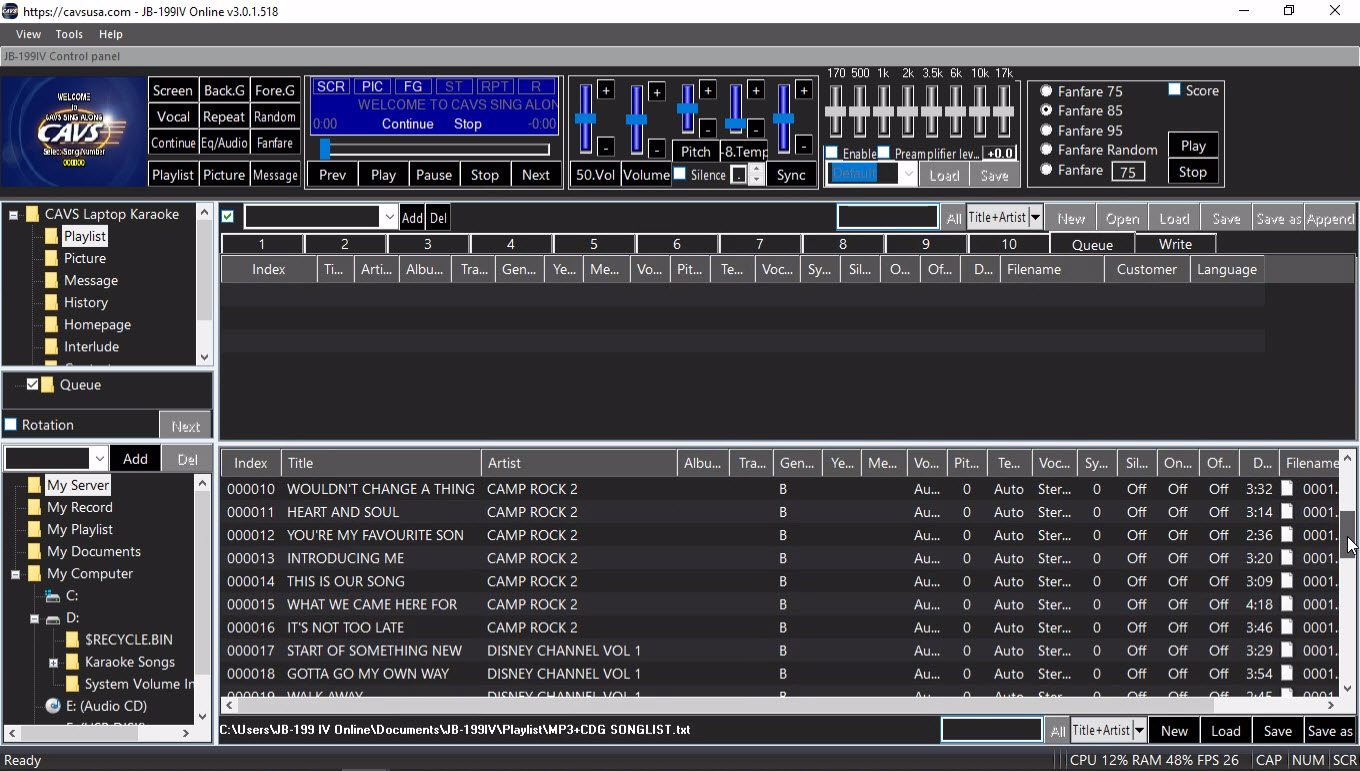
To sort, press a field name. Press the field name again to reverse the sort order. In this example, the Title field name is pressed to sort the playlist by title.
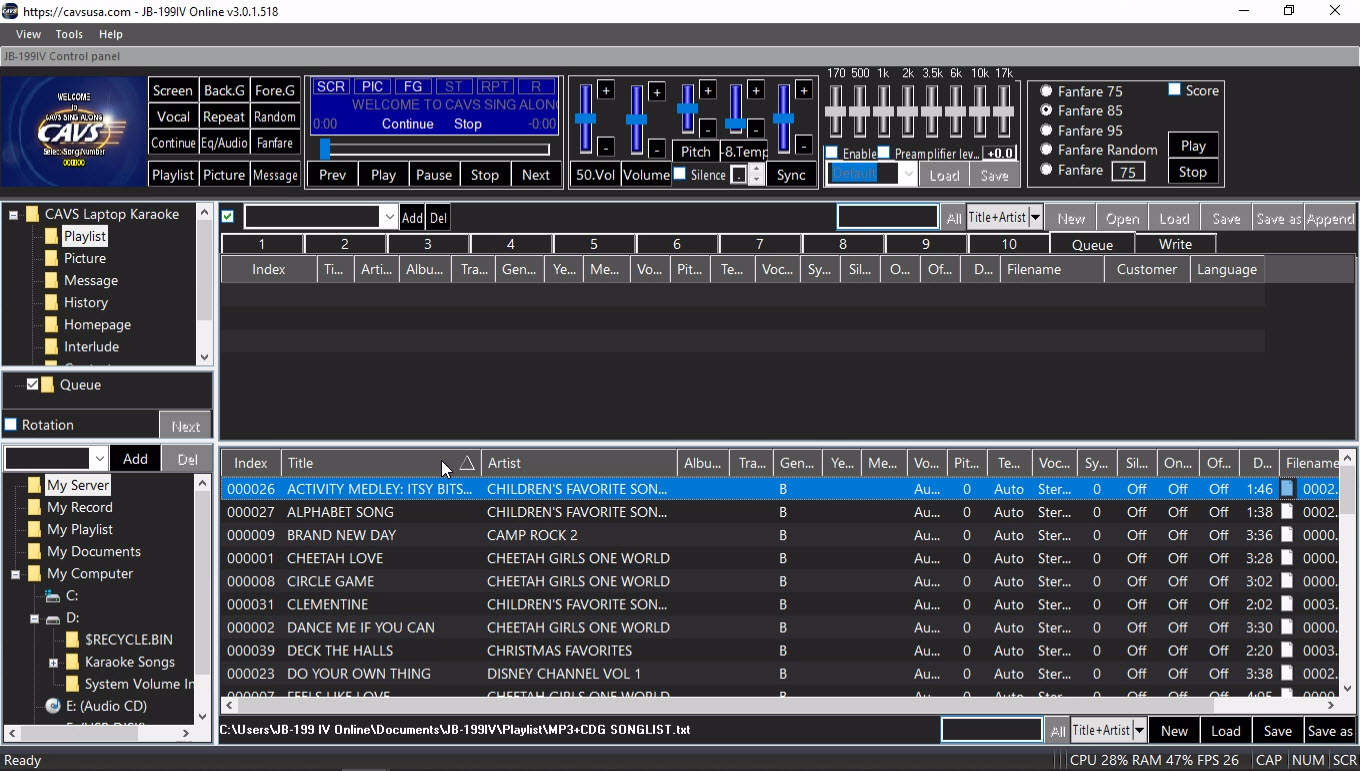
To search, click the down arrow at the lower right corner of the File Browser. A popup menu will appear showing the available search categories. Select a search category, for example Title+Artist, which means that the search will be conducted for a match in the title or artist fields.
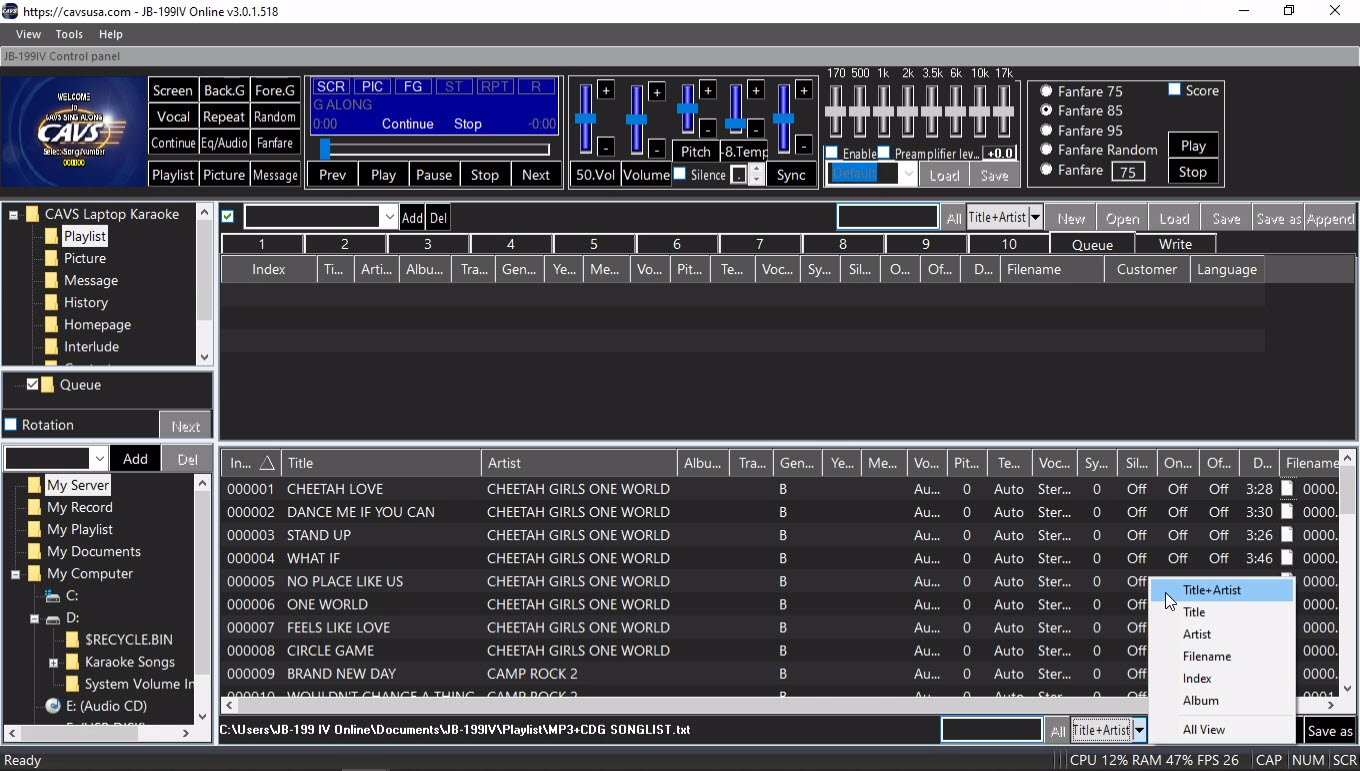
Type in a word or phrase to search for. Matching songs appear in the File Browser.
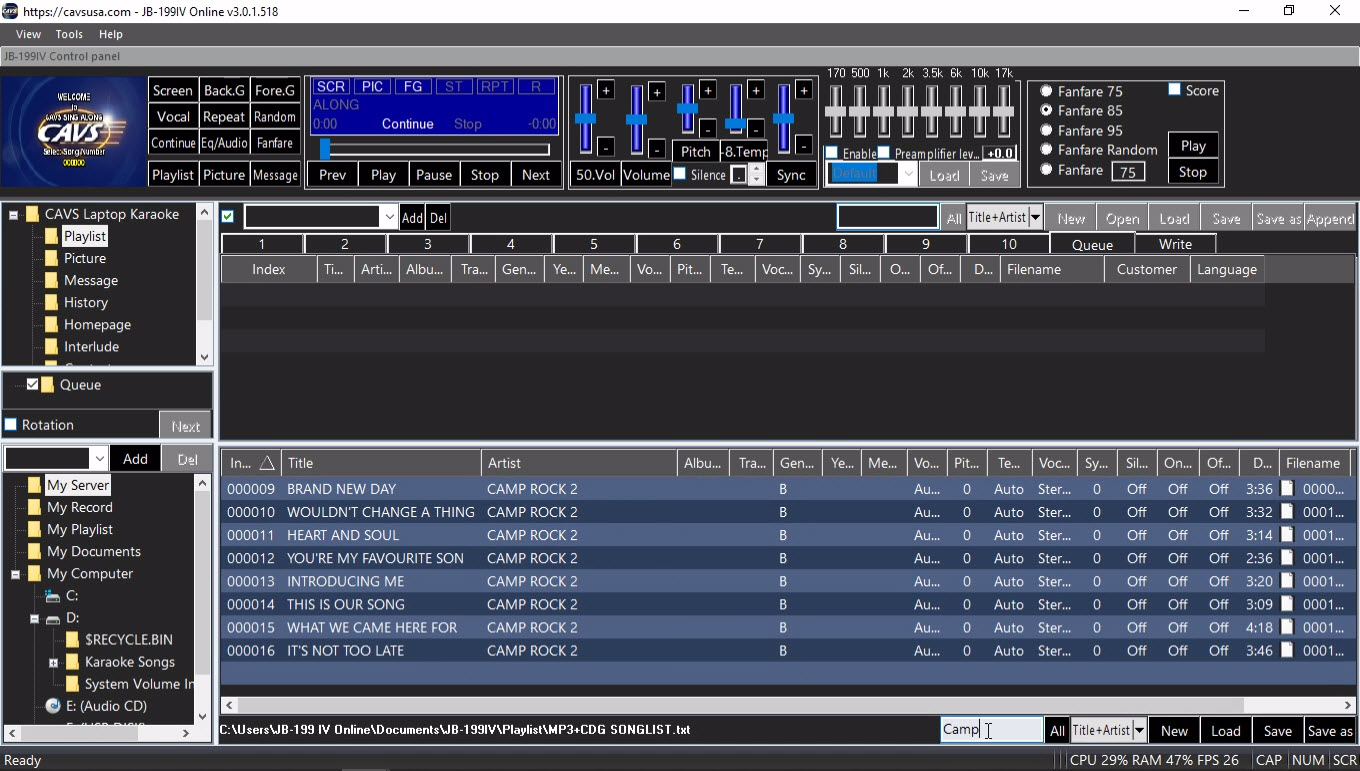
Right click on a song to play and select Queue.

Press Play.
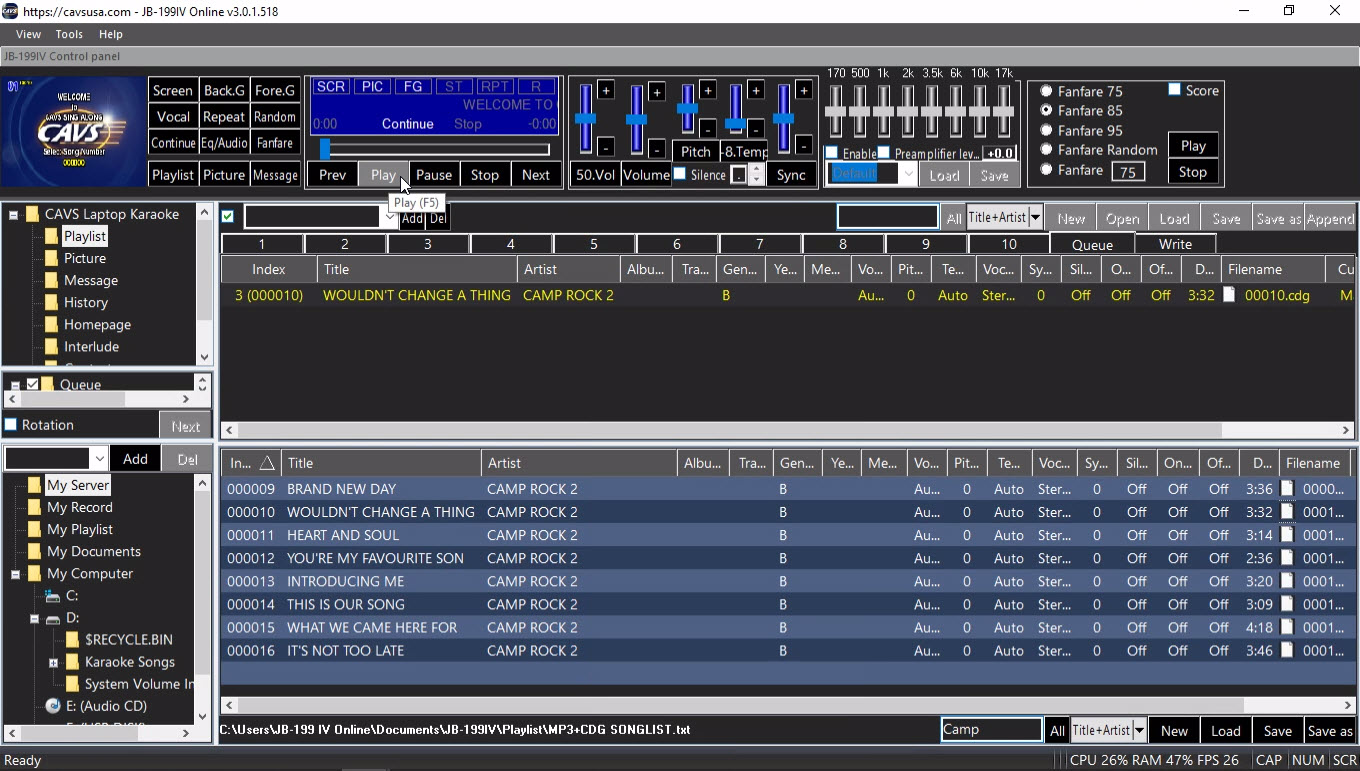
To return to view all songs in the playlist, press the All button at the lower right corner of the File Browser.
A common setup to start the JB-199 IV is to load a playlist into My Server and set the List Browser to Queue. In this example, MP3+CDG SONGLIST playlist is loaded into My Server and the List Browser is showing the Queue. To reserve a song, right click on the song and select Queue.

The song will appear in the Queue window. Press the Play button above to begin playing.

Up to 999 songs can be reserved and they play from the top down in the Queue. To change the order, simply by drag & drop the songs up or down in the Queue. In this example, the song NO PLACE LIKE US is moved from the 4th position to the 1st by drag & drop.
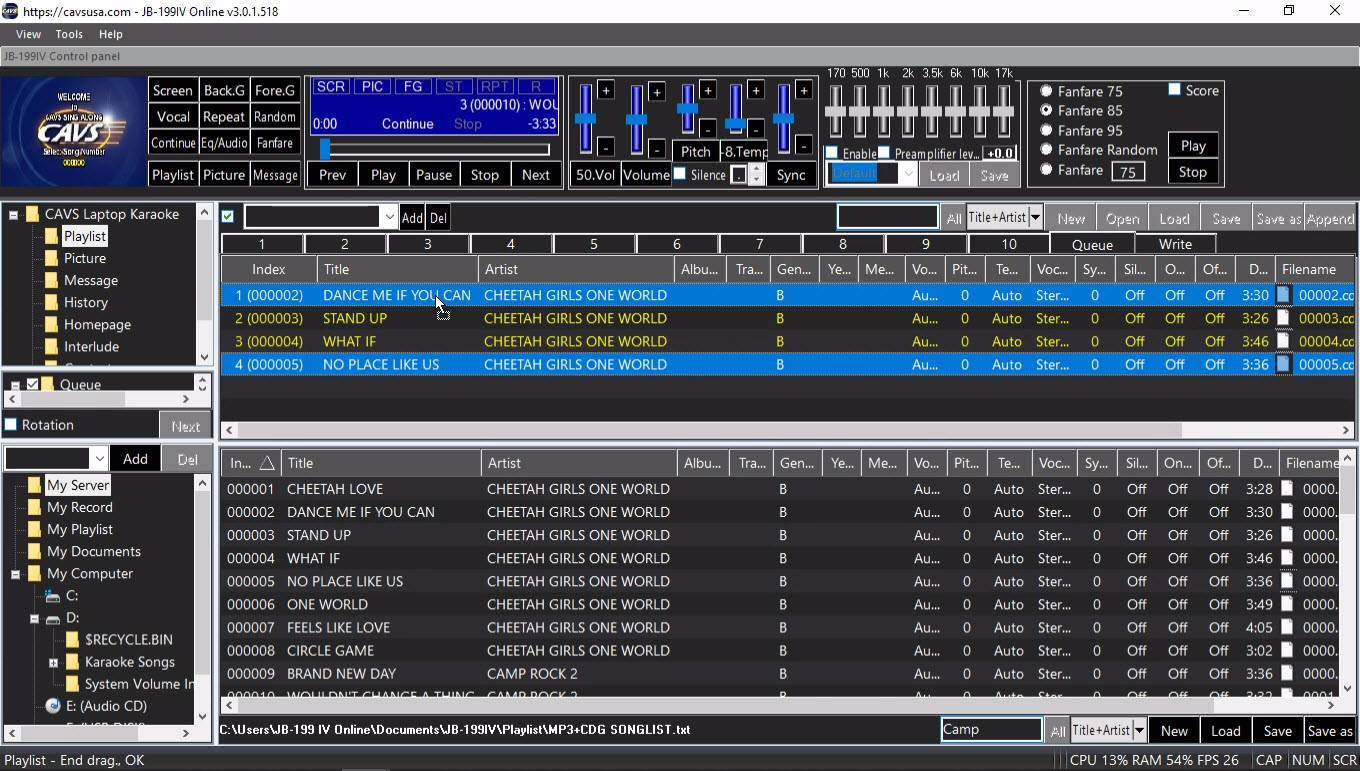
The reserved songs will play continuously when the JB-199 IV is in the Continuous mode. The reserved songs will play one song at a time when the JB-199 IV is in the Single play mode. To set the Continous/Single play mode, go to 4.5.B PLAYER.
For each reserved songs, a customer name can be added manually. Double click on the customer field, type in a name, and press Enter to finish.

The customer names can also be added automatically using the Auto Add feature in the List Browser. Turn on the Auto Add by checking the check box. Click on the pull down menu to search for the customer name. If the customer name is not found, type in the customer name and press the Add button. To delete a name, select the name and press the Del button.

With the customer name selected in the Auto Add, reserve a song into the Queue. The customer name automatically fills in.

When the reserved songs are tagged with customer names, the Queue can display the reserved songs for all or each customer. Click Queue on the left column to see the reserved songs for all.

Click a customer name on the left column to see the reserved songs for the customer. In this example, Tony is selected.
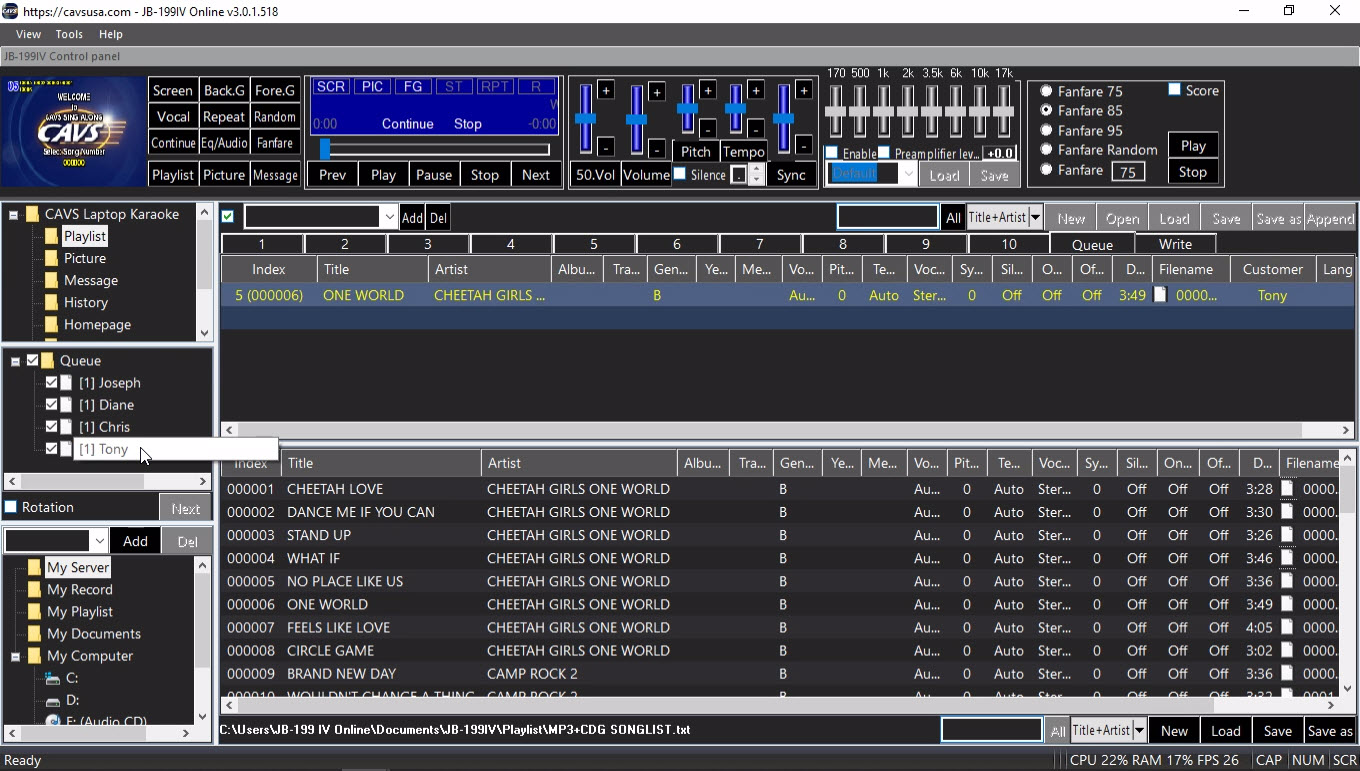
Load a playlist into My Server. Select Queue in the List Browser. In this example, MP3+CDG SONGLIST is loaded into My Server.
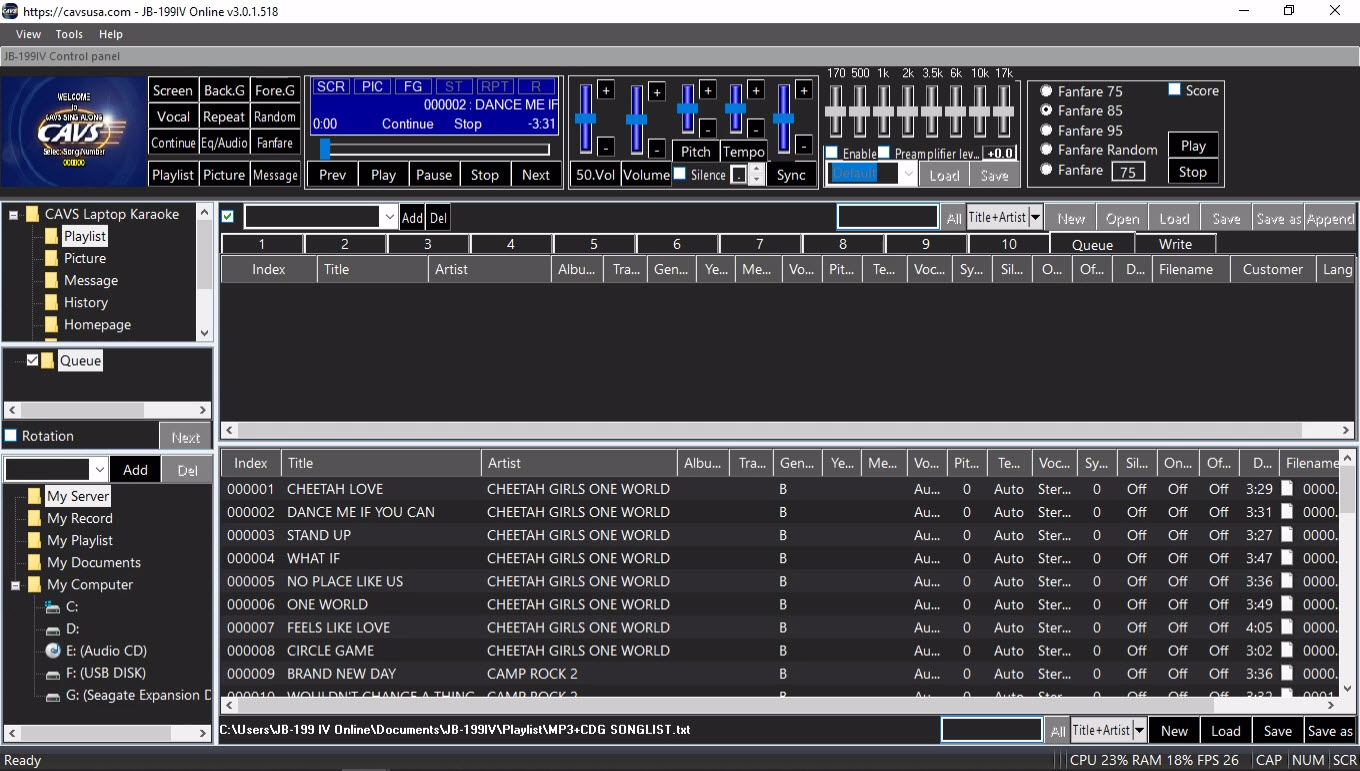
To play a song, double click on the Index of the song in My Server.
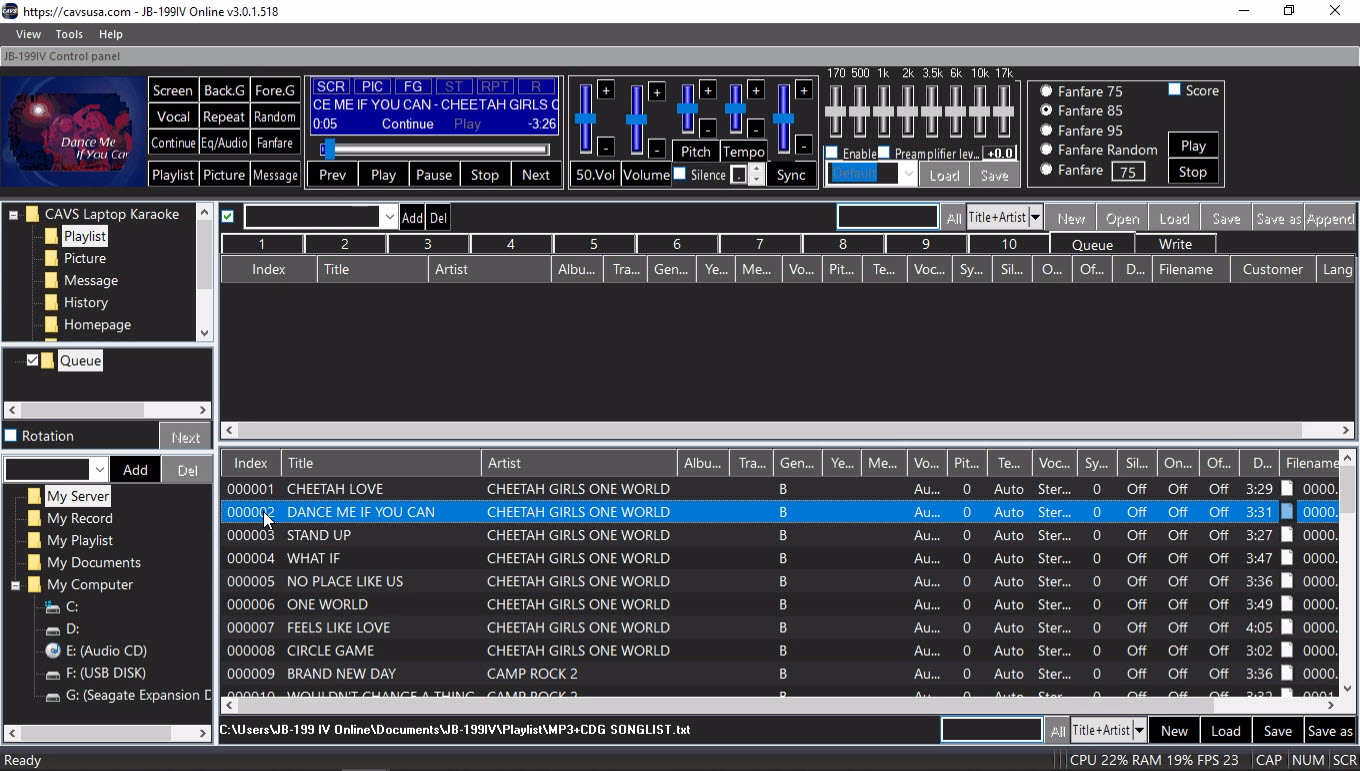
Or reserve the song into Queue first and then press Play.
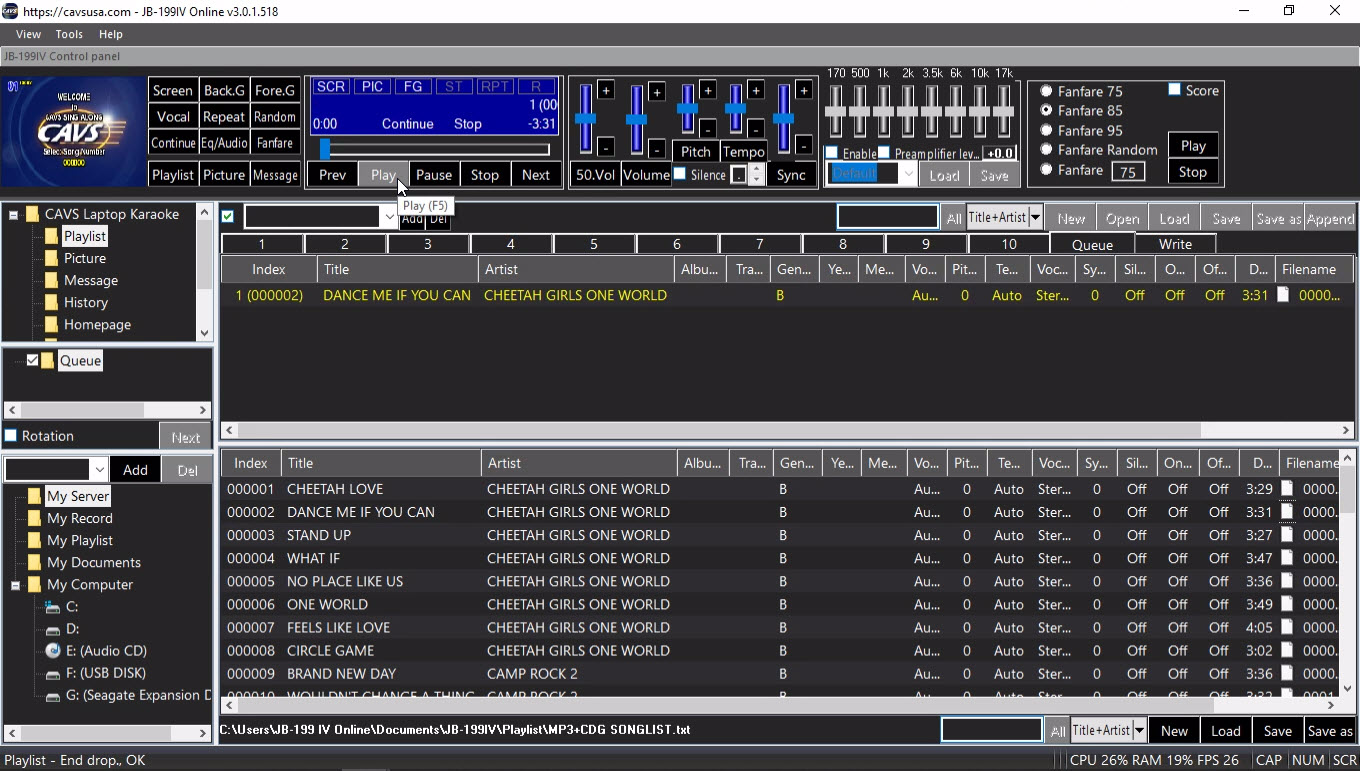
This is a common way to setup for a karaoke show loading the Master Playlist into My Server and opening the Queue window in the List Browser. The Master Playlist would contain all song files in the JB-199 IV and be shared with online guests and E-Songbooks.
Another way to setup is to load multiple playlists such as Wedding, Birthday, Christmas, 70's, 80's, Pop, Rock, etc. into the playlist slots 1 - 20. The playlists may also be the Favorite lists of the customers. To play, double click on the index of any song in any playlist. Or reserve the song first into Queue and press Play.
Before playing a song, the Key, Tempo, Sync, Vocal, Volume, etc. can be preset as shown 7.1.4.3.5 Pressing controls. When in play, they can be changed using the controls at 4.5.C CONTROLLER.
The name Master Playlist for a playlist has a special meaning in the JB-199 IV. At boot up, if My Server is empty, the JB-199 IV automatically looks for a playlist named Master Playlist in the folder Documents\JB-199IV\Playlist. If found, the Master Playlist is loaded into My Server. So there is a benefit to name the playlist that is most used or has the most number of songs to be Master Playlist. In this example, the MP3+CDG SONGLIST playlist is most used and is henceforth renamed as Master Playlist.
Subscription services provide non-ending supply of new karaoke songs that are fully licensed and updated daily and automatically in JB-199 IV Online. The songs are delivered via streaming technology which does not store the song files locally, and the Internet connection is required at all time, i.e., for use in a show, the Internet connection must be maintained throughout the show. The subscription services are currently available from Party Tyme and Karaoke Cloud, of which you can subscribe to one or both.
1. Start the JB-199 IV Online player and select 'My Subscription" in the Control Panel as shown below. Note that if the Internet connection is not detected, 'My Subscription' will not appear.
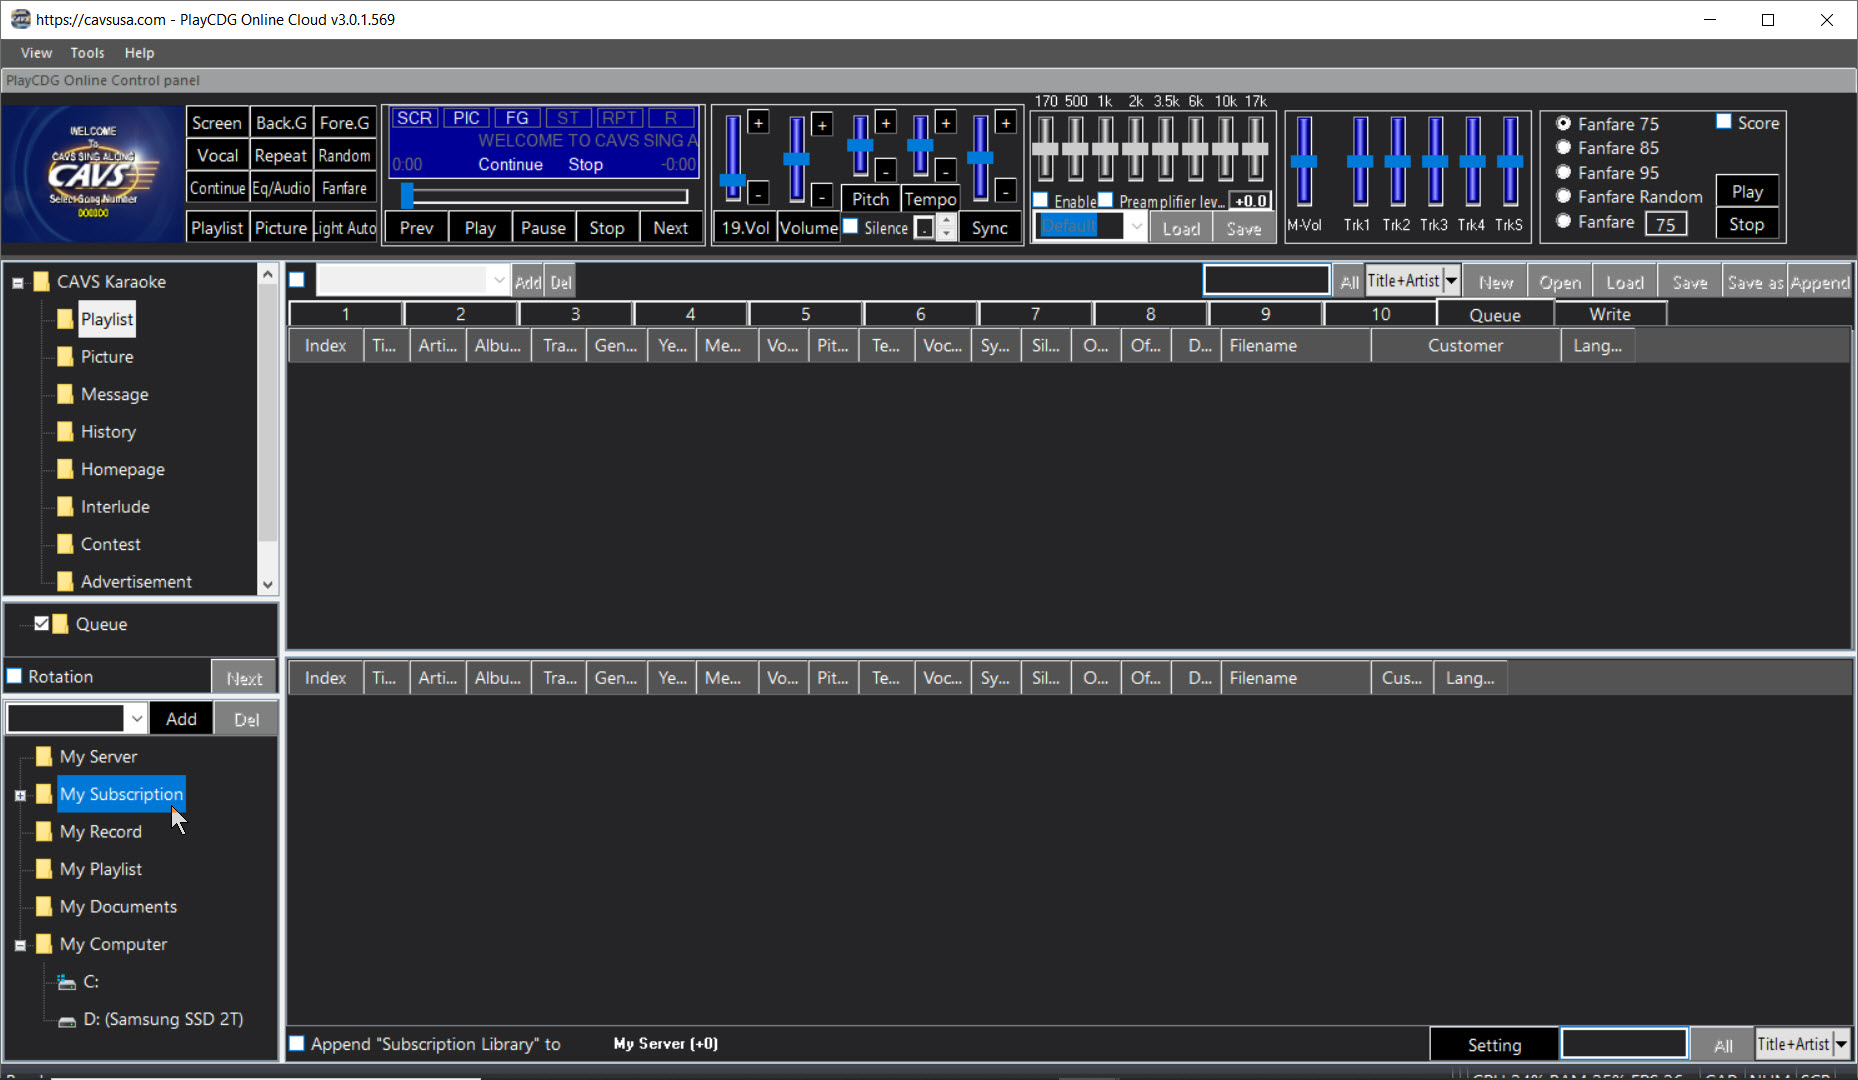
2. Click '+' to see all available services, currently from Karaoke Cloud and Party Tyme (1). Select a service and press the 'Setting' button in the bottom right corner (2).
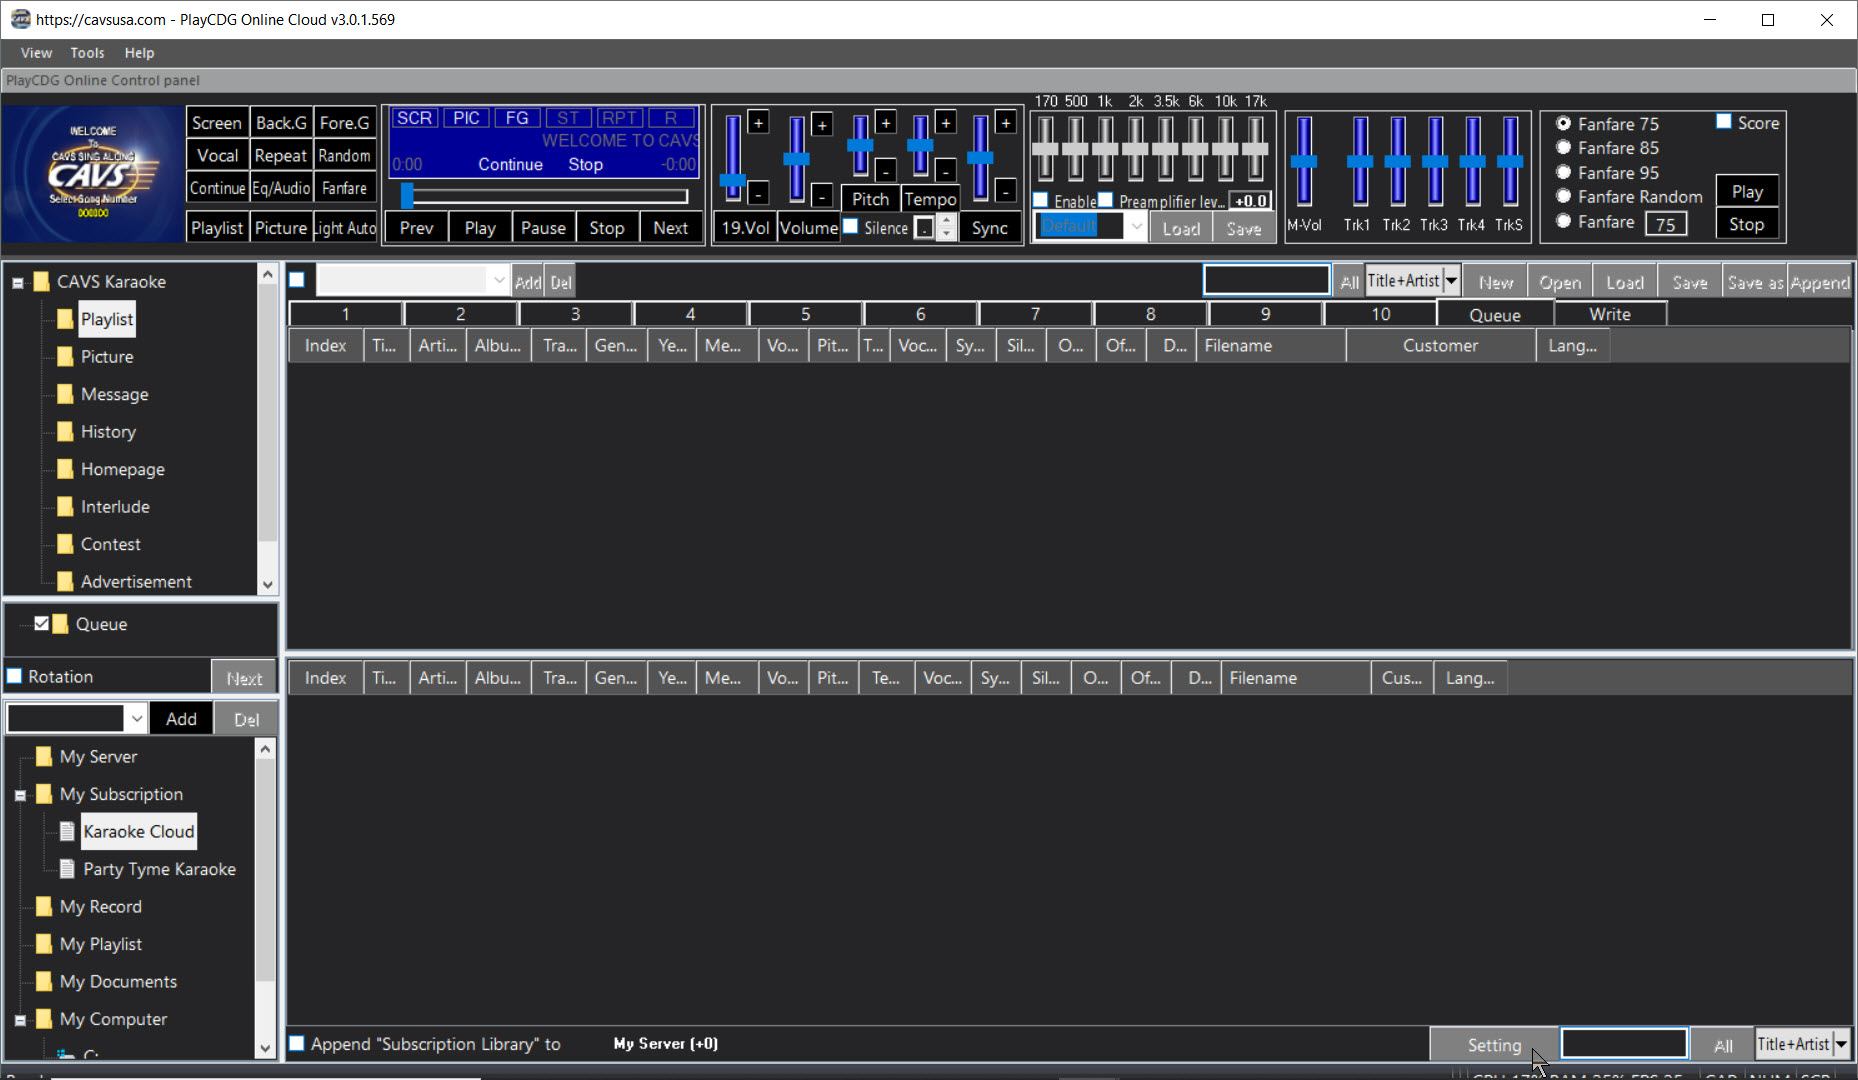
3. A popup screen will appear asking for Username and Password as shown below.
- First click on the link 'click here' and follow the online instruction to purchase a subscription directly from the service provides. Username and Password will be issued to you upon your purchase.
- Insert the Username and Password into their respective fields and click 'OK'.
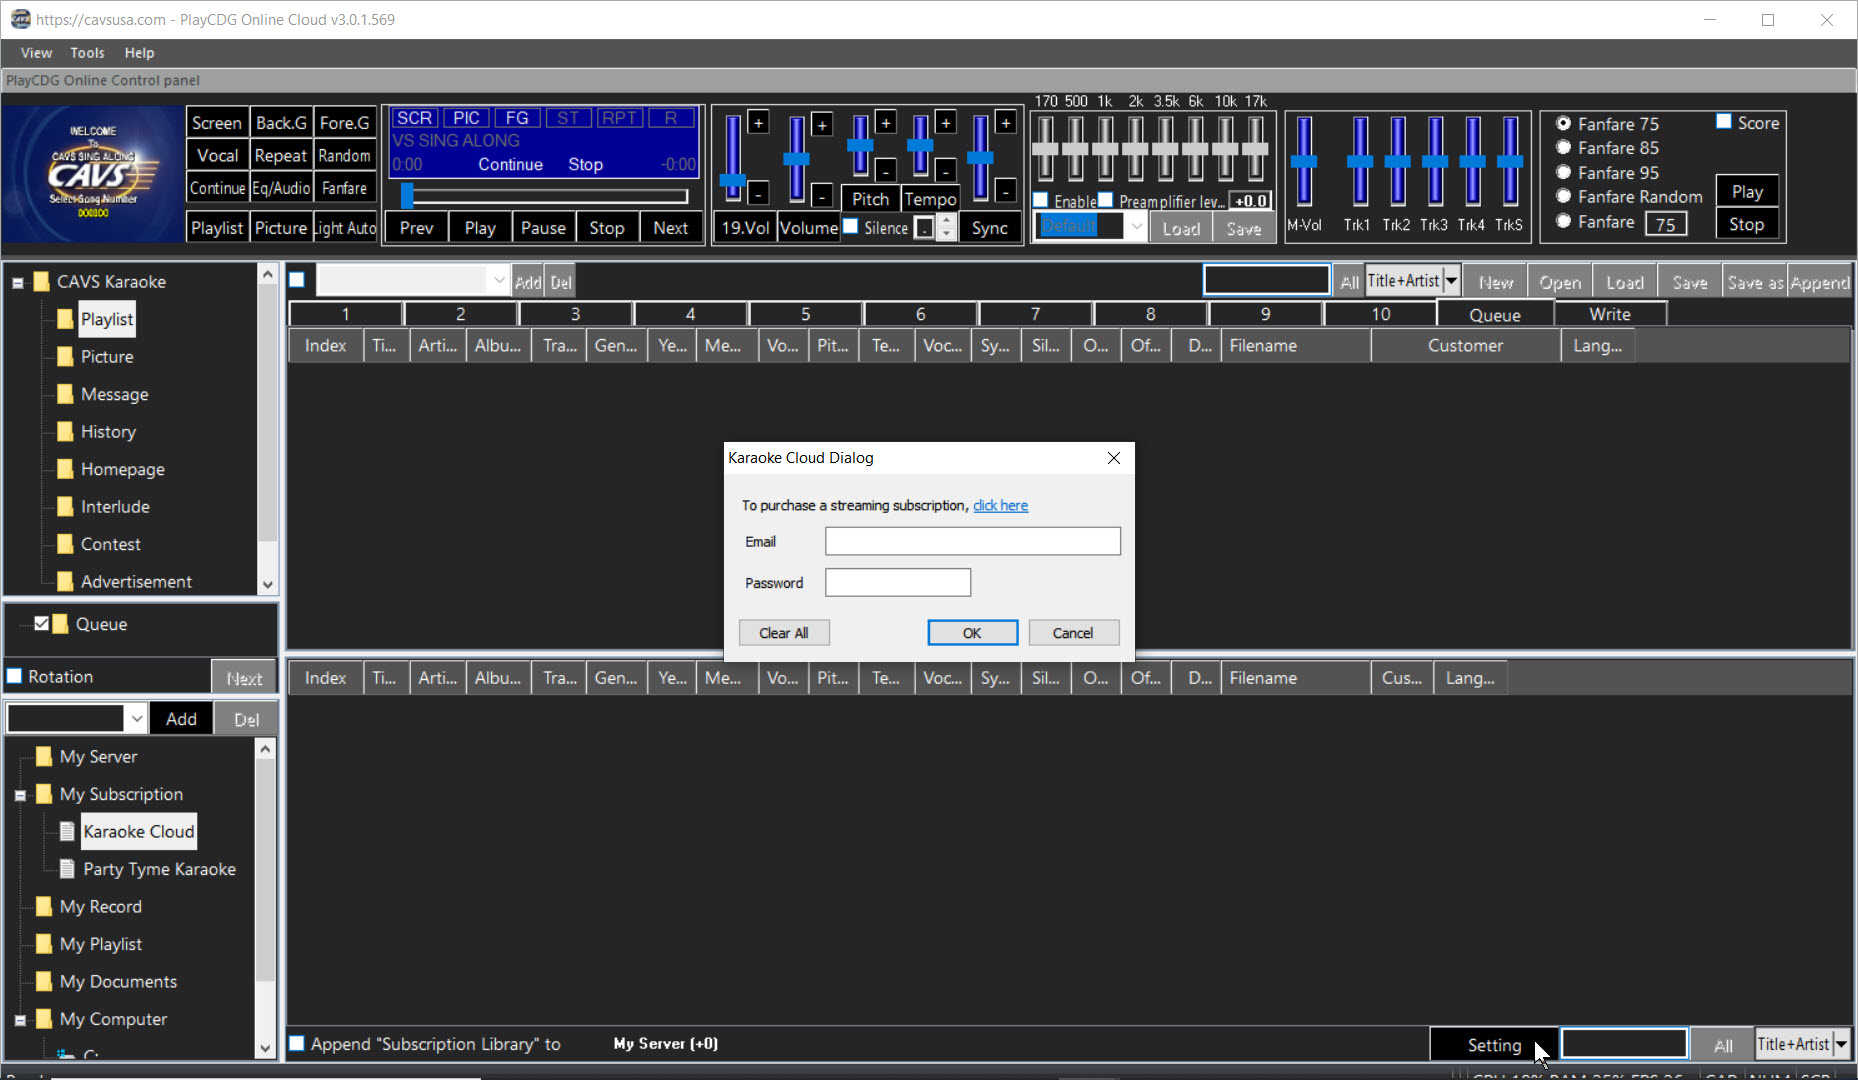
4. Upon inserting your credentials, a playlist of the songs available in the service will appear on the right side window. You can select a song from the playlist and play just as a song from any other playlist. Here we show the Party Tyme subscription service.
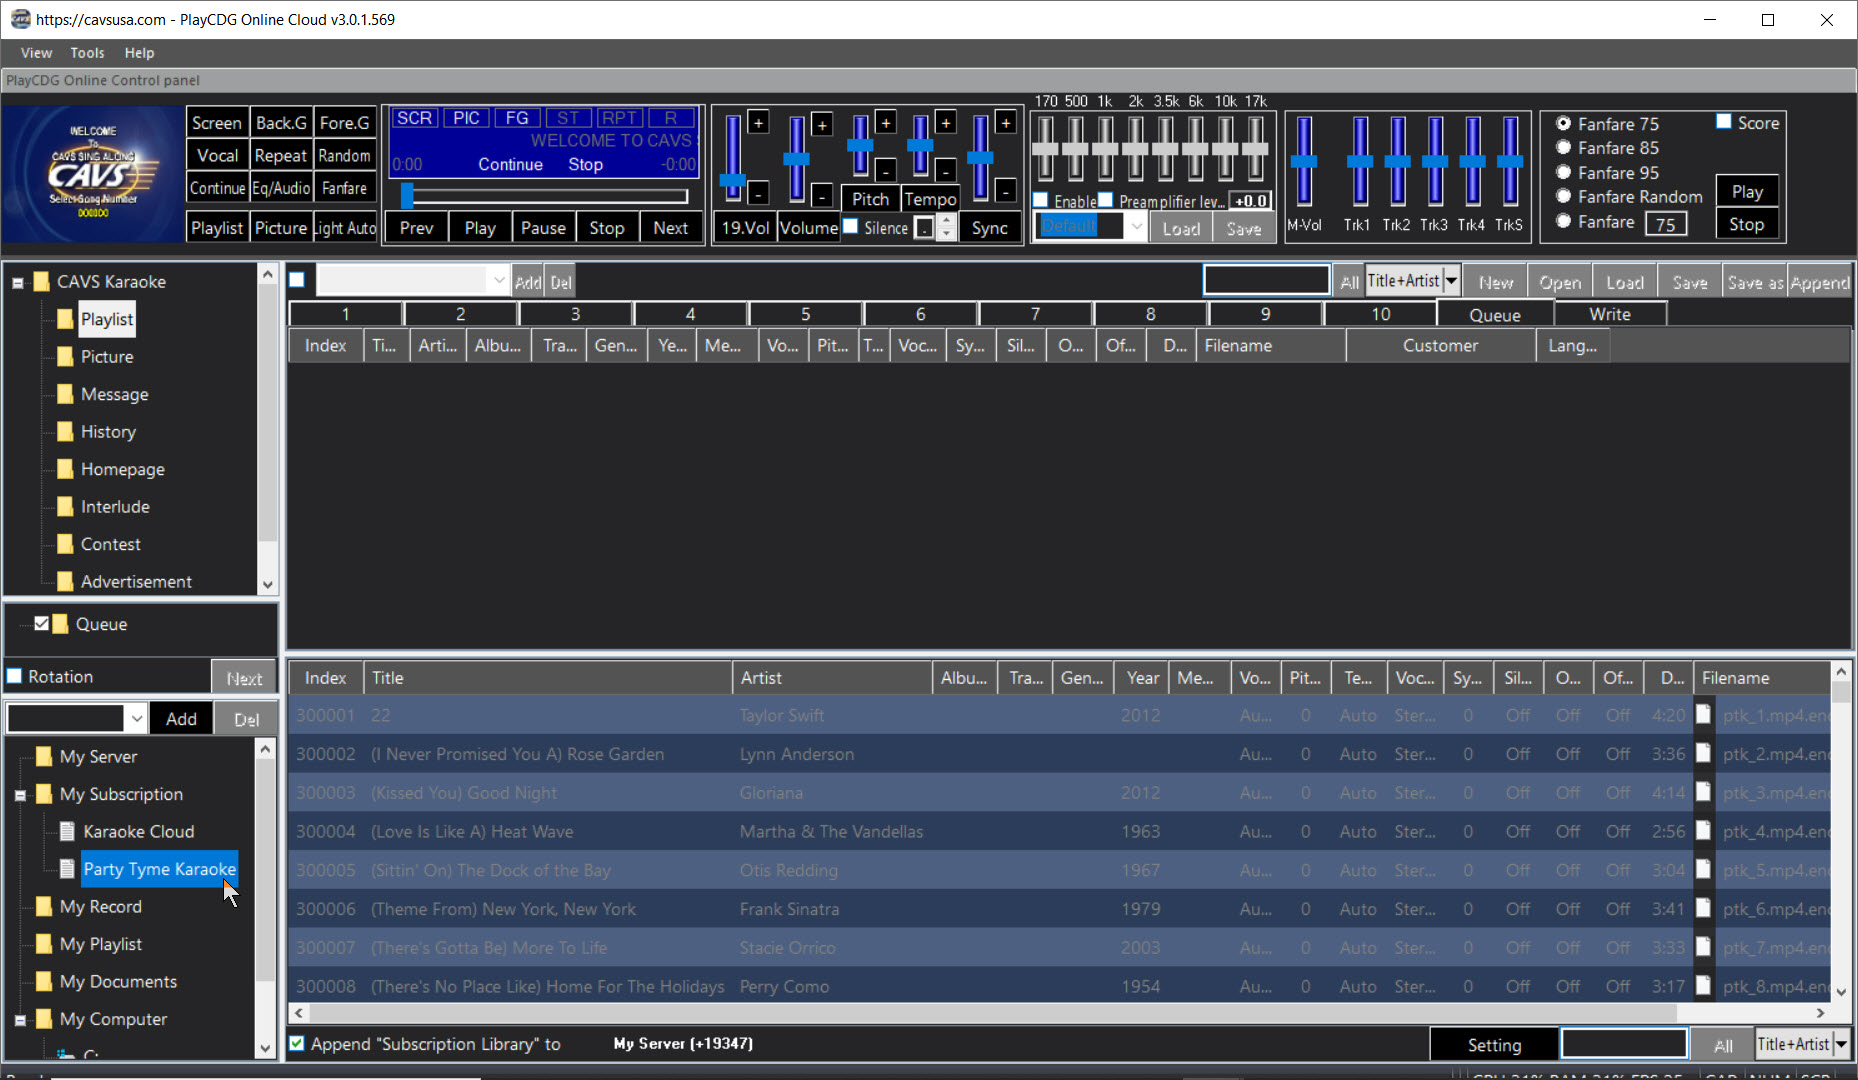
5. Note that in My Server, the Master Playlist of your own songs becomes merged with the playlist of the subscription service. The merged playlist will also show in the Customer Interface, thus in all of the customers' phones and tablets.
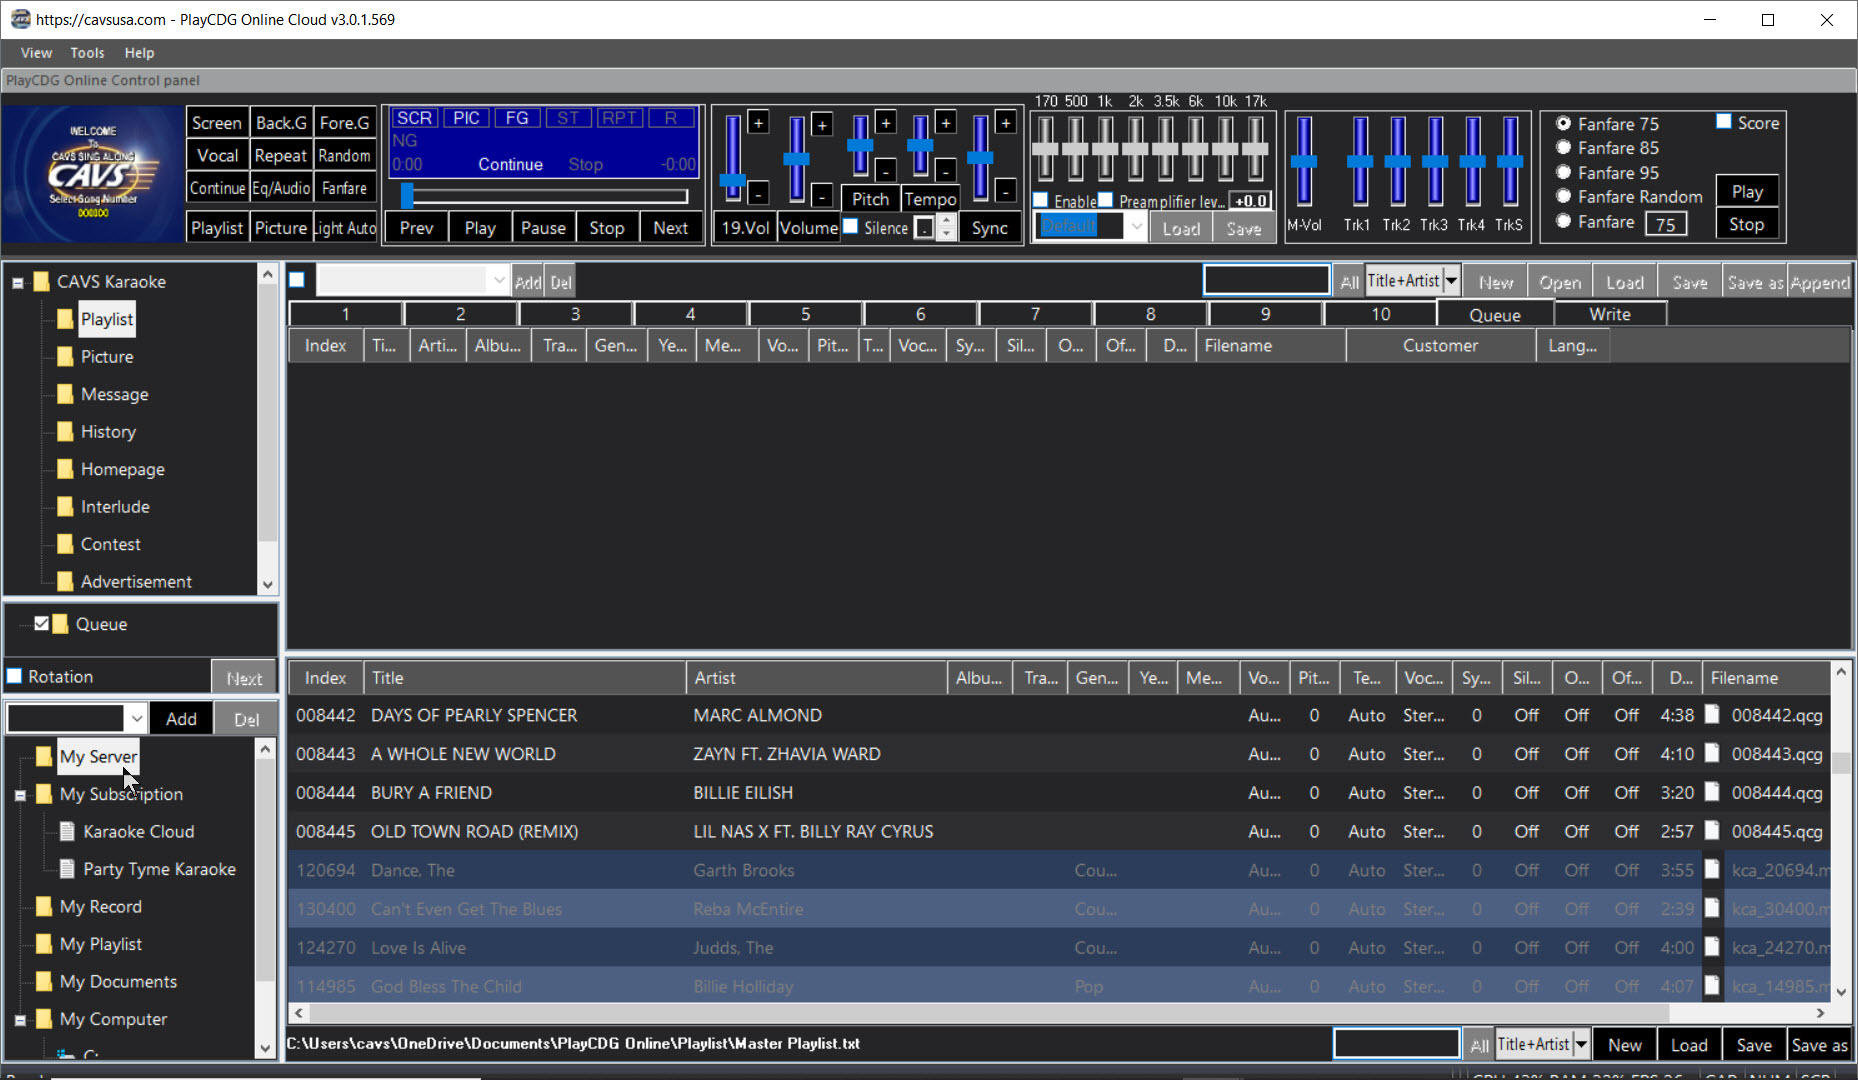
6. If you do not wish to merge the playlists, uncheck the option 'Append "Subscription Library" to My Server' at the bottom of the screen. Reload the Master Playlist of your own songs into My Server and the Master Playlist will remain separated.
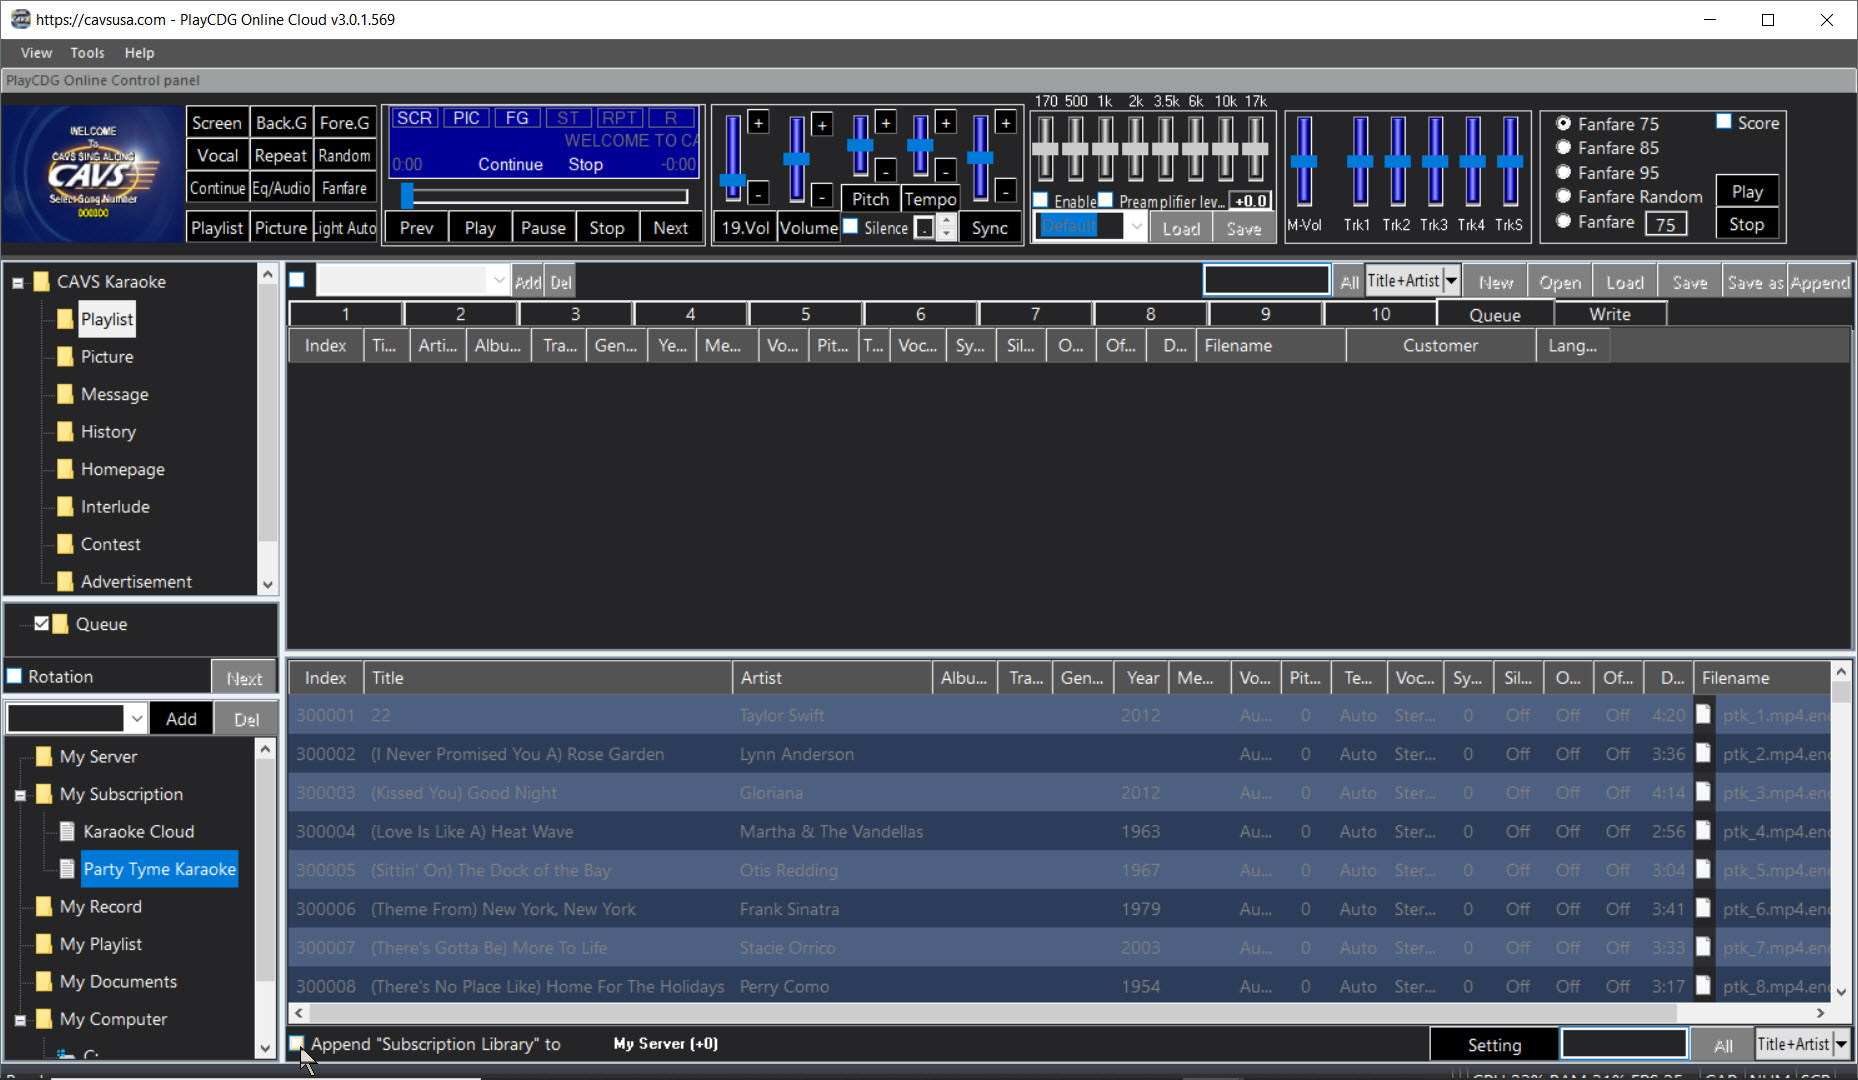
7. When restarting the JB-199 IV Online, your credentials for the subscription service will automatically reload and bring up the latest playlists of the subscription services. For any interruption or break in the services, click on Setting, confirm or insert the credentials, and reconnect.
The JB-199 IV program can display different backgrounds to the lyrics, such as still pictures, motion videos, or live webcams. Click on the Picture in the List Menu.

Press the Open button at the upper right corner of the List Browser and navigate to pictures of JPEG, TIF, or BMP format. In this example, C:\JB-199IV\Sample\Pictures is opened.

Highlight the picture files and press Open. The picture files will appear on the List Browser with preview icons. Place a check mark to select the pictures and specify the display interval. Press the Back G button in the 4.5.B PLAYER to PIC to begin the slide show.

Videos can also be added as the background pictures. After pressing the Open button at the upper right corner of the List Browser, navigate to the video files in AVI, WMV, or MP4 format. Select the video files and open. The video files will appear in the List Browser. Place the check marks to select the files. Press Back G button in the 4.5.B PLAYER to VID to begin the video play.
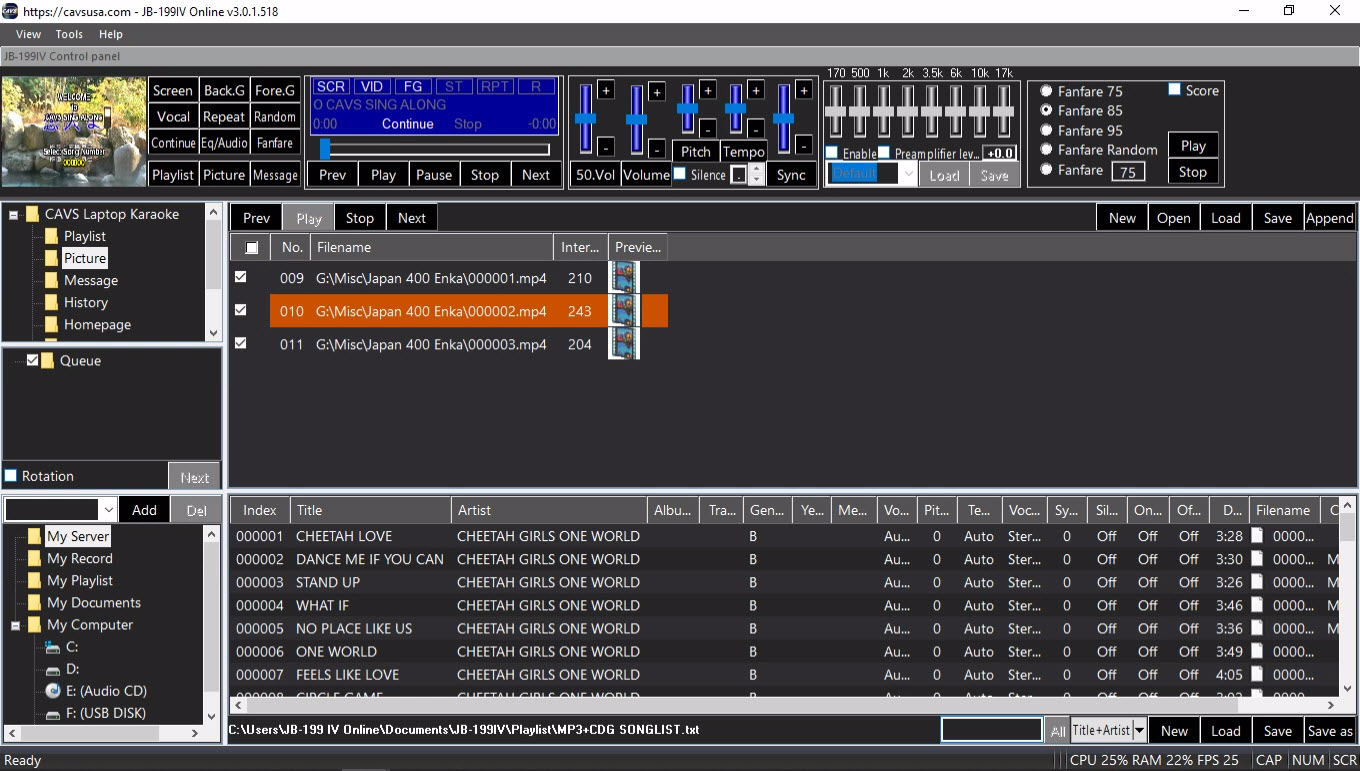
Live webcam can also be added for the background display. In the List Browser, right click and select a webcam. All webcams that are enabled in the JB-199 IV will appear in the menu.
Note that the JB-199 IV does not come with a built-in webcam.
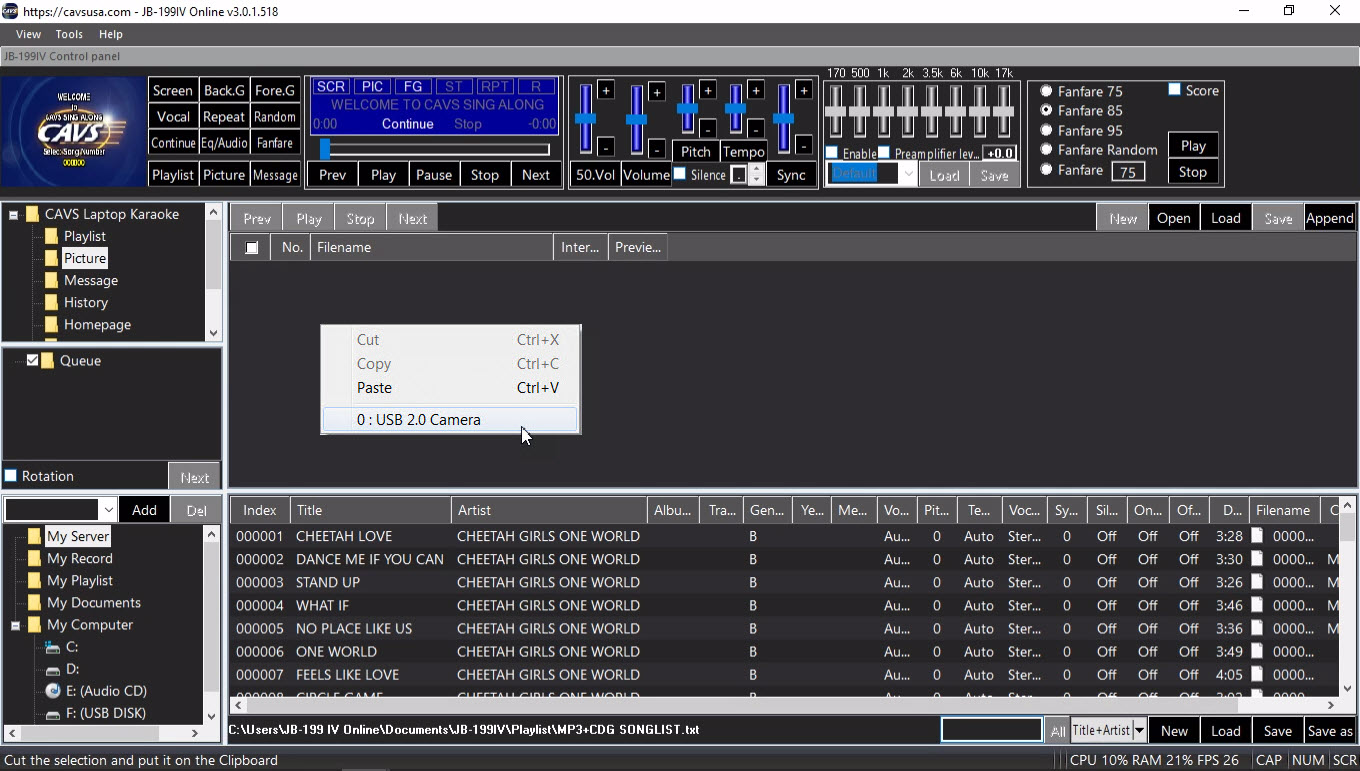
Place a check mark to enable the webcam. Press the Back G button in the 4.5.B PLAYER to WEC to begin the live webcam broadcast as the background.

When the photos, videos, and webcams are opened in the List Browser, press the Save button at the upper right corner of the List Browser. All items including the webcams will be saved in a list which can easily be reloaded at any time.
The JB-199 IV can display notices including calls for the next customers. It provides macro variables of customer name, title, artist, and time left of the next three reserved songs for use in notices.
Click on the Message in the List Menu and press the Load button at the upper right corner of the List Browser. Two files Nextsong and Samplemsg will appear in a popup window.
Load the Nextsong first. Message 001 will appear with the content “Next Song {Customer}-{Title}-{Time}”. This notice will display on TV the next customer name, next song title, and the time until the next song.

[Click to view large picture]
Place a check mark at the Auto Display Message 001 and the notice will go out automatically at the 1 minute remaining mark of the song in play. Note that the Auto Display Message 001 only works under the Single play mode which is set at 4.5.B PLAYER.Macros variables that can be used in notices are:
- {Customer} - Customer name of the next song
- {Title} - Title of the next song
- {Artist} - Artist name of the next song
- {Time} - Time left until the next song
- X - Number (1 - 3) of next songs
Here are some examples of notices using the macros.
-
Next Song {Customer}-{Title}-{Artist}-{Time} :
Next Song - Customer name of the next song - Title of the next song - Artist of the next song - Time left until the next song -
Next {Customer}-{Time}-2 :
Next - Customer name of the next song - Title of the next song - Customer name of the next next song - Title of the next next song -
Get Ready {Customer}-3 :
Get Ready - Customer name of the next song - Customer name of the next next song - Customer name of the next next next song
A notice can be launched by pressing the Call button. It can be turned off by pressing the Call Off button.
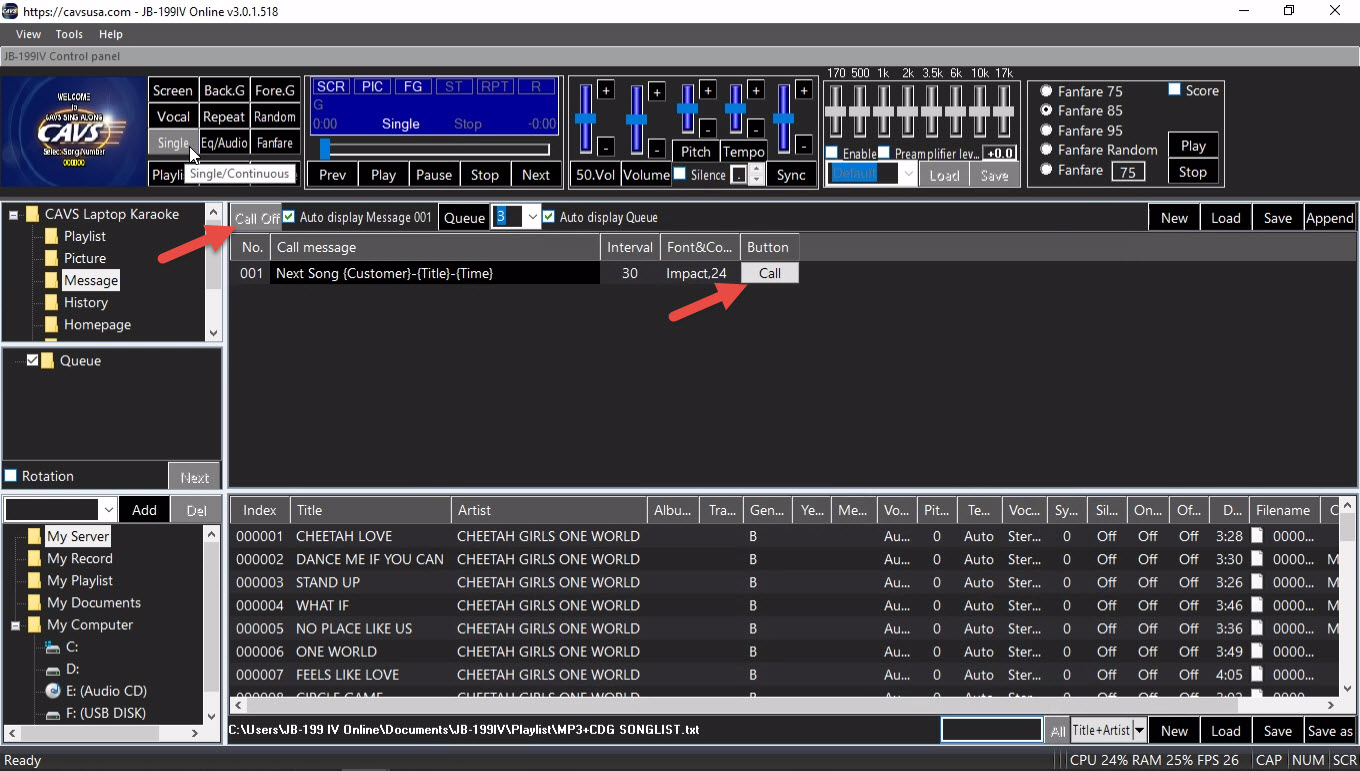
Next press the Load button at the upper right corner of the List Browser and open the Samplemsg file. Several sample notices in different fonts and colors will appear. They can be customize as needed.

Customized notices can be saved by pressing the Save button at the upper right corner of the List Browser. Select a name and press Save. The notices can also be appended to an existing list of notices by pressing the Append button. Select an existing list file and press Save.
The JB-199 IV can display the Queue on the TV for customer viewing. Place a check mark on the Auto Display Queue. Press the pull down menu to select 3 or 5 which indicates how many reserved songs in the Queue will be displayed on the TV.
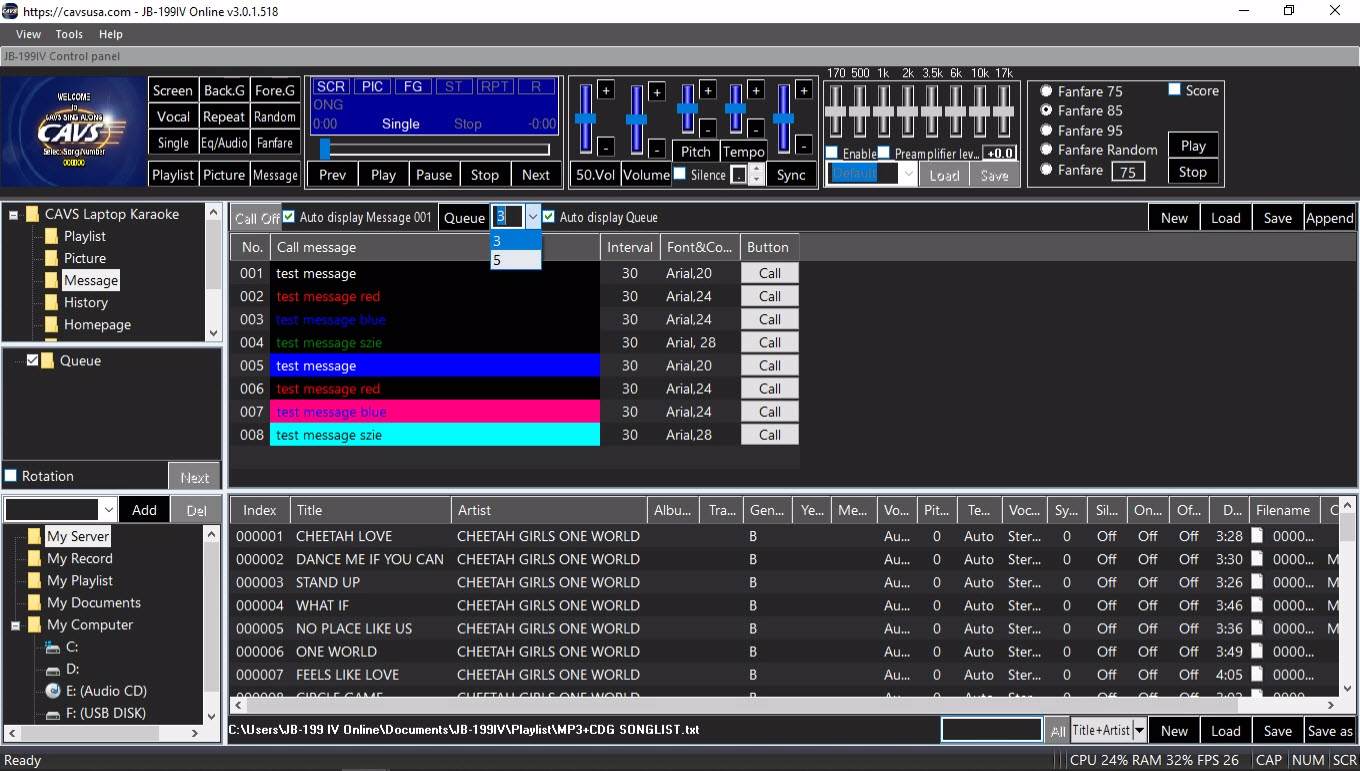
Note that the Auto Display Queue only works in the Single Play mode which can be set at 4.5.B PLAYER. The Queue will be displayed in between the karaoke songs.
Select History in the List Menu. Songs that played previously, at least for 10 seconds, will appear in the List Browser. The songs can be sorted by Index, Date, Customer, Title, Artist, Album, Track, Genre, or Year. The songs also show the preset values that were used to play.
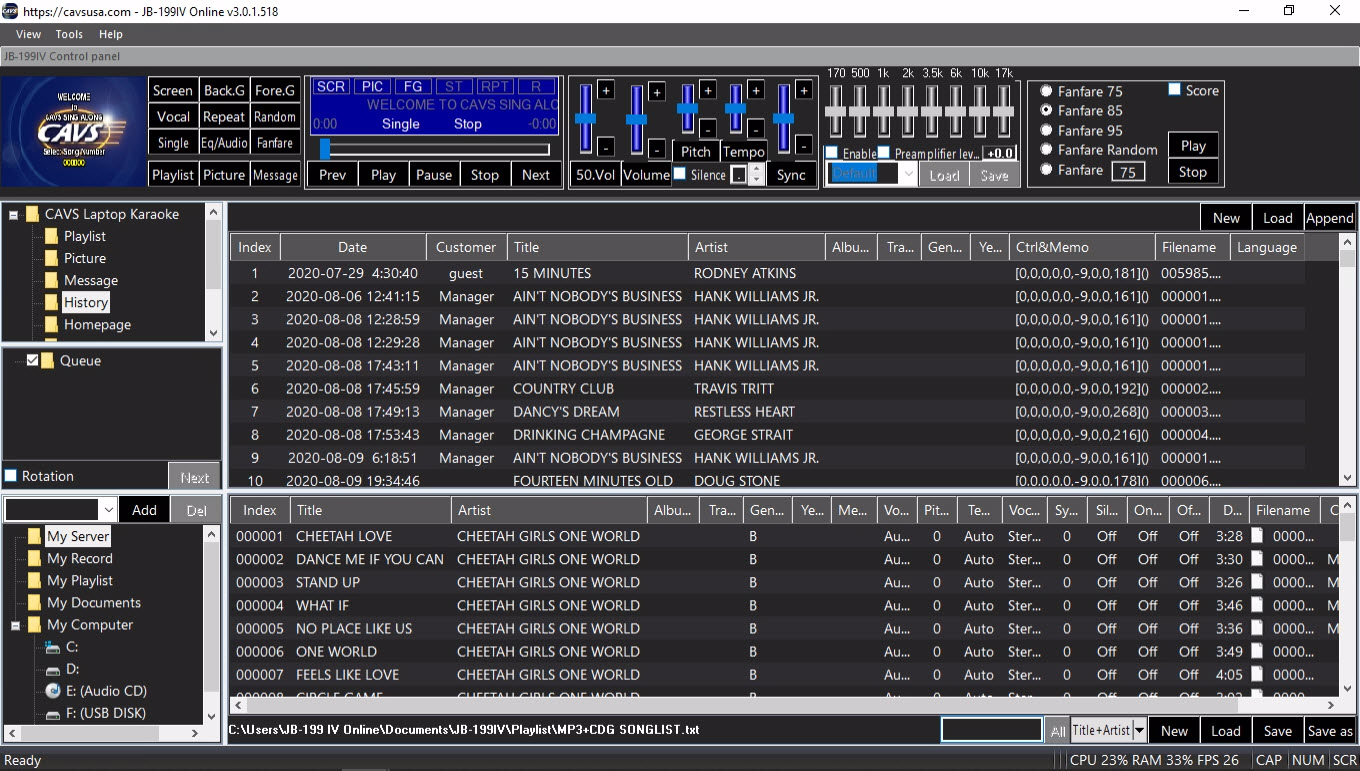
Right click on a song and select Playlist, Queue, or Write.
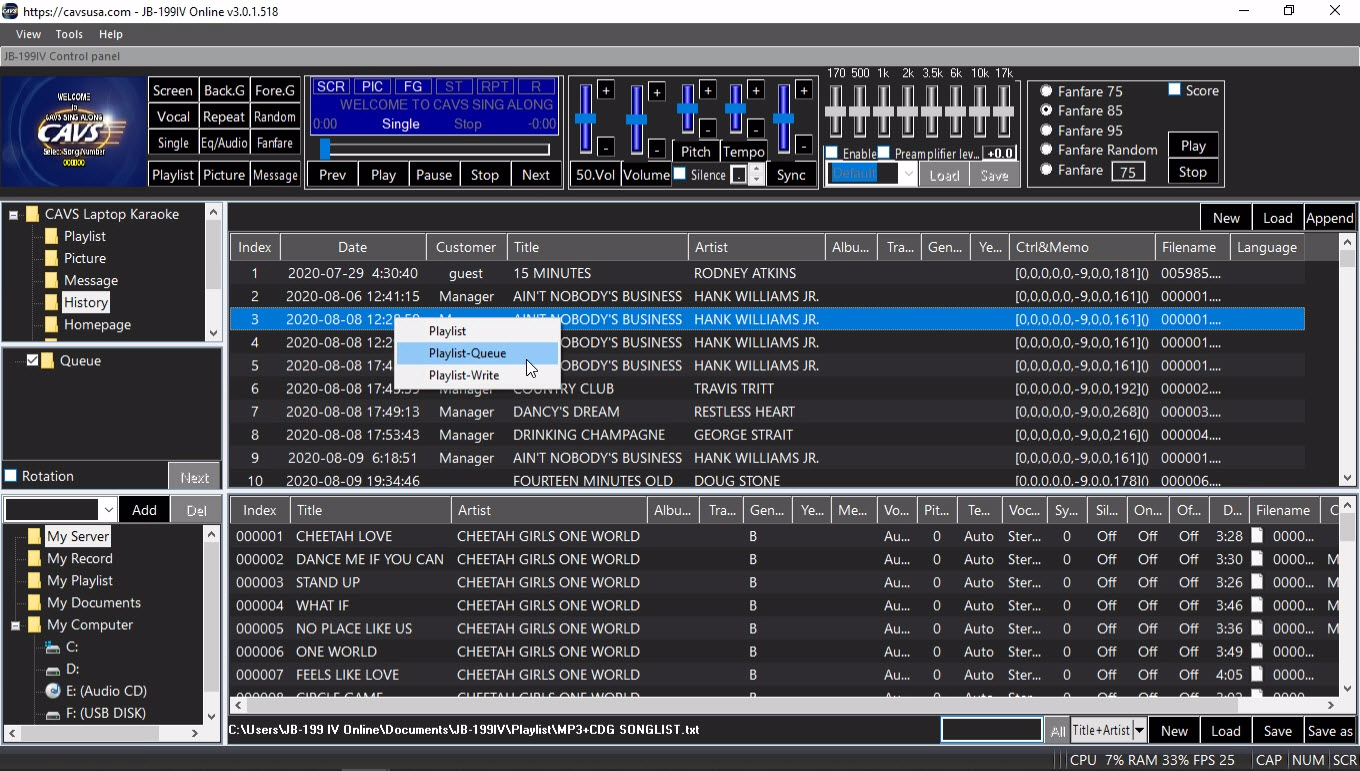
The song will be copied to a playlist, Queue, or Write respectively. A playlist would mean the playlist slot that is opened in the List Browser when the Playlist in the List Menu is highlighted.
Copy & Paste commands can also be used to copy a song from the History to a playlist, Queue, or Write. Copy a song in the History, select a playlist and click inside the playlist, and paste the song.
Press Save at the upper right corner of the List Browser. Enter a name and click Save to save the History. Press Append at the upper right cornet of the List Browser. Select an existing file and click Save to append the History. Press New at the upper right cornet of the List Browser to clear the History.
The History can be particularly useful for finding songs for repeat customers. Go to the History, sort by Customer, right click on a song, and select Queue. The song along with the preset values will be copied to the Queue.
Select the Homepage in the List Menu to open the Internet. Search for new songs or the updated user manuals. Be sure to connect the JB-199 IV to Internet for this function.
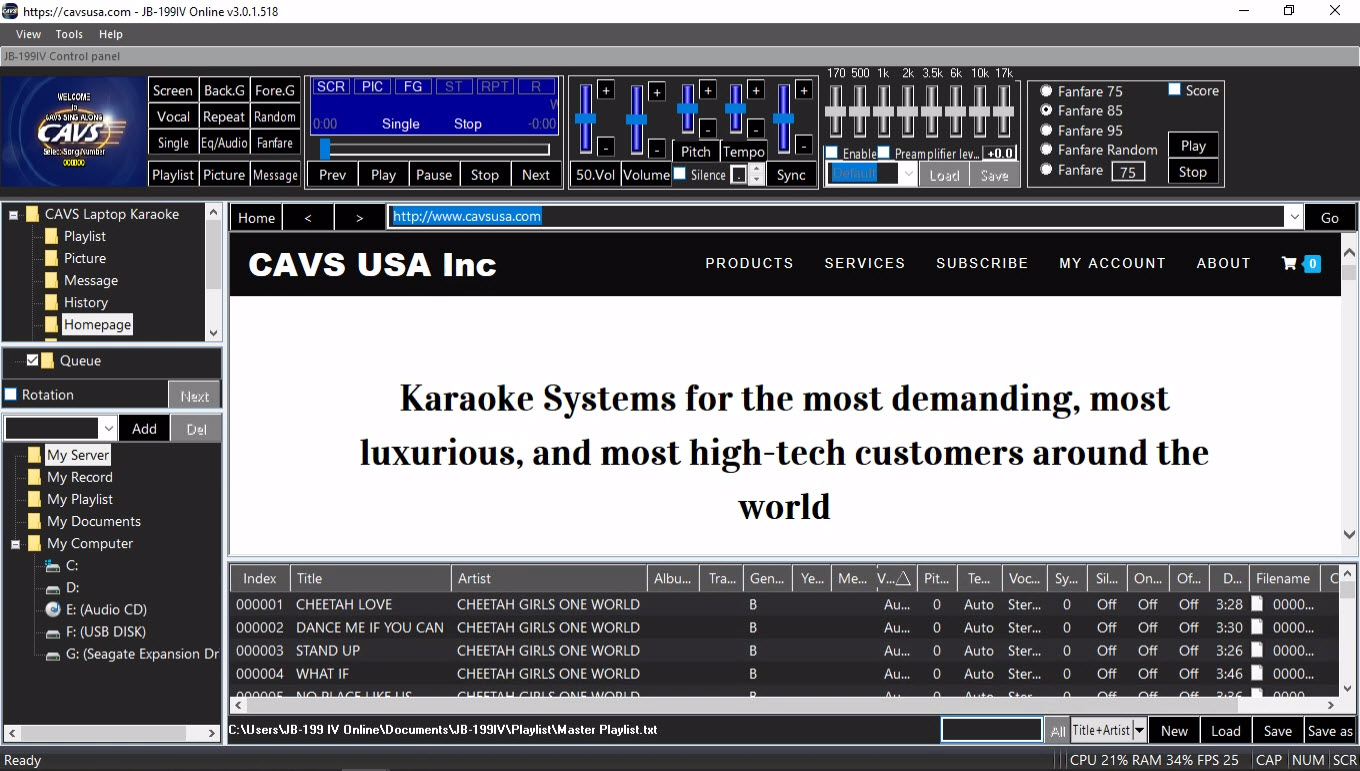
The default homepage can be set at 4.5.A.2.1.2 Control Panel.

Interlude plays background music in between karaoke songs with automatic fade in and fade out. Note that the Interlude will only work in the Single play mode which is set at 4.5.B PLAYER. Press Interlude in the List Menu.
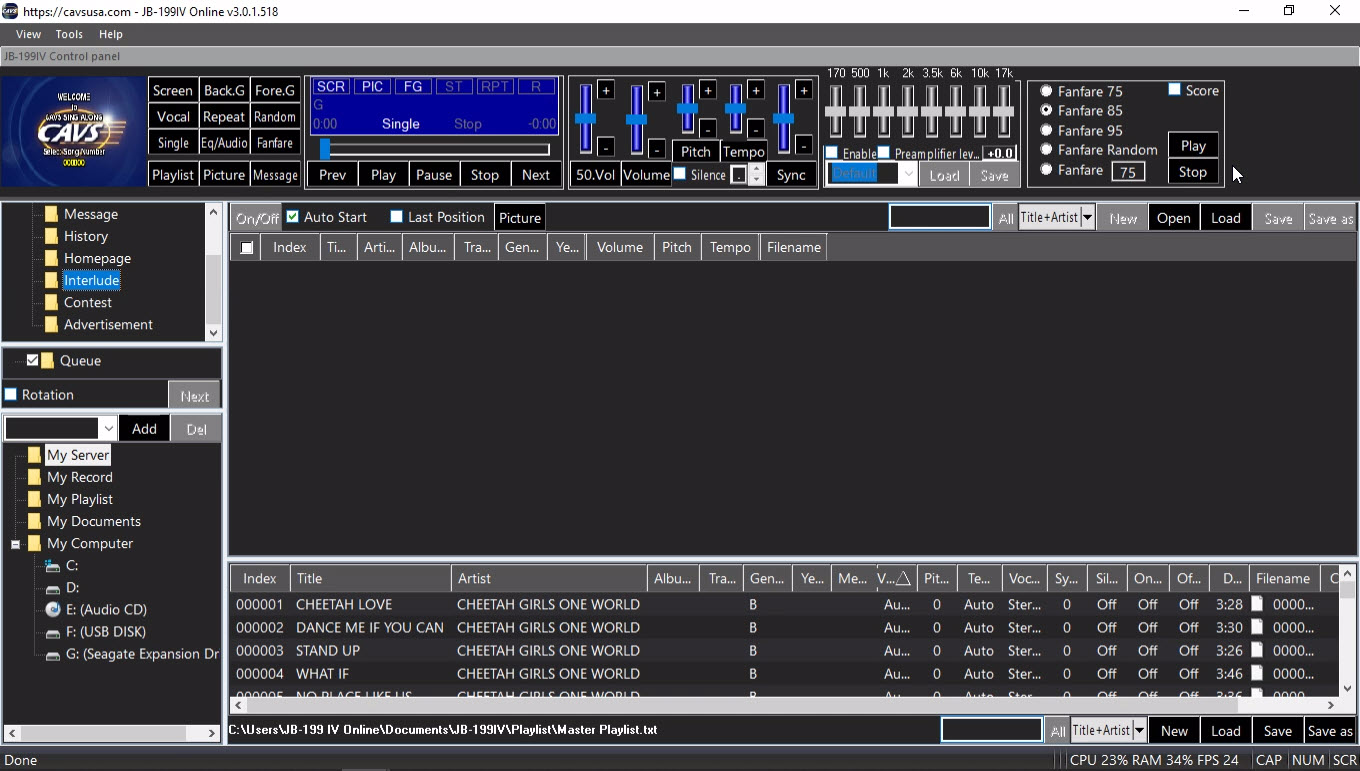
Press Open at the upper right corner of the List Browser and navigate to the MP3 music files. Mark the MP3 files and click Open.
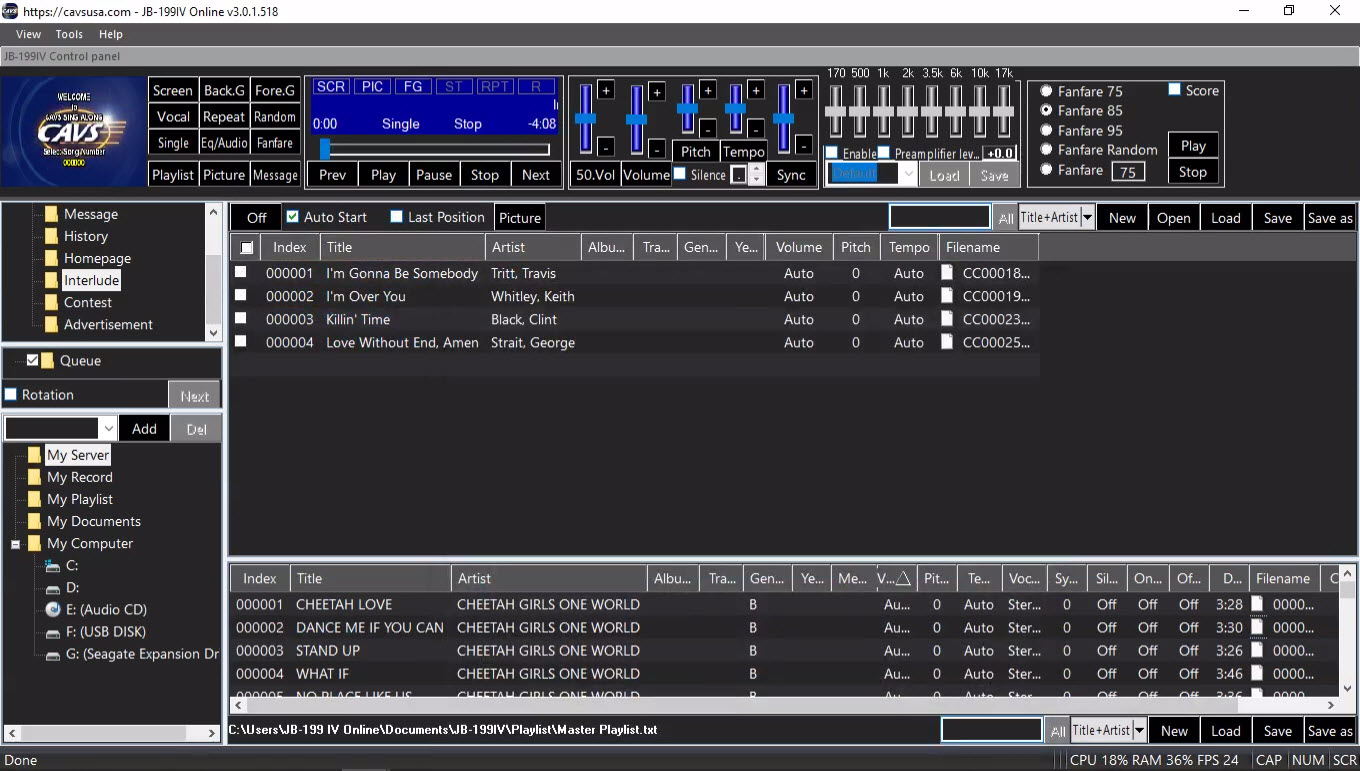
Check the Auto Start to turn on the Interlude. Check the MP3 files to be used. Check the Last Position if the background music is to start from the last ending position instead of starting from the top each time. The files will play in circle.

Press Picture to select a photo to display during Interlude.

A MP3 file can be searched for in the Interlude. Press the down arrow button and select a search category from the menu.
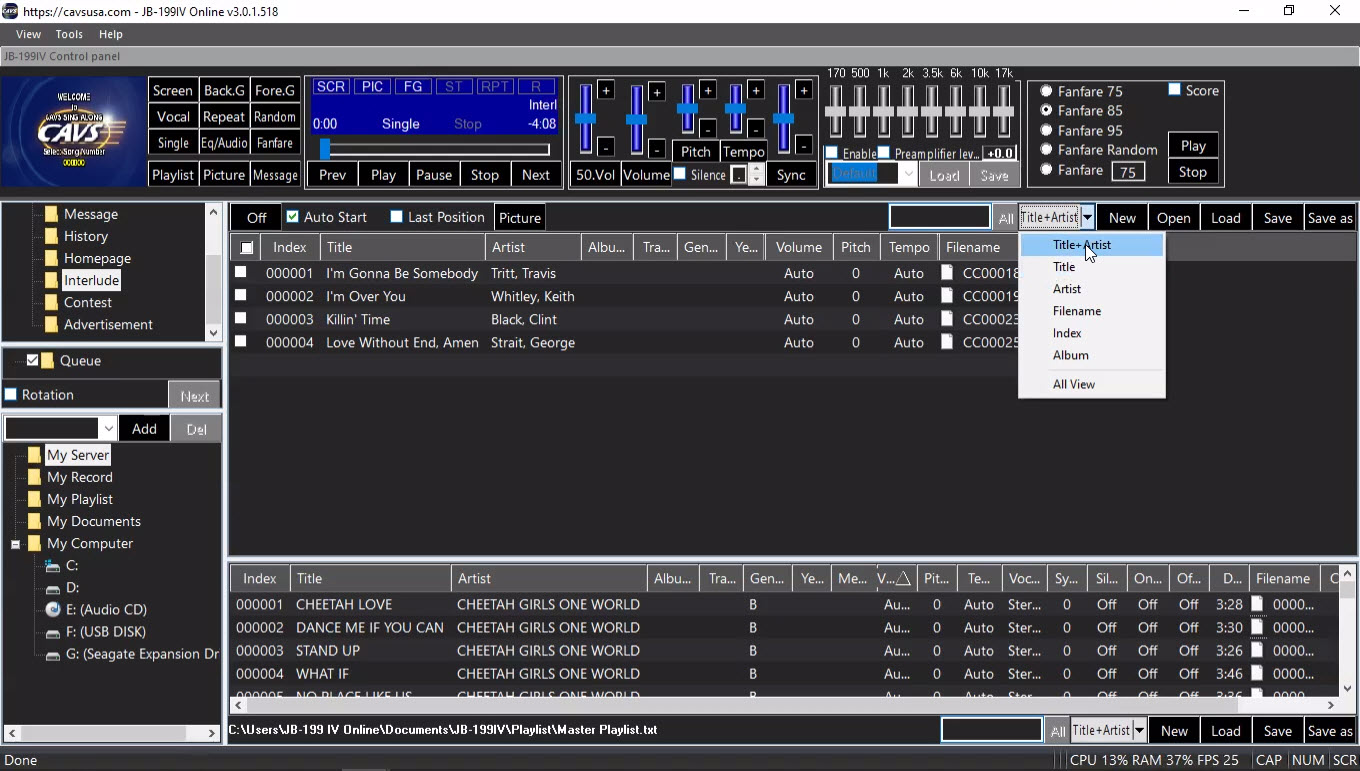
Next input a word or phrase in the search field. Matching files will appear. Be sure to press All to return to the whole list.
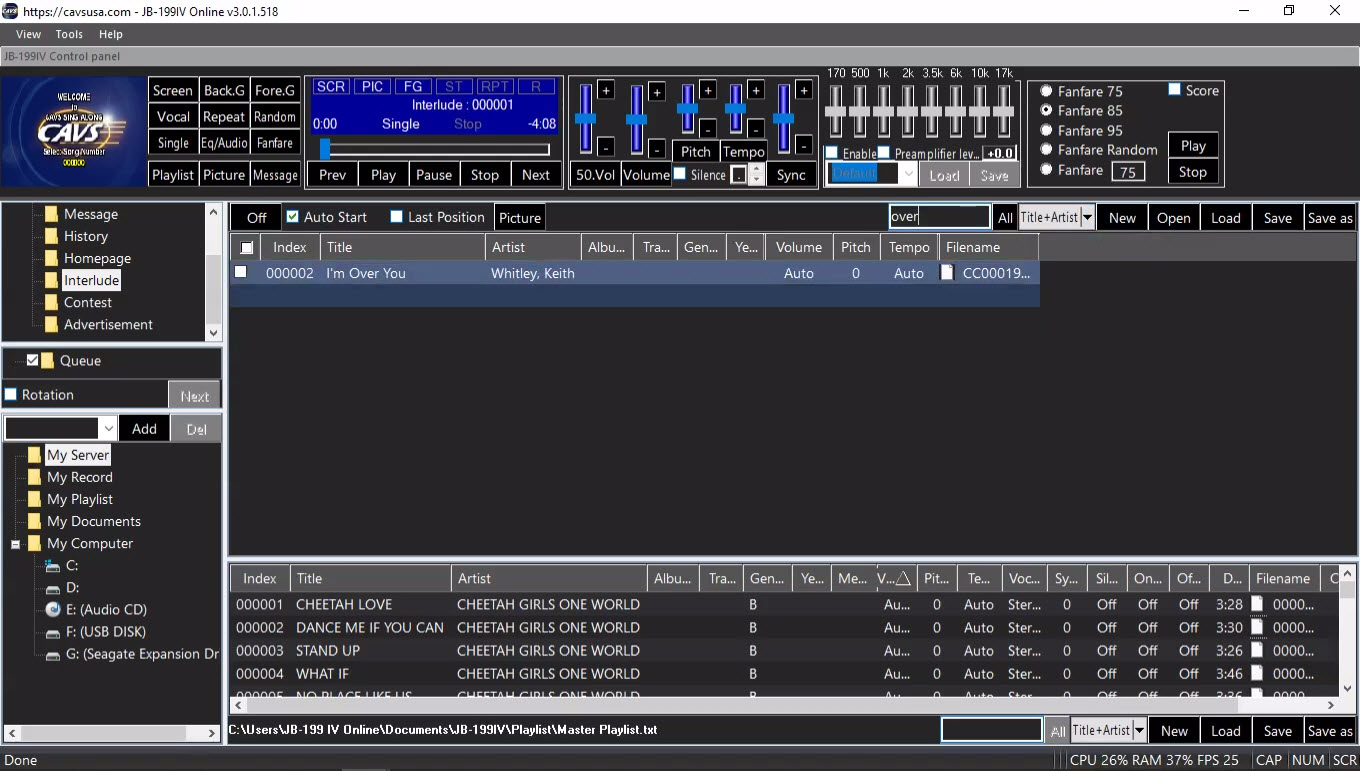
Press Save at the upper right corner of the List Browser. Select a name and press Save. All files and setting in the Interlude will be saved for easy reload at a later time.
Click on the Contest in the List Menu. The controls for the Singing Contest will appear in the List Browser.
Place a check mark on the Enable Contest to start the Singing Contest. Be sure that the JB-199 IV Server is also enabled at 4.5.A.2.1.5 Server & Browser. The JB-199 Server is needed to wirelessly receive the scores from online guests and E-Songbooks.
In the Score Setup of the Singing Contest, set the following options.
Score after -
Specify the play time after which the call for scores will be issued and the scores will be accepted by the JB-199 IV.
- Midpoint mark of song
- Three Quarters mark of song
- End of song
No Multiple / Allow Multiple -
Restrict each guest or E-Songbook to send in a score only once / Allow the guests and E-Songbooks to send in multiple scores. Note that an effort to send in multiple scores may reflect the singer's performance.E-Songbook -
Set the weight of E-Songbook scores against the guest scores. For example, if set to 10, the E-Songbook scores will be counted 10 times more than the guest scores. Invited judges may be given the E-Songbooks to score and the public uses their smartphones to score as guests.Waiting -
Set the time period after a song to submit and accept scores. The time period can be 1 - 99 in seconds.Save the setting by pressing the Apply button at upper right corner of the Score Setup. Note that the changes will take effect starting from the next song.
In the Score Message, input the customized messages to go out with each outcome.
Call - Call for scores. This message will go out automatically as specified in the Score Setup or by pressing the Call for Score button at the top of the Score Message.
Gong - Gong message. Press the Gong button at the top of the Score Message to sound the Gong and send out the message.
Scores 0 - 5 - Score messages. These messages will go out automatically with the scores.
After changes, press the Save button on top of the Score Message. Or press the Cancel button to exit without saving.
Having set the Score Setup and the Score Message, return to the Playlist in the List Menu and proceed with karaoke show. The Singing Contest will run in the background automatically calling, accepting, tally, and announcing the scores as shown below.
There are a few way you can interject the Contest while running a show.
Call for Score - Press the Call for Score button at the top of the score message anytime during a song. It will immediately display the Call message and accept scores.
End Call for Score - Press the End Call for Score button at the top of the Score Message to stop the Call message. It will displays the total score at the end of the song. It overrides the Waiting Time in the Score Setup.
Gong - Press the Gong button at the top of the Score Message to stop the song in play. It will sound out the Gong and send out the Gong message. No score will be displayed.
Display Ranking - Press the Display Ranking button at the top of the Score Message. It will show the rankings of the singers competing in the contest. Press again to turn off the display.
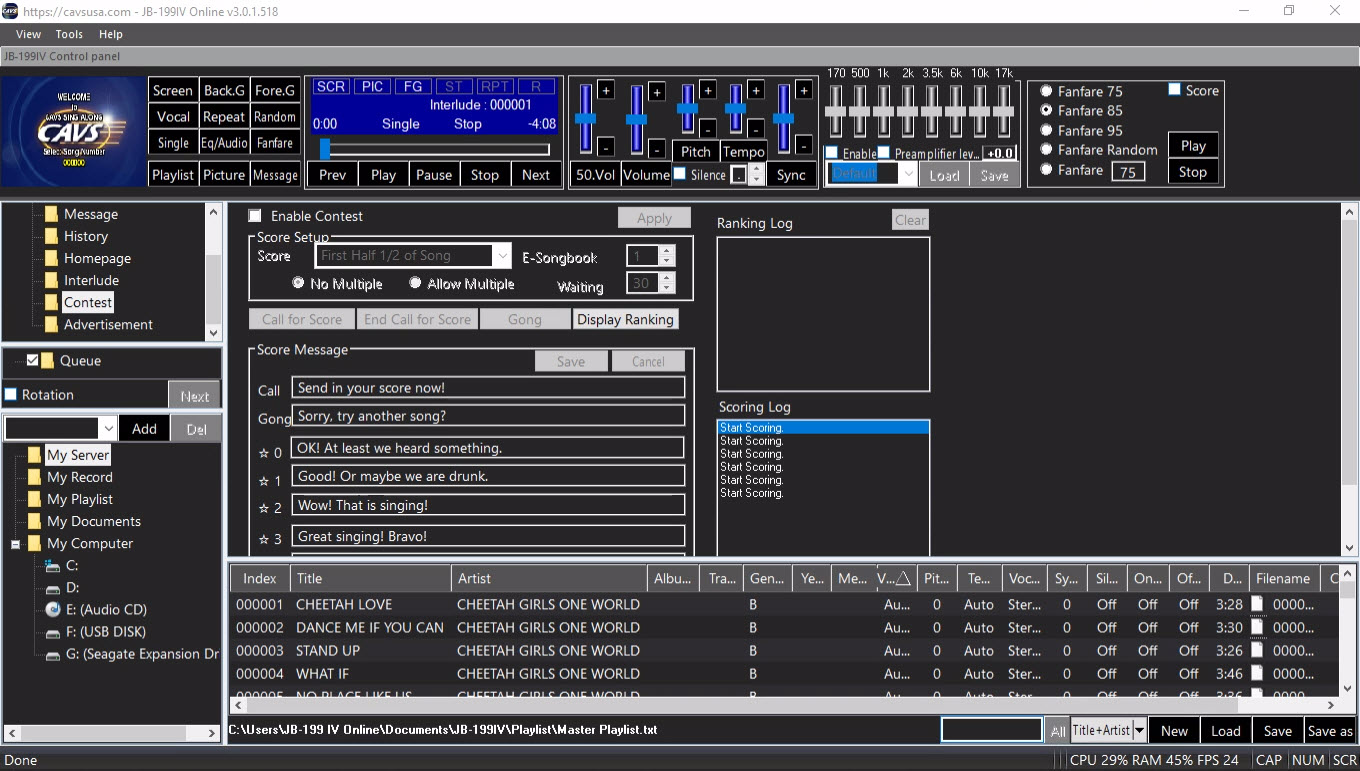


Advertisements in photo (JPG) or video (MP4) files can be inserted in between karaoke songs. Go to 4.5.A.2.1.2 Control Panel and place a check mark on Enable Advertisement.
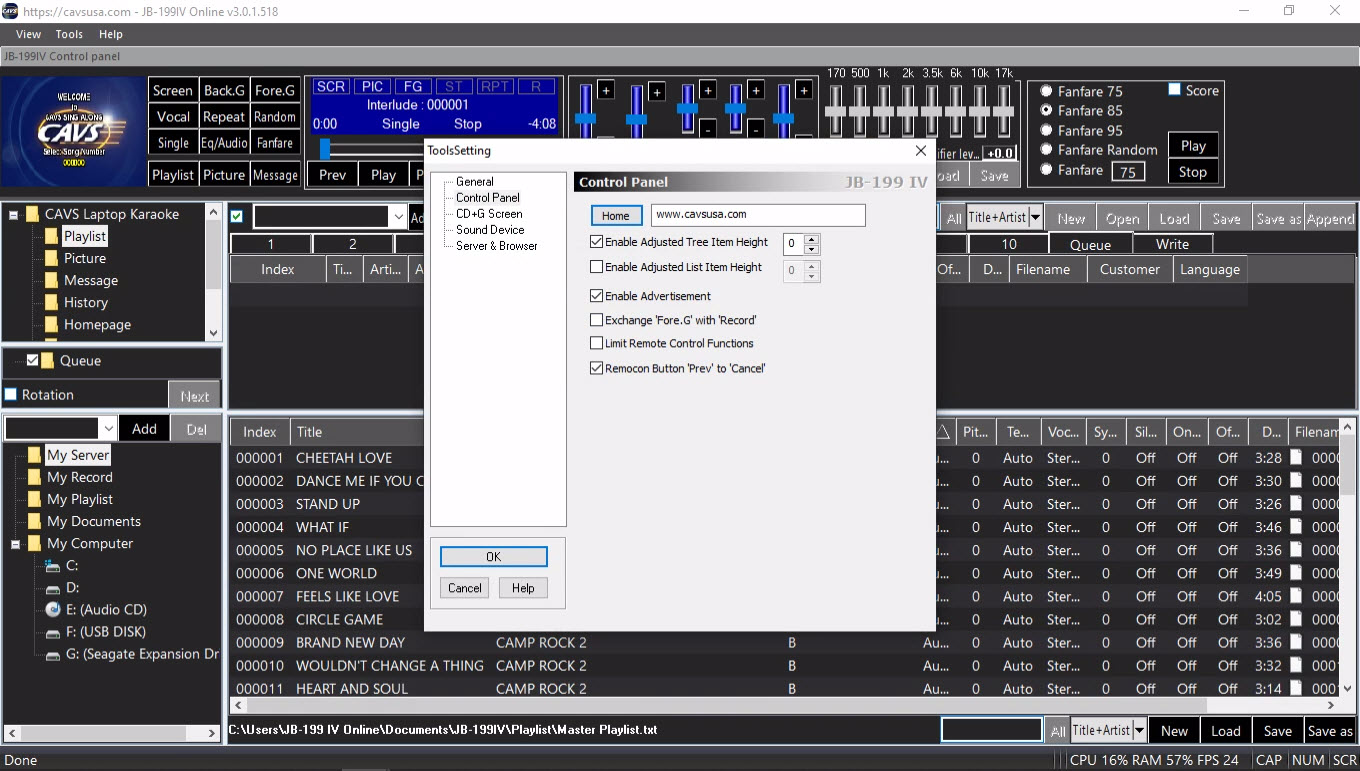
Click to highlight the Advertisement in the List Menu. The controls for the Advertisement will appear in the List Browser.

Press the Open button at the upper right corner of the List Browser and select the JPG or MP4 files for the Advertisement.
In this example, two JPG and one MP4 files each with priority and interval are opened.
The priority 1 - 99 determines which files play first.
Lower numbers indicate higher priorities.
The interval determines the time duration for play.
For videos, the interval is automatically set by the file length.
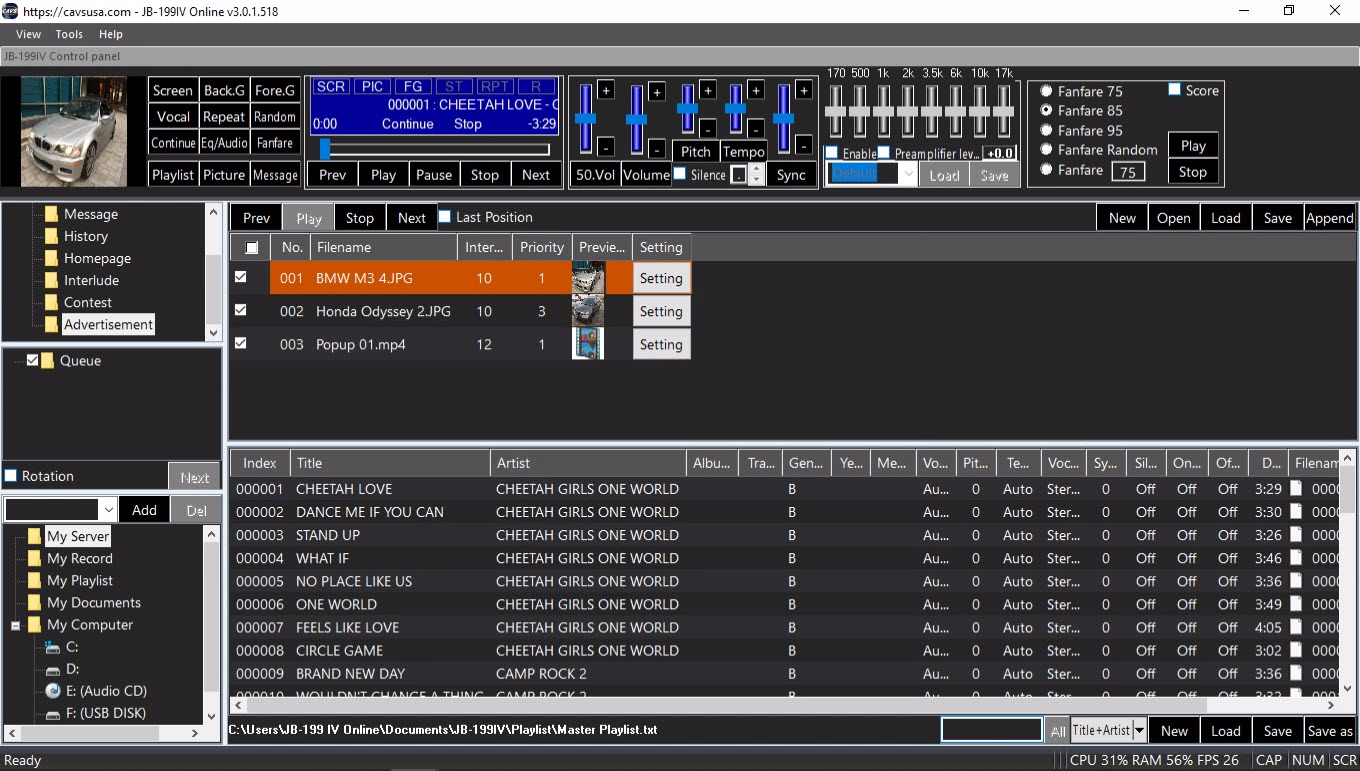
To schedule the Advertisement, press the Setting button for each photo or video file in the List Browser.
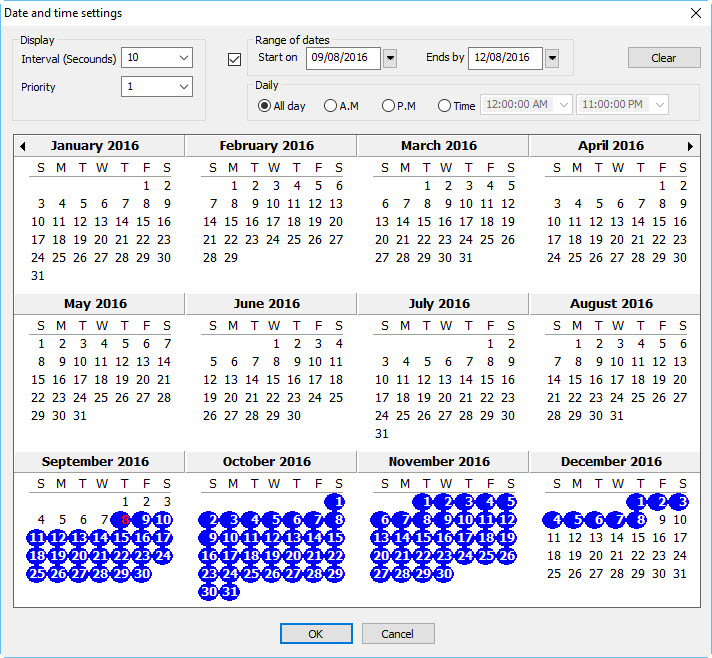
Place a check mark on the Range of dates and select the Start on and End by dates. The dates can also be chosen using the calendar. Next select the time to be All day, AM, PM, or a range of hours. Press OK to save and exit.
Having set the controls, press Play to begin the Advertisement. Check the Last Position to start playing from the previous ending position. If uncheck, the Advertisement will always start according to the priority and from the top.

Press the Save button at the upper right corner of the List Browser to save the Advertisement. Enter a name and press Save. All files and schedules will be saved and can be easily reloaded at any later time.
The Rotation is used when the guests are in a number of groups that will take turns to sing. To activate, place a check mark on the Rotation as shown in 4.5.F ROTATION. In this example, there are four groups named as Group 1, Group 2, Group3, and Group 4.
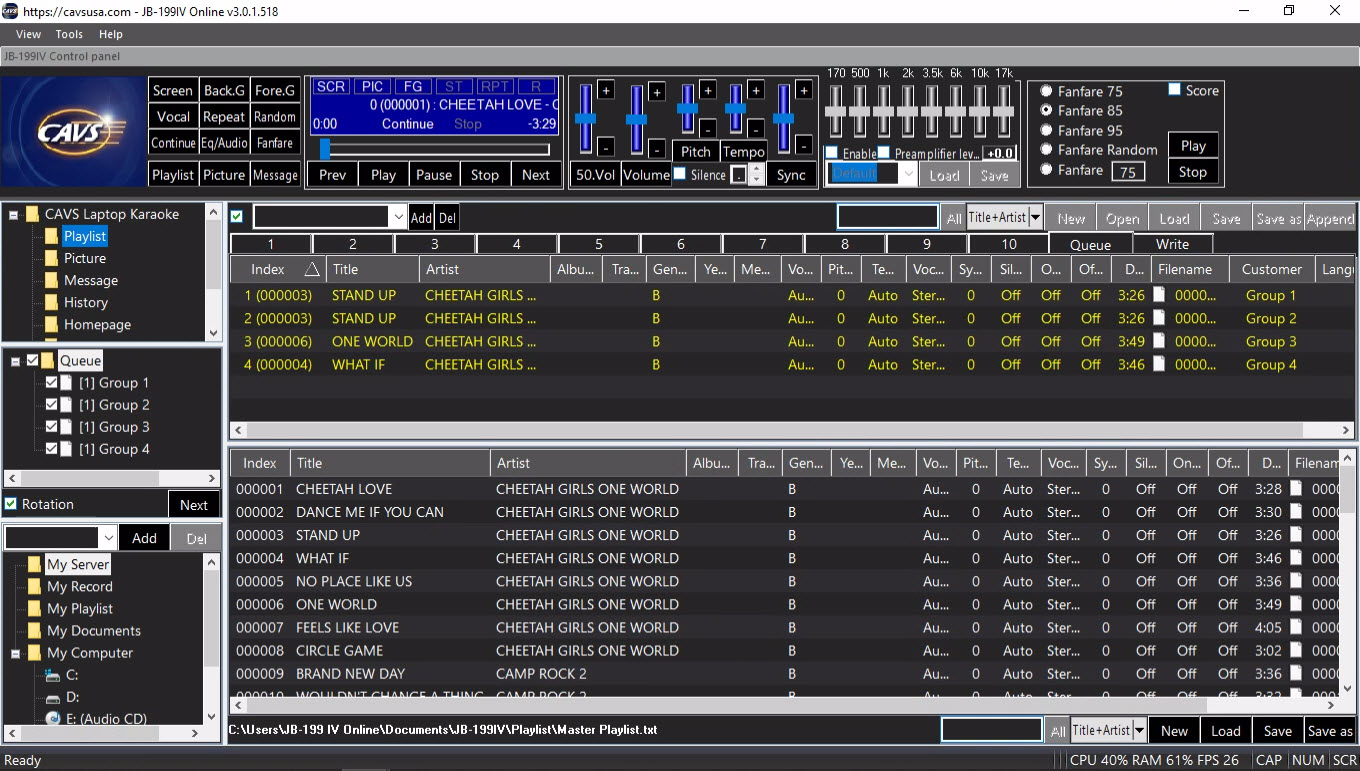
The Queue in the Rotation can show the reserved songs for all or for each group. It will list all groups with non empty Queues.
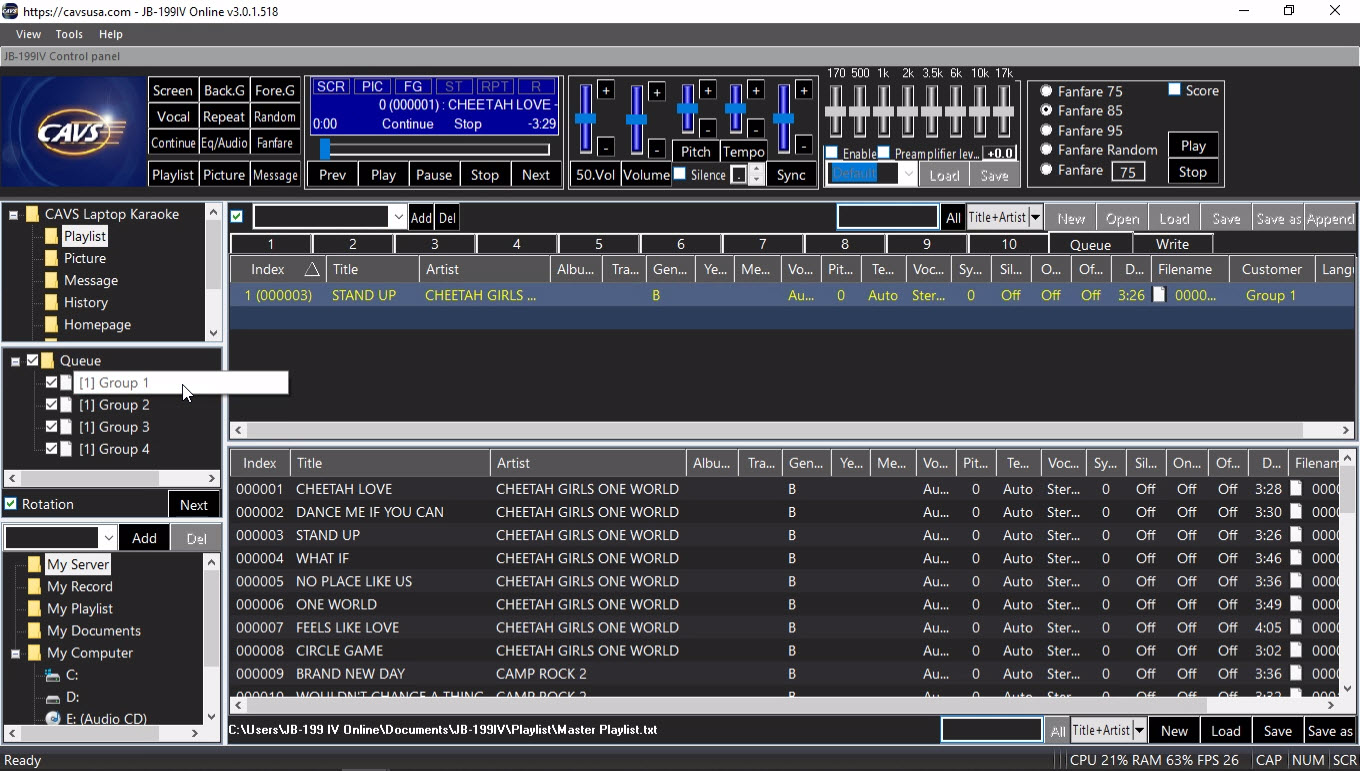
When reserving a song, a popup window will appear asking for a group name to assign the song. Select a group name from the list shown in the popup windows. A new name can also be added by typing in. Press OK.
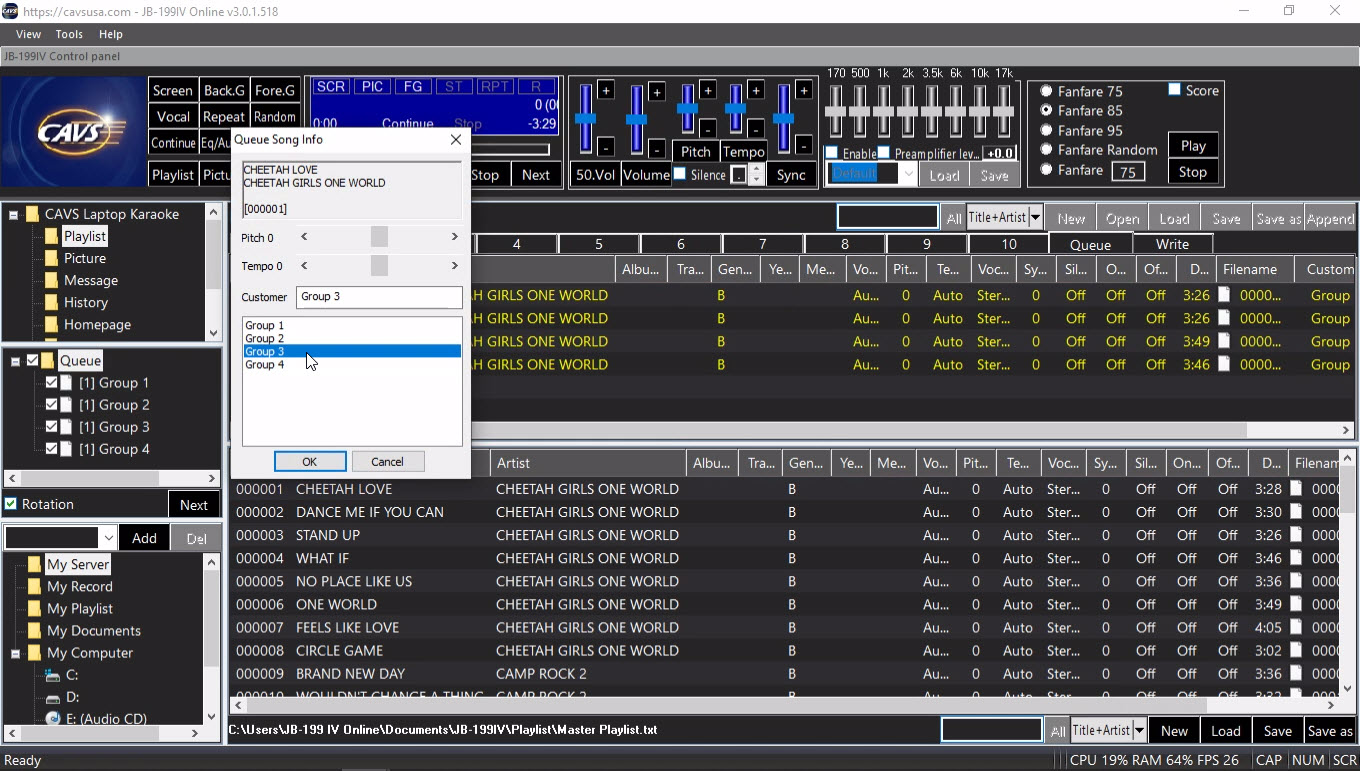
The reserved songs will play in rotation giving turns to each group automatically.
Singings of guests can be recorded using the Record feature. Select My Record in the Folder Menu. The controls for the recording will show in the File Browser.
-
Audio -
Audio signal coming into the Audio Input shown at 4.3 BACk PANEL is recorded. To record the music and singing, loop back the mixed audio going into the speakers into the Audio Input. -
Audio + TV -
Audio signal coming into the Audio Input and video signal of the CD+G screen shown at 6.2 CD+G Screen are recorded in MP4 file format. -
Audio + Camera -
Audio signal coming into the Audio Input and video signal coming in from any connected camera are recorded in MP4 file format. Select a camera at 4.5.A.2.1.4 Sound Device when there are multiple cameras connected.
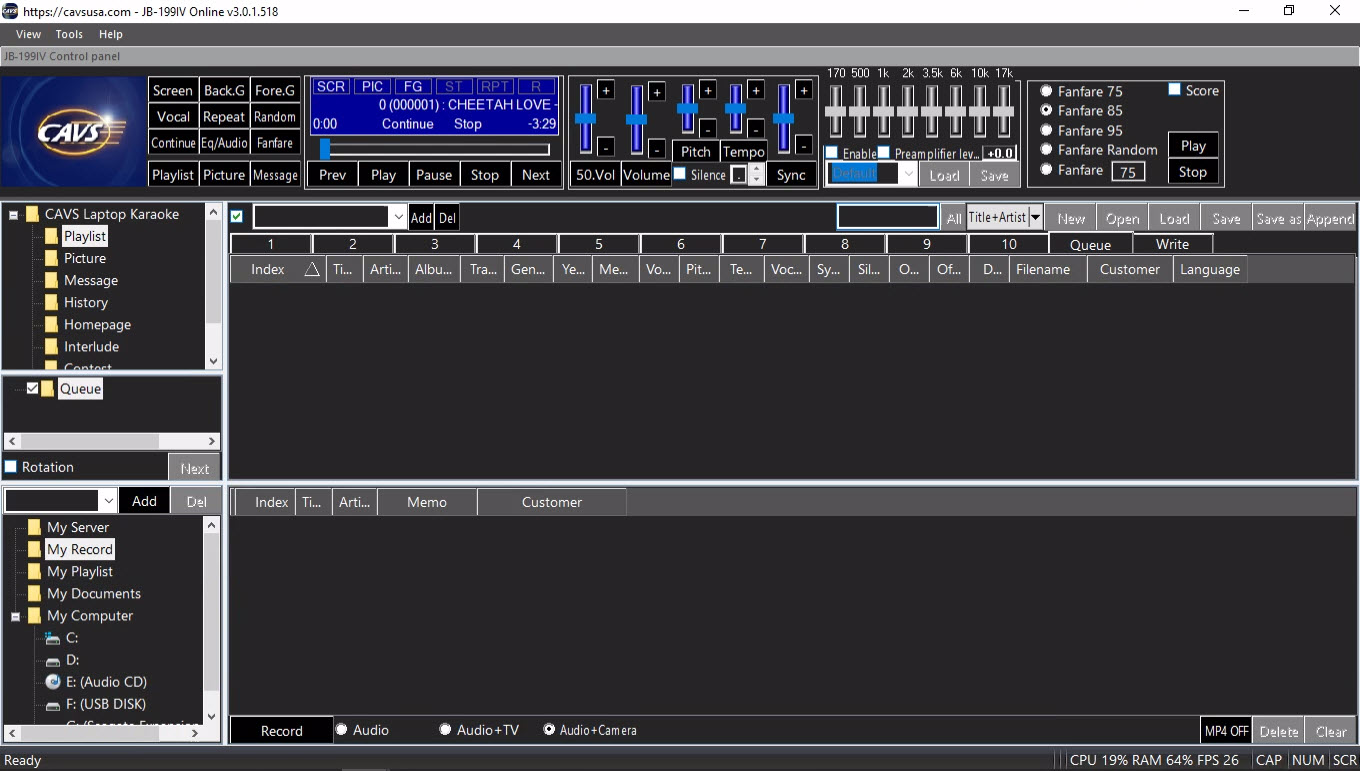
In this example, Audio + Camera is selected.
For the audio of music and singing, refer to the 5.How to Connect: Local Devices for instruction.
Press Record to begin recording.
The button will change to Stop Record.
Press again to stop the recording.
The recording may continue for multiple songs.
The recorded file however will be parsed automatically for each song.
To play, drag & drop the recorded file into the Queue in the List Browser and press Play. Or drag & drop the recorded file into a playlist in the List Browser and double click on the index to play. Once copied to a playlist, the recorded file can be treated just like a song file. Remember to turn off the recording when playing a recorded file.
To write the recorded files onto a blank disc, drag & drop the recorded files into Write in the List Browser. See 7.2.10 Writing to disc for instruction.
View and Play Recordings
To enable customers to see and play the recorded files, go to 4.2.A.2.1.5 Server & Browser and check Display Recordings followed by OK. Let the customers refresh the Customer Interface screen in their phones and tablets to see a new item Record as shown below.
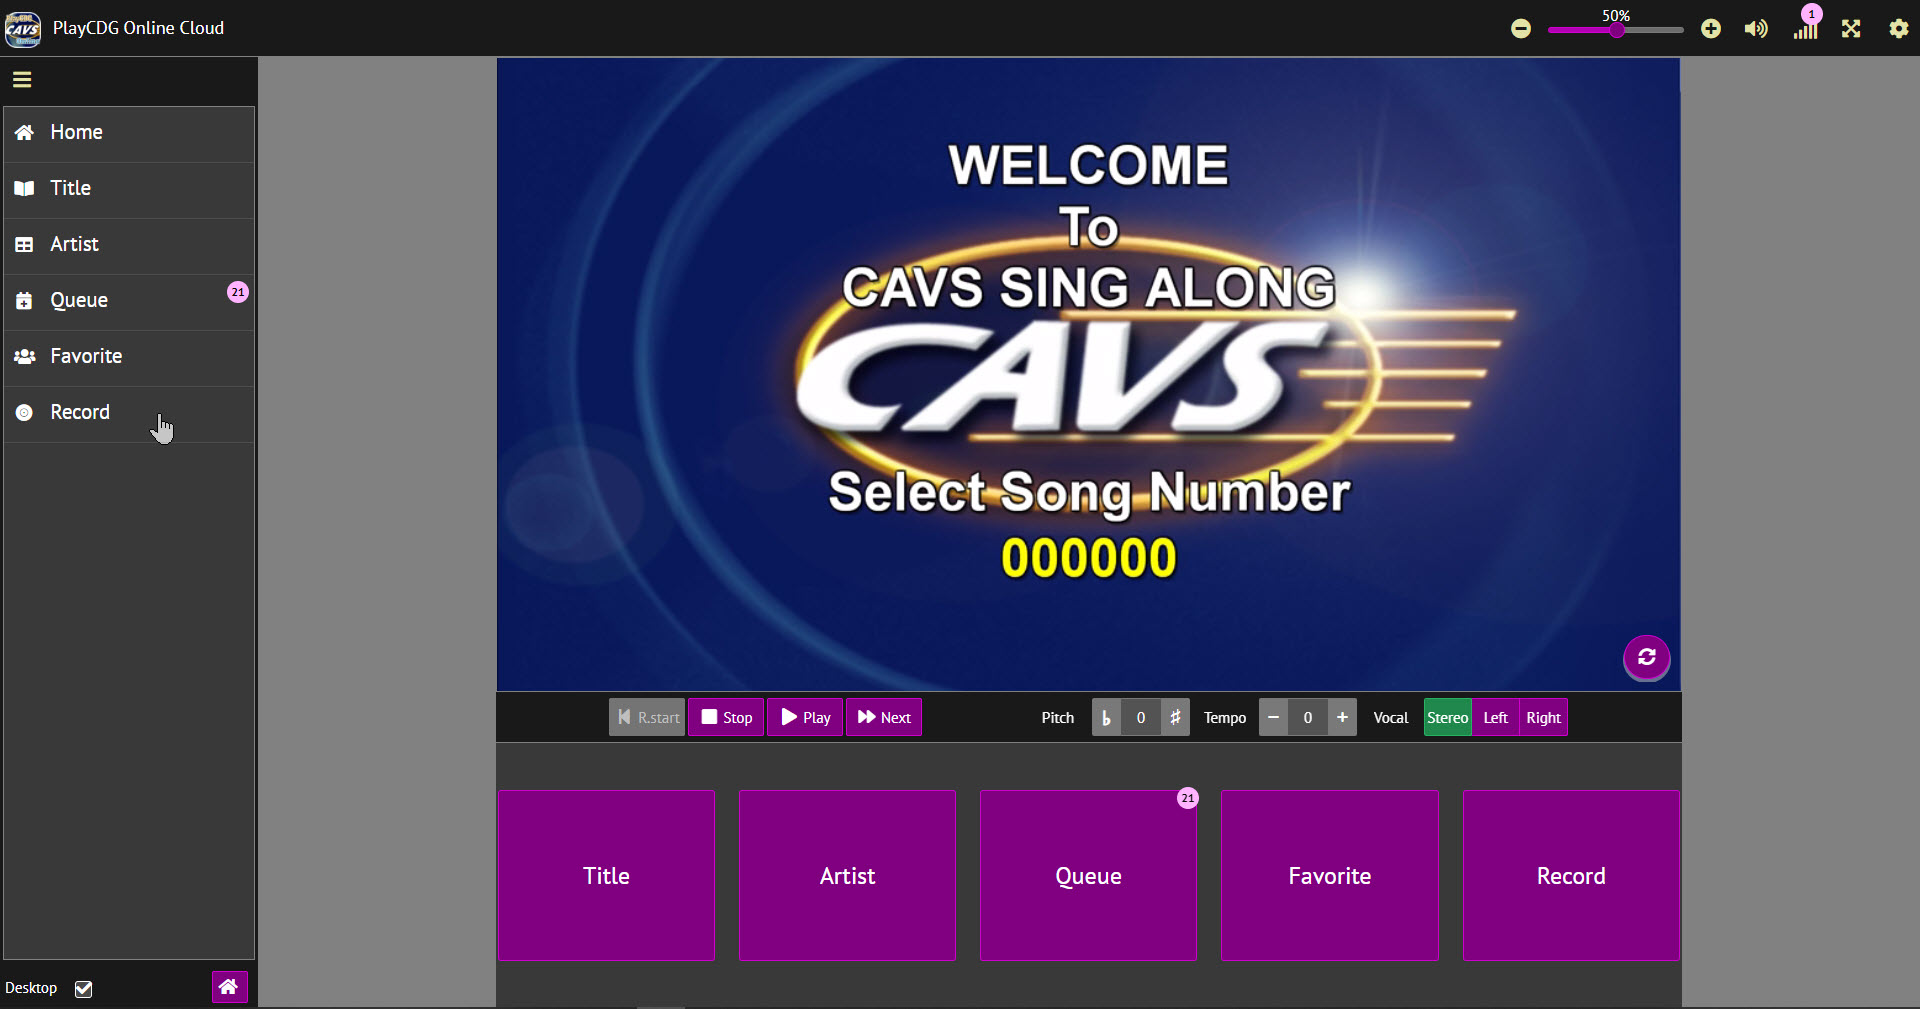
Press Record and a list of recordings will appear on the right. Press Preview to play any of the recorded files through their phones or tablets. The recordings become availabe for listening instantly after the singings.

Note that each recording is tagged with a customer field which is automatically transferred from the Queue. It would thus be a good practive to insert a customer name when reserving a song into the Queue. It would ease the finding of recordings by the customers.
If the customer field is left blank or inserted incorrectly, go to My Record in the Control Panel. Double click on the customer field and make changes. Press Enter to save. The customers can see the changes when the Customer Interface in their phones or tablets are refreshed.
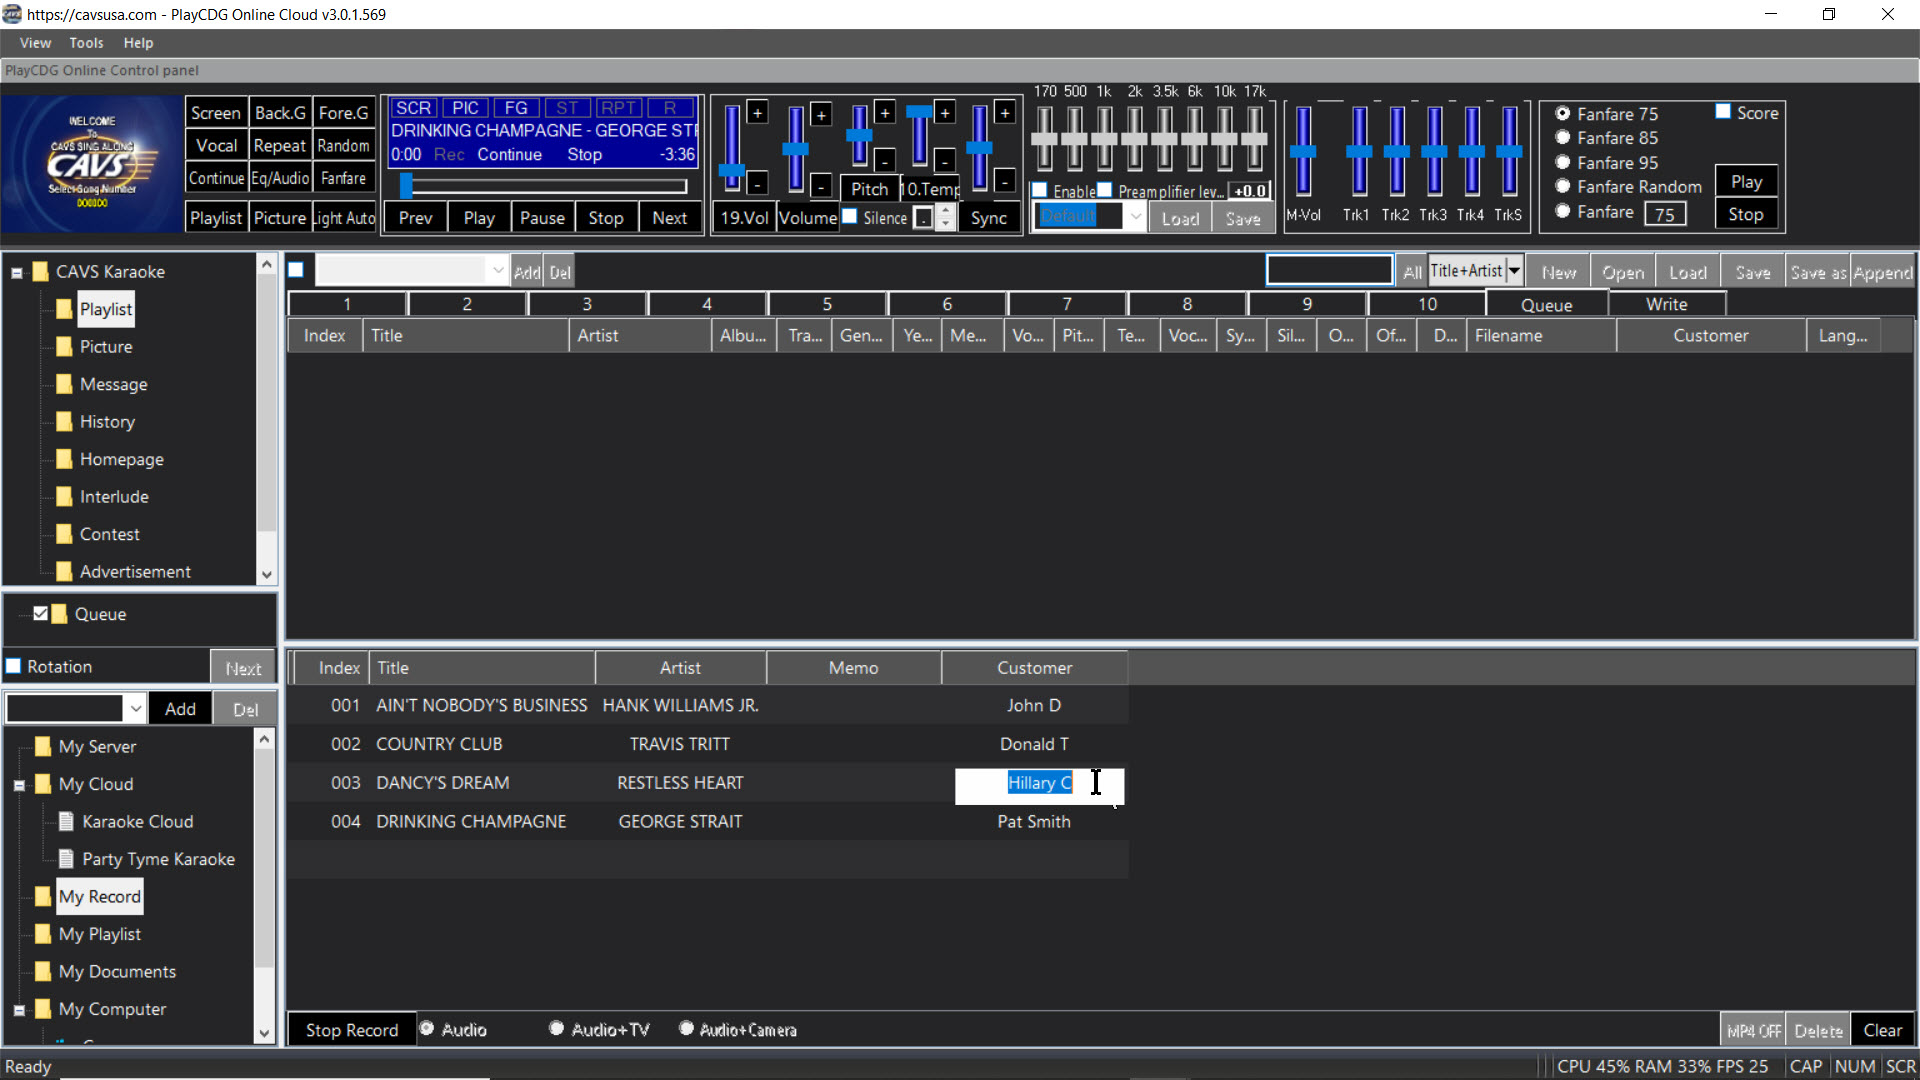
Song files can be written onto blank disc. Select the Playlist in the List Menu and click on the Write in the List Browser.
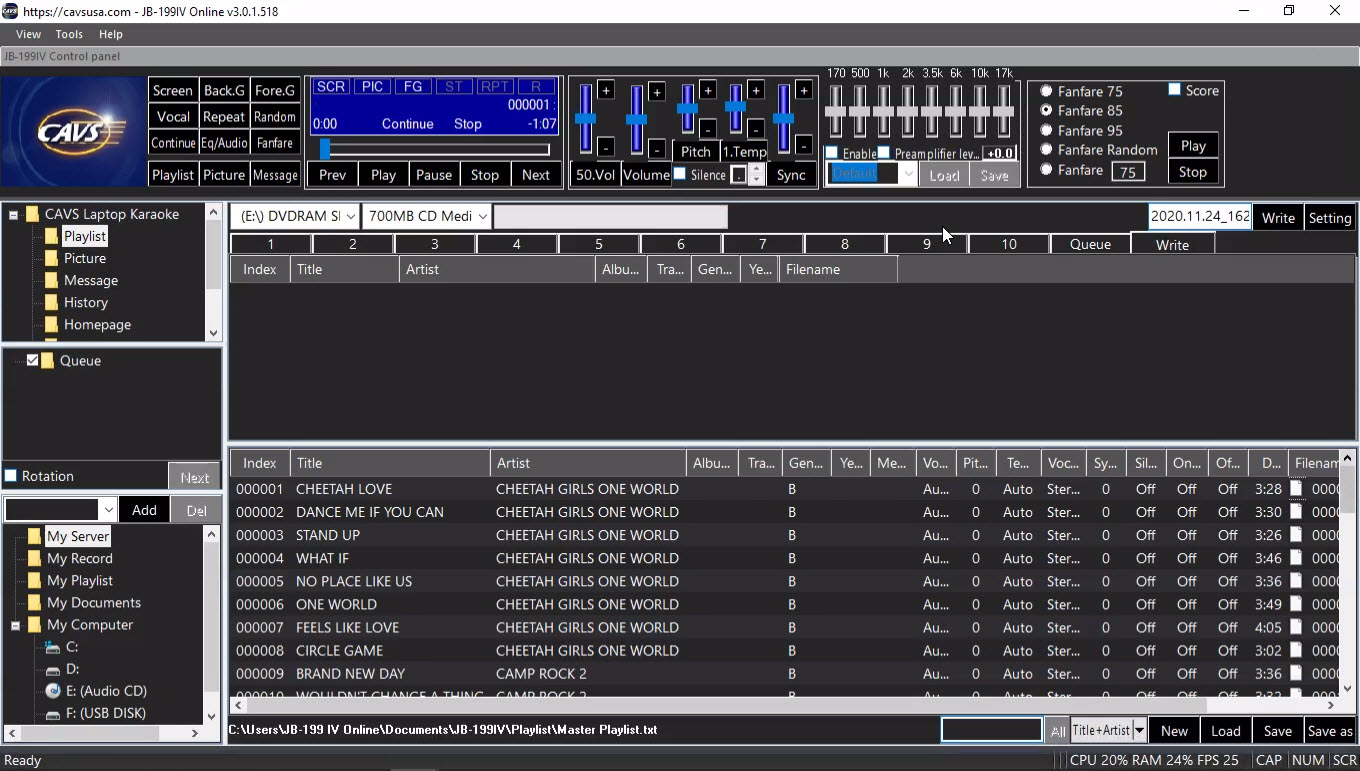
Right click on a song and select Write. The song file will copy into the Write in the List Browser.
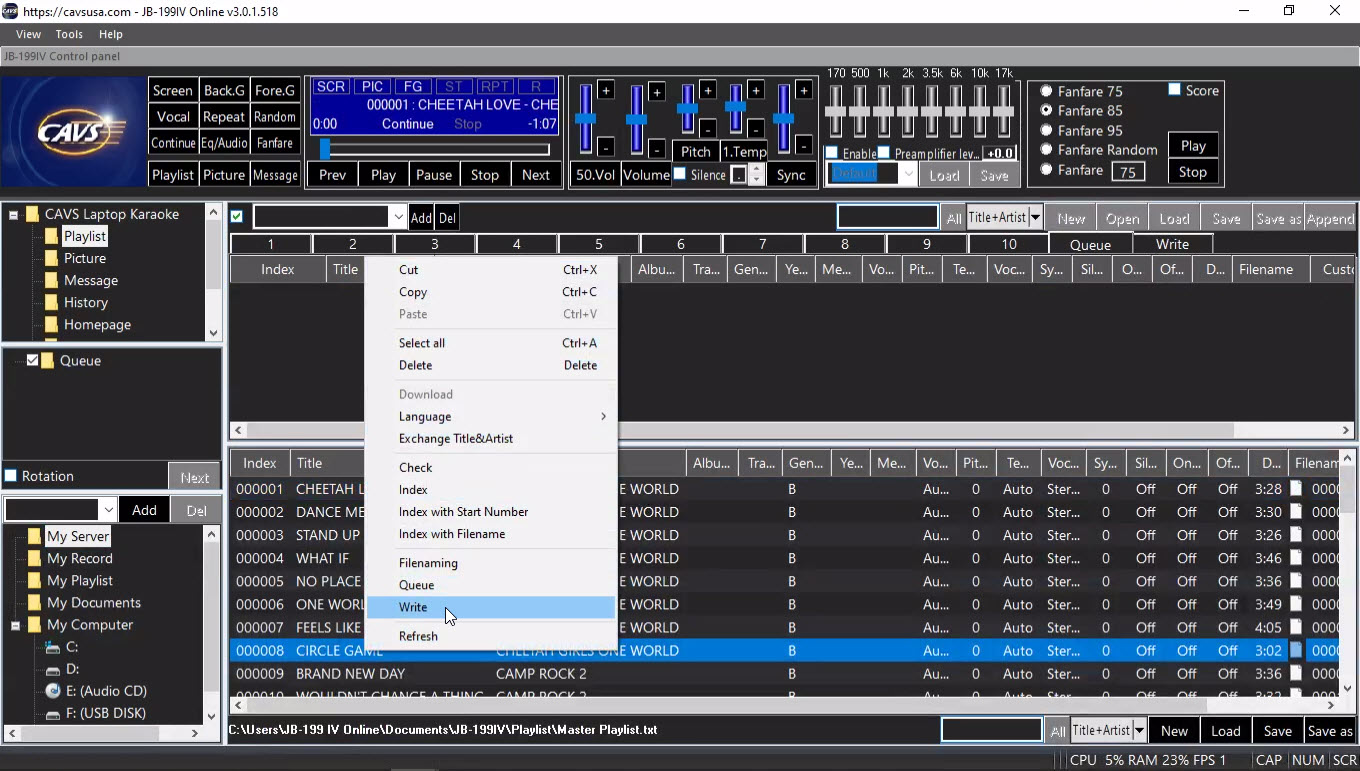
Next select the disc drive and the disc type to be used in the writing.

Click on the Setting button at the upper right corner of the List Browser. It will open a popup window with options in the disc writing.
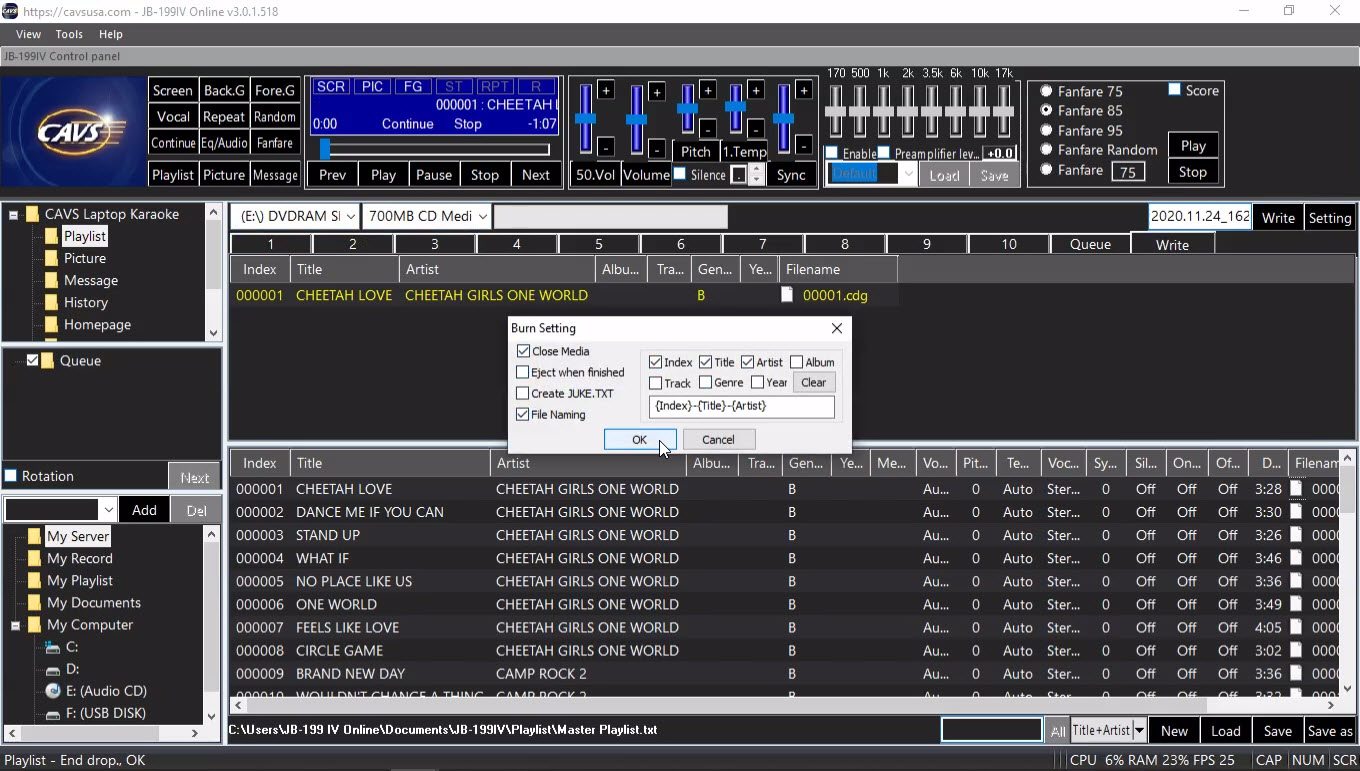
In this example, check marks are placed on Close Media and File Naming where Index, Title, and Artist are chosen to form the file name.
Insert a blank disc into the disc drive and click on the Write button at the upper right corner of the List Browser to start writing.
The process of the writing will be shown by the progress bar at the bottom of the screen.
E-Songbook for the JB-199 IV offers remote access in ways and scope that were not available or even possible before.
7.3.1 E-Songbook features
Ease of Access
E-Songbook accesses the JB-199 IV using a standard Internet Browser such as the Google Chrome, MS Edge, Apple Safari, and Firefox. It no longer requires an App to download or install. It requires only an IP address or a QR code to connect to the JB-199 IV.
Open Hardware
E-Songbook can be any device with Wi-Fi. It can be your smartphone, tablet, or laptop. It requires no additional software or hardware.
Full Control
E-Songbook can access, search, and select the songs in the JB-199 IV. It can also reserve, play, cancel, and stop the songs. It can pitch control, tempo control, sync control, and voice cancel. It can create and manage unlimited number of Favorite lists.
Mixer Control
E-Songbook can control the music volume, master volume, microphone volume, balance, echo, and reverb of the JB-199 IV audio output. Working seamlessly with CAVS DK3 or Soundcraft Ui mixer, it provides complete control of the JB-199 IV and its mixer.
Play Music and Video
E-Songbook can now play the music and video of the JB-199 IV right from its own screen and speaker. It is no longer just a song book display but a full karaoke player on its own. It receives and plays the music and video streaming from the JB-199 IV.
Karaoke-on-demand
E-Songbook can select any song in the JB-199 IV and play independently from the JB-199 IV or other E-Songbooks. It can be set to preview the songs in the JB-199 IV or provide full service Karaoke-On-Demand with music and video for any song.
7.3.2 Connecting to a network
Connect the JB-199 IV to a local network as shown in 5.1 How to Connect: Network: Local Network. Go to 4.5.A.2.1.5 Server & Browser and place check marks on
- Start JB-199 IV Server
- Enable Audio Steaming, For All
- Enable Video Streaming For All
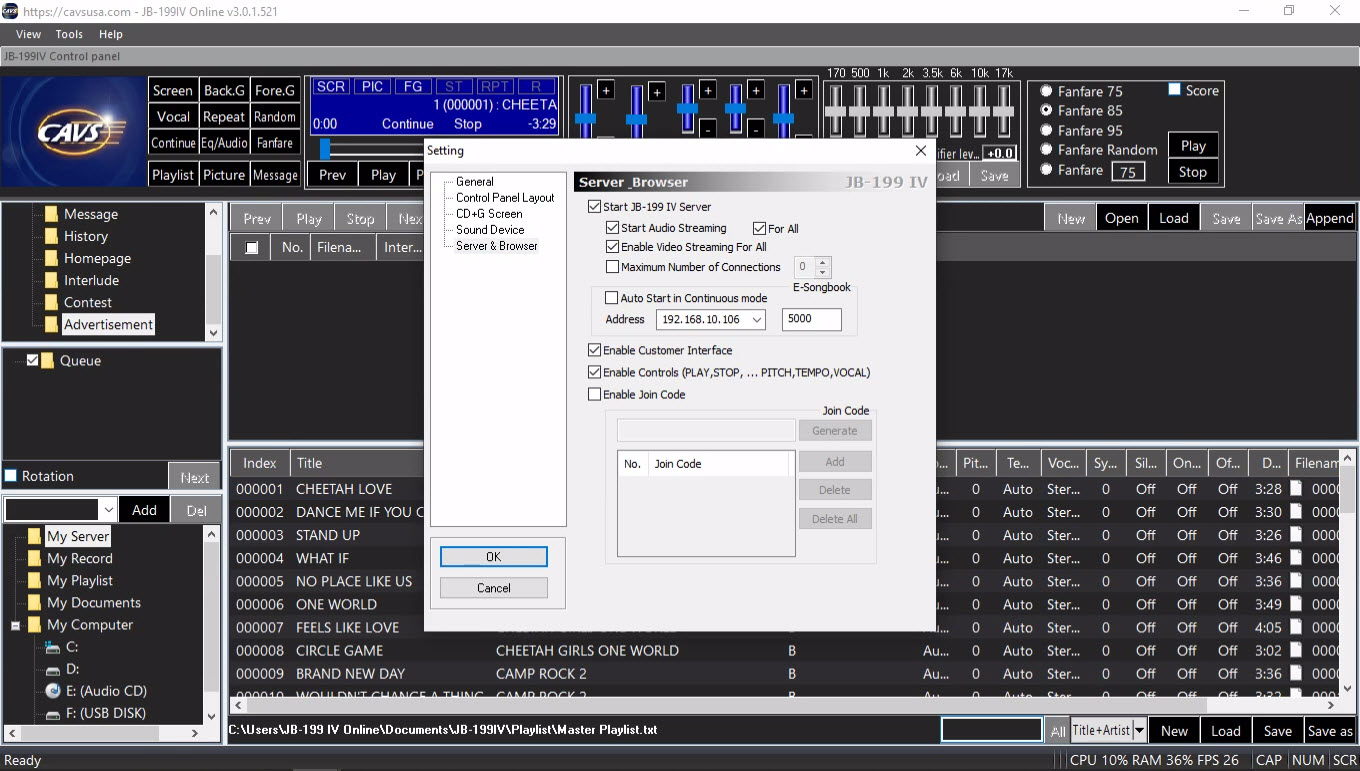
The JB-199 IV Server is enabled for the communication between the E-Songbook and the JB-199 IV.
Audio and video streaming is enabled for the E-Songbook to play the music and lyrics.
The Enable Customer Interface is checked.
It enables an E-Songbook within the JB-199 IV and allows the operator to use the E-Songbook as an alternative to the Control Panel.
The Enable Controls (PLAY, STOP, ... PITCH, TEMPO, VOCAL) is also checked.
It enables the Controls of the JB-199 IV in each E-Songbook, which may not be ideal with unruly guests.
7.3.3 Starting an E-Songbook
E-Songbook can be any device equipped with Wi-Fi. It can be a smartphone, tablet, laptop, etc. Using such a device, open the Settings and go to Wi-Fi. In this example, an iPhone is used as the device.
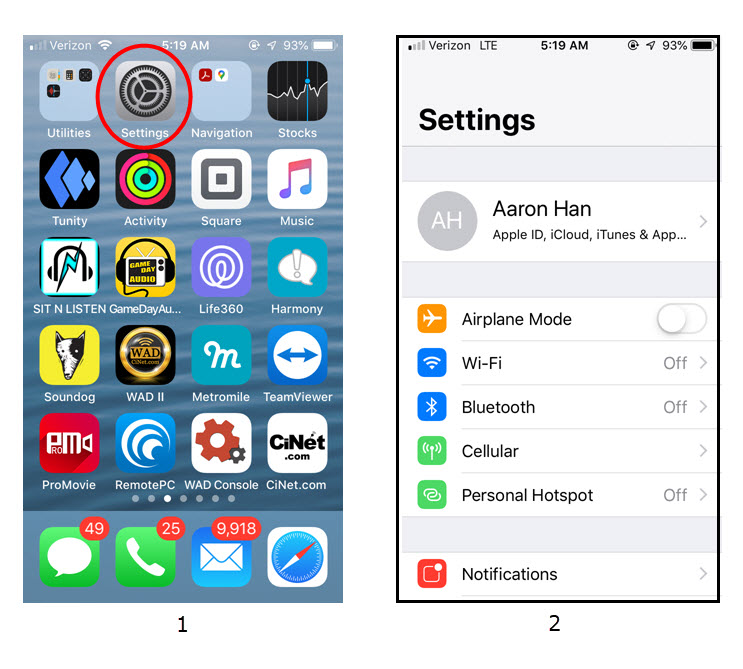
Turn on and connect the Wi-Fi to the network to which the JB-199 IV is connected. The network name would be known to the JB-199 IV operator. It can be shared as a QR code for ease of inputting the details such as the name and password. In this example, the network name is CAVS Network.

Close the Setting and open an Internet browser such as Google Chrome, MS Edge, or Apple Safari. In this example, Apple Safari is opened. Input the IP address of the JB-199 IV in the browser. The Customer Interface of the JB-199 IV will appear.
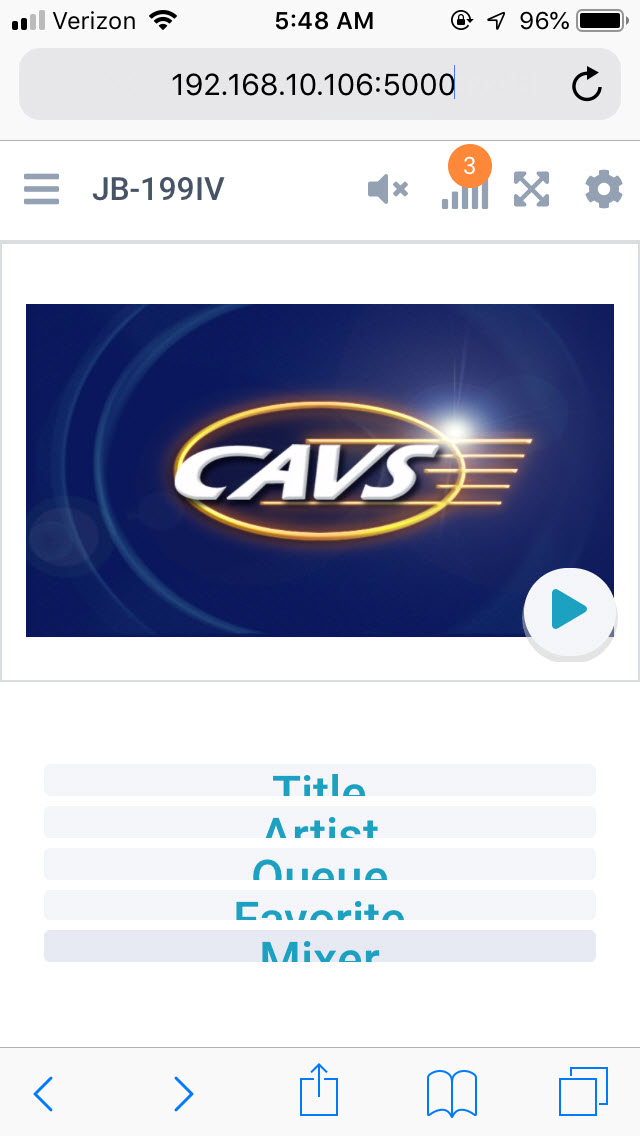
The IP address of the JB-199 IV can be found at 4.5.A.2.1.5 Server & Browser. It would be known to the JB-199 IV operator and can be shared by a QR code for ease of inputting.
7.3.4 Operating E-Songbook
The Customer Interface will vary slightly in colors and proportions depending on the E-Songbook device. The Customer Interface for iPhone 6 in particular was shown in the previous section. The Customer Interface in full screen is as follows.

For detail instruction, go to 4.4 Customer Interface.
It is highly recommended to read 4.4 Customer Interface for full understanding of the controls and options.
Only a brief guide to the main functions is shown here.
Press the right arrow button at the lower right corner of the CD+G screen.
The button will change to the Home button indicating that the screen is now showing the CD+G screen of the JB-199 IV.
It may show a song playing, a standby title, or no activity depending on what the JB-199 IV is engaged in doing at that moment.
Press the audio button at the upper right corner of the Customer Interface to un-mute the sound.
The sound playing in the JB-199 IV will now play through the Customer Interface.
Adjust the volume level using the Volume control slider.
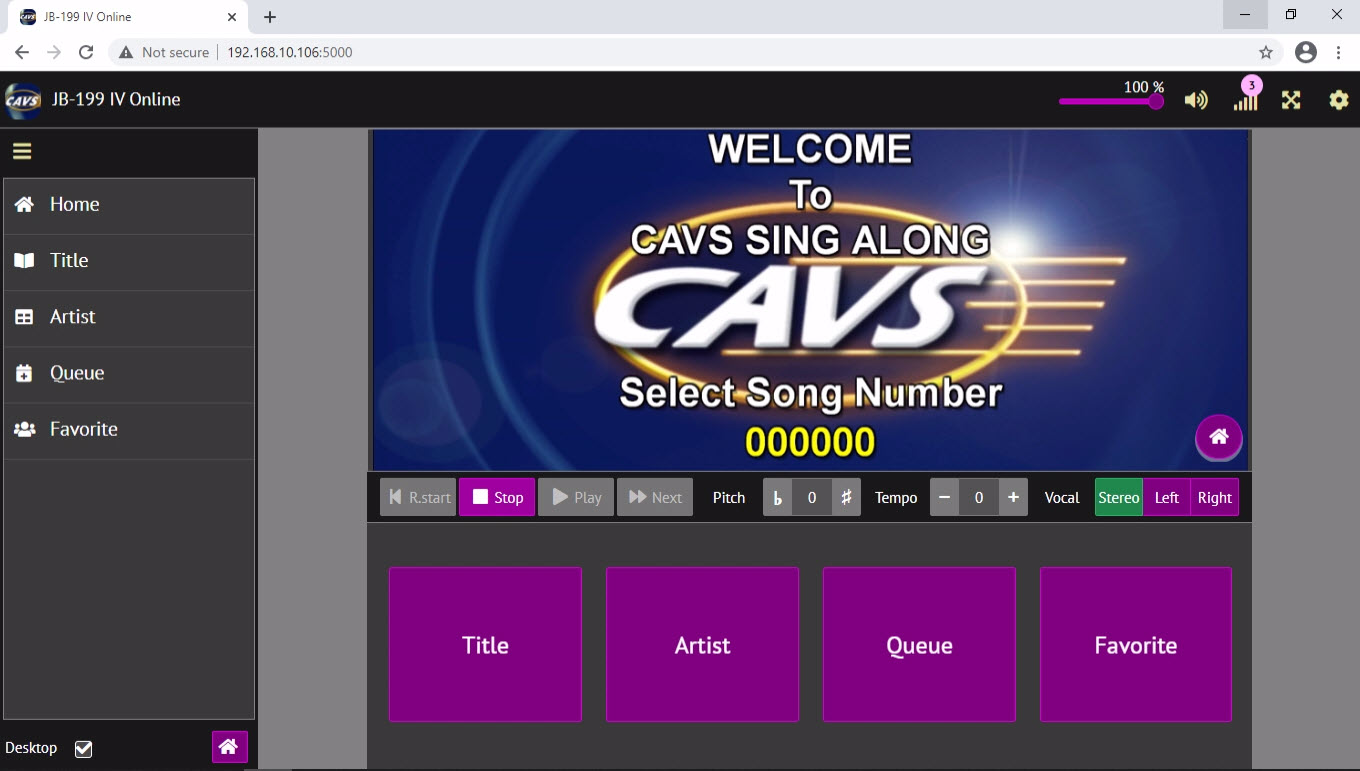
To select a song, click on Title for the following display.

- Click on Number, Title, Artist, or Lang at the top of the song list to sort the song list by number, title, artist, or language respectively. Click again on the field name to reverse the sort order.
- Click on a song title or number to reserve the song. A popup window will appear with options to input a guest name, preset the pitch and tempo controls, and reserve the song to play or place it in a Favorite list.
- Click on an artist for the artist's available song list. From the list, songs can be sorted, searched, and reserved as before.
- Search for a song by selecting a search category and inputting a word or phrase to search for. When done, be sure to clear the search word or phrase to return to the complete song list.
- Filter the songs by language. Available languages depend on the loaded song list.
-
Click on a preview button to play the song independently from the JB-199 IV.
A separate popup window will appear to play the lyrics.
The music will also begin playing.
Be sure to mute the music from a song playing in the JB199 IV by pressing the audio button at the upper right corner of the Customer Interface.
The time duration of the preview play can be set at 4.5.A.2.1.5 Controls and Functions: Control Panel: Server & Browser. Unlimited time duration enables the Preview to become the Karaoke-On-Demand service.
To reserve a song, click on a song number or title for the following popup window.
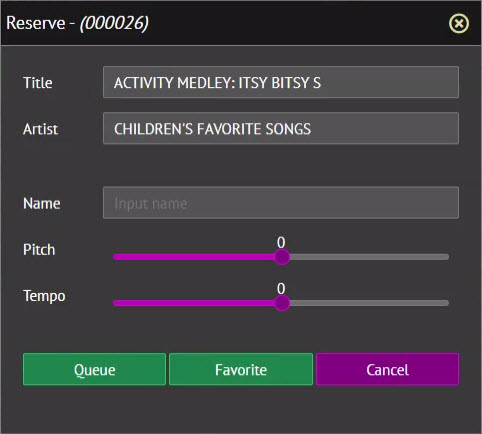
- Click on Queue to reserve the song. It is optional insert the guest name and preset the pitch and tempo.
- Click on Favorite to save the song in a Favorite list. The name of the Favorite list must be entered in the Name field.
To manage the Favorite lists, click on Favorite for the following display.
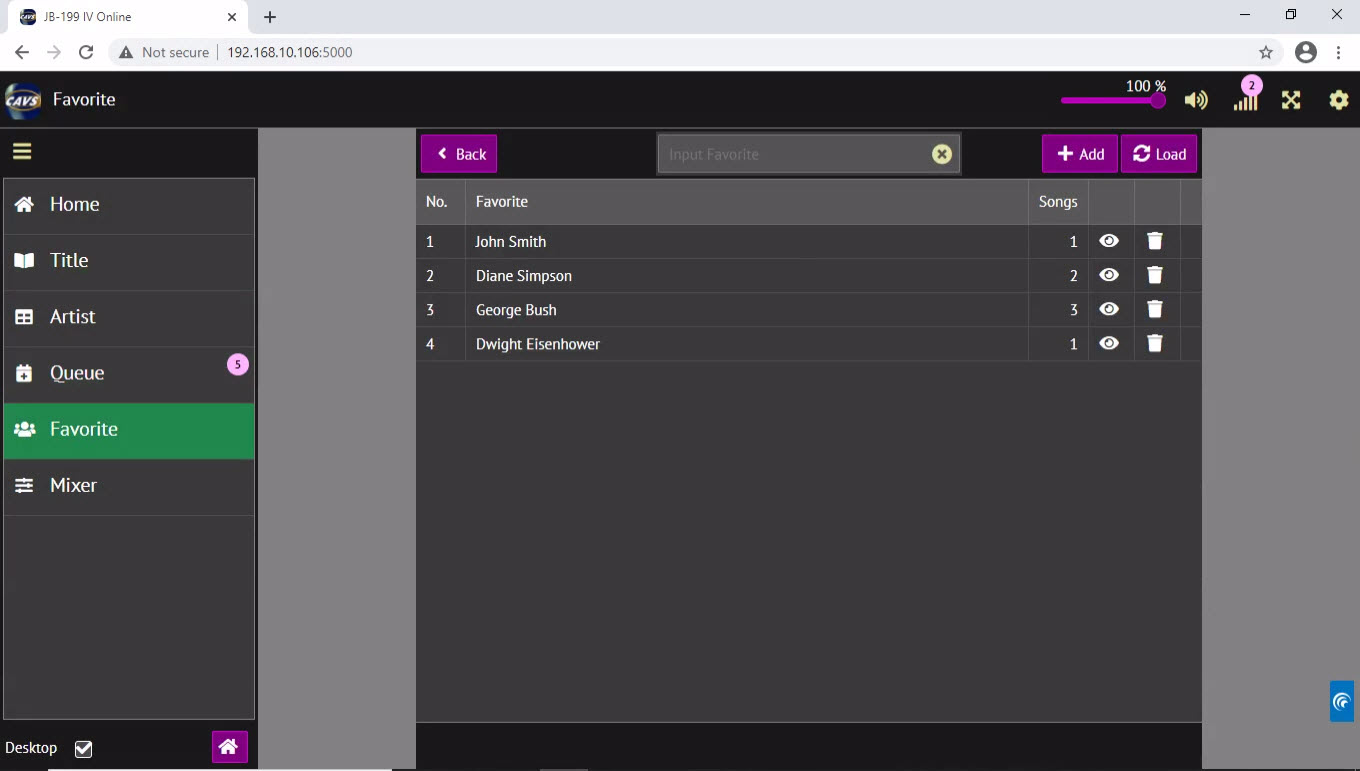
- To add, input the name of a new Favorite list and press Add. To delete, press the Delete button at each Favorite list.
- Press the View button at each Favorite list to see the list. In the list, click on a song title or number to reserve the song.
To view the reserved songs, click on Queue for the following display. The reserved songs play in the order of top to bottom.
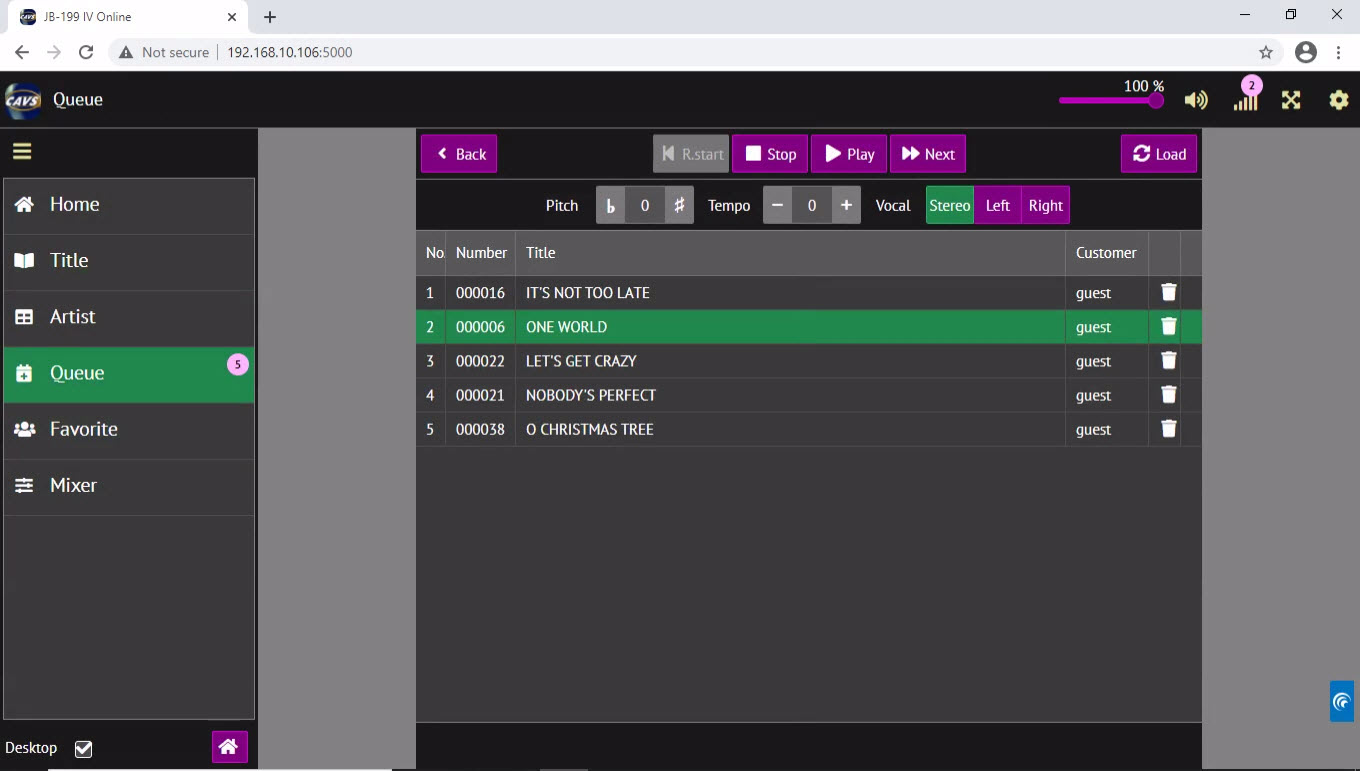
- To delete, click on Delete button at each reserved song.
- To edit the Customer name, double click on the name at each reserved song.
- To shuffle the order, drag & drop any reserved songs into new positions.
Note that Delete, Edit, and Shuffle functions in Queue will be disabled when the Enable Controls button is uncheck at 4.5.A.2.1.5 Server & Browser.
The details of controls and options in the Customer Interface is described in 4.4 Customer Interface.
Careful reading of the section is strongly recommended.
7.3.5 How to search songs using Voice Command
This section describes how to search the songs using Voice Command.
Start by connecting your E-Songbook, phone, or tablet to the JB-199 mini II.
After connecting, open the Customer Interface.
Here we demonstrate using the Microsoft Surface Go tablet. For intruction on other devices, refer to the examples at the end of the section

Press the Title button to open the song list.

Next,
- Press the down arrow button to select the category under which to conduct the search.
- Tap the search field to place the cursor inside.

The on-screen keyboard will appear in your device. Instead of typing the search word(s), press the microphone button to activate the Voice Command.

The microphone button will turn blue in color, indicating the device is ready to accept a Voice Command.

Speak the search word(s) clearly. Here we speak the word "Yesterday".

Press the Search button and the matching songs will appear on the screen.

Tap on a song and reserve.

To search in foreign language, press the Language button when the keyboard appears in the device.

The Language button will toggle between additional languages loaded in the device. The keyboard layout will also change accordingly.
Next press the microphone button, and when it turns blue, speak the search word(s) in the language selected.
To add or remove additional languages in the device, refer to the user manual of the device.
In the following, we repeat the above instruction on how to search songs using Voice Command for some popular device models, such as Aaple and Android.
Start by connecting the iPhone 6S to the JB-199 mini II.
After connecting, open the Customer Interface.

Press the Title button to open the song list.

Next,
- Press the down arrow button to select the category under which to conduct the search.
- Tap the search field to place the cursor inside.

The on-screen keyboard will appear in your device. Instead of typing the search word(s), press the microphone button to activate the Voice Command.

The keyboard will change to Voice Command, indicating the device is ready to receive a Voice Command.

Speak the search word(s) clearly. Here we speak the word "Yesterday".

The ssearch word(s) will appear in the search field. Here "Yesterday" appears in the search field. Press the search button.

The matching songs will appear on the screen.

Tap on a song and reserve.

To search in foreign language, press the global button when the keyboard appears in the device.

The global button will toggle between additional languages loaded in the device. The keyboard layout will also change accordingly.
Next press the microphone button, and the keyboard changes to Voice Command, speak the search word(s) in the language selected.
To add or remove additional languages in the device, refer to the user manual of the device.
Start by connecting the Samsung Galaxy S7 to the JB-199 mini II.
After connecting, open the Customer Interface.

Press the Title button to open the song list.

Next,
- Press the down arrow button to select the category under which to conduct the search.
- Tap the search field to place the cursor inside.

The on-screen keyboard will appear in your device. Instead of typing the search word(s), press the microphone button to activate the Voice Command.

The microphone buttom will turn blue in color, indicating the device is ready to receive a Voice Command.

Speak the search word(s) clearly. Here we speak the word "Yesterday" and it appears in the search field. Press the search button.

The matching songs will appear on the screen.

Tap on a song and reserve.

To search in foreign language, slide the Shift key when the keyboard appears in the device.

The Shift key will toggle between additional languages loaded in the device. The keyboard layout will also change accordingly.
Next press the microphone button and when it changes to blue in color, speak the search word(s) in the language selected.
To add or remove additional languages in the device, refer to the user manual of the device.
Set the Internet connection for the JB-199 IV as shown in 5.2.2 How to Connect: Network: Internet. The JB-199 IV is now ready for 10, 20, 50, or even 100 online guests to connect using their smartphones, tablets, and laptops. Invite your friends and family to online karaoke party.
Ease of Access
Guests can access the JB-199 IV using a standard Internet Browser such as the Google Chrome, MS Edge, Apple Safari, and Firefox. They do not need to download or install an App. They need only the public IP address or the QR code of the JB-199 IV.
Open Hardware
Guests can use any device with Internet connection. They can use their smartphones, tablets, or laptops.
Full Control
Guests can access, search, and select the songs in the JB-199 IV. They can also reserve, play, cancel, and stop the songs. They can pitch control, tempo control, sync control, and voice cancel. They can create and manage unlimited number of Favorite lists.
Karaoke Room and Karaoke-On-Demand
Guests can join in a karaoke room sharing the music and lyrics with others. They can also enjoy the service of Karaoke-On-Demand playing any songs at any time.
Connect the JB-199 IV to Internet as shown in 5.2.2 How to Connect: Network: Internet. Go to 4.5.A.2.1.5 Server & Browser and place check marks on
- Start JB-199 IV Server
- Enable Audio Steaming, For All
- Enable Video Streaming For All
The JB-199 IV Server is enabled for the communication between the online guests and the JB-199 IV.
Audio and video streaming is enabled for the online guest to enjoy the music and lyrics.
The Enable Customer Interface is checked.
It activates the Customer Interface within the JB-199 IV and allows the operator to use the Customer Interface as an alternative to the Control Panel.
The Enable Controls (PLAY, STOP, ... PITCH, TEMPO, VOCAL) is checked.
It enables the Controls of the JB-199 IV by each online guests in the karaoke room.
It may be uncheck with unruly guests.
Guests can use on any device with Internet access. It can be a smartphone, tablet, laptop, etc. In this example, an iPhone 6 is used and it is connected to Internet by the 4G service provider.
Open an Internet browser such as Google Chrome, MS Edge, or Apple Safari. In this example, Apple Safari is opened. Input the public IP address of the JB-199 IV in the browser. The Customer Interface of the JB-199 IV will appear.
The public IP address of the JB-199 IV can be found following the instruction at 5.2.2 How to Connect: Network: Internet. It would be known to the JB-199 IV operator and shared with the guests by a QR code for ease of inputting.
7.4.4 Operating the Customer Interface
The Customer Interface will vary slightly in colors and proportions depending on the devices used by the guests. The Customer Interface for iPhone 6 in particular was shown in the previous section. The Customer Interface in full screen is as follows.
For detail instruction, go to 4.4 Customer Interface.
It is highly recommended to read 4.4 Customer Interface for full understanding of the controls and options.
Only a brief guide to the main functions is shown here.
Press the right arrow button at the lower right corner of the CD+G screen.
The button will change to the Home button indicating that the screen is now showing the CD+G screen of the JB-199 IV.
It may show a song playing, a standby title, or no activity depending on what the JB-199 IV is engaged in doing at that moment.
Press the audio button at the upper right corner of the Customer Interface to un-mute the sound.
The audio is now playing from the JB-199 IV.
To select a song, click on Title for the following display.
- Click on Number, Title, Artist, or Lang at the top of the song list to sort the song list by number, title, artist, or language respectively. Click again on the field name to reverse the sort order.
- Click on a song title or number to reserve the song. A popup window will appear with options to input a guest name, preset the pitch and tempo controls, and reserve the song to play or place it in a Favorite list.
- Click on an artist for the artist's available song list. From the list, songs can be sorted, searched, and reserved as before.
- Search for a song by selecting a search category and inputting a word or phrase to search for. When done, be sure to clear the search word or phrase to return to the complete song list.
- Filter the songs by language. Available languages depend on the loaded song list.
-
Click on a preview button to play the song independently from the JB-199 IV.
A separate popup window will appear to play the lyrics.
The music will also begin playing.
Be sure to mute the music playing from the JB199 IV by pressing the audio button at the upper right corner of the Customer Interface.
The time duration of the preview play can be set at 4.5.A.2.1.5 Controls and Functions: Control Panel: Server & Browser. Unlimited time duration transforms the Preview to become the Karaoke-On-Demand service.
To reserve a song, click on a song number or title for the following popup window.
- Click on Queue to reserve the song. It is optional insert the guest name and preset the pitch and tempo.
- Click on Favorite to save the song in a Favorite list. The name of the Favorite list must be entered in the Name field.
To manage the Favorite lists, click on Favorite for the following display.
- To add, input the name of a new Favorite list and press Add. To delete, press the Delete button at each Favorite list.
- Press the View button at each Favorite list to see the list. In the list, click on a song title or number to reserve the song.
To view the reserved songs, click on Queue for the following display. The reserved songs play in the order of top to bottom.
- To delete, click on Delete button at each reserved song.
- To edit the Customer name, double click on the name at each reserved song.
- To shuffle the order, drag & drop any reserved songs into new positions.
Note that Delete, Edit, and Shuffle functions in Queue will be disabled when the Enable Controls button is uncheck at 4.5.A.2.1.5 Server & Browser.
Be sure that the Preview time duration is set to Unlimited in the 4.5.A.2.1.5 Controls and Functions: Control Panel: Server & Browser. Start the Customer Interface.
Click on Title.
Click on the Preview button of a song. A popup window will appear to play the lyrics. The music will also begin playing. Be sure to mute the music playing from the JB199 IV by pressing the audio button at the upper right corner of the Customer Interface. With the time duration set to Unlimited, the song will play in entirety.

Karaoke-On-Demand is available in the Title and Artist pages.
This section shows how to use the JB-199 IV with a video chatting program such as Skype, Zoom, Facebook Live, etc. for online karaoke show. It describes one of many configurations that are possible.
7.5.1 Video chatting
Start a meeting and invite your guests with the Invite Link. The meeting can be hosted from any device which is not necessarily the JB-199 IV. The guests can join the meeting using their smartphones, tablets, or laptops. In this example, a Zoom meeting is hosted in a laptop.
For the host, press the Participants button at the bottom of the Zoom meeting screen. The meeting number and password will be found and can be shared with the guests. For description of how to run a Zooom meeting in particular, go to support.zoom.us/hc/en-us.
7.5.2 Combining Video chatting with JB-199 IV
Ask each guest to open an Internet browser.
The browser is apart from the window opened to join the meeting.
The browser in fact can be opened in a different device than the meeting.
Using the browser, ask each guest to login to the JB-199 IV as shown in 7.4.3 Preparing the guest.
If both the browser and the meeting are opened in the same device, the two windows can be set side by side as follows.
If the browser and the meeting are opened in two different devices, the two screens can be set side by side as follows.
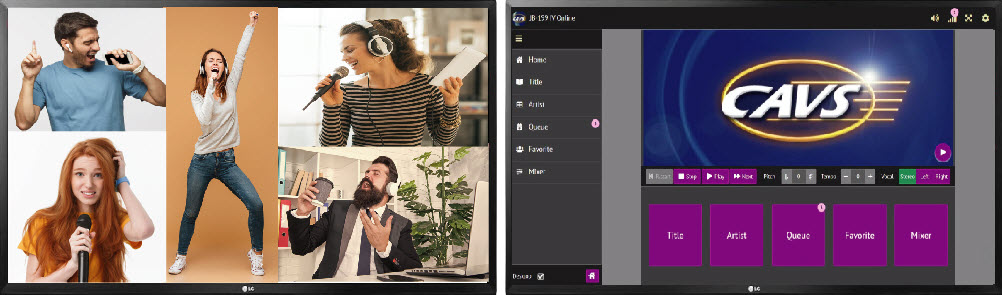
For each guest, be sure to have the audio and microphone enabled in the meeting.
For each guest, be sure to have turned on the CD+G screen of the JB-199 IV and un-muted the audio in the Customer Interface.
For instruction, go to 7.4.3 Preparing the guest.
Next reserve a song into Queue and play.
Each guest will hear the music coming from the JB-199 IV.
Each guest will also see the lyrics play in the Customer interface.
A guest who reserved the song can sing along in solo or any guests can join in making it a duet, quartette, etc.
The singing voices will be shared with all guests in the meeting.
Once a song begins play, the guests should minimize making any changes in their devices.
Change such as plugging and unplugging of earphone or headphone can cause unnecessary latency in audio especially in smartphones due to their interface with external peripherals.
The latency will only arise in devices having made the changes.
7.5.2 Adding echo and reverb
A karaoke mixer can enhance your singing by adding echo and reverb to your voice. Elephant Ear karaoke mixer of www.Cinet.com is recommended. It has a built-in microphone with 10 step echo and reverb levels which delivers excellent sound. Connect the ElephantEar karaoke mixer to the microphone input of the smartphone, tablet, or laptops which is used to join the meeting. Now sing like a pro in solo, duet, quartette, etc.
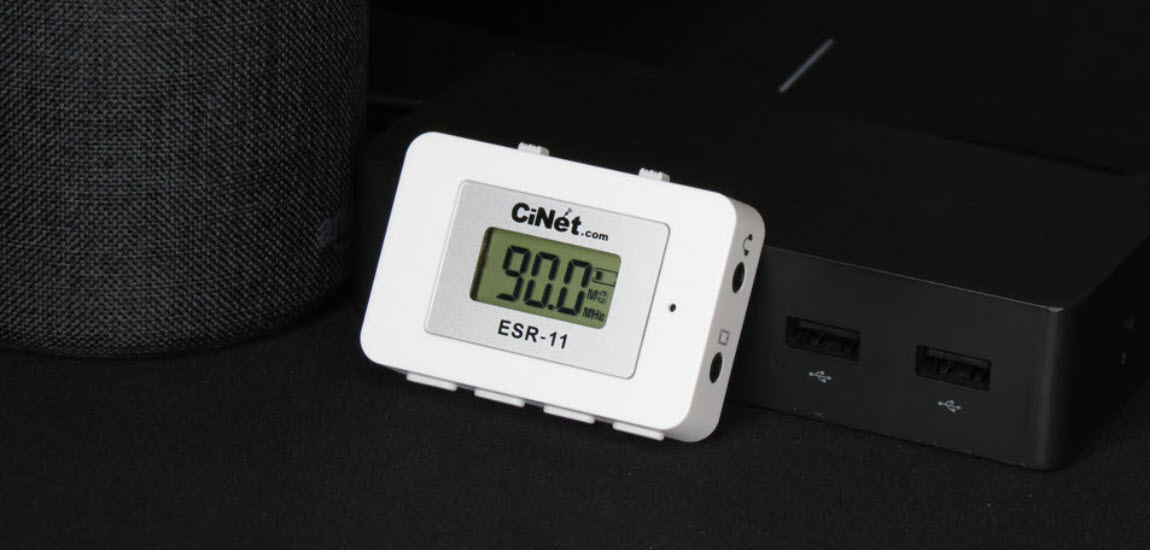
This section shows how to censor, block, or flag inapropriate songs from playing in the karaoke player. The censor control is needed, for example, to filter out songs of adult content or foul languages for the audience of families and minors.
In the Control Panel, go to Tools > Setting. The Setting window will appear showing the censor controls (for the program versions higher than v579).

7.6.1 Enable local censor
Check the Enable local censor and click OK. Next go to My Server for the loaded playlist and you will see an added field "Filter" at the end of each song.
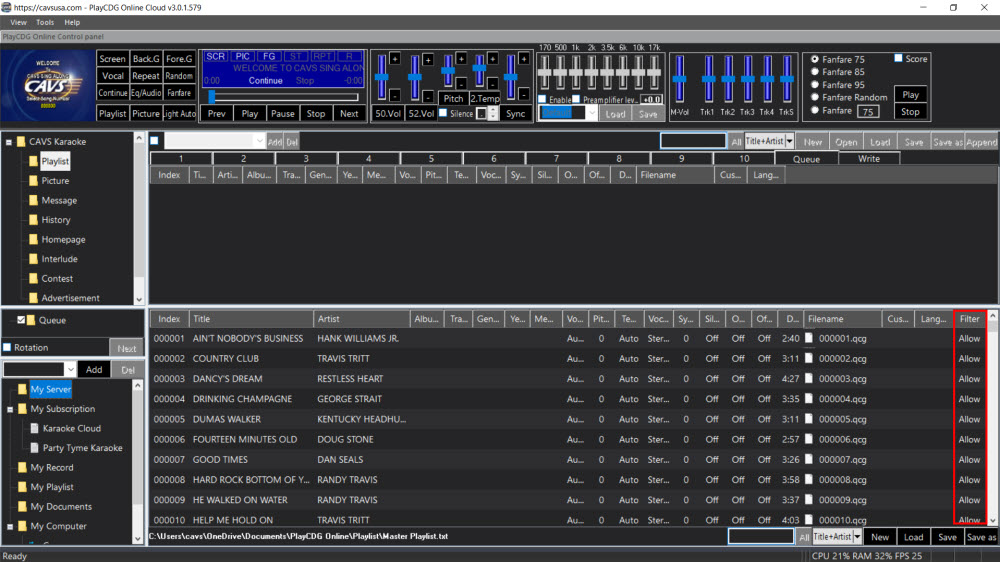
Right click on a song and select Censor.
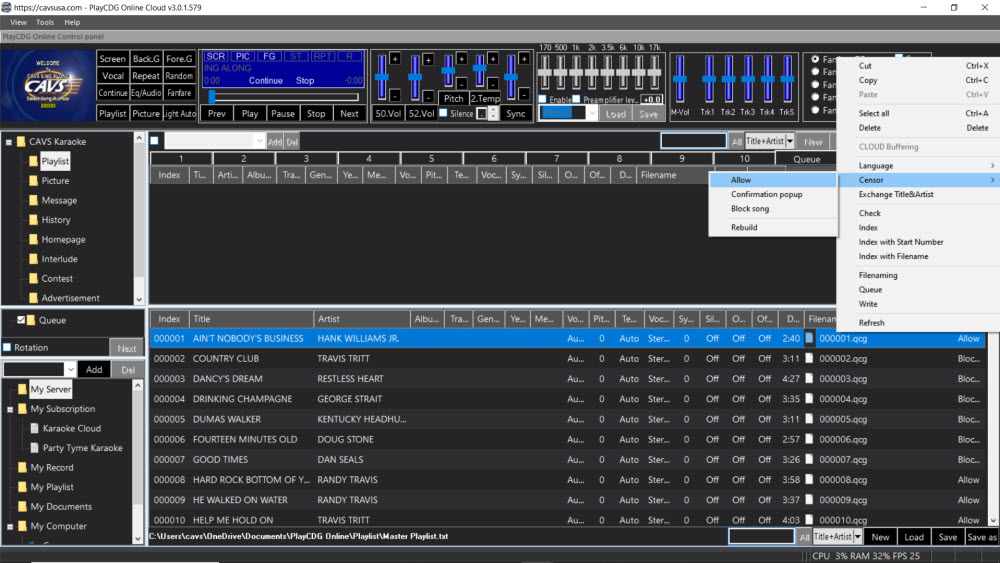
You will see the following three options.
- Allow: Allow the song to play
- Confirmation popup: Flag the song for confirmation before play
- Block song: Block the song from play
Note that you can change the control value for a group of songs at a time using Click and Shift-Click.
Finally, when done changing the control value(s), right click anywhere in the playlist and select Censor followed by Rebuild.
Clicking on Rebuild is important as it sends the changed control information to the server, which then sends to each of the E-Songbooks and devices connected to the player.
7.6.2 Enable word filter
In the Tools > Setting, check the Enable word filter.
Next select words to filter in the title and artist fileds of the songs.
For example, you may select a word such as "(clean)" which is attached to the title for the songs that contain foul languages but cleaned in lyrics. You may select an artist name whose songs are prone to contain adult languages.
Then for each word, select
- Confirmation popup: Flag the song for confirmation before play
- Block song: Block the song from play
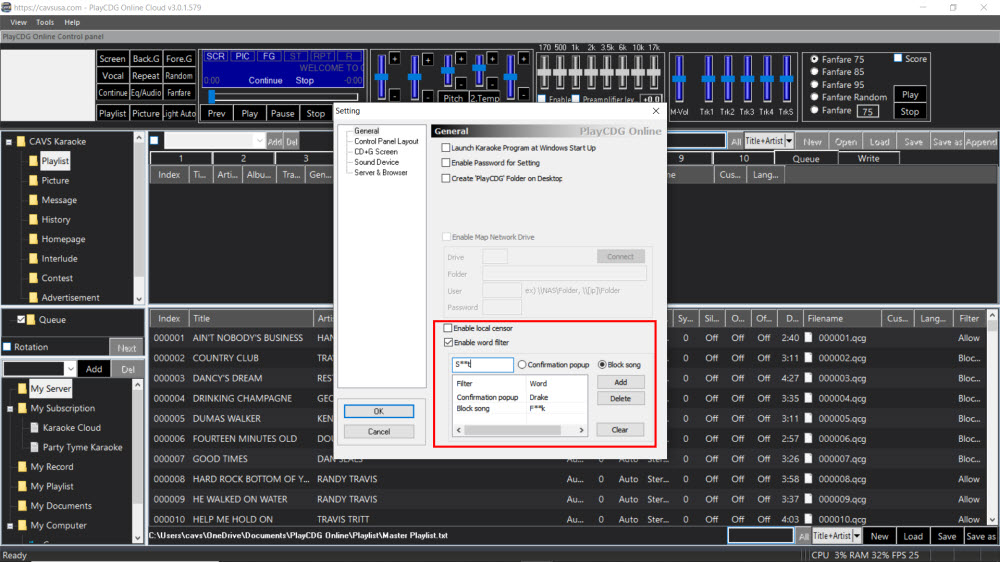
Next click on Add.
To delete a word in the filter, select the word and press Delete.
Press Clear to delete all words in the filter.
When done selecting words, click OK to close the Setting window, which will activate the word filter.
Note that the word filter does not differenciate between upper case and lower case.
Subscription services to play the latest and most popular songs are available from online providers such as Karaoke Cloud and Party Tyme. The services remove the hassles of searching and loading new songs by updating daily and automatically. The services also provide the full commercial licenses to play the songs in bars, restaurants, etc. This section shows how to activate the subscription services in the karaoke player.
In the Control Panel, go to Folder Menu and select Subscriptions. You will see available services, such as Karaoke Cloud and Party Tyme.
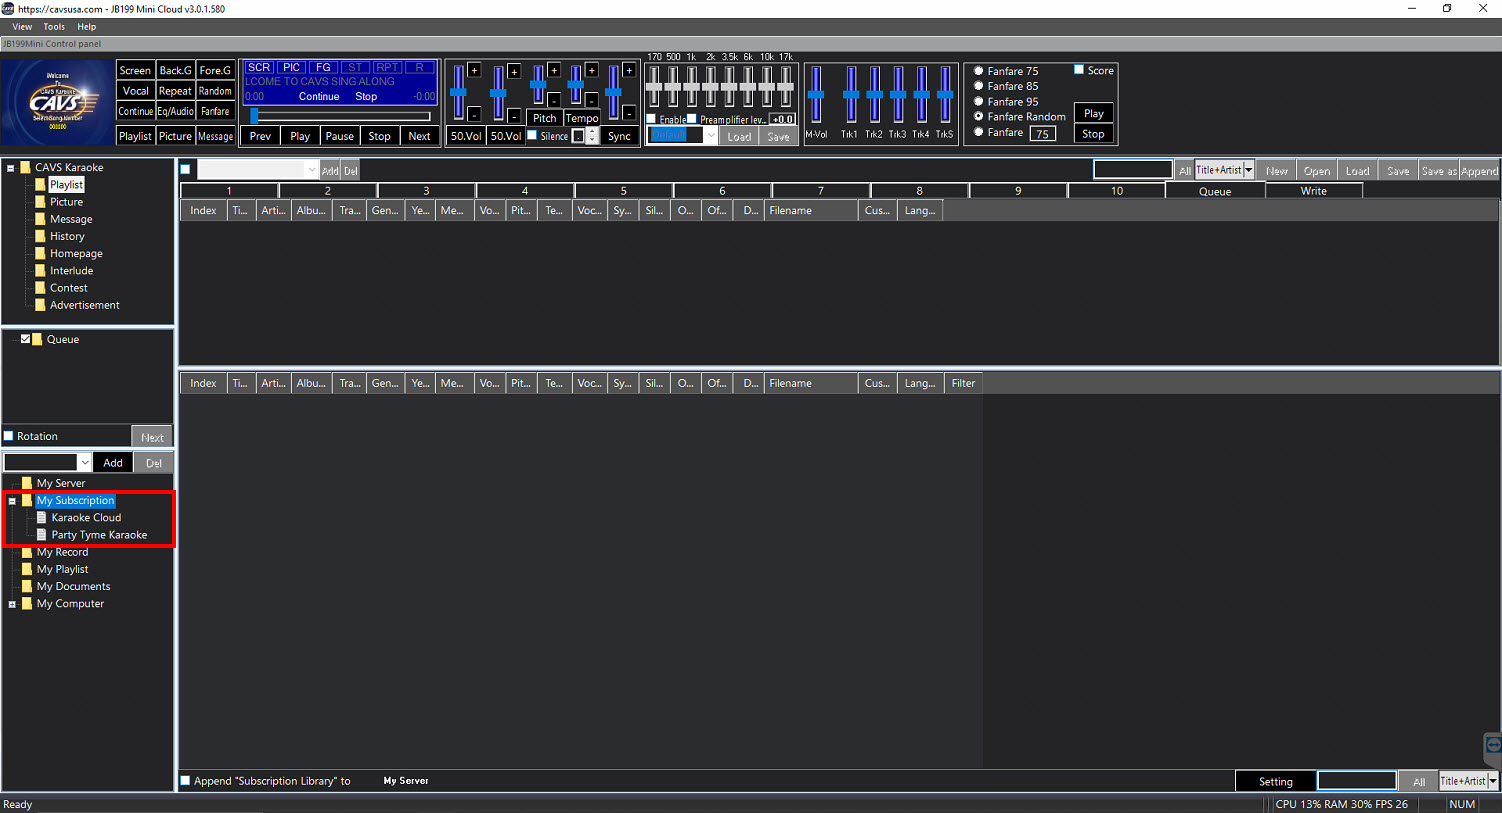
Click on any one, for example Party Tyme, and the Setting button will appear on the right bottom corner.
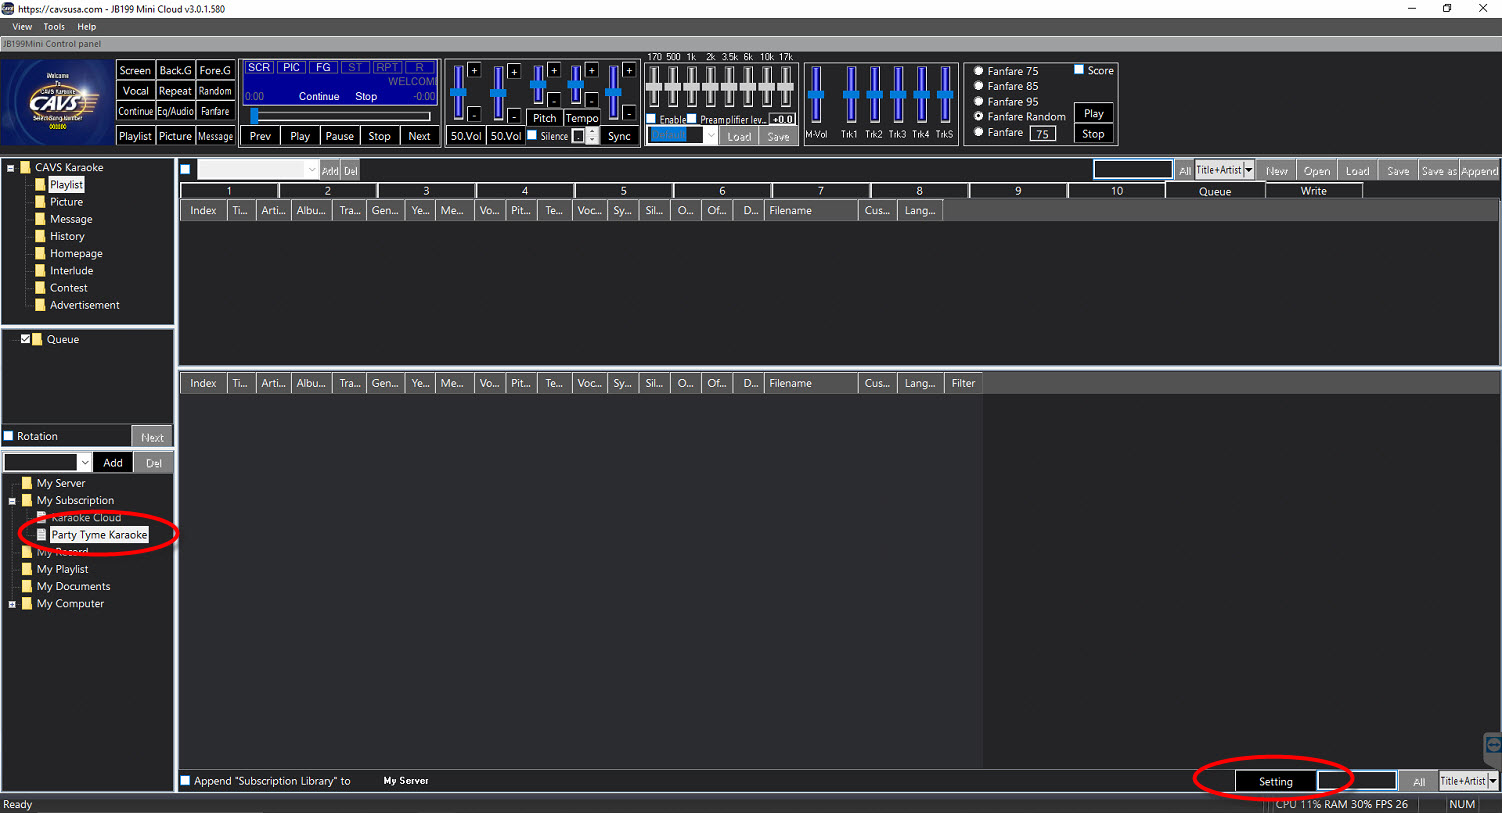
Click on the Setting button and a pop-up window will appear. If it is your first time, click on "click here" link and follow the on-screen instruction to activate the subscription. It is important that you purchase the subscription through this link, and not through the service company's general webapge. Upon your completion of activation, you will be given Username and Password. The subscription is available for one day, one month, one year, etc.
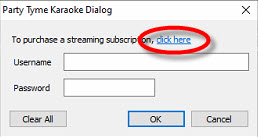
When you have your Username and Password from activation, insert them into the popup window and press OK. You will see the song list of the subscription populate in the File Browser.
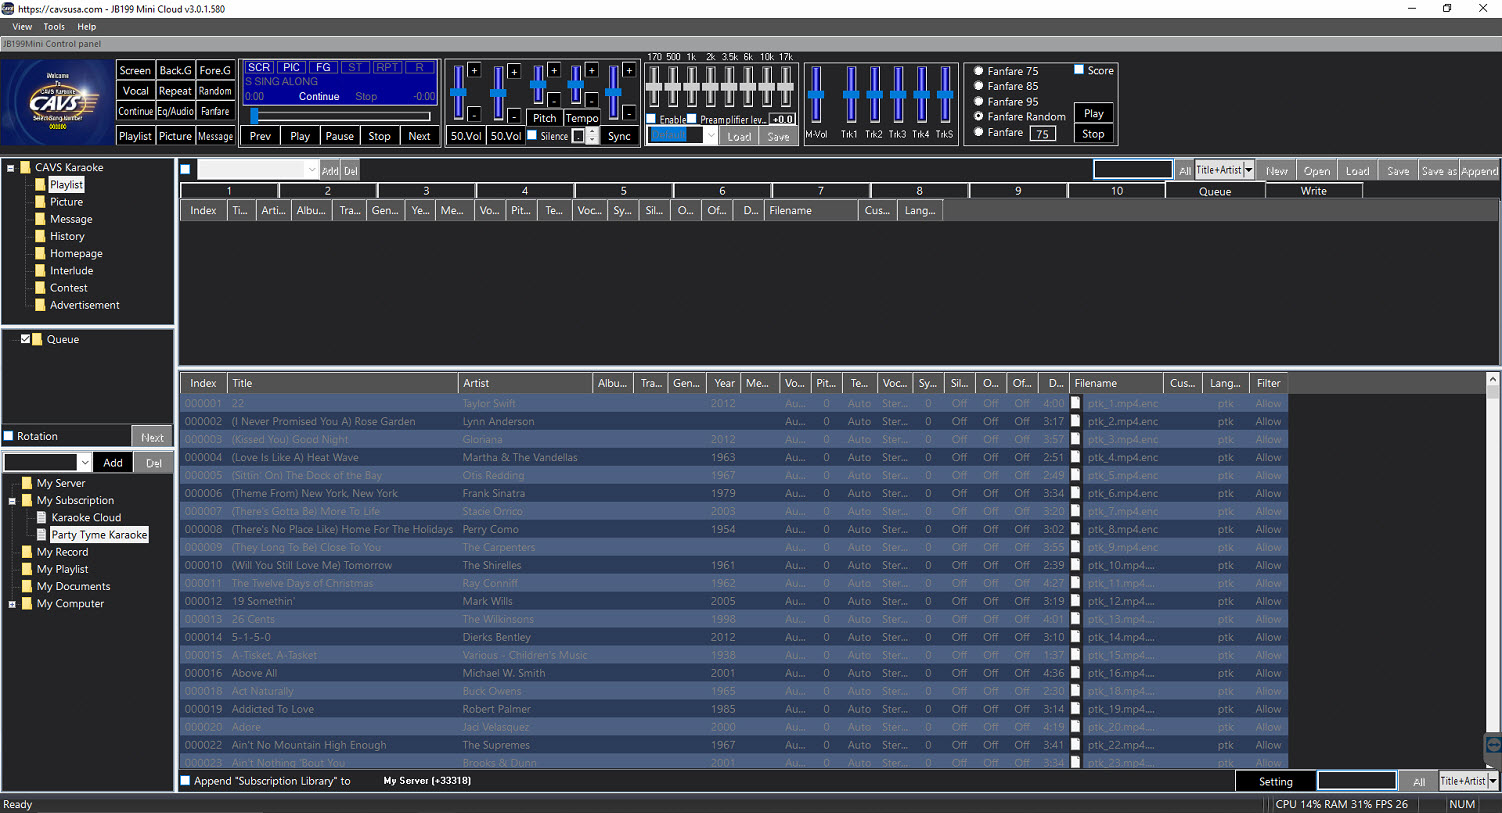
Next you can choose to display the subscription song list in My Server by checking the option as below.
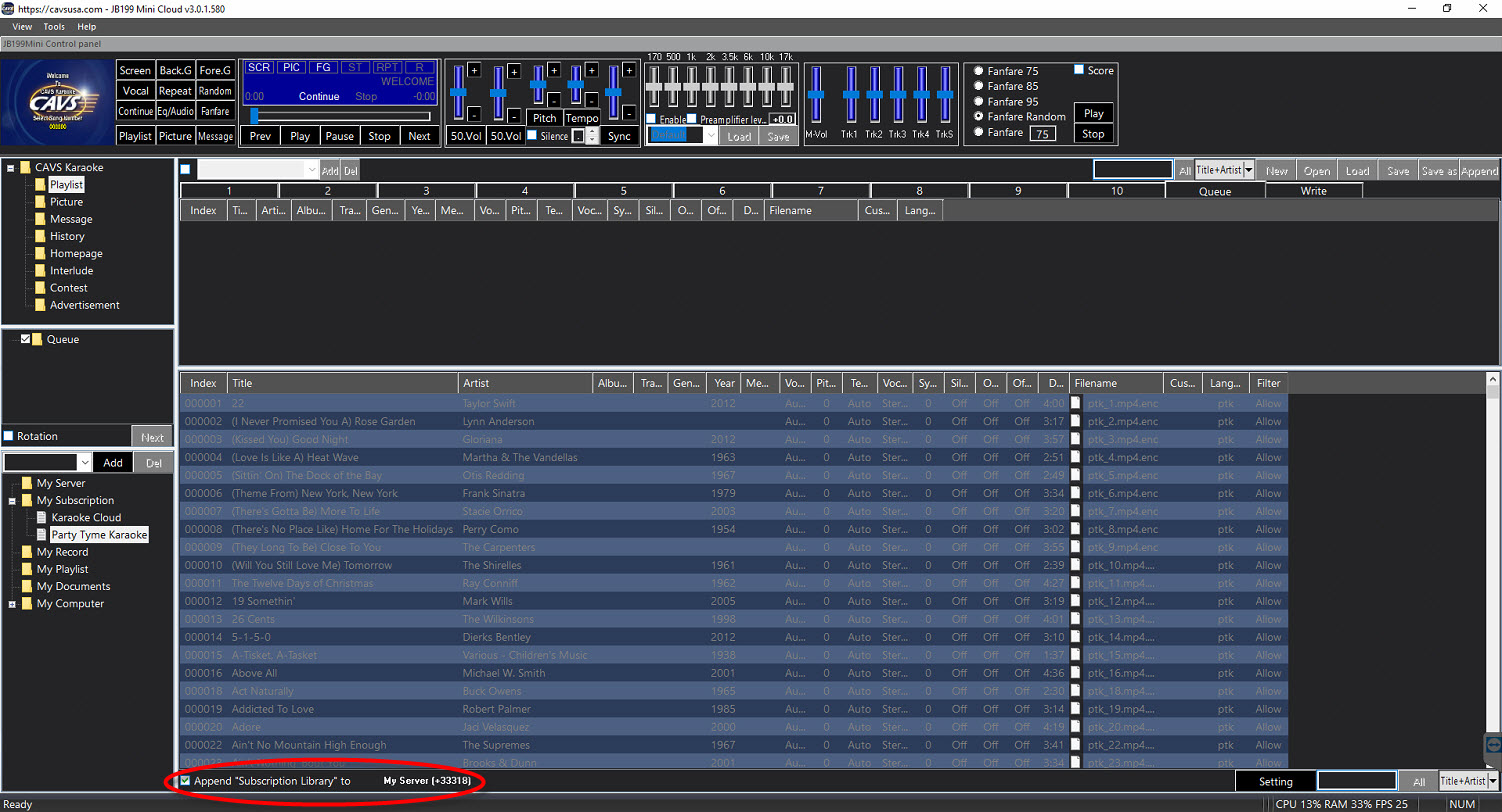
When choosen, the subscription songs along with all other songs that are in My Server will appear together in the Customer Interface. Note that displaying the subscription songs in the Customer Interface will enable guests or customers connecting through phones and tablets to view the songs and select.
E-Songbook for the JB-199 IV has the convenience shown in 7.3 How to use E-Songbook.
However a paper songbook may be required in some circumstances and can be printed as follows.
First locate the playlist to print.
The playlists by default are saved in Documents\JB-199IV\Playlist folder inside the JB-199 IV.

Copy the playlist onto an external device to take the file to a laptop/PC which will be used to print.
The laptop/PC is assumed to have the Microsoft Excel program.
Start the MS Excel program.
Click on File, Open, and navigate to the playlist.
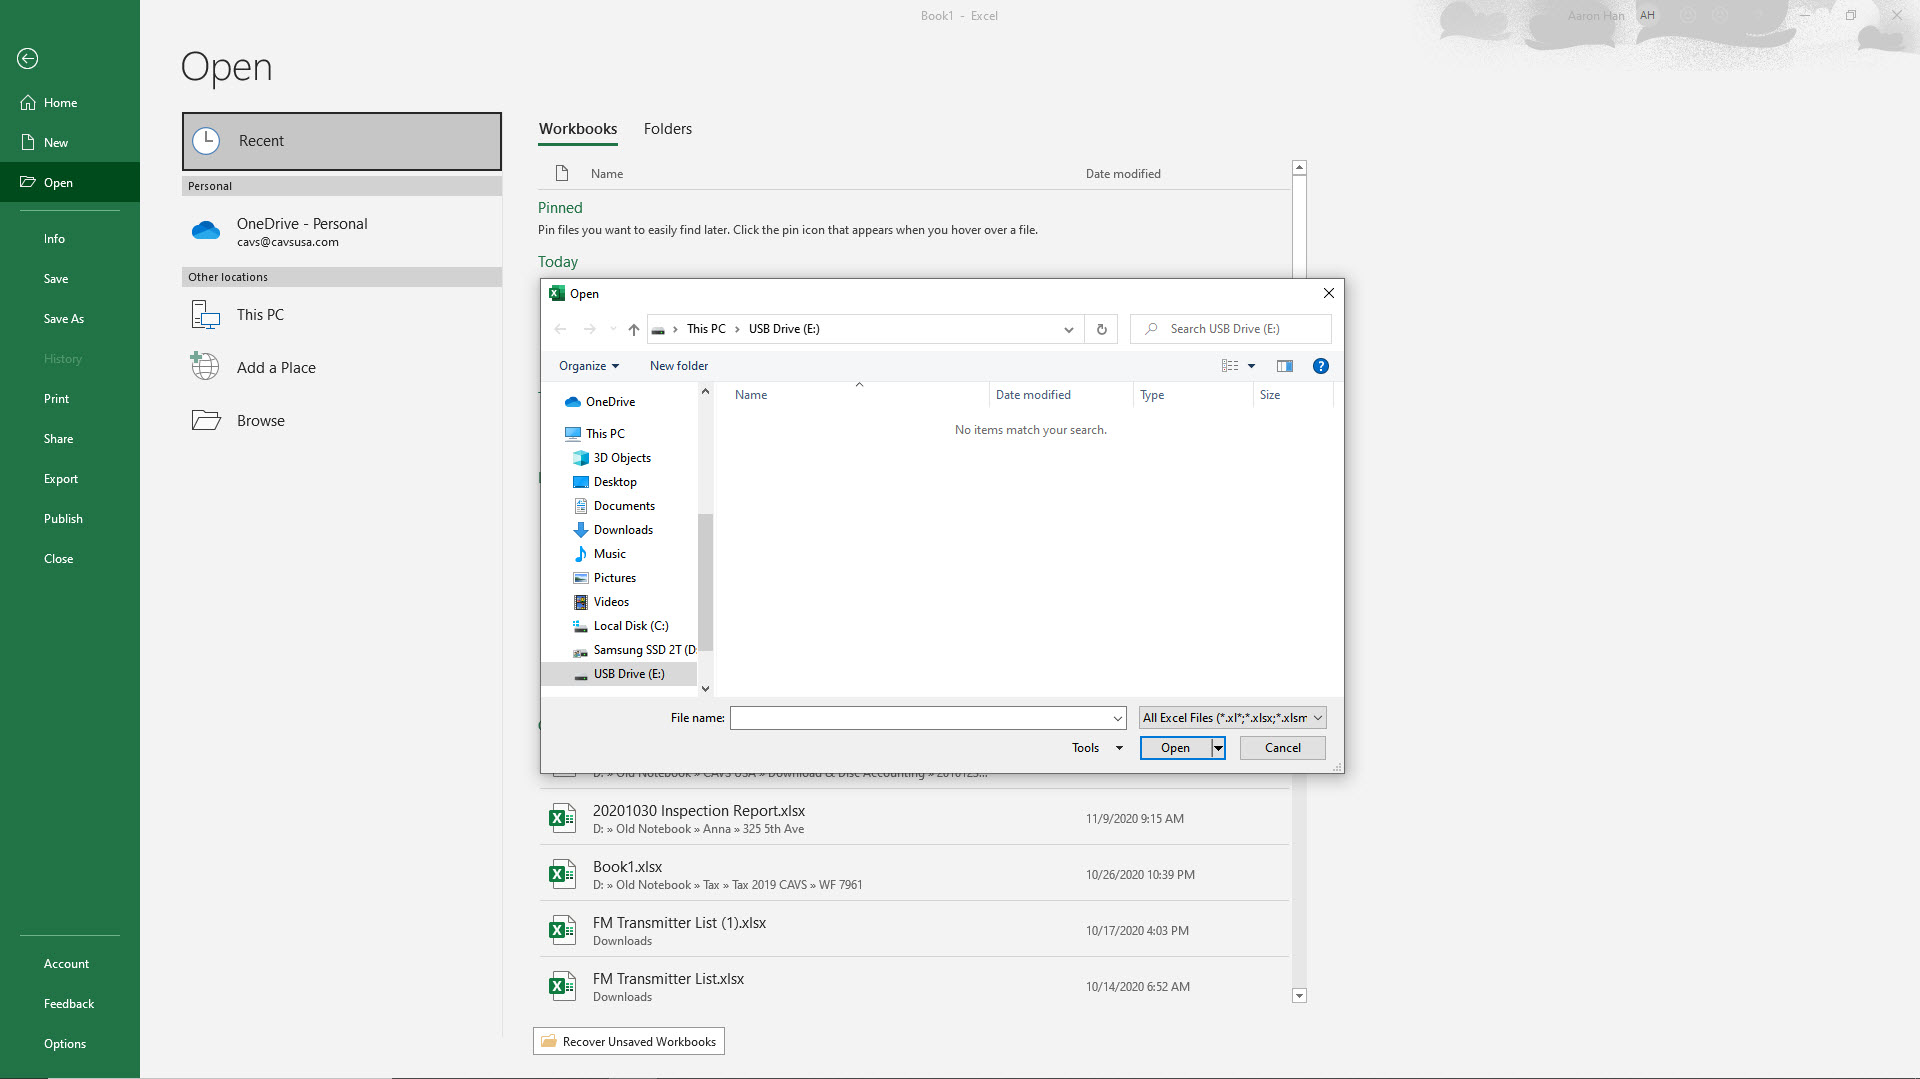
Since the playlist is a text file, it will not be visible until less All Files is selected for the file type.

In this example, the Master Playlist is opened.
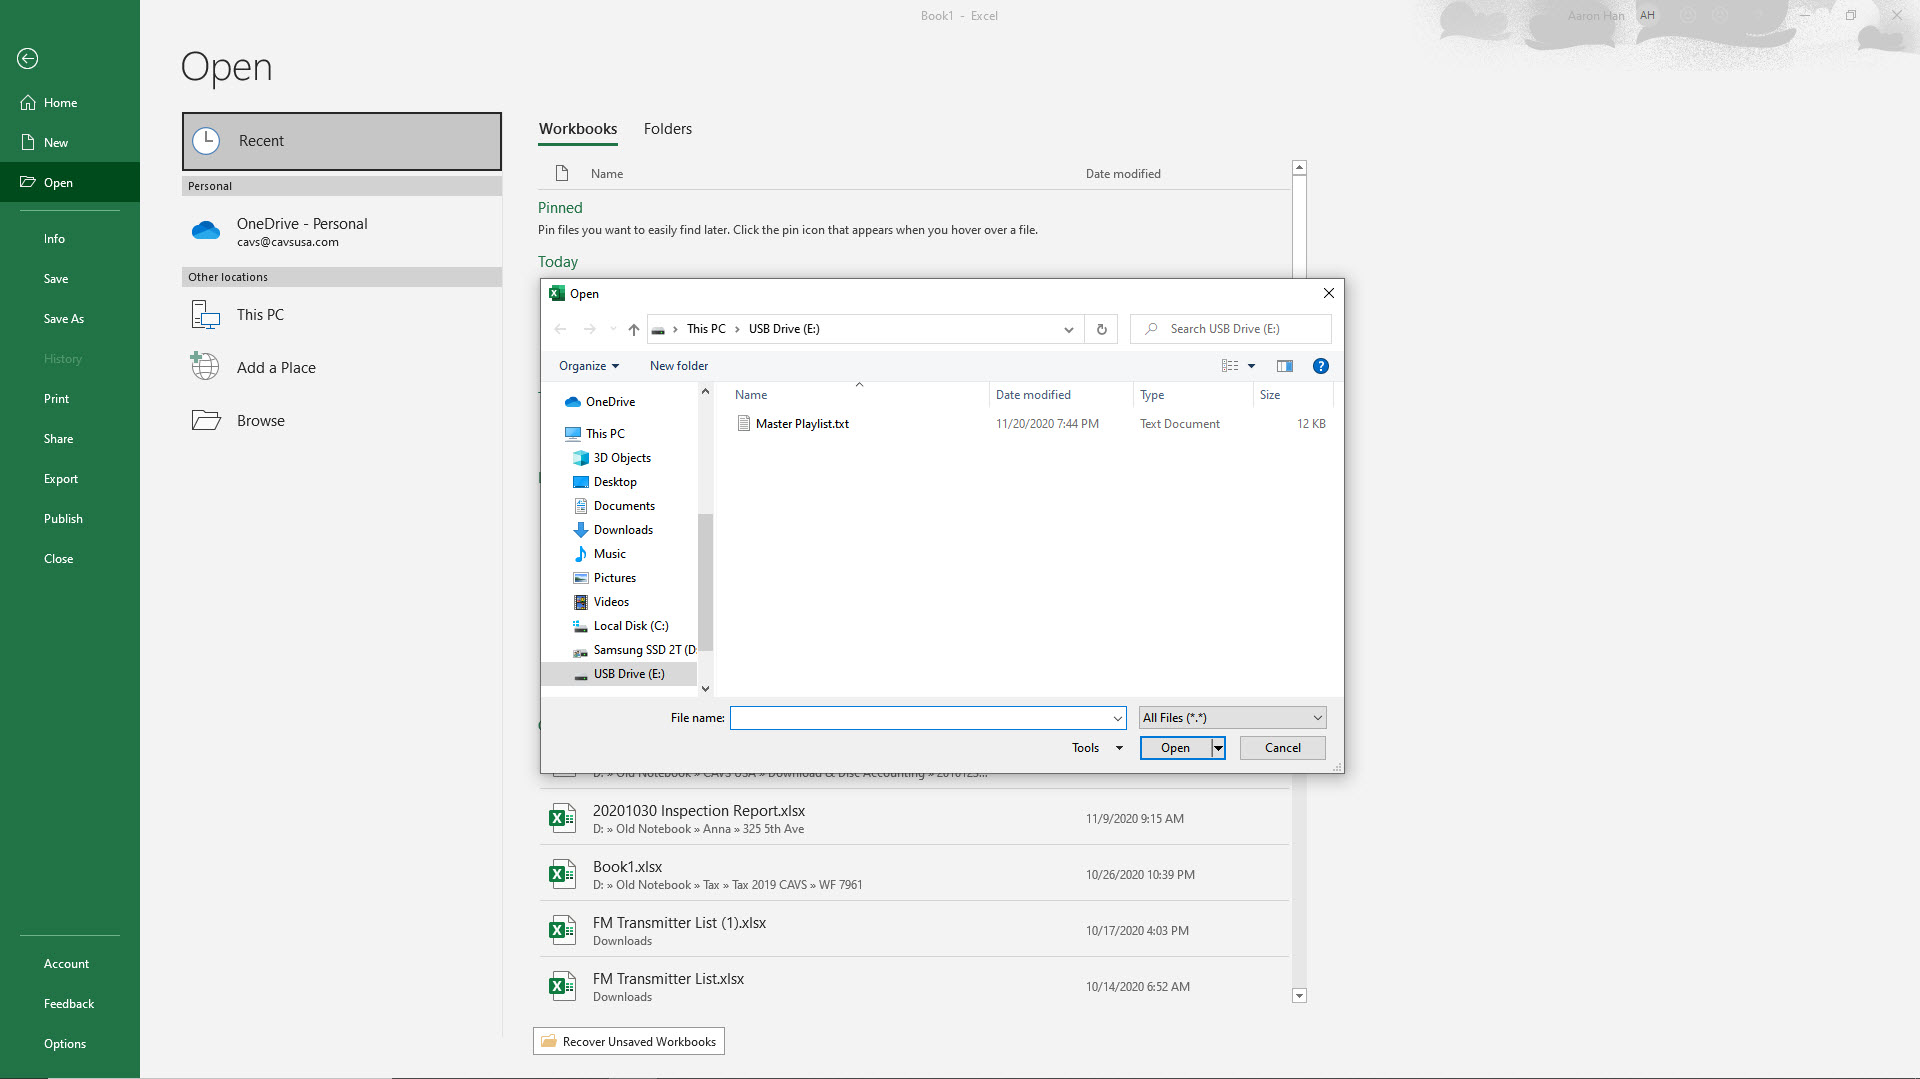
A pop-up window of Text Wizard Import - Step 1 of 3 will appear. Check Delimited and press Next.

Check Others and input “|” sign in the input field. “|” is the Pipe sign inputted by typing Shift-\. Press Next.
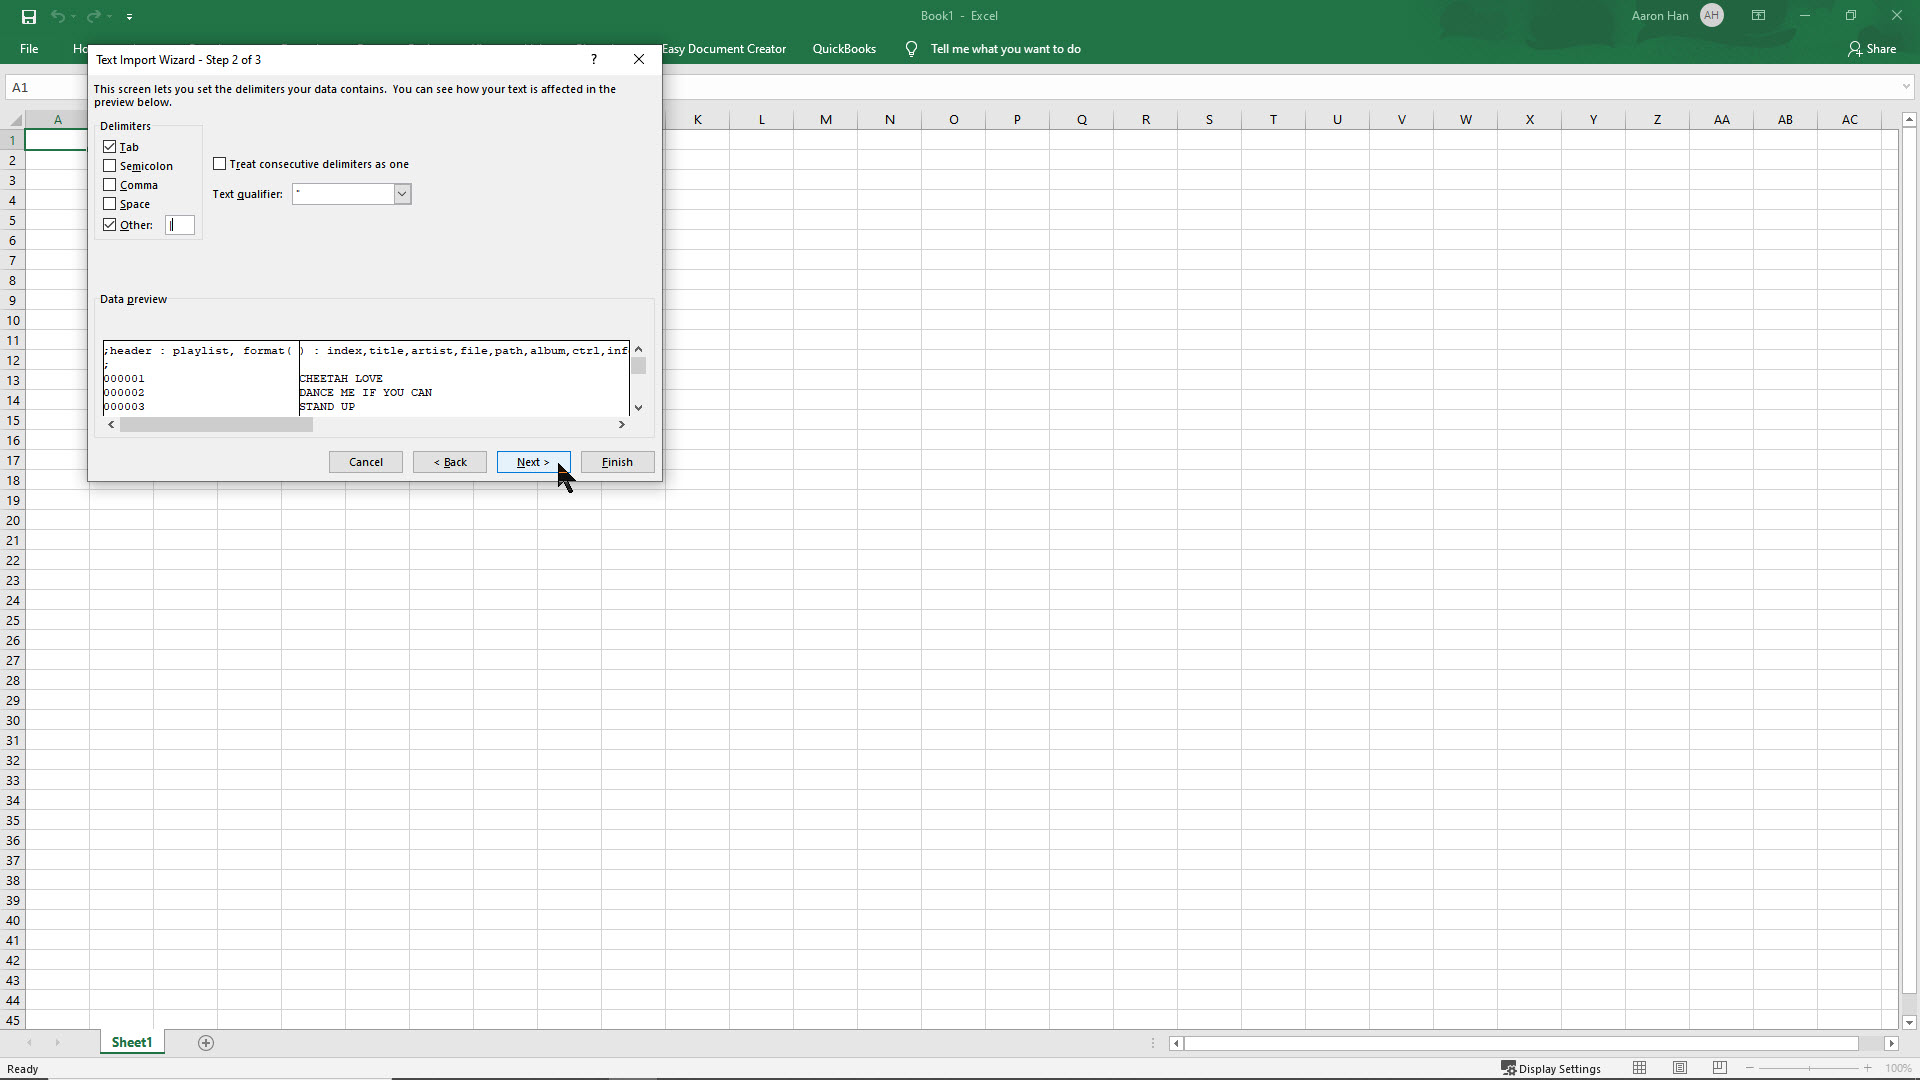
In order to maintain the zeros in front of the Song Index, click Text as shown for the first column and press Finish.
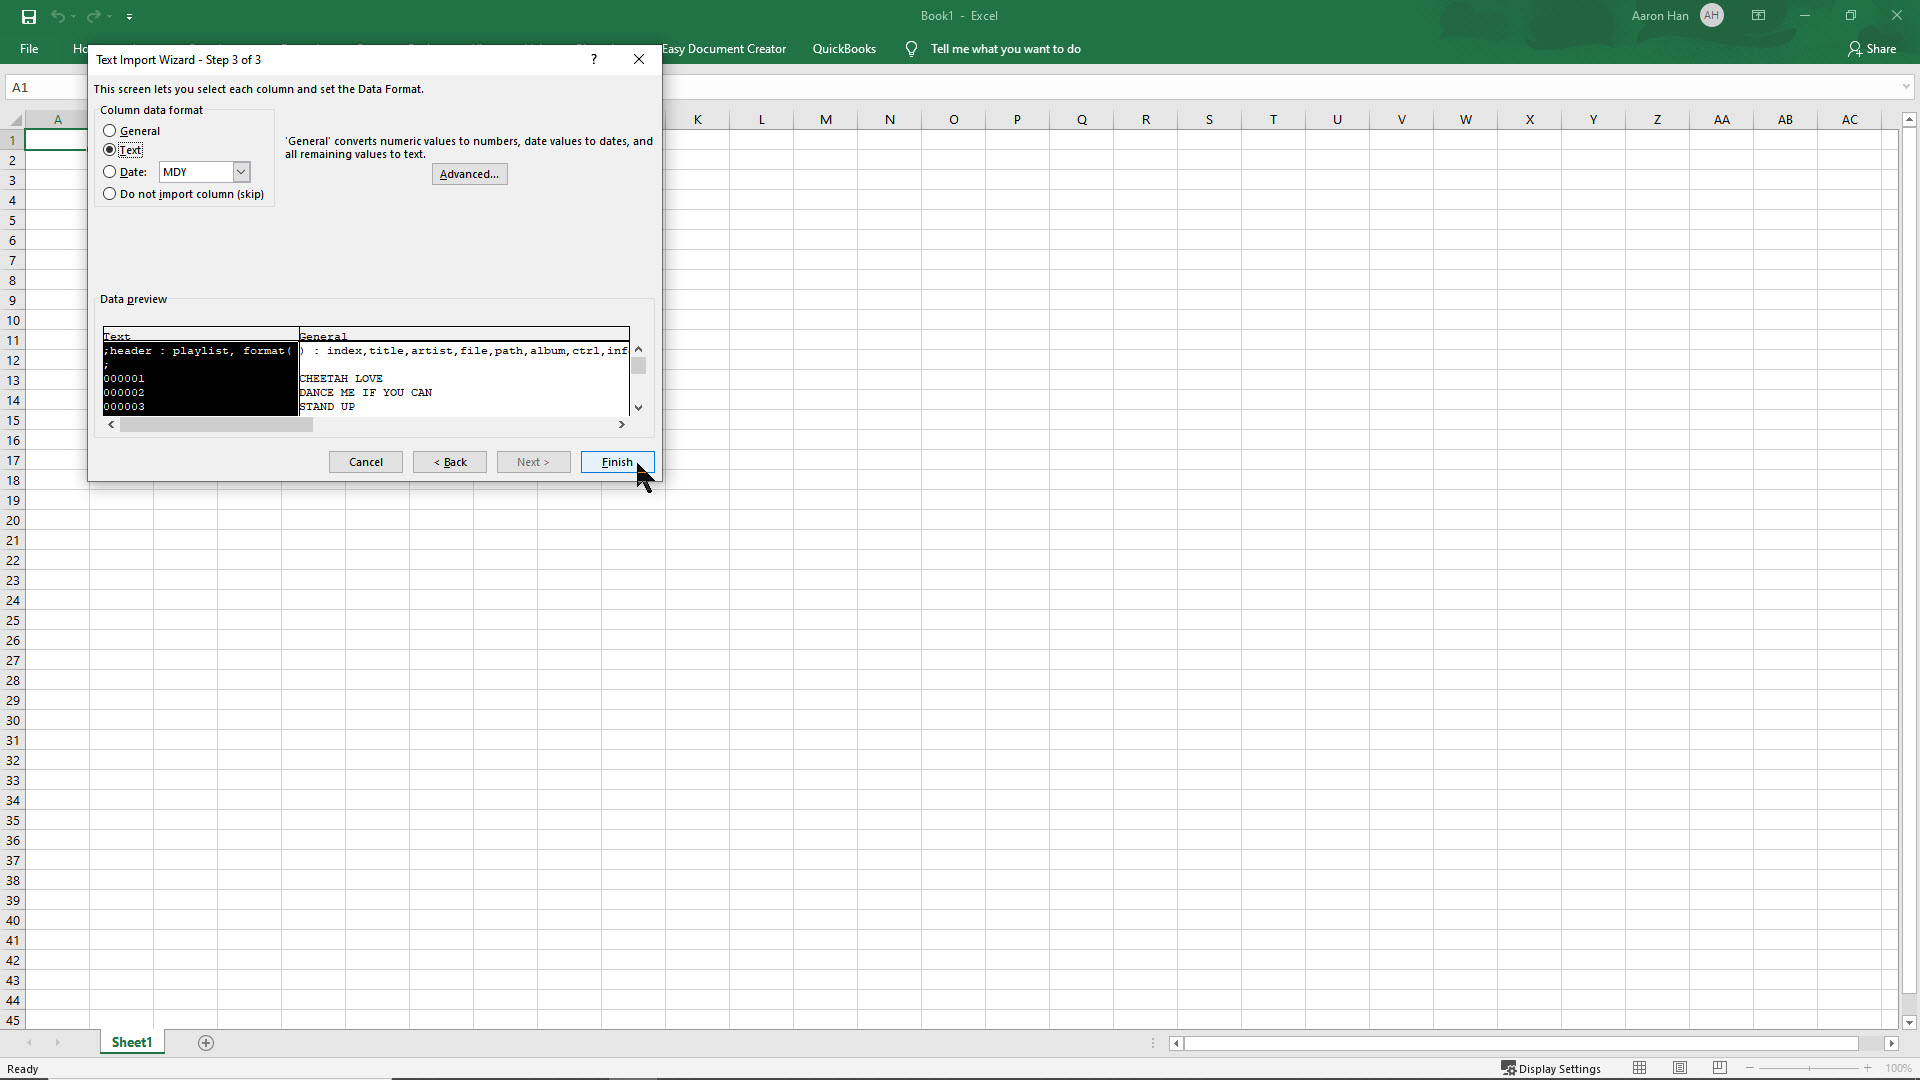
The playlist will appear with separate columns for Index, Title, Artist, Filename, etc. Adjust the width of each column for clear view of the divisions.
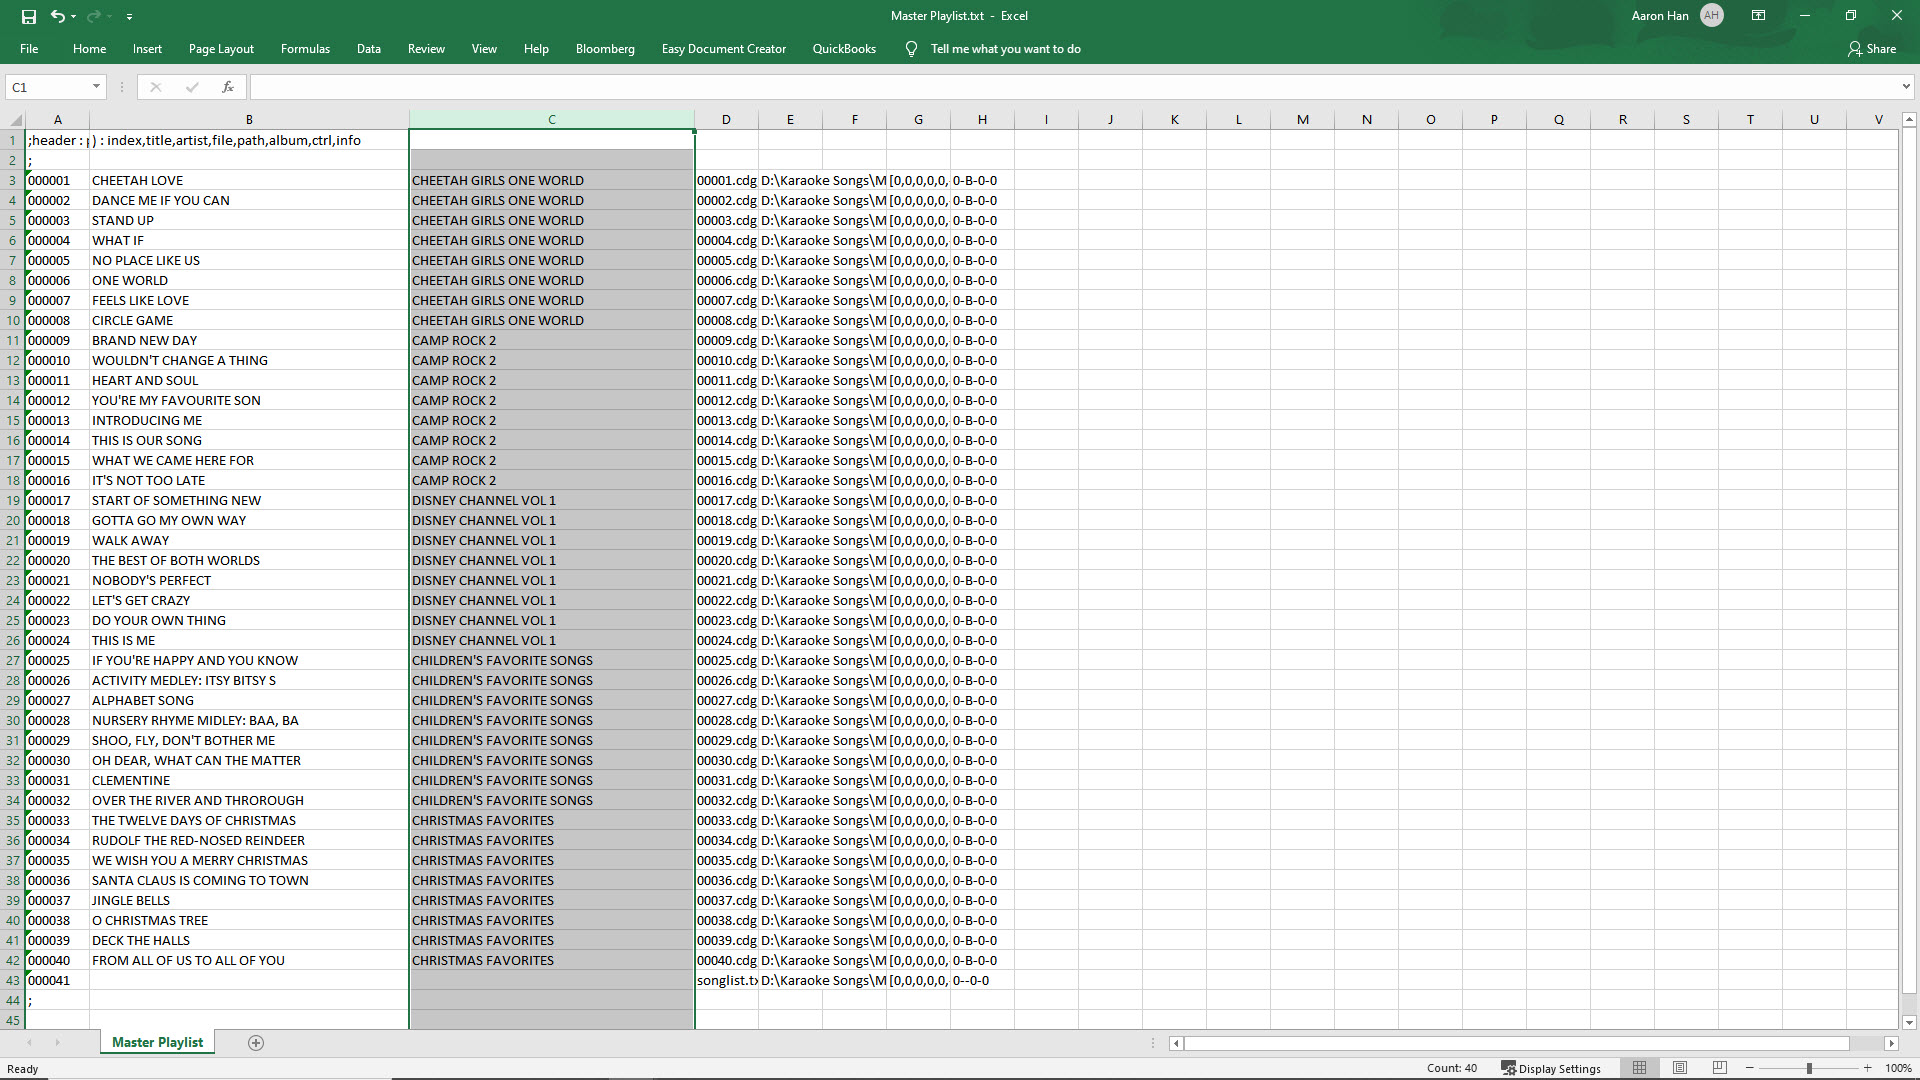
Next trim the playlist by deleting the first two rows, and deleting un-needed columns. In this example, only the columns of Index, Title, and Artist are kept.

Adjust the alignments and column widths for a better presentation.
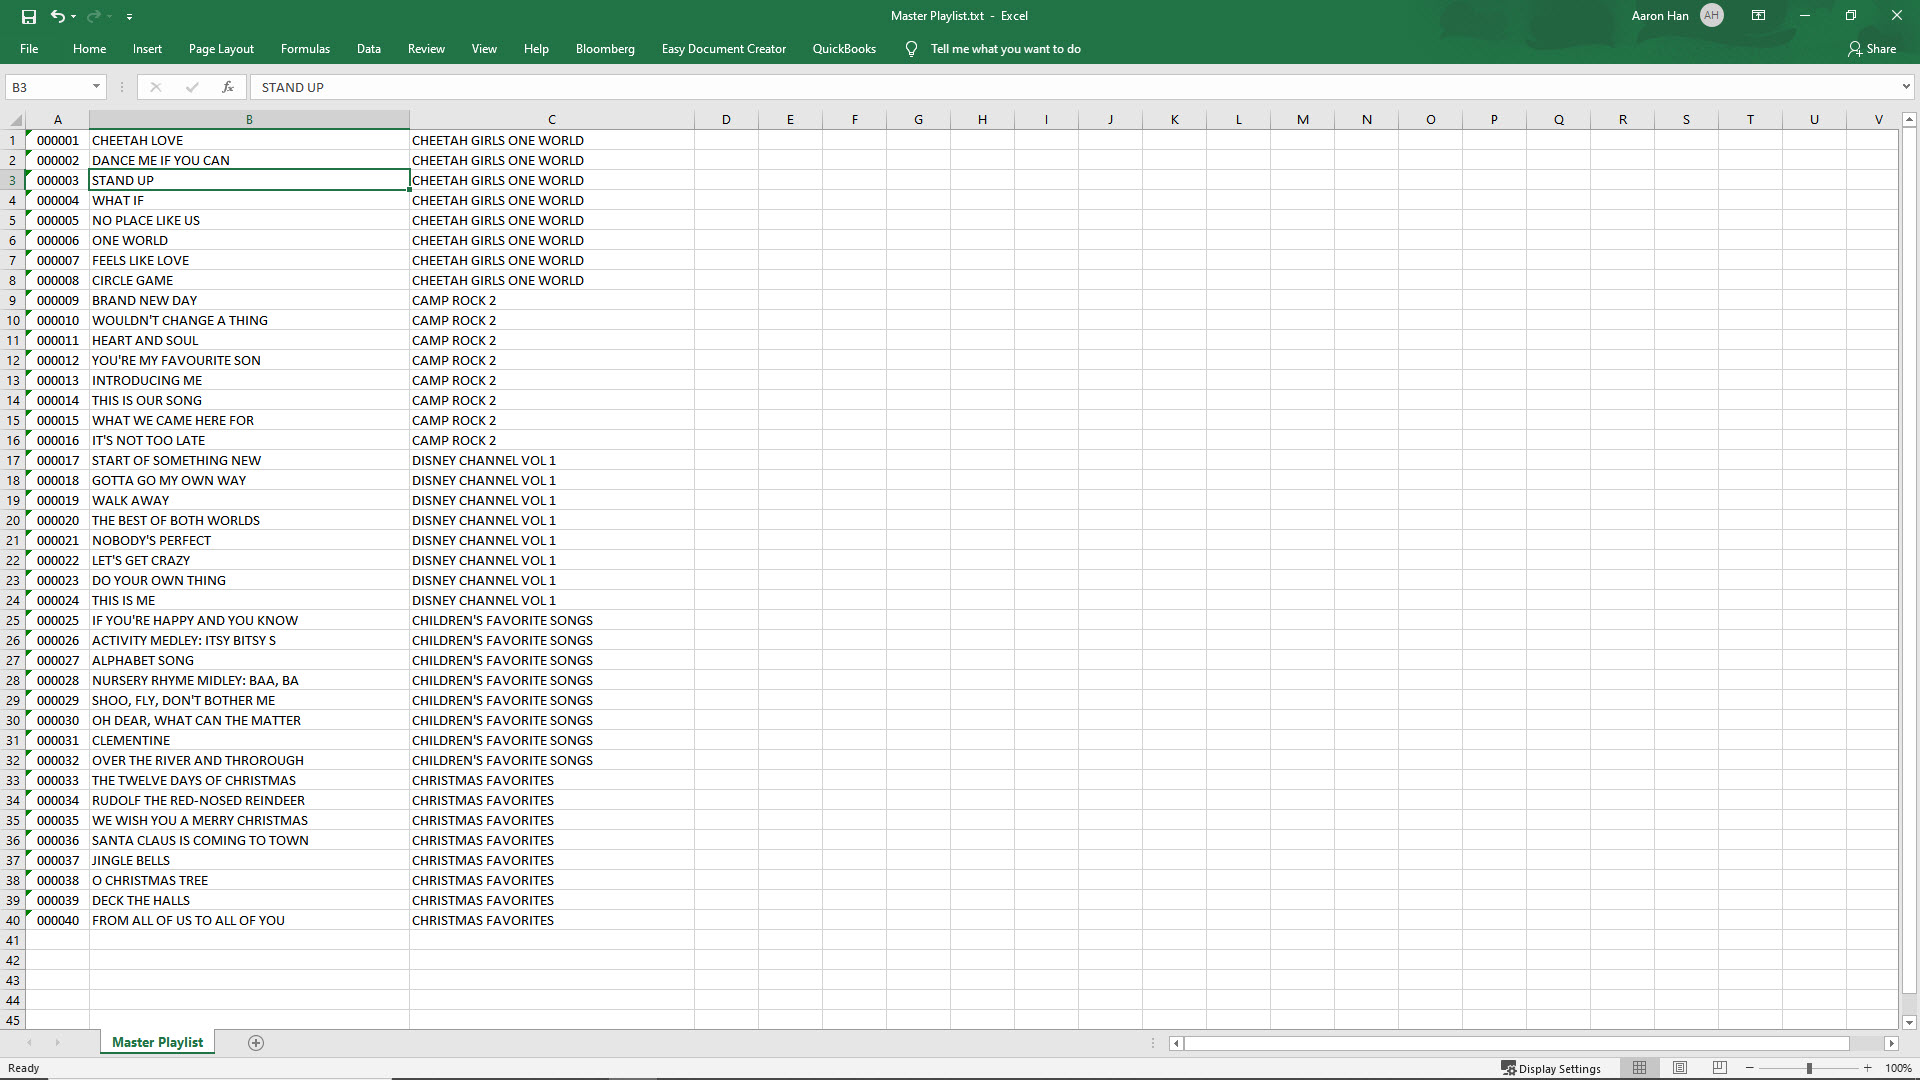
Next select the entire playlist and sort by Column B. That would be the Title.
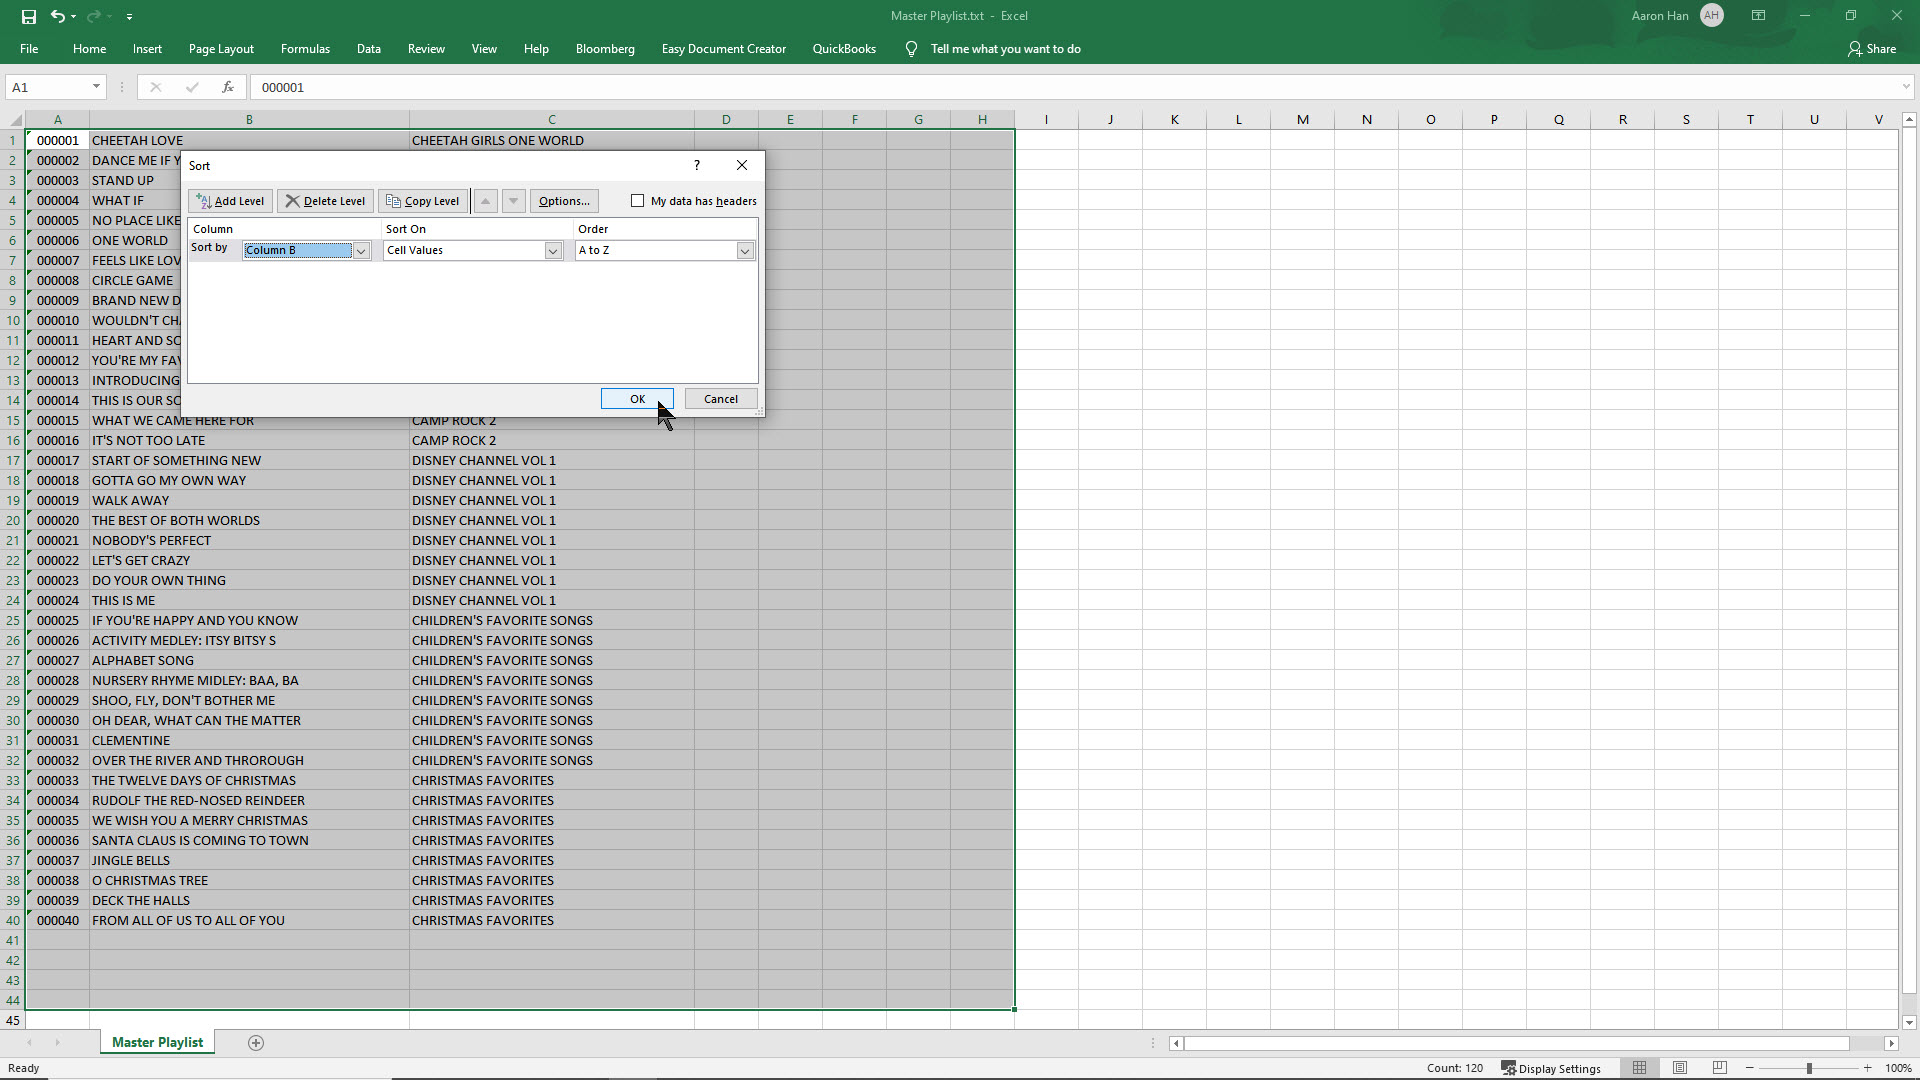
Save the file in the Excel file format indicating that it is sorted by Title.
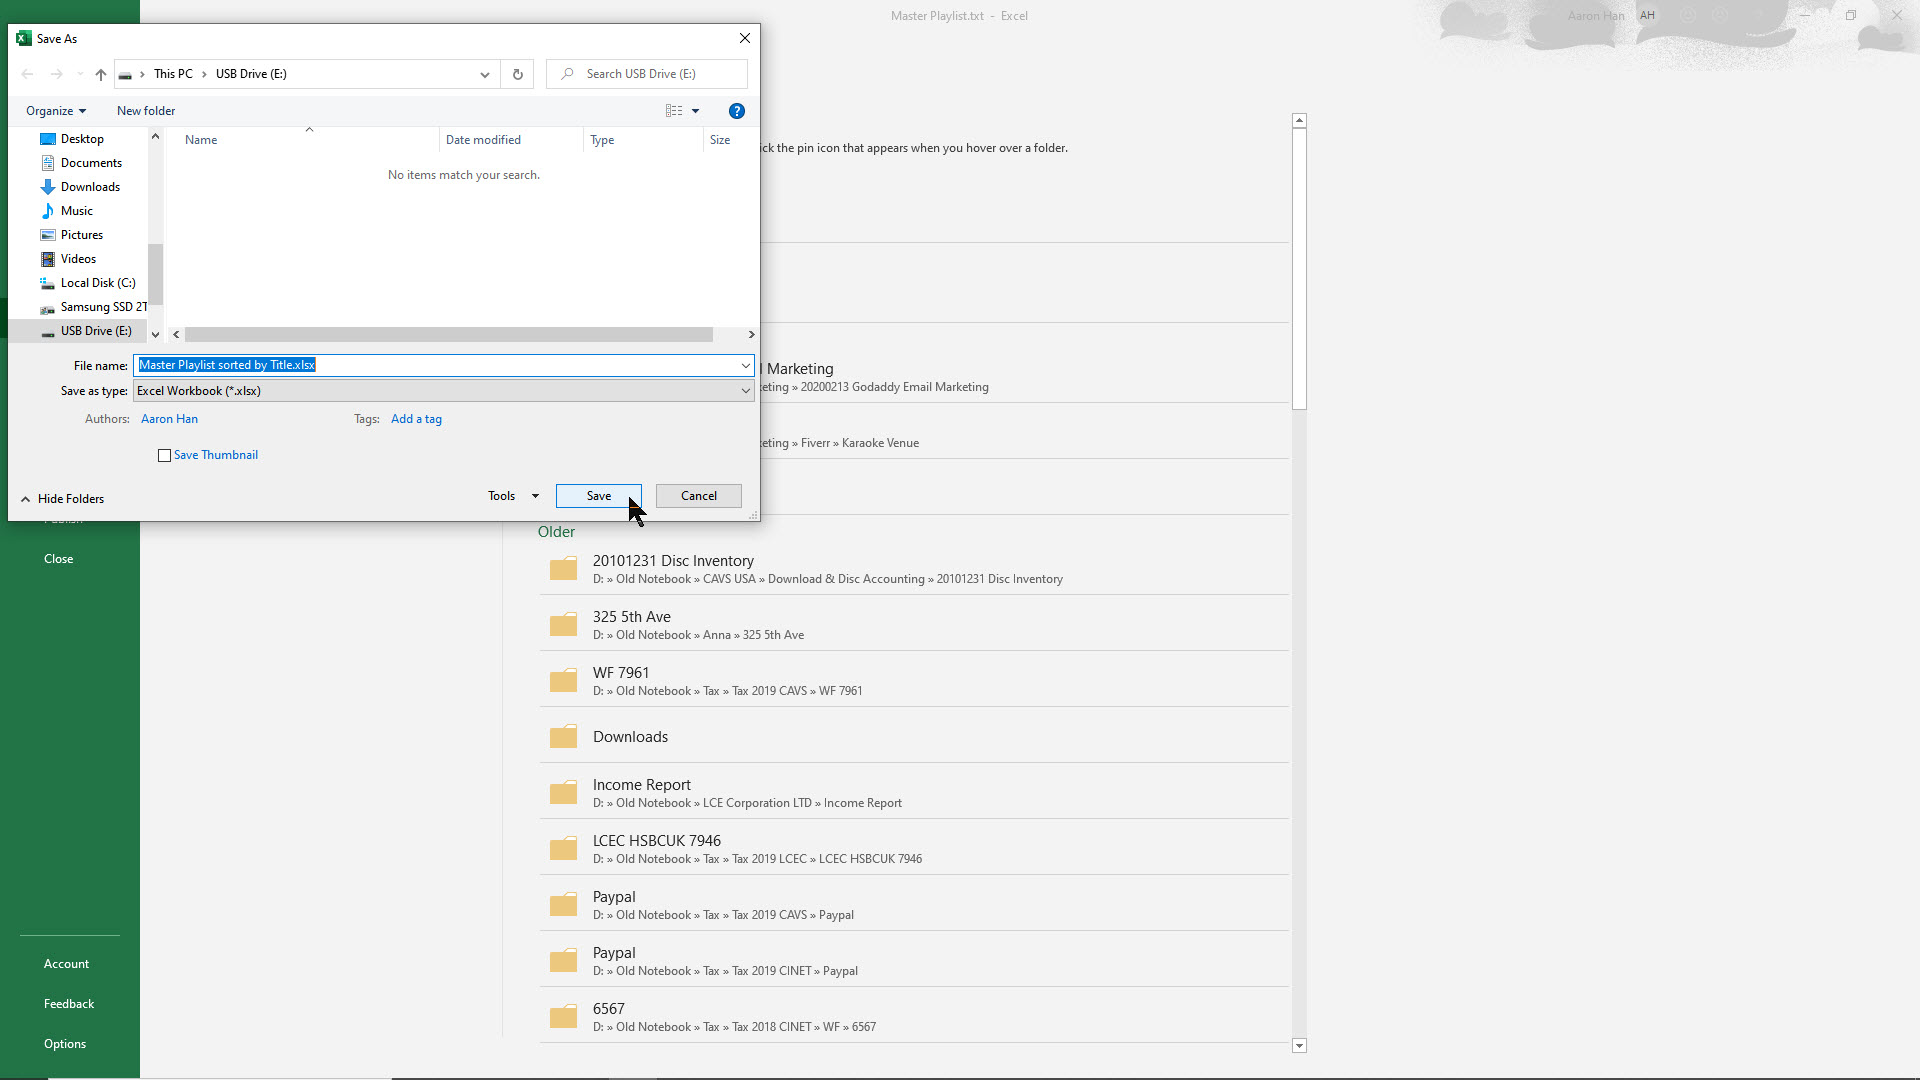
Similarly, the playlist can be sorted by Column C, the Artist.
Since there may be more than one song under each artist, click on Add level to sort thereafter by title.
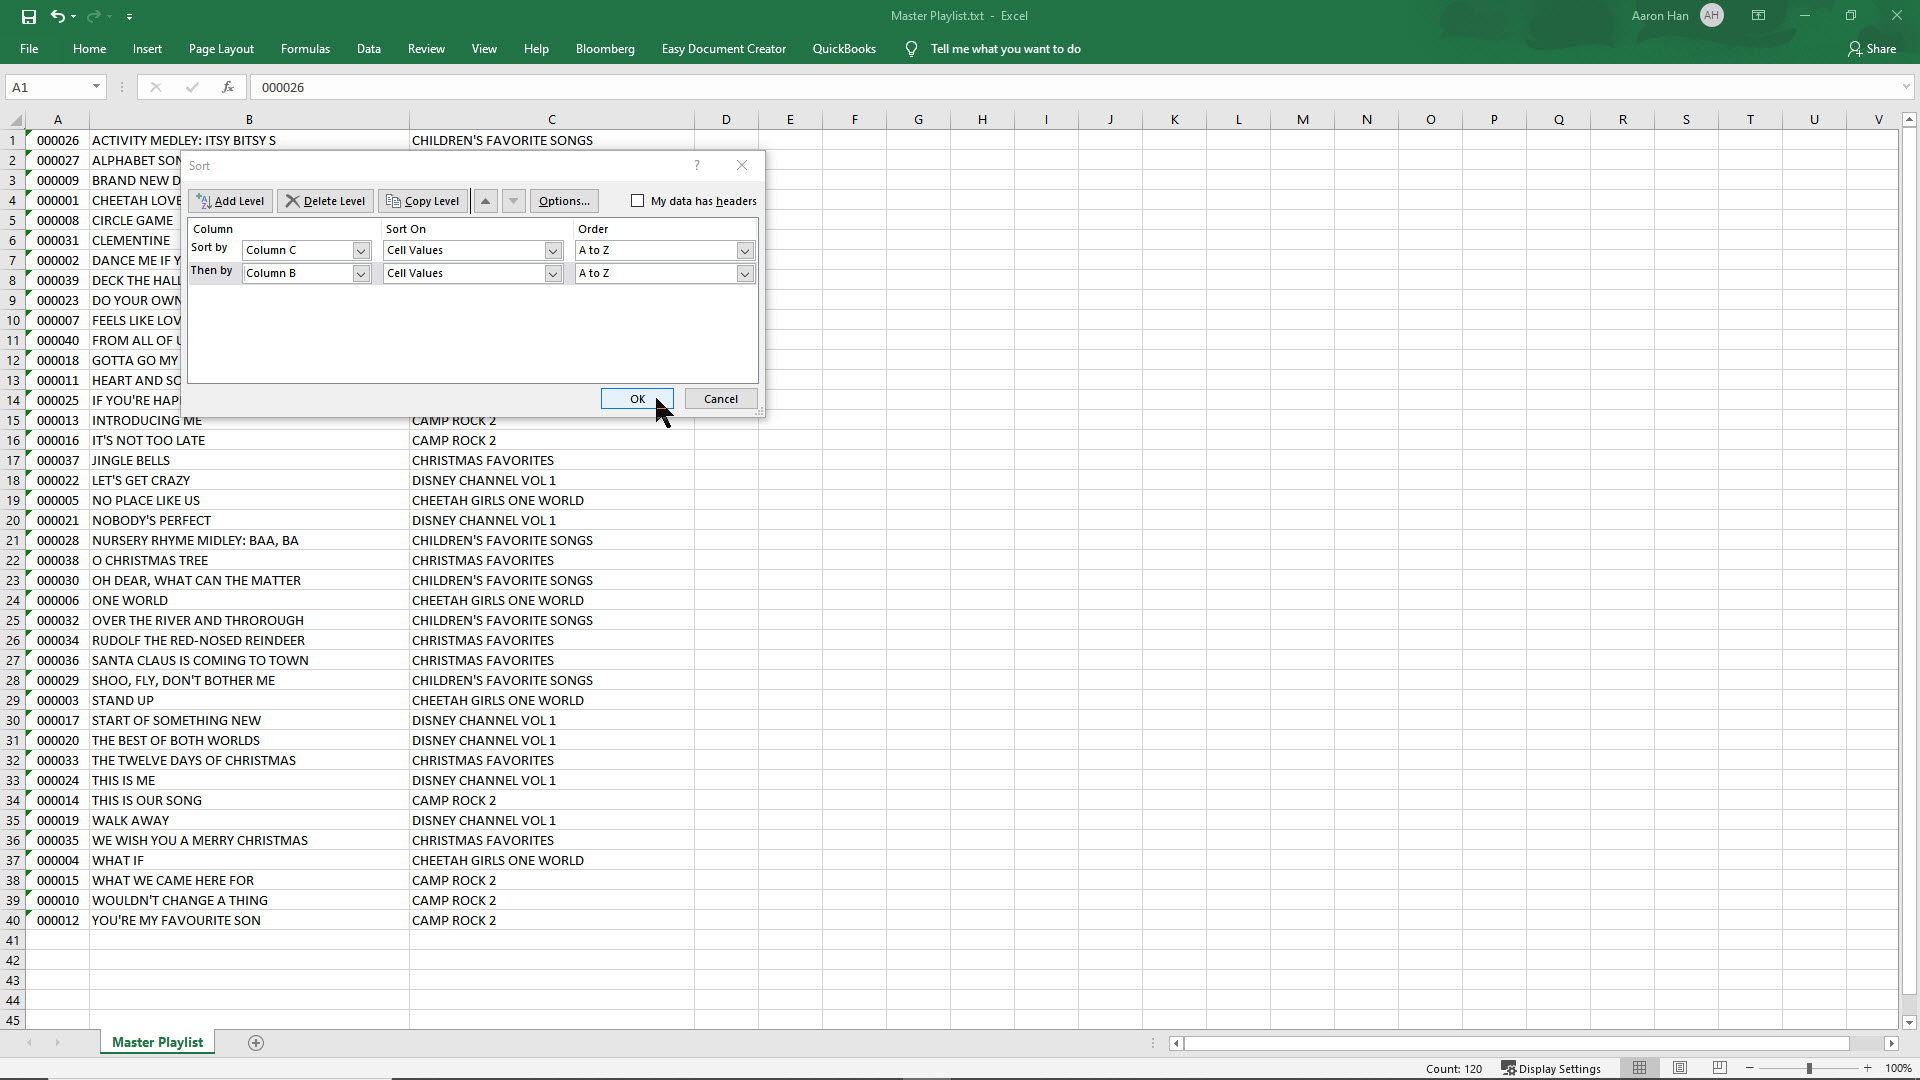
Save the file in The Excel file format indicating that it is sorted by Artist. Next print the saved files for the paper song books.
Playing songs of different languages has not been a problem in karaoke. The song files in CD+G or MP4 play the graphics, and whether the graphics contain the foreign fonts or not would not matter. The lyrics shown on TV are simply the result of the graphics playing.
Displaying the song lists in foreign fonts and searching the song lists in foreign fonts, however, are very different and serious problems. To display the song lists in foreign language, the karaoke player requires a system that is powerful enough to support the international fonts. To search the song list in foreign language, the karaoke player requires an input device such as a keyboard or touch pad that supports the foreign language.
The JB-199 IV has the support to both display and search the song lists in foreign language.
9.1 Loading International Songs
Loading songs of foreign language follows the same steps as in 7.1 How to load and play karaoke songs. The difference is that the playlist will be in foreign fonts instead. In this example, the songs of following foreign languages are loaded and made into playlists.
- Spanish
- Chinese
- Japanese
- Russian
- French
Spanish songs in QCG format are loaded from the folder D:\Karaoke Songs\Spanish. The song title and artist information is filled in from a songlist.

Note that the QCG is a subscription file format that can be scheduled with a preset time period in days, months, or years for use. It is managed exactly the same way as other file formats in the JB-199 IV. For inquiry on the QCG file format, contact techsupport@cavsusa.com.
Next, to make a playlist,
- Open the Playlist 1 slot in the List Browser
- Press the Check mark at the bottom of the File Browser to highlight all songs
- Press the Playlist button at the bottom of the File Browser to send the list up to the Playlist 1 slot
- Press Save as button in the List Browser to save the playlist as Spanish.
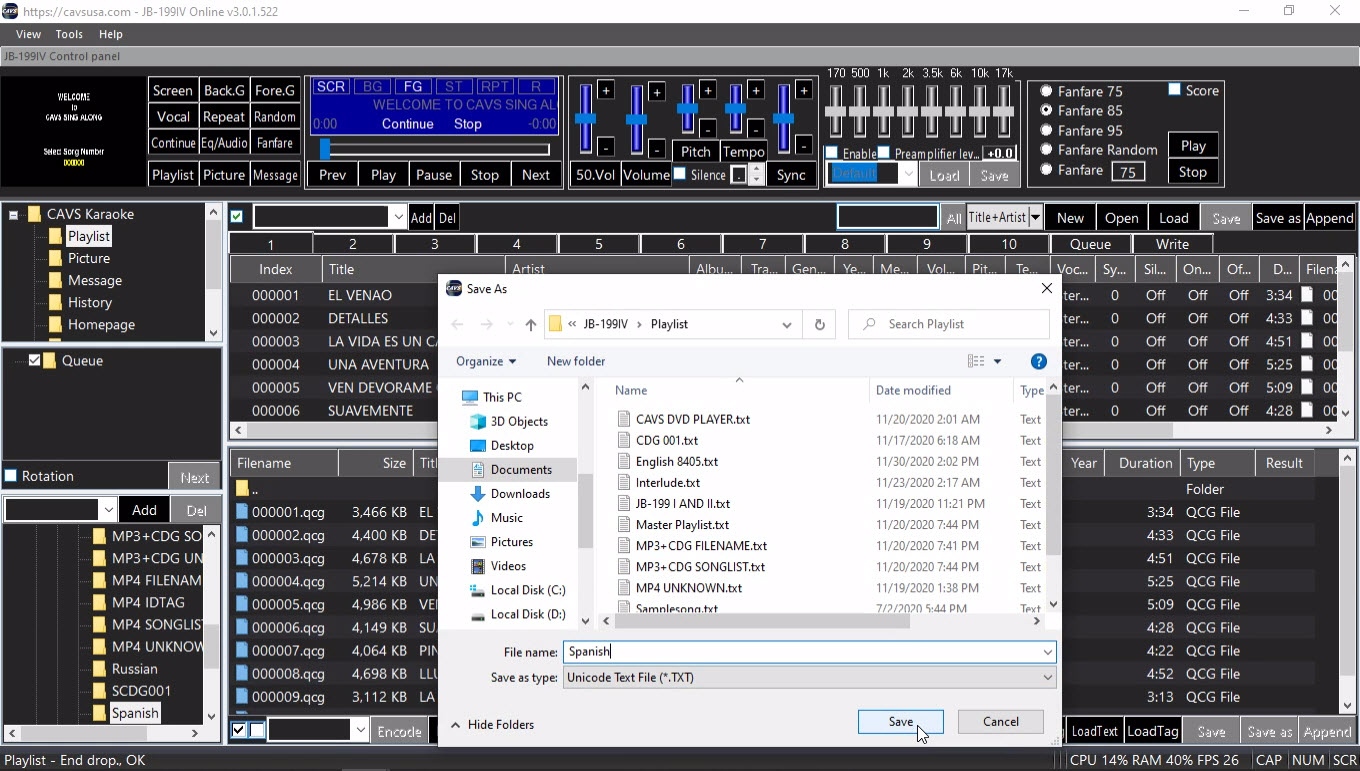
Chinese songs in AVI format are loaded from the folder D:\Karaoke Songs\Chinese. The song title and artist information is filled in from a songlist.
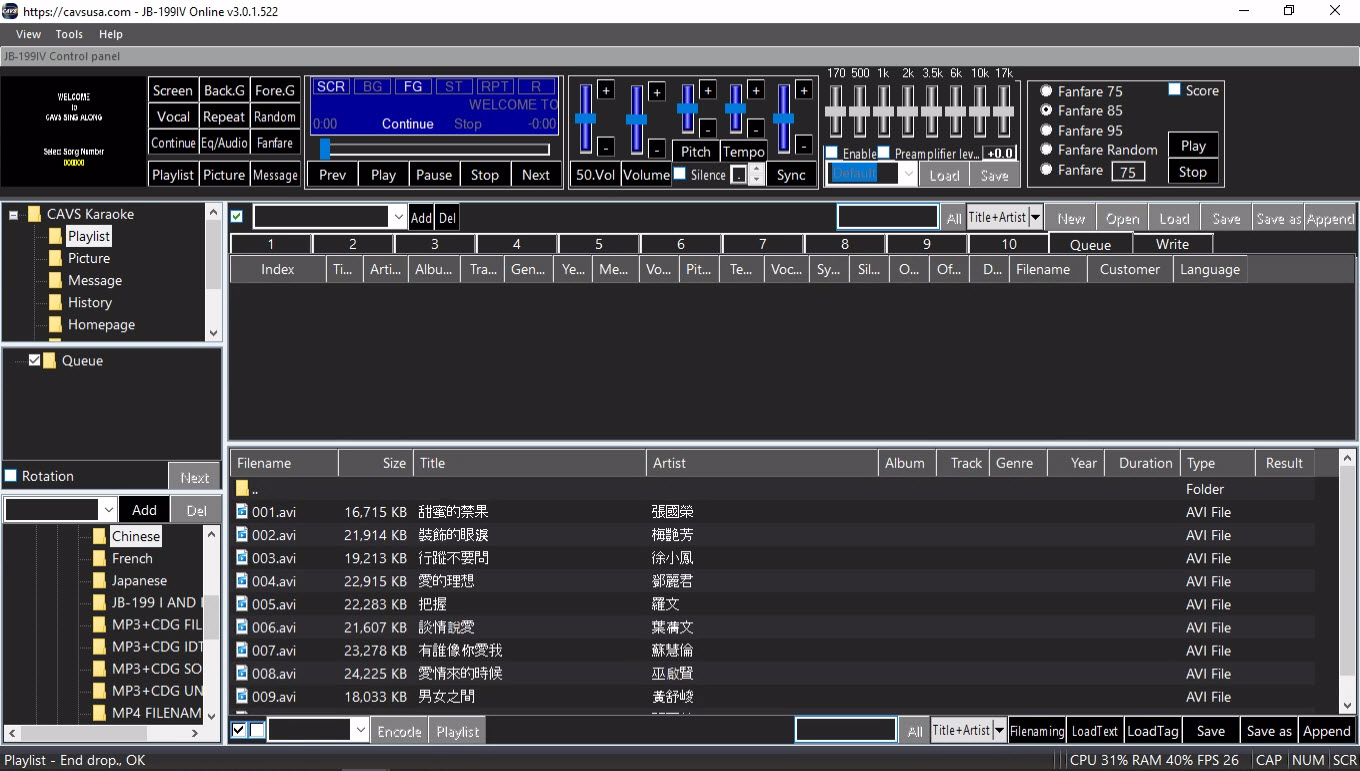
Next, to make a playlist,
- Open the Playlist 1 slot in the List Browser
- Press the Check mark at the bottom of the File Browser to highlight all songs
- Press the Playlist button at the bottom of the File Browser to send the list up to the Playlist 1 slot
- Press Save as button in the List Browser to save the playlist as Chinese.
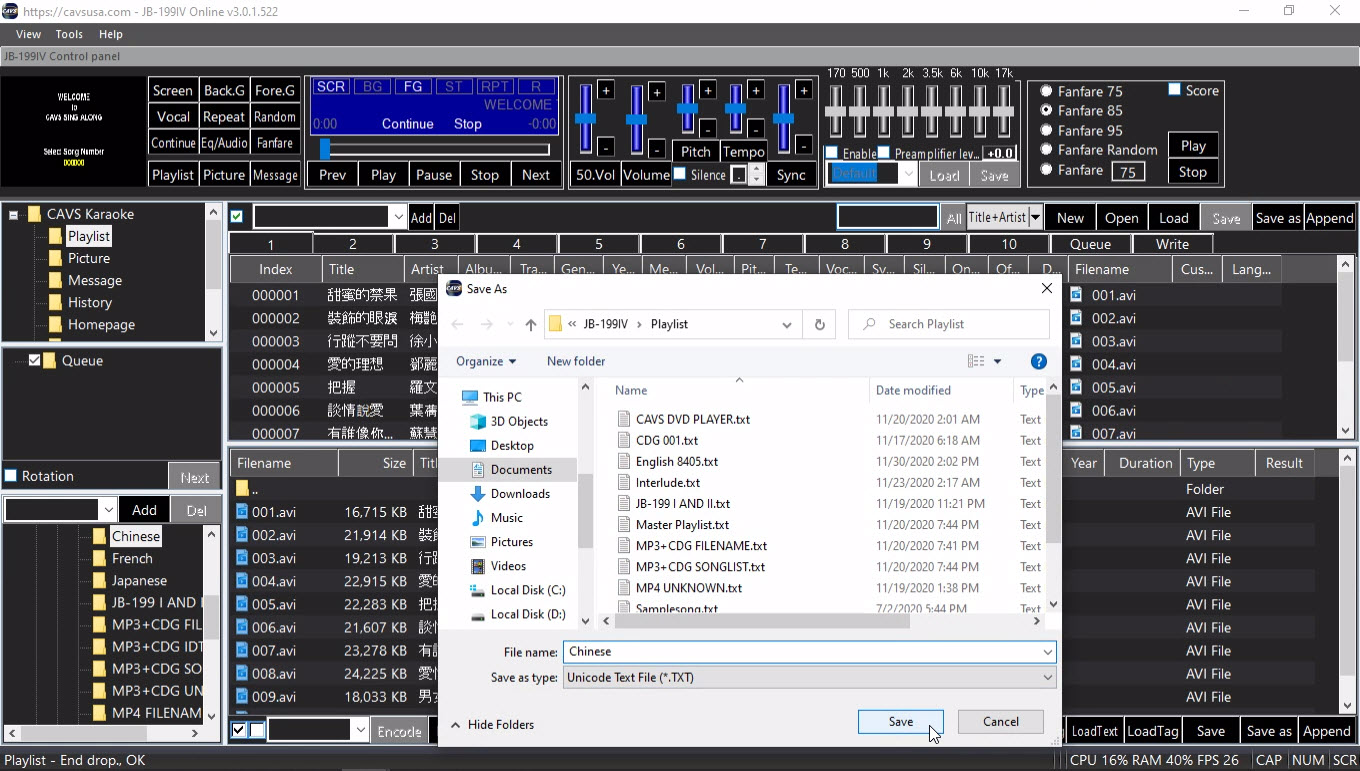
Japanese songs in MP3 + MCG file format are loaded from the folder D:\Karaoke Songs\Japanese. The song title and artist information is filled in from a songlist.

Next, to make a playlist,
- Open the Playlist 1 slot in the List Browser
- Press the Check mark at the bottom of the File Browser to highlight all songs
- Press the Playlist button at the bottom of the File Browser to send the list up to the Playlist 1 slot
- Press Save as button in the List Browser to save the playlist as Japanese.
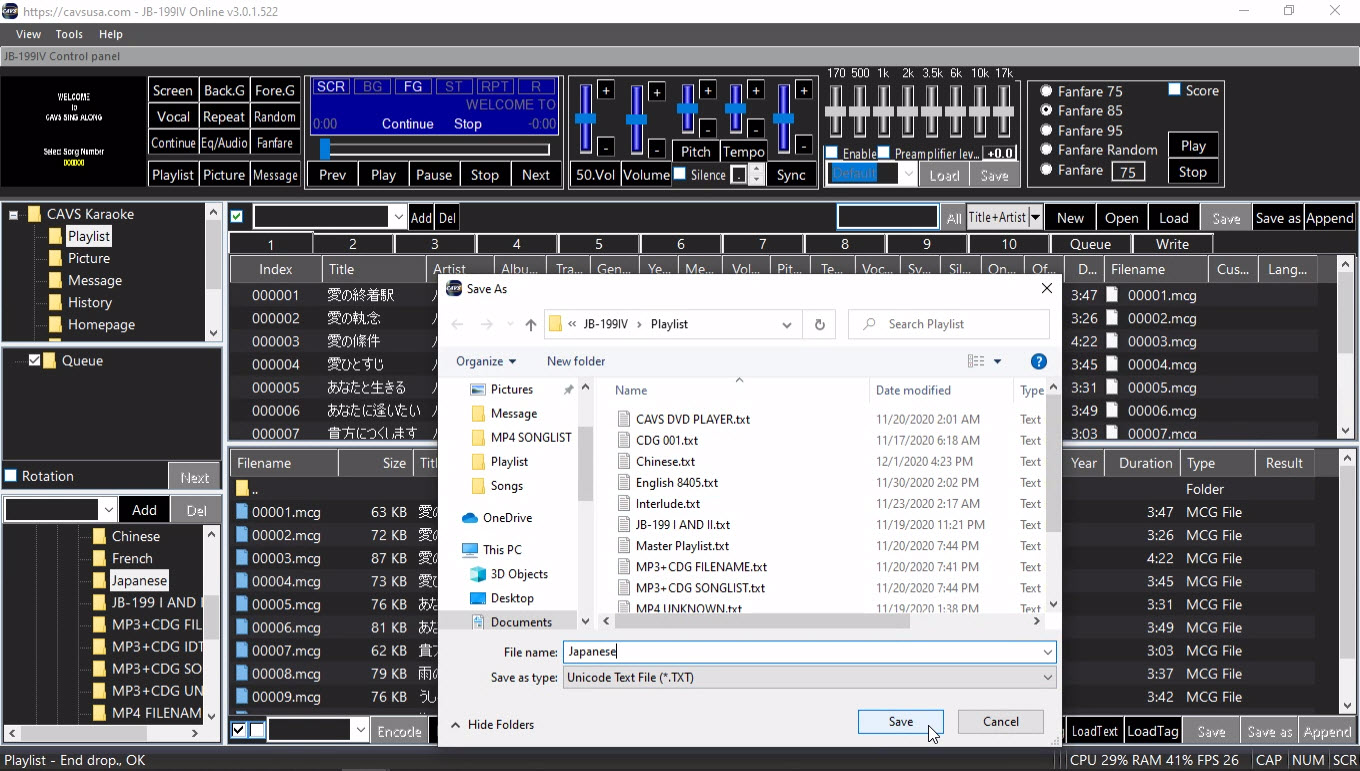
Russian songs in MP3 + MCG file format are loaded from the folder D:\Karaoke Songs\Russian. The song title and artist information is filled in from a songlist.
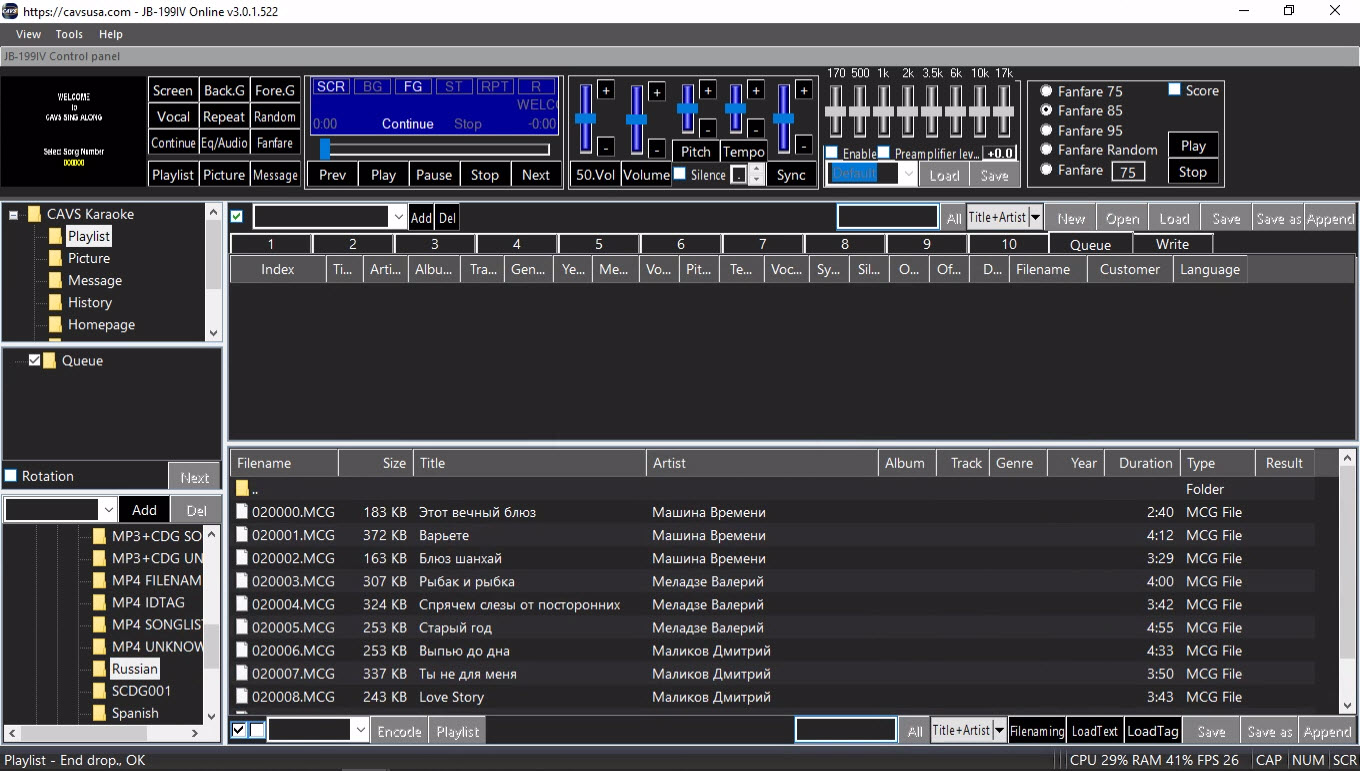
Next, to make a playlist,
- Open the Playlist 1 slot in the List Browser
- Press the Check mark at the bottom of the File Browser to highlight all songs
- Press the Playlist button at the bottom of the File Browser to send the list up to the Playlist 1 slot
- Press Save as button in the List Browser to save the playlist as Russian.
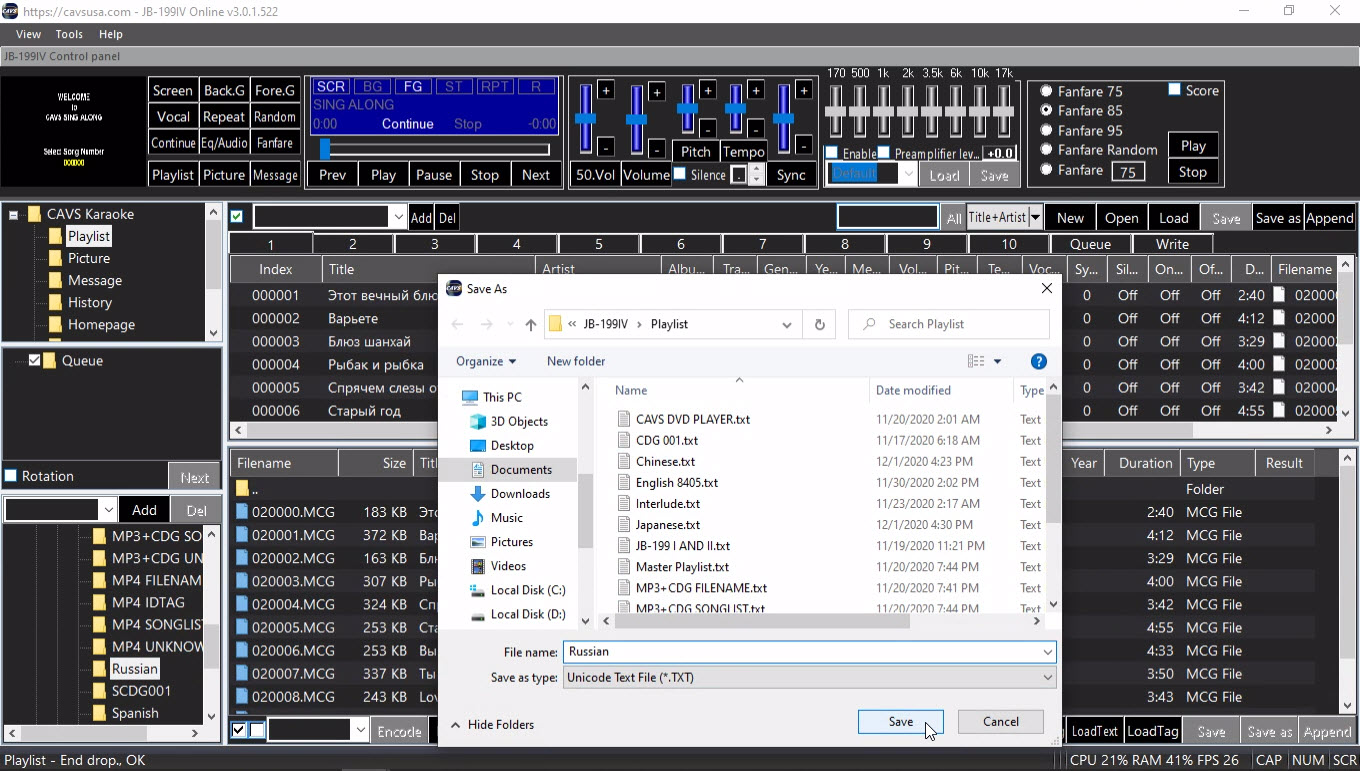
French songs in MP3 + CDG file format are loaded from the folder D:\Karaoke Songs\French. The song title and artist information is filled in from the file names using the Filenaming function.
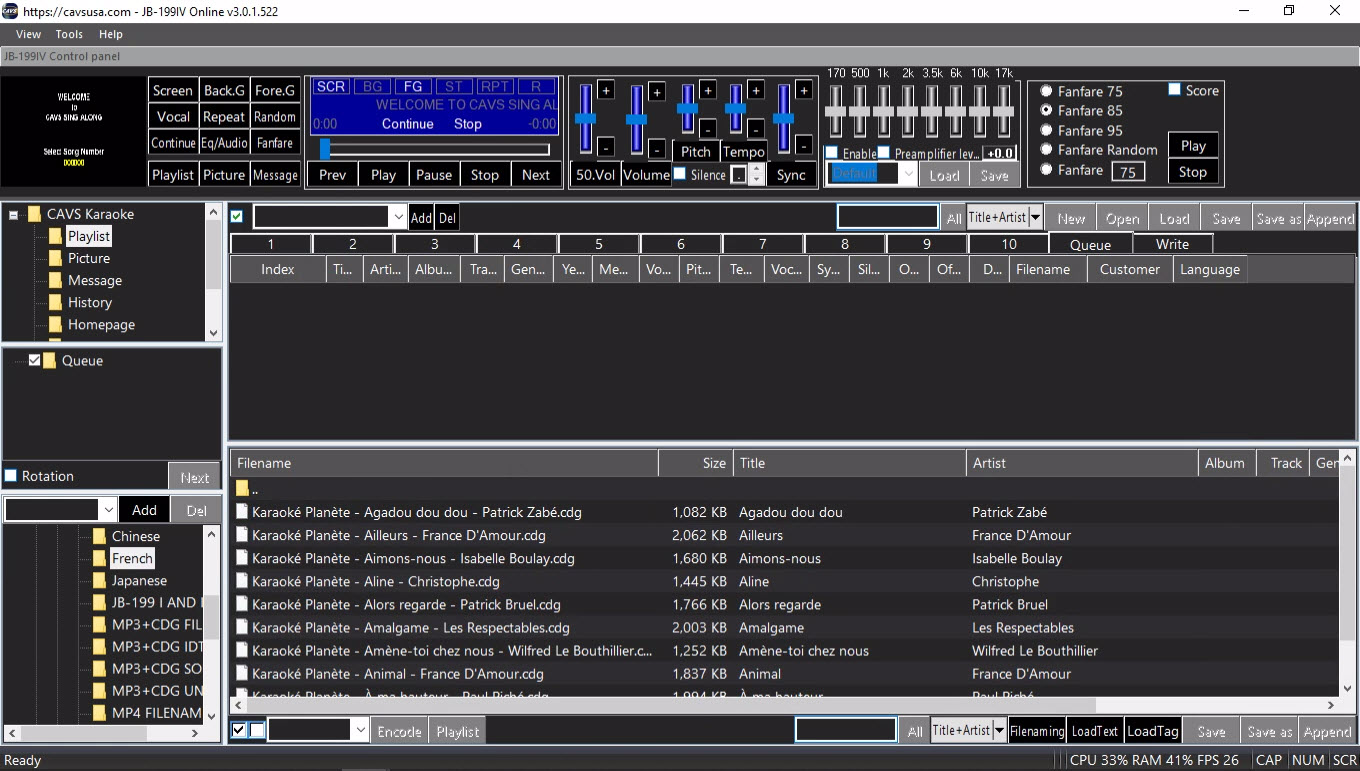
Next, to make a playlist,
- Open the Playlist 1 slot in the List Browser
- Press the Check mark at the bottom of the File Browser to highlight all songs
- Press the Playlist button at the bottom of the File Browser to send the list up to the Playlist 1 slot
- Press Save as button in the List Browser to save the playlist as French.
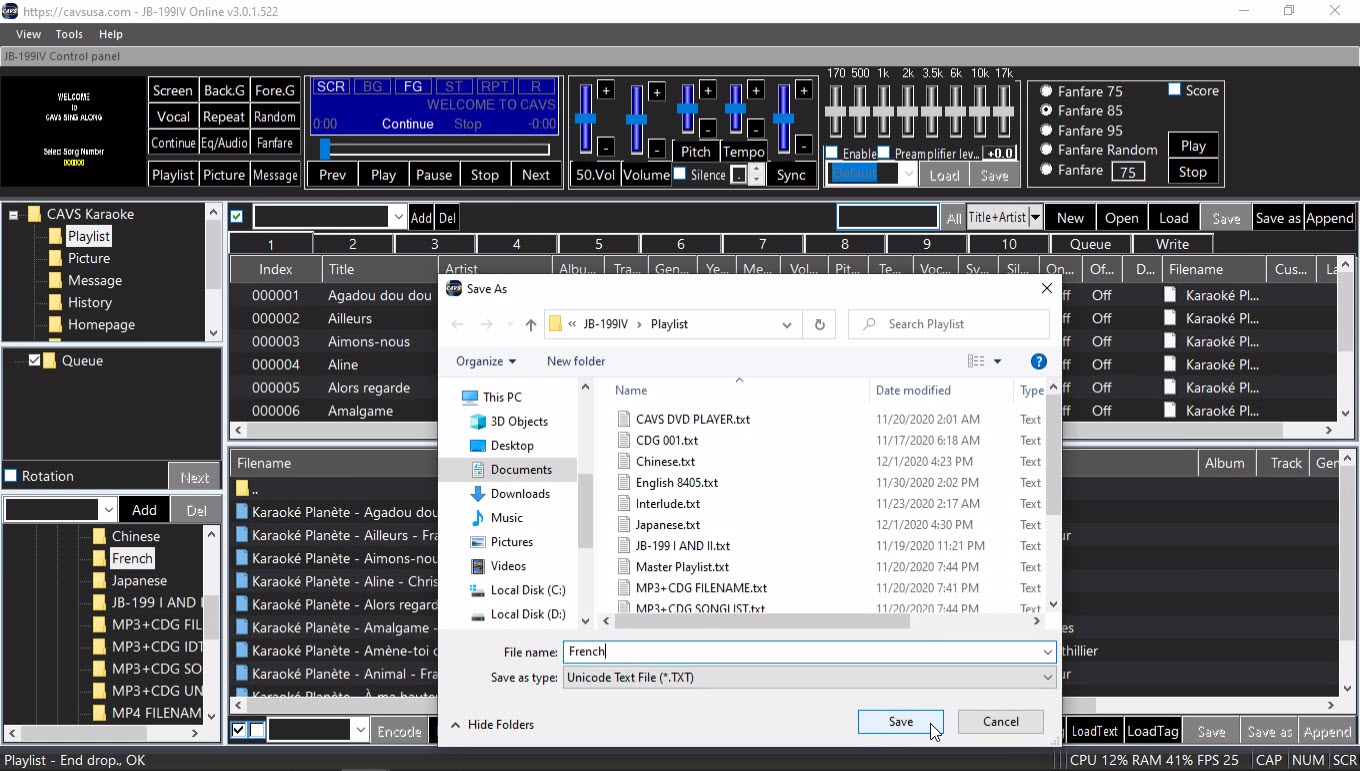
9.2 Making an International Master Playlist
The playlists Spanish, Chinese, Japanese, Russian, and French are appended to the Master Playlist which contains the English songs as shown in 7.1 How to load and play karaoke songs. Follow the instruction at 7.1.4.3 Editing playlist to append the playlists.
- Open the Playlist 1 slot in the List Browser
- Press the Load button and select a playlist, such as Spanish
- Press the Append button and select the Master Playlist
- Press Save and Press Yes when asked to replace
- Repeat the steps from above for other playlists such as Chinese, Japanese, Russian, and French
Next, close the JB-199 IV karaoke program and exit out to Windows Desktop. Open the File Explorer and go to Documents\JB-199IV\Playlist. Right click on the Master Playlist.txt, select Open with, and select Notepad. The following window of Notepad will open.
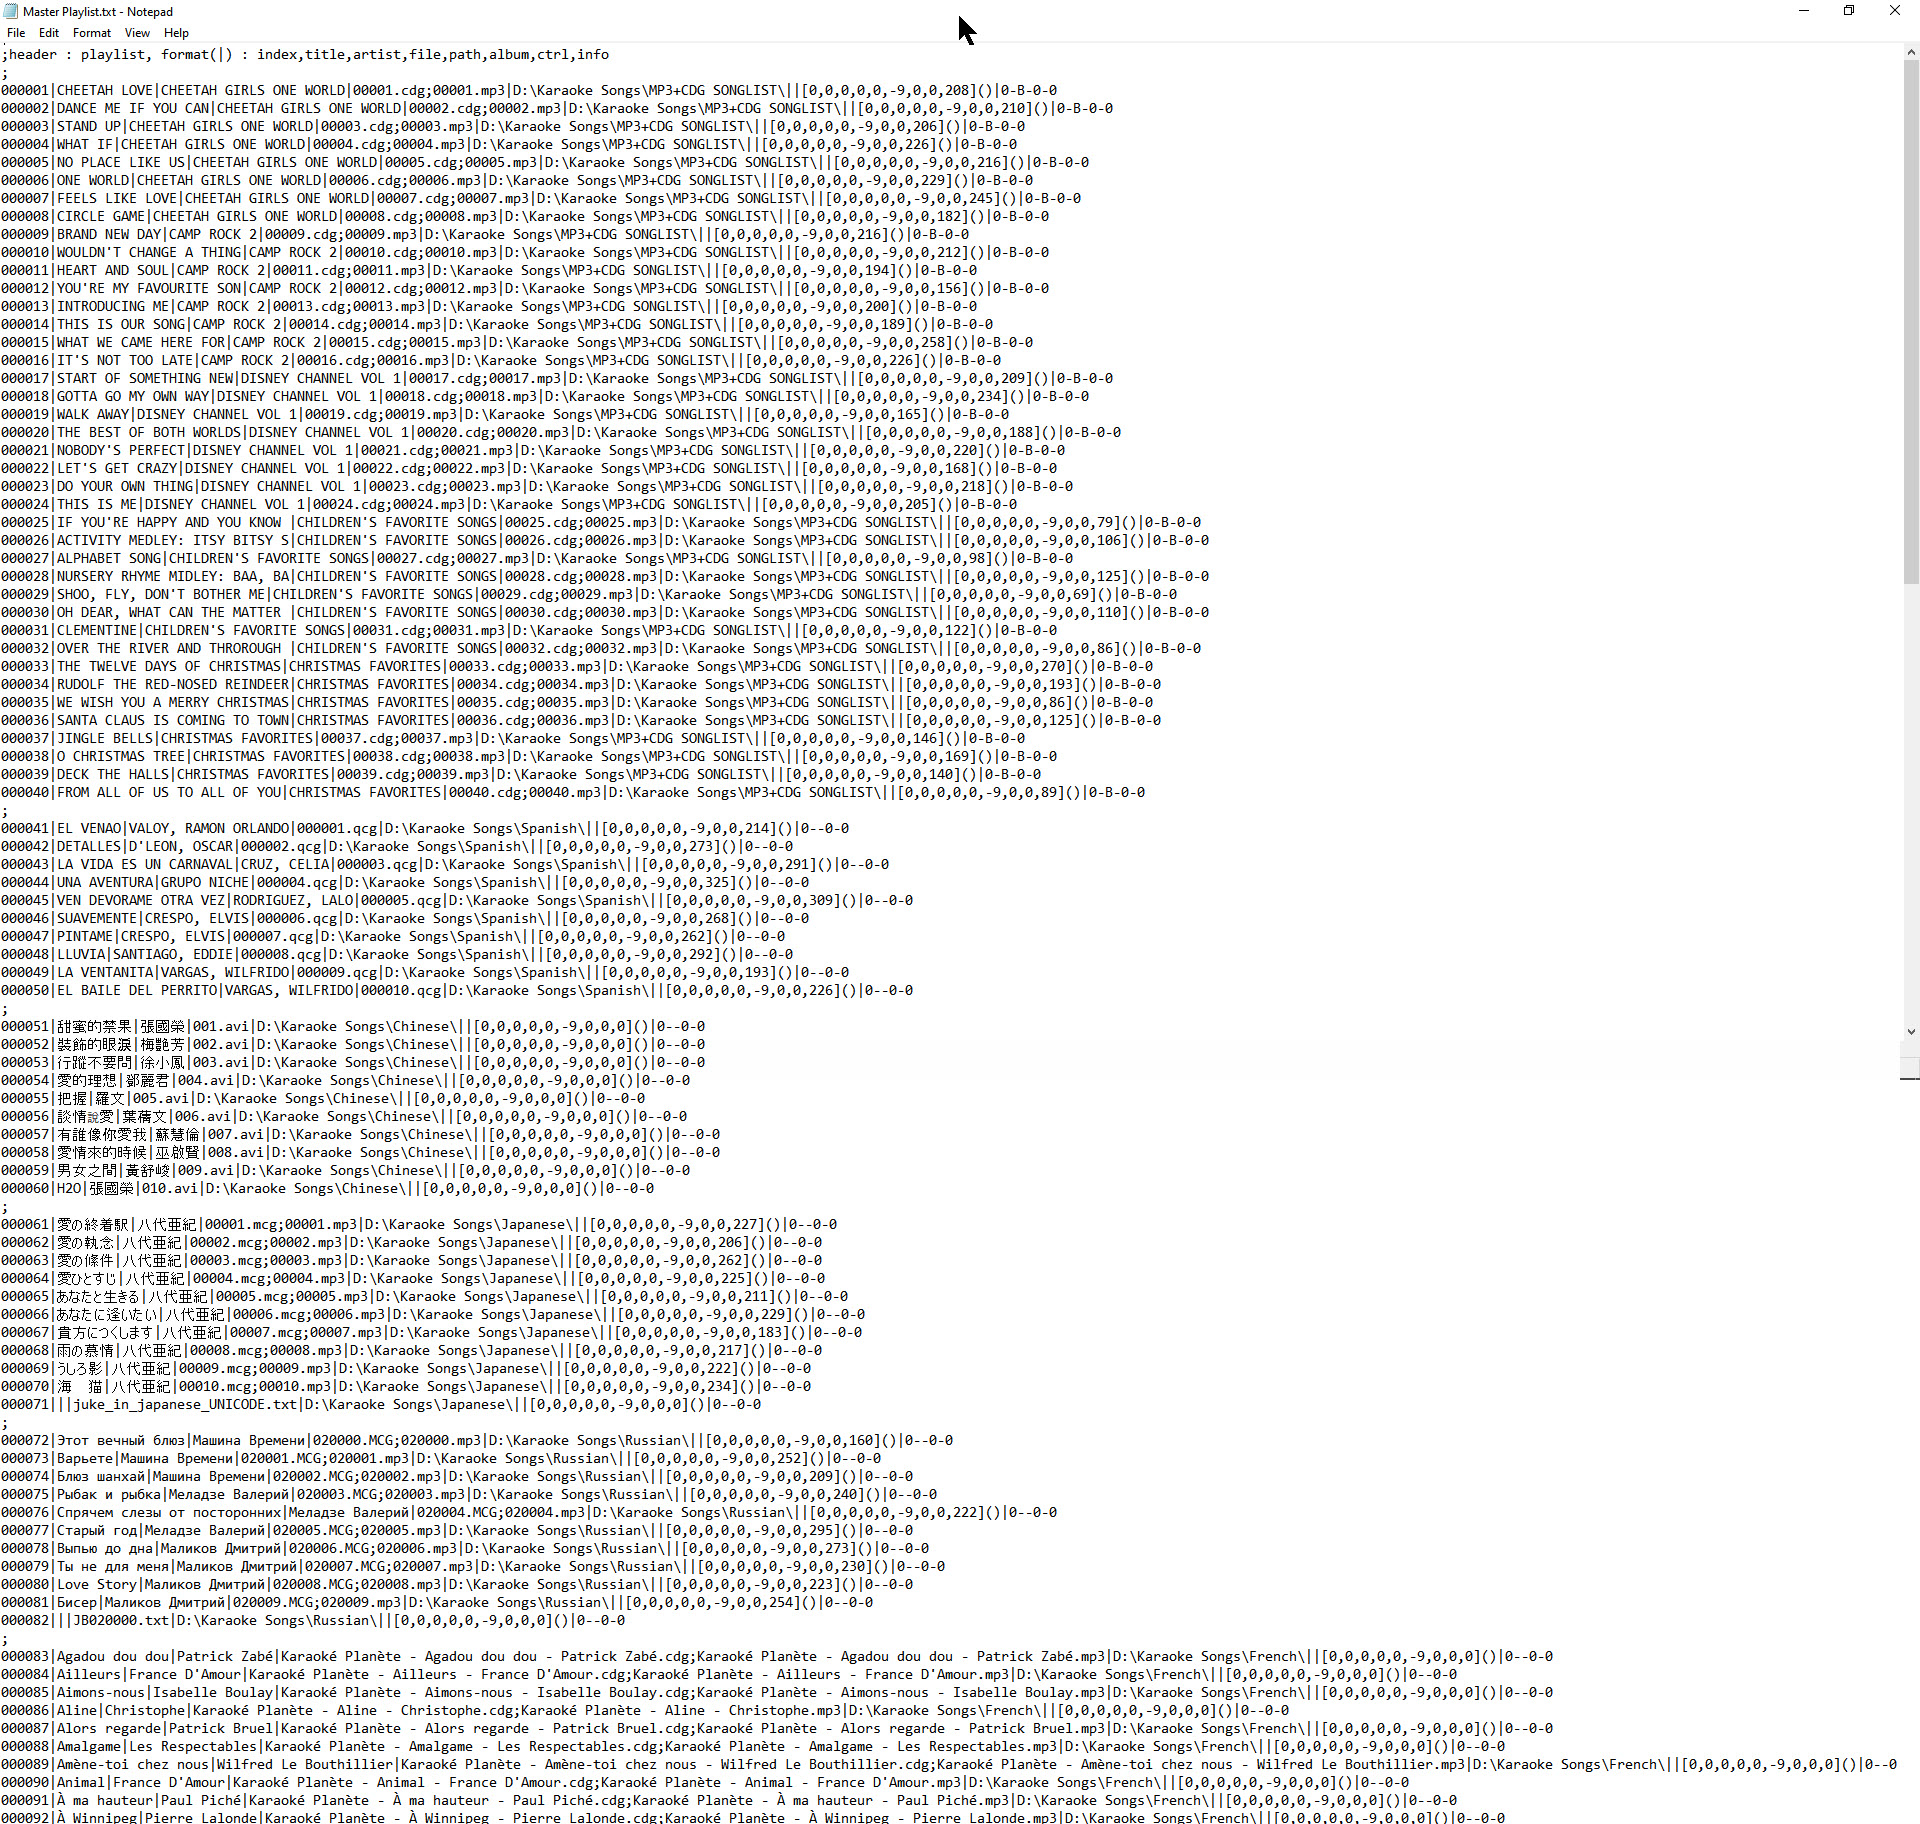
For each language block in the Master Playlist, add a header as below.
- For the first block of English songs, add # eng
- For the next block of Spanish songs, add # spa
- For the next block of Chinese songs, add # chi
- For the next block of Japanese songs, add # jpn
- For the next block of Russian songs, add # rus
- For the next block of French songs, add # fre
The edited Master Playlist is as follow.

Save the Master playlist. There can be multiple blocks of songs belonging to a same language in the list. In such cases, add the same header for each of the multiple blocks.
The list of headers for the foreign languages is below. For any language that is not found in the list, contact techsupport@cavsusa.com
- Arabic - ara
- Chinese - chi
- Egyptian - egy
- English - eng
- French - fra
- German - ger
- Hebrew - heb
- Hindi - hin
- Hungarian - hun
- Indonesian - ind
- Irish - gle
- Italian - ita
- Japanese - jpn
- Korean - kor
- Malayalam - mal
- Mongolian - mon
- Norwegian - nor
- Persian - fas
- Philippine - phi
- Polish - pol
- Portuguese - por
- Romanian - ron
- Russian - rus
- Spanish - spa
- Swedish - swe
- Thai - tha
- Tonga - ton
- Turkish - tur
- Vietnamese - vie
9.3 Preparing International Keyboards and Touch pads
For the foreign languages including Chinese, Japanese, Russian, and French, new language packs and the handwriting tools can be downloaded and installed into the JB-199 IV from Microsoft.
Boot up the JB-199 IV player. Close the JB-199 IV karaoke program and exit out to Windows Desktop. Go to Start and Setting.
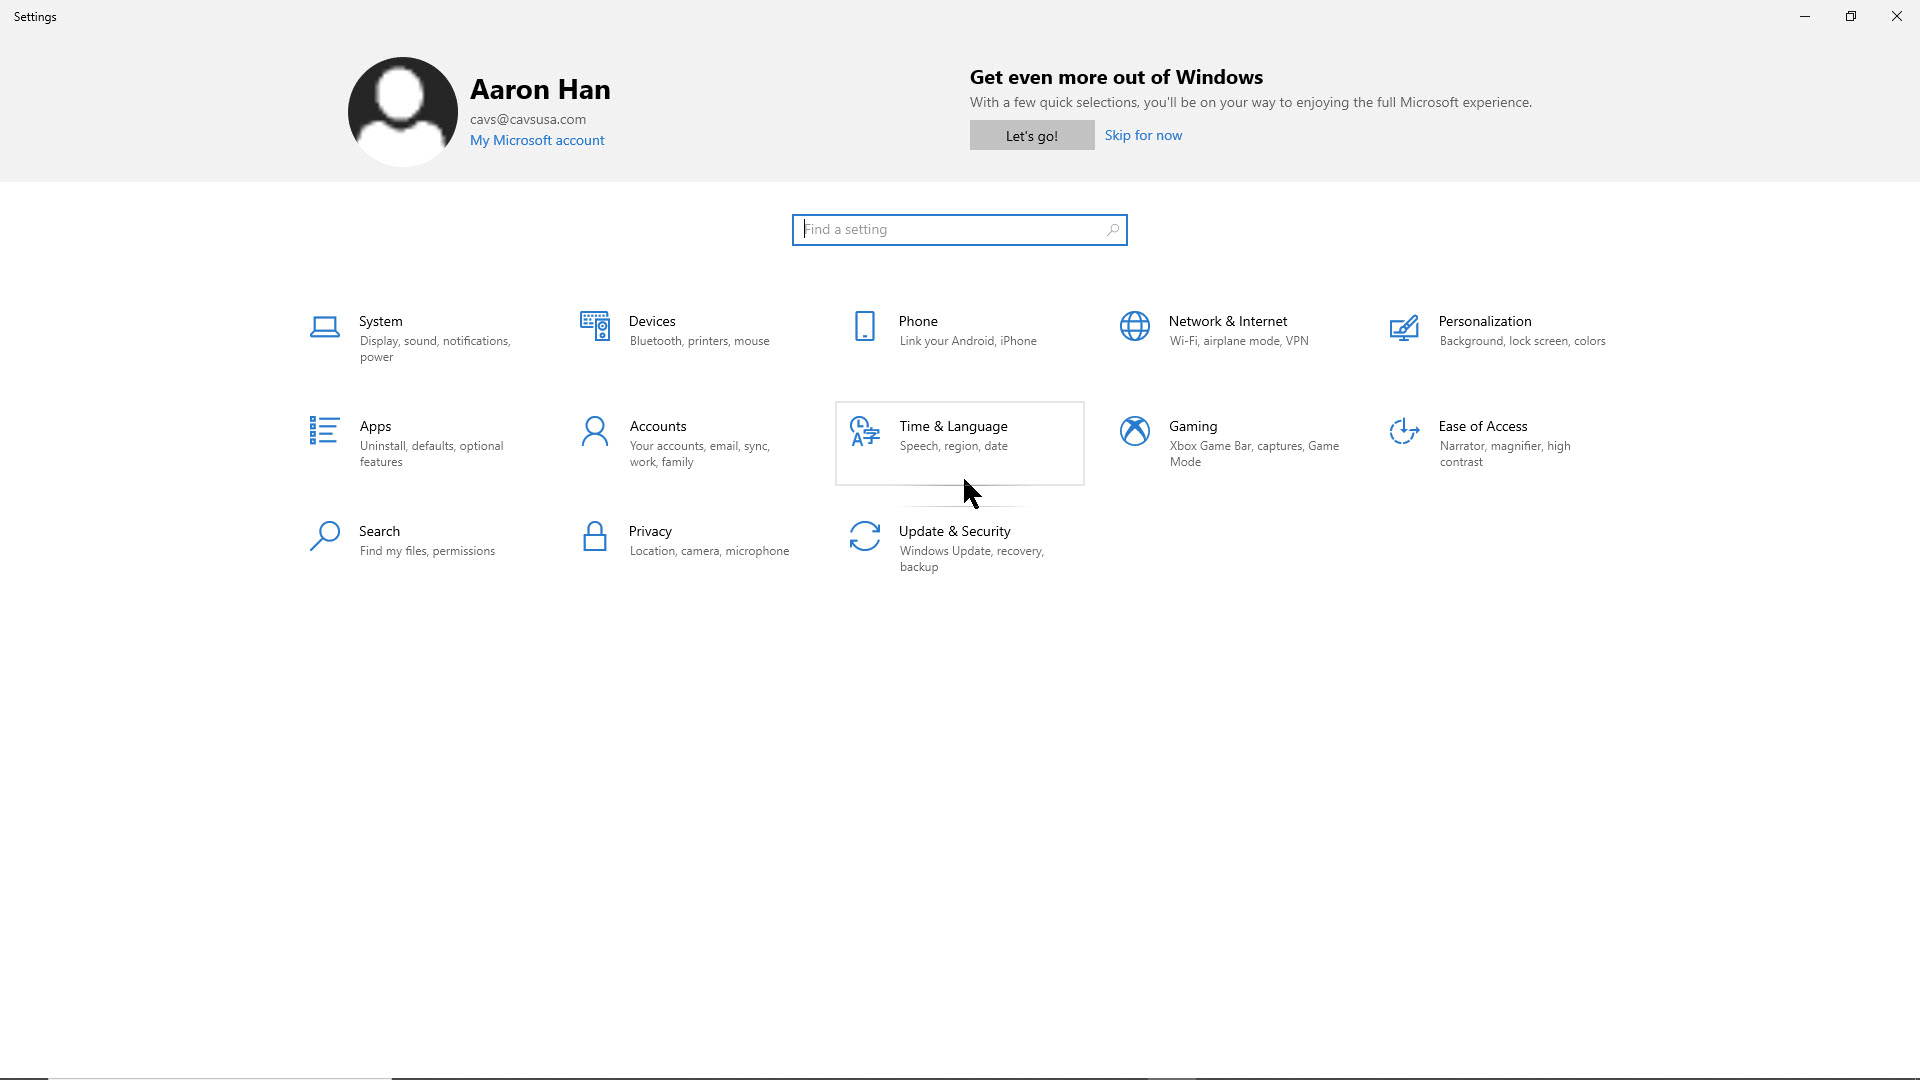
Go to Time & Language, Region & language, and Add a language.
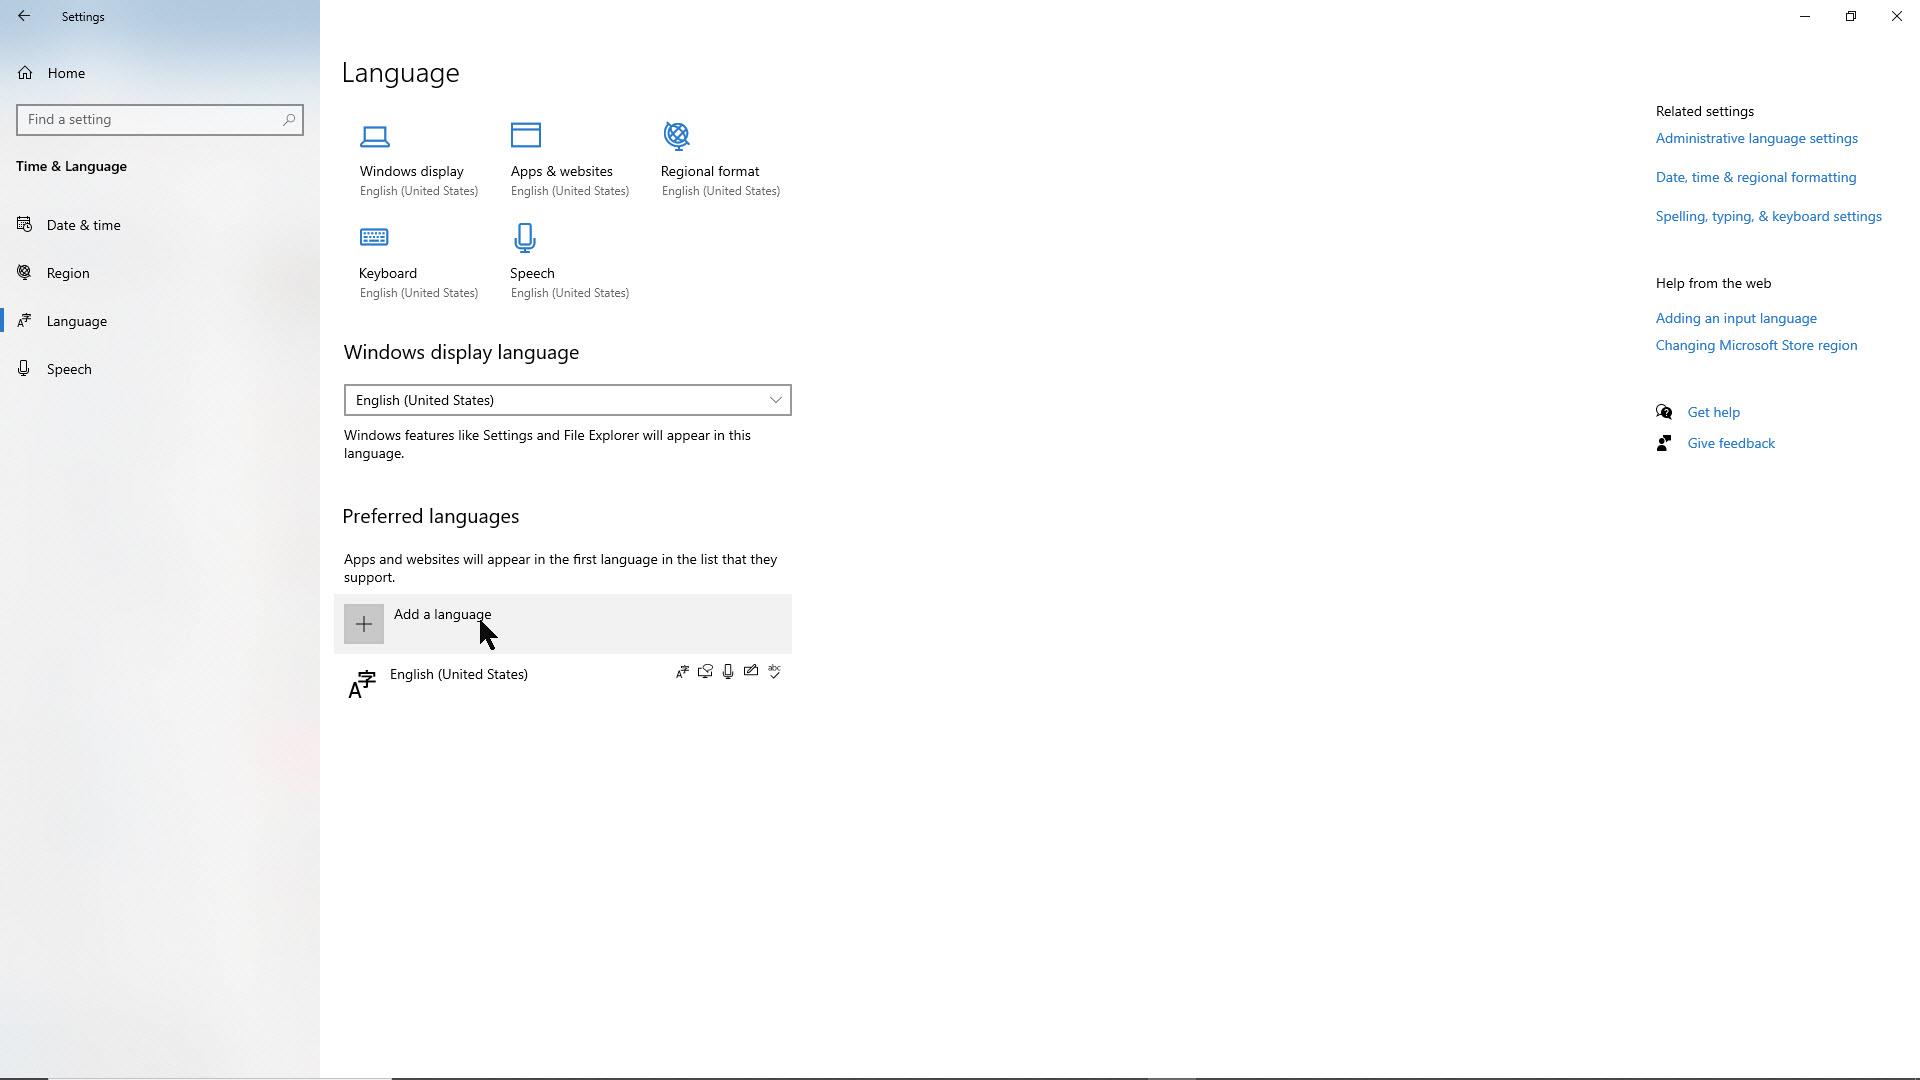
Select a language. In this example, Chinese is selected. Note that for Chinese and some other languages, there are many different versions including Simplified and Traditional. A correct version depends on the song files and their origins. In this example, Chinese (Traditional, Taiwan) is selected.
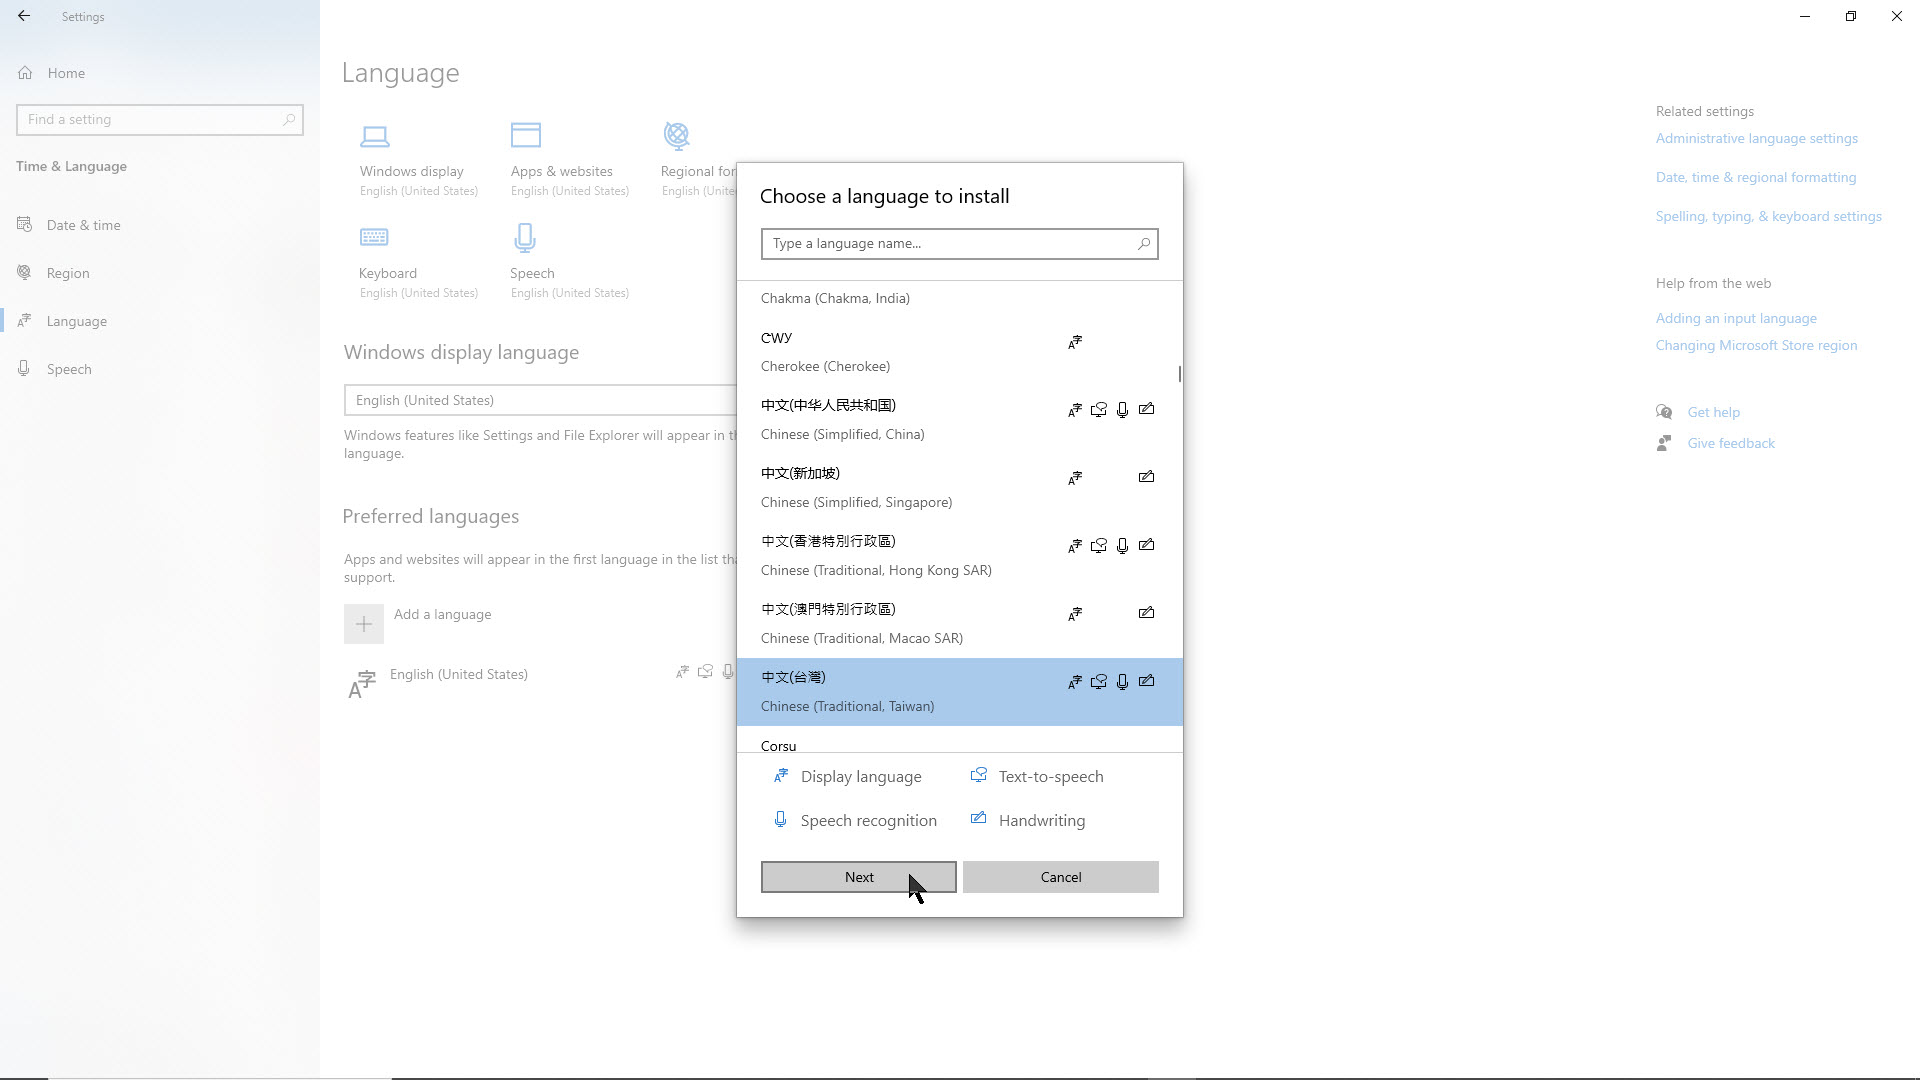
Check the Install language pack and Handwriting when available. Press Install.
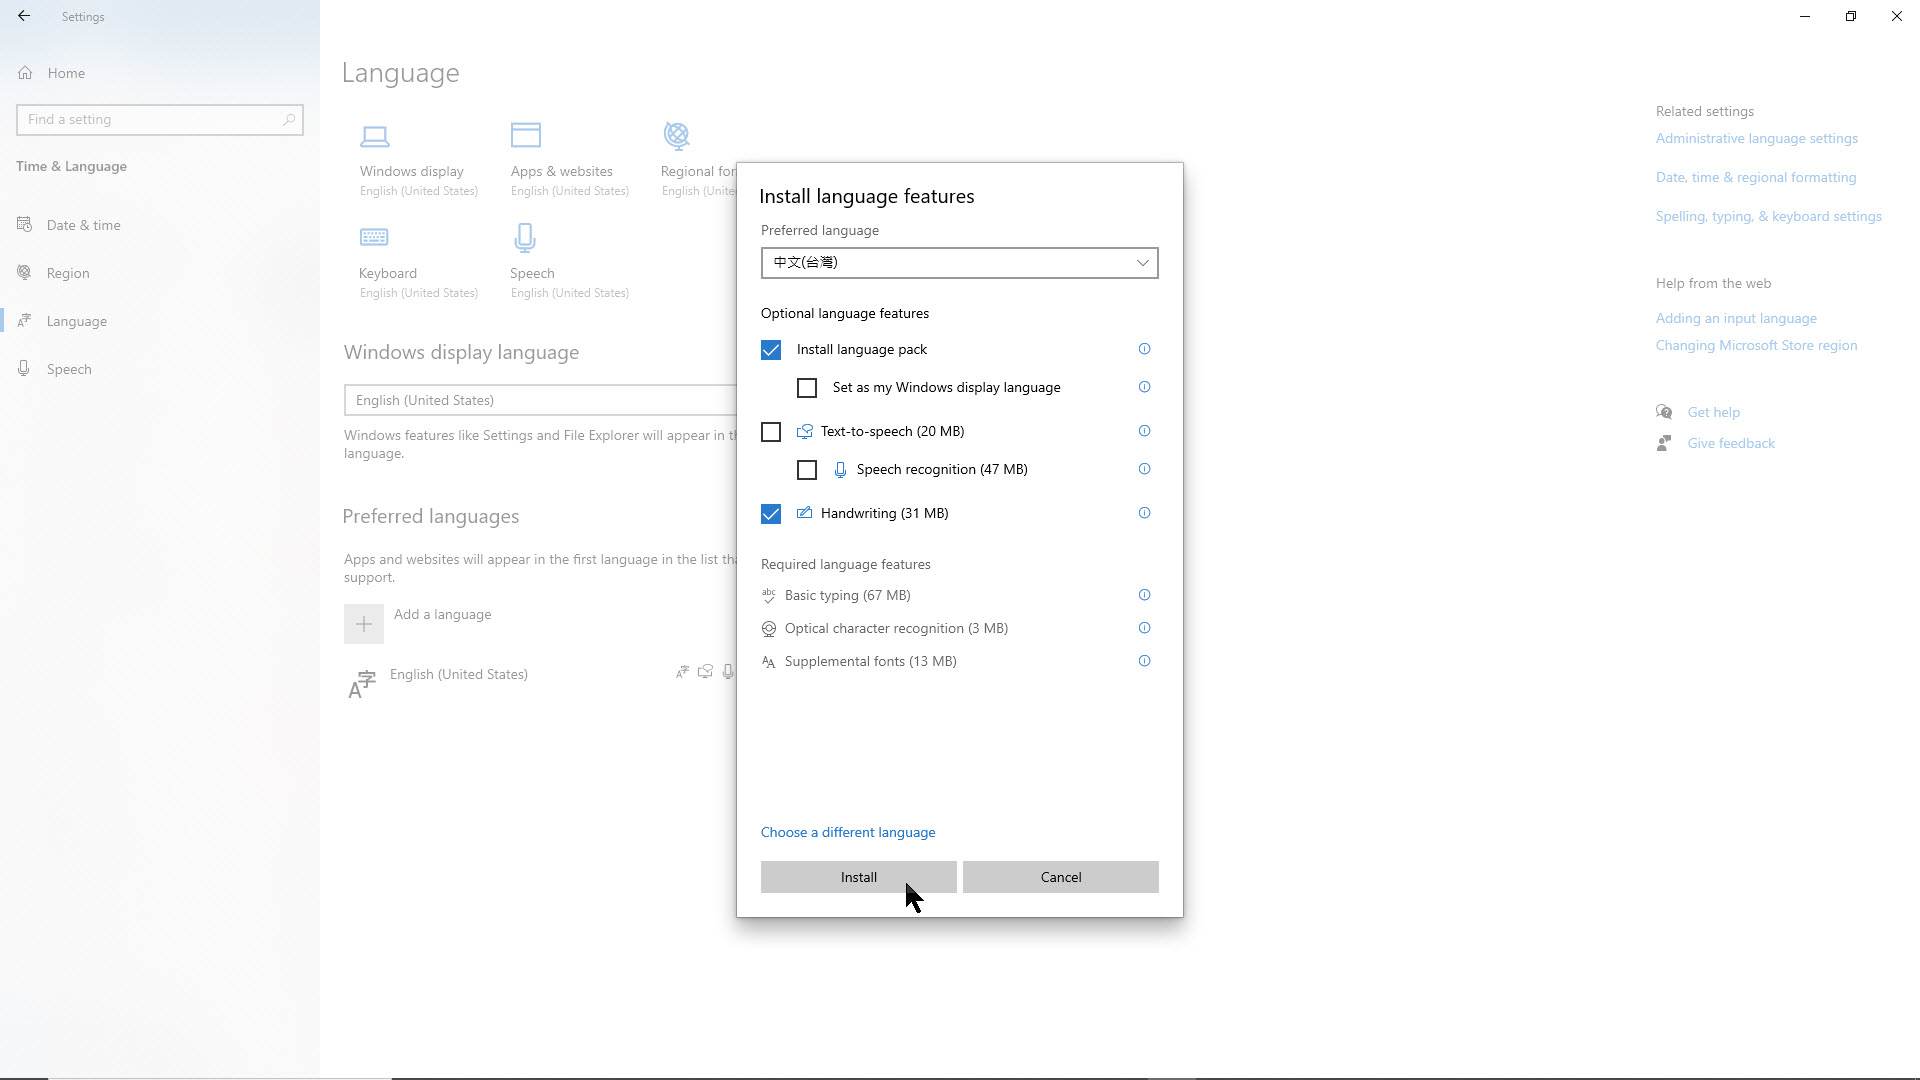
Downloading will begin. When done, click on the added language and selection Options.
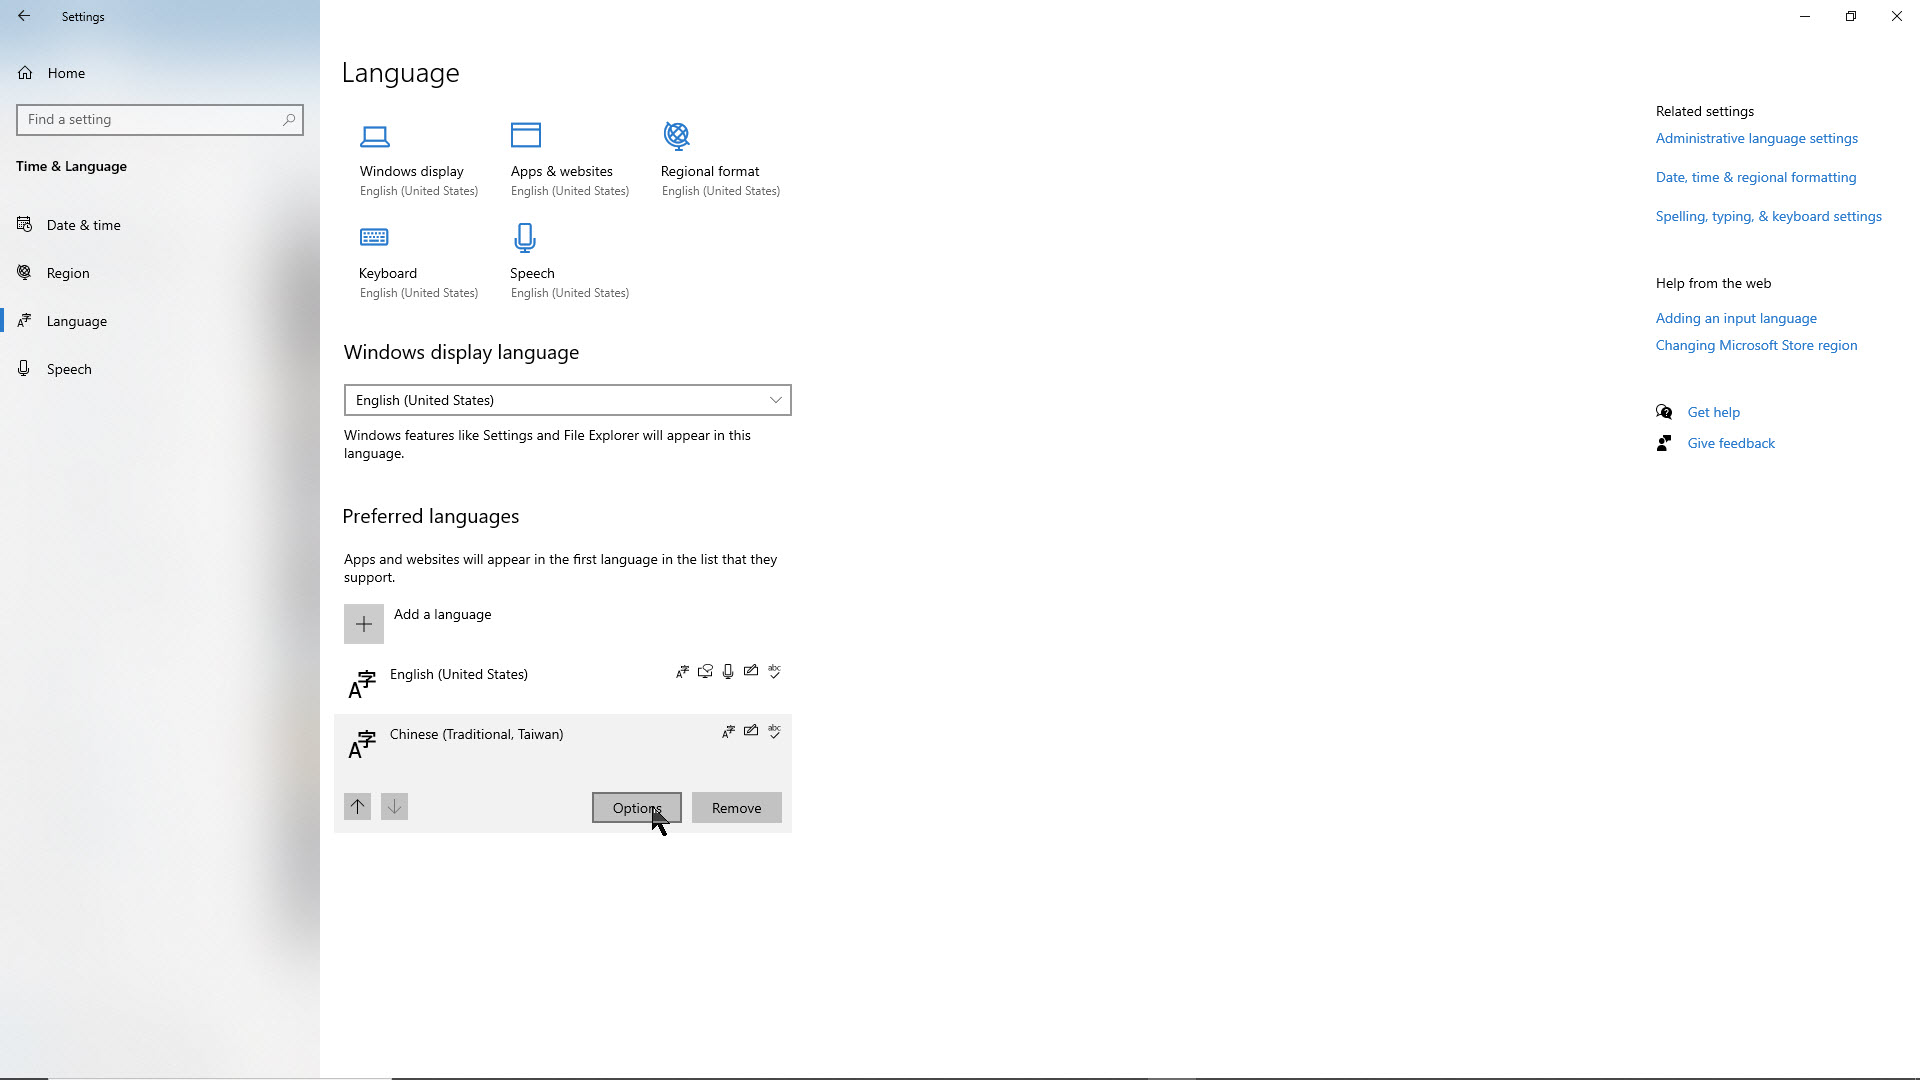
An assigned keyboard appears. In this example, it is Microsoft Bopomofo. It can be replaced or supplemented with another by pressing Add a keyboard button. The selection will depend on which is most familiar to the users.
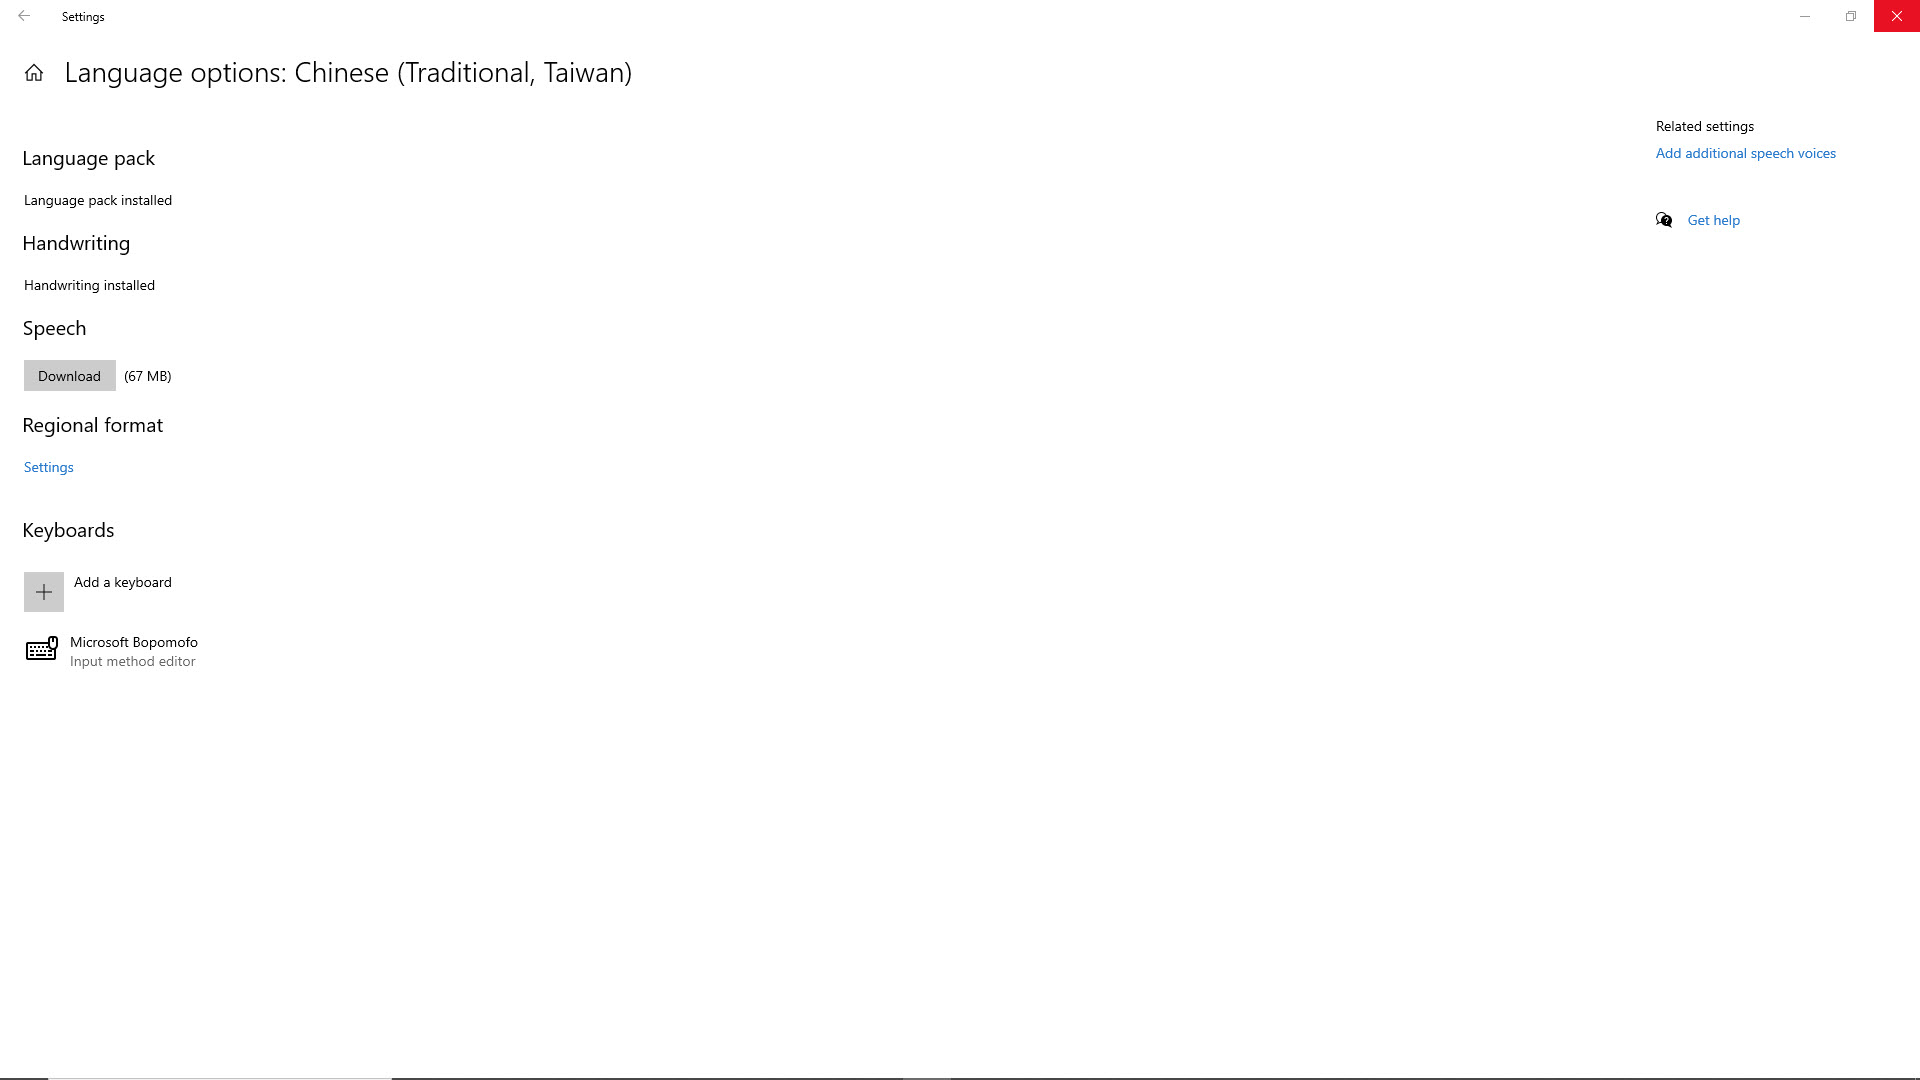
Follow the steps above for each of the languages to download the language pack and the handwriting if available. When done, restart the JB-199 IV player.
Start the JB-199 IV and its server. Load the Master playlist with international songs into My Server. Go to the Customer Interface as an online guest or using an E-Songbook.
Press Title. The song list sorted by Title will appear. Press the All languages button or the pull down menu.
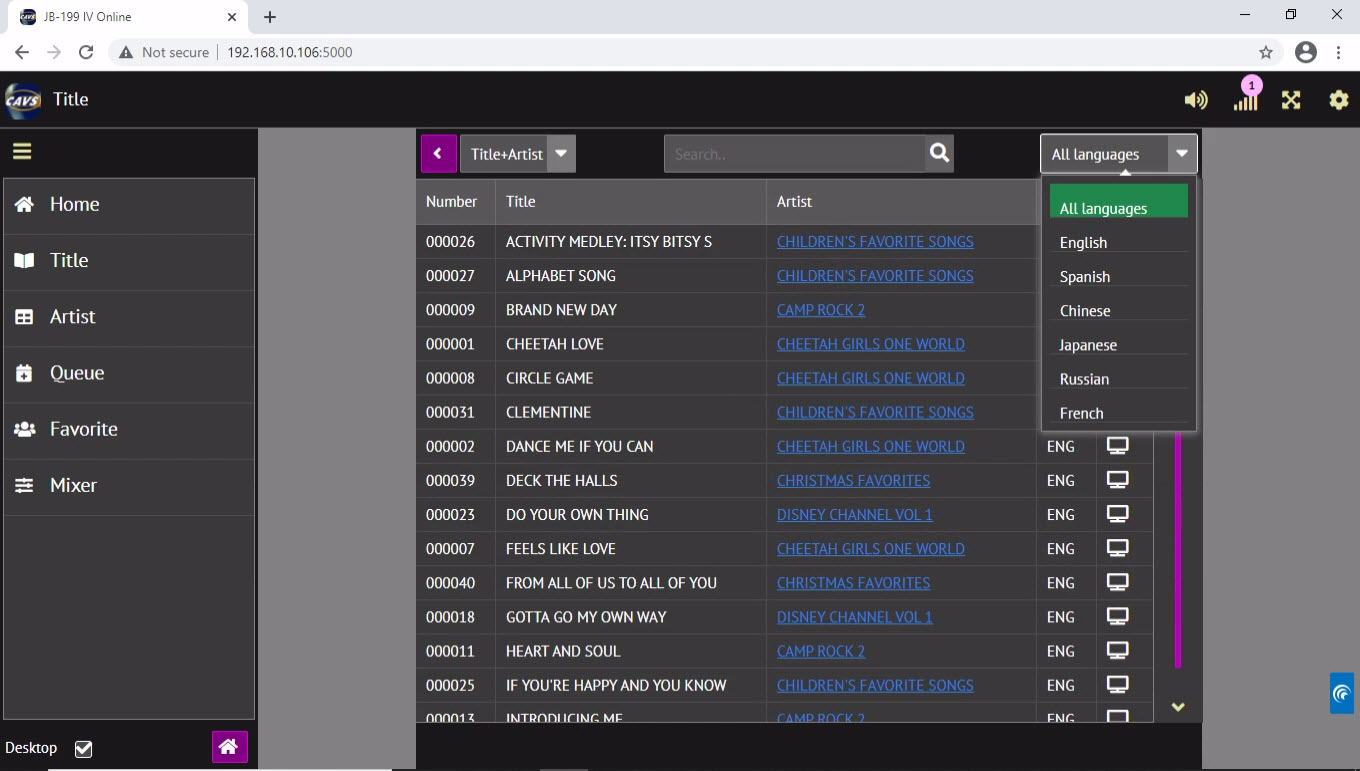
A list of languages available in the songs appears. Select a language to display only the songs of the selected language. Or select All languages to display all songs. In this example, Chinese is selected.
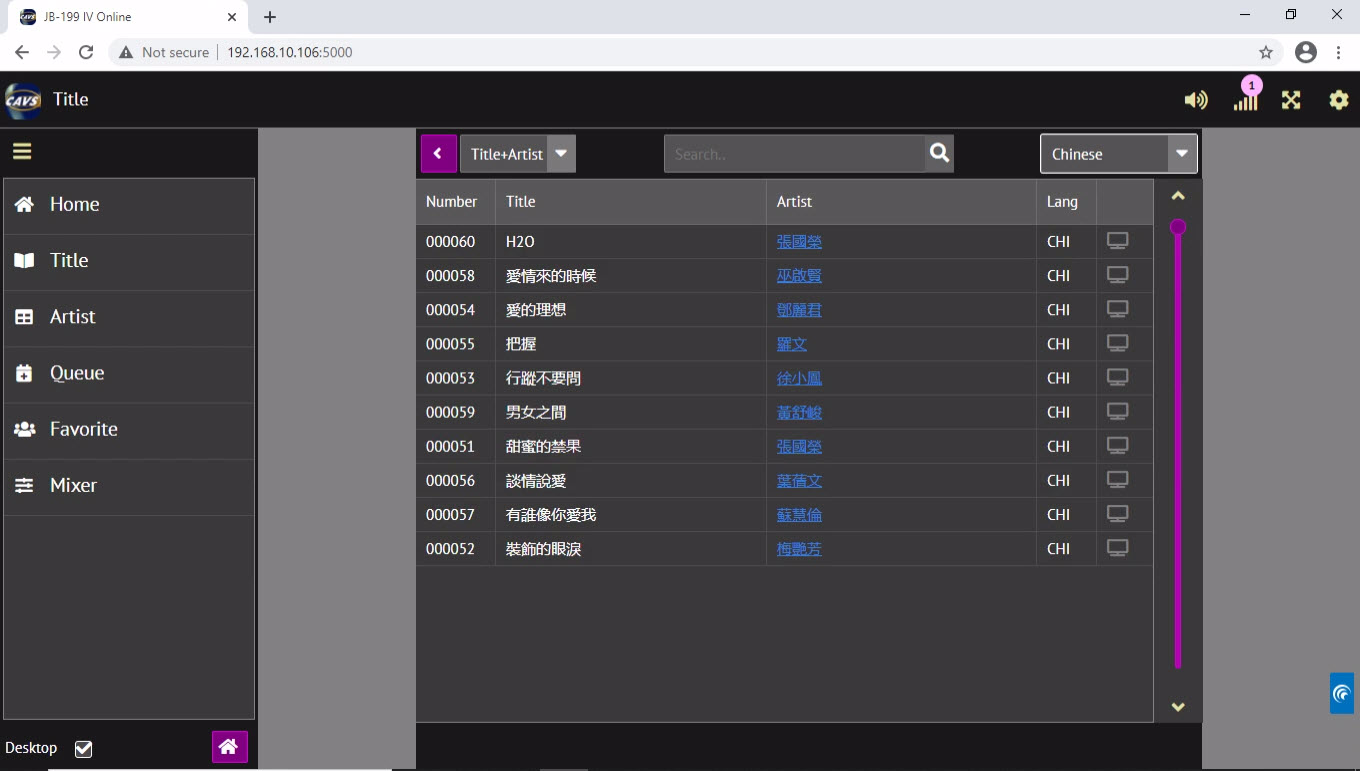
Next to search for a song, press the language indicator in the Taskbar to select a keyboard. In this example, Chinese (Traditional, Taiwan) Microsoft Bopomofo is selected.

Next click on the keyboard icon in the Taskbar.
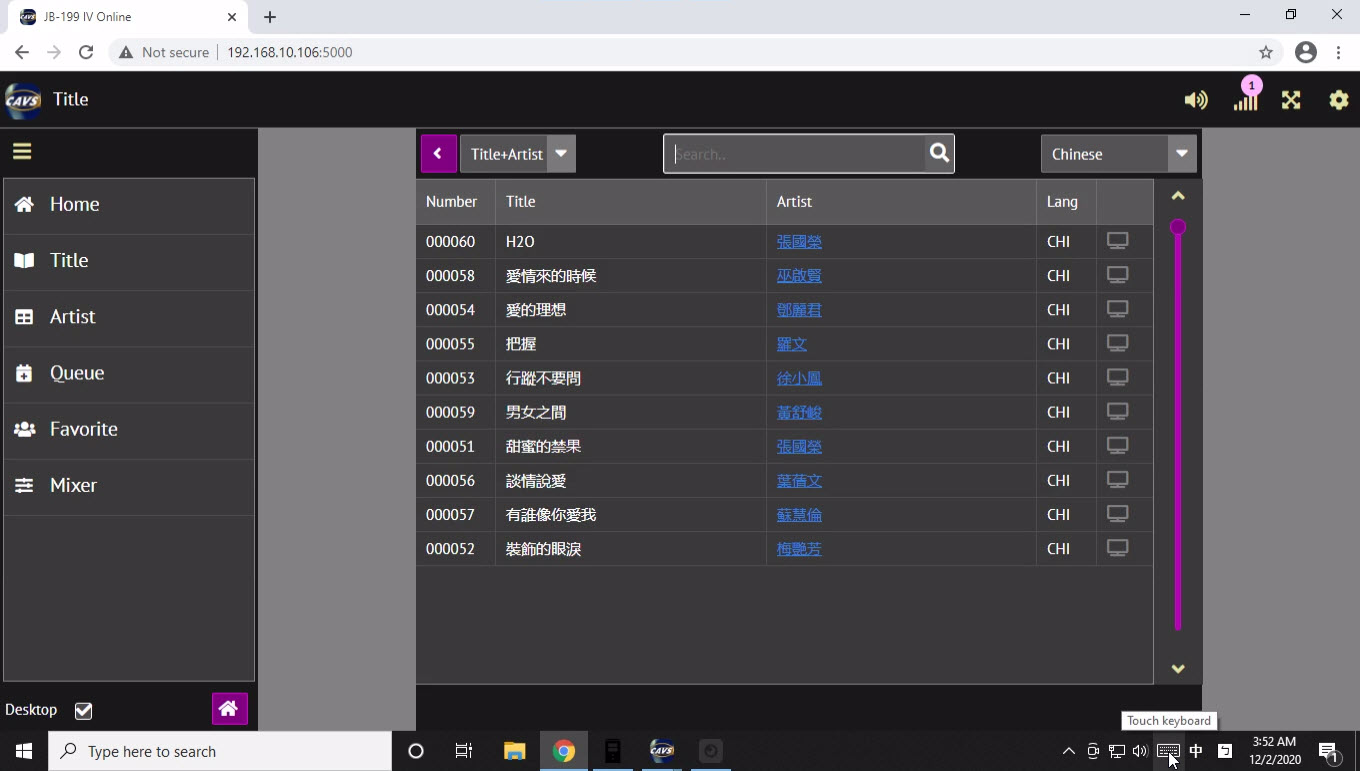
A touch screen keyboard will appear. Use the keyboard to input a search word or phrase into the search field. Press the Search button.
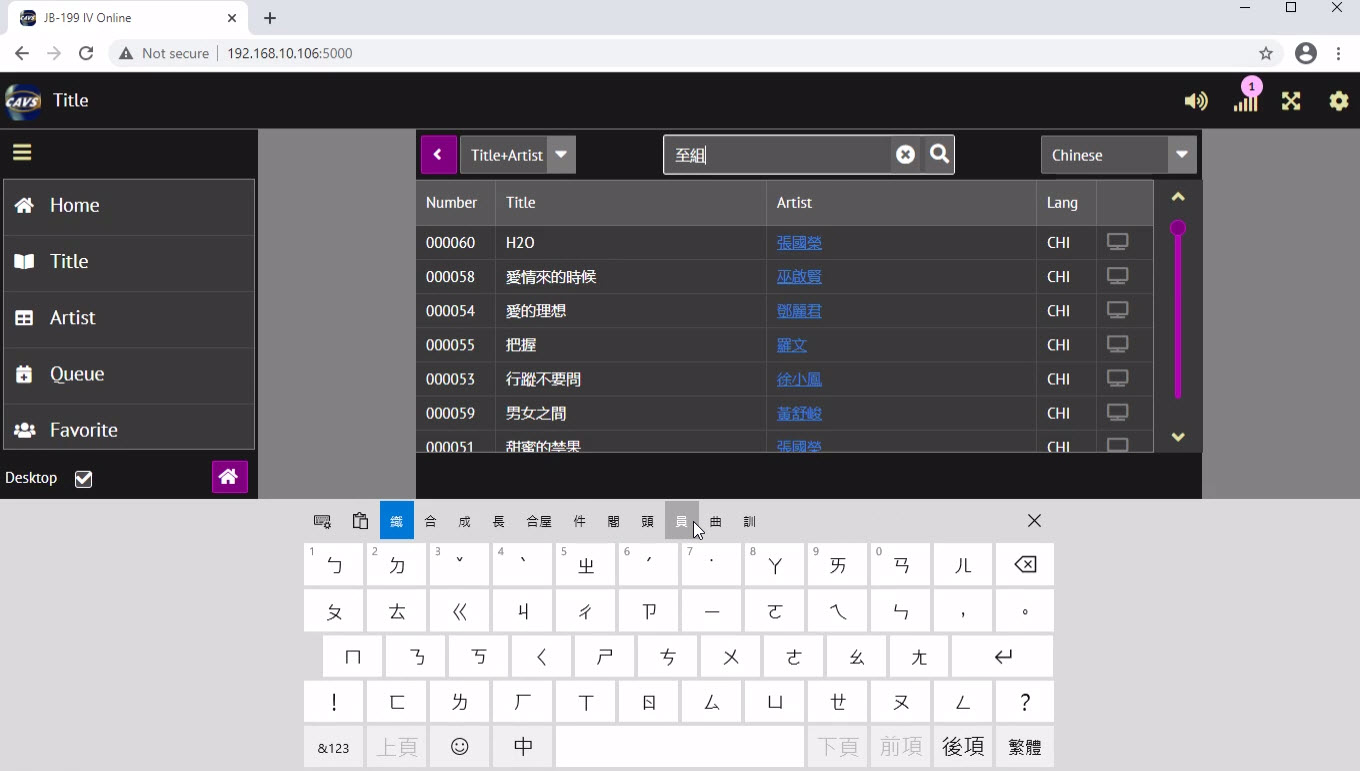
To use a handwriting instead of the touch screen keyboard, click on the Keyboard setting at the upper left corner of the touch screen keyboard.
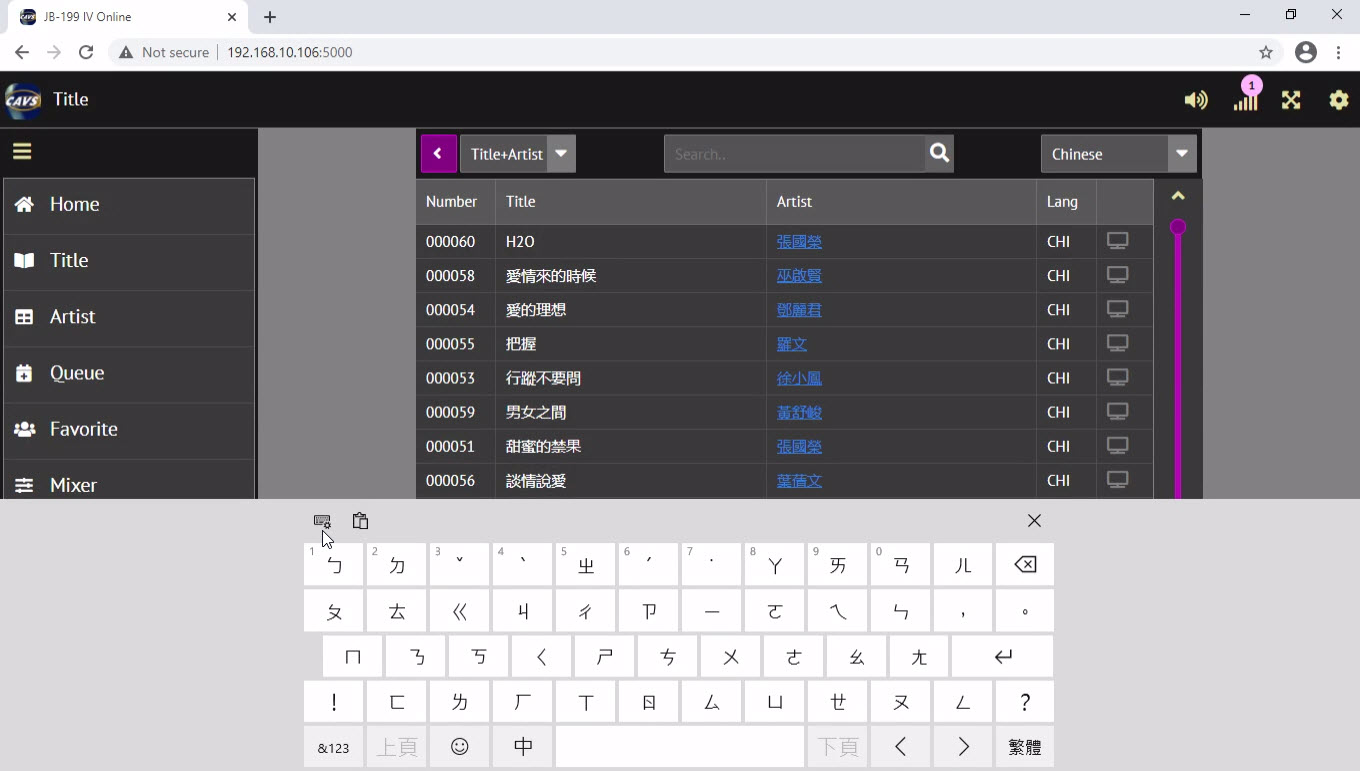
Select the drawing pad in a popup menu to select the handwriting.

A drawing pad will appear. Use the drawing pad to input a search word or phrase into the search field. Press the Search button.
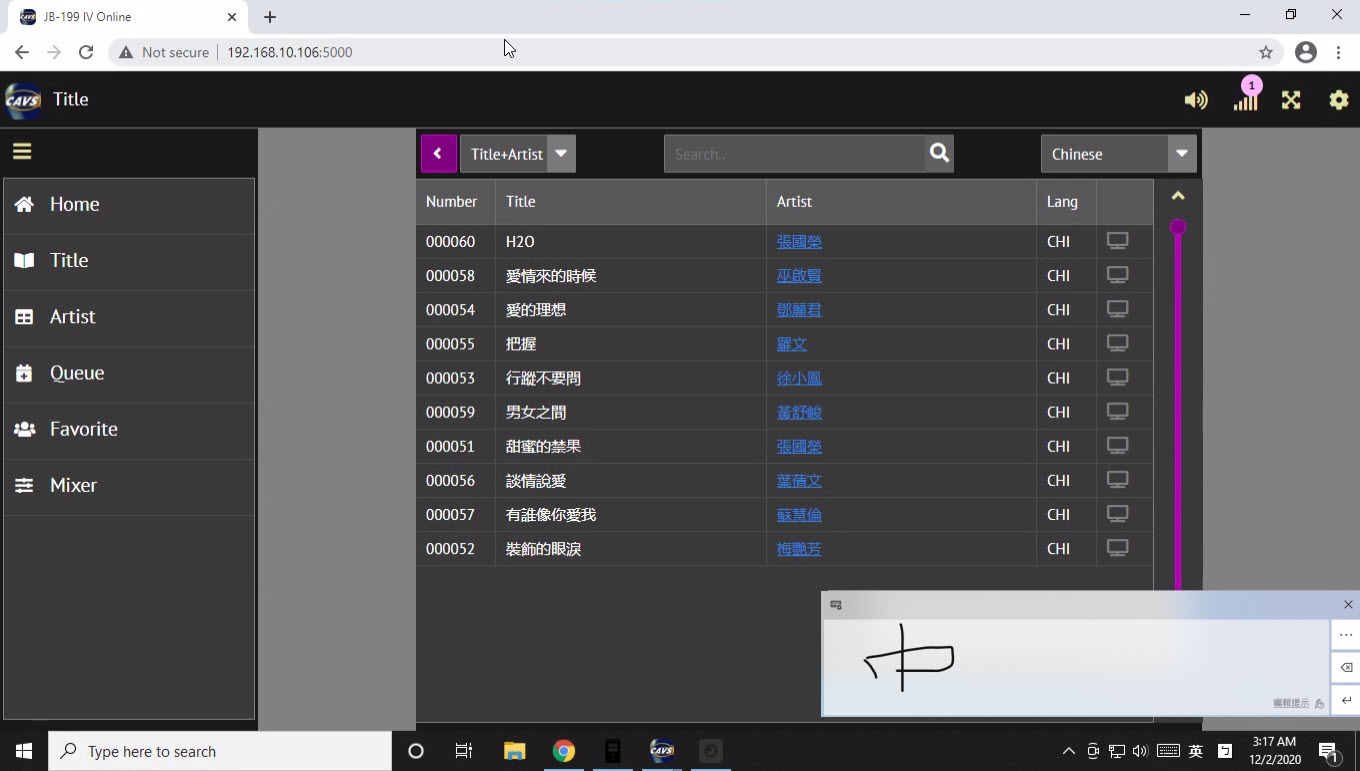
Search in other languages follow the same steps.
- Select a keyboard language
- Select a touch screen keyboard or handwriting
- Input a search word or phrase
- Press Search
END