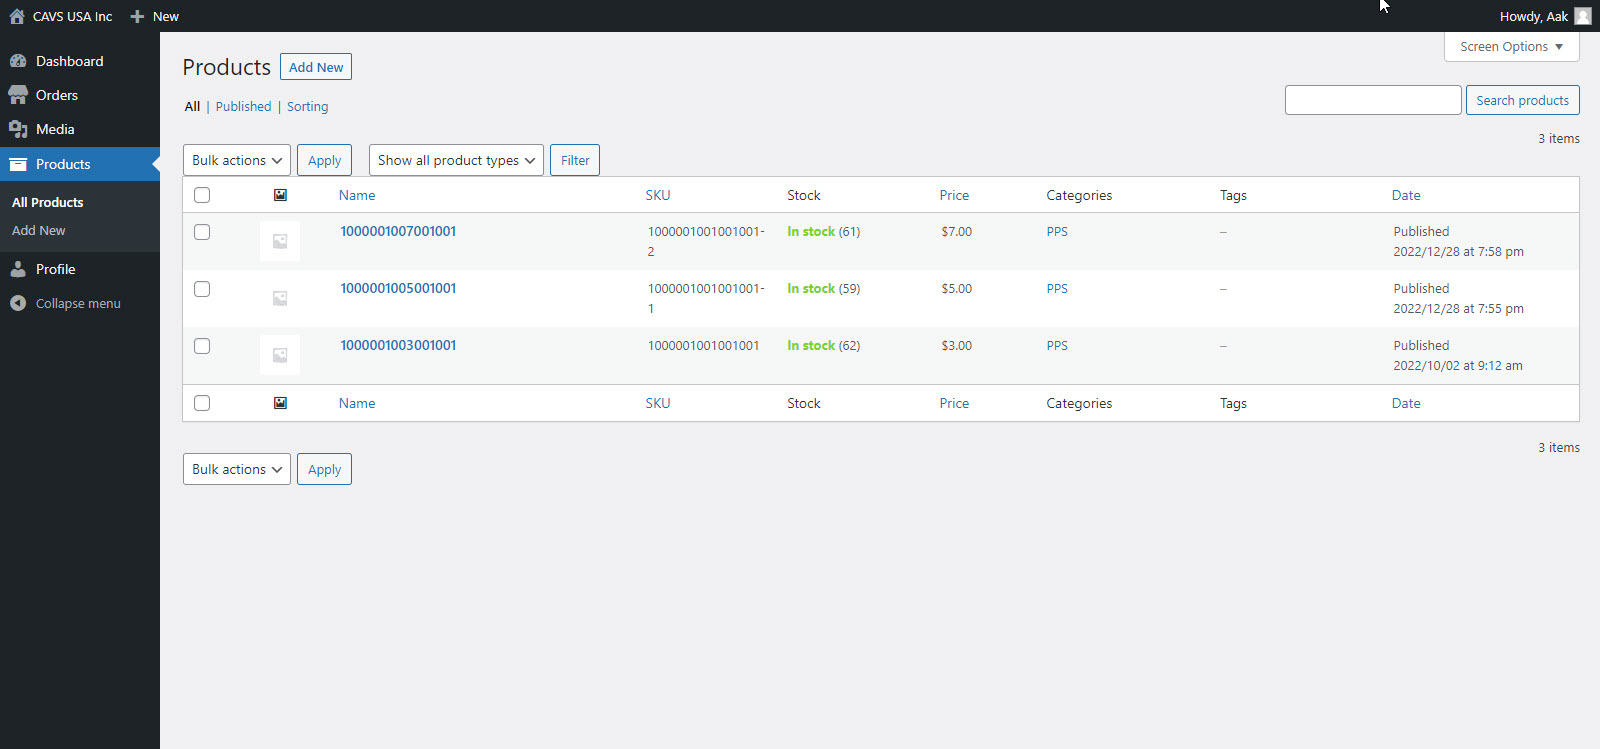
CAVS Digital Bill Acceptor
Vending solution to accept
Apple Pay, Google Pay, Paypal, and Credit Cards
Complete with Shopping Cart, Payment Gateway, Scanner,
Automatic Deposit, and Online Statement
CAVS Digital Bill Acceptor comes complete with shopping cart, payment gateway, scanner, automatic deposit, and online statement. It needs only to connect to your karaoke player to receive digital payments directly into your bank account.
You can set the vending mode as "per song" or "per time". You can also set your vending prices, for example $3, $5, $7. You can select up to three vending prices and the customers can purchase any combination of the three.
Eash digital sales is designed with firewall to work only in the paired karaoke player. The sales income is then automatically deposted into your bank account.
Never worry about the bill acceptor getting jammed or lock-picked. Your money is digitally secured from sales to deposits which can be scheduled instantly, weekly, bi-weekly, or monthly.
CAVS Digital Bill Acceptor works seamlessly together with traditional bill acceptors of paper money. It can be added as an enhancement to cover the digital payments that is ever growing popular. Start vending digitally and earn the online sales income.
CAVS Digital Bill Acceptor works with following karaoke players
- JB-199 IV Online
- JB-199 III Premier
- JB-199 mini II
- PlayCDG Online
- Karaoke Laptops
- Karaoke Touch Screens
- A turn-key solution for digital vending - complete with shopping cart, payment gateway, scanner, automatic deposit, and online statement.
- Option to set the vending mode to "per song" or "per time"
- Option to set up to three vending prices (for example, $3, $5, $7). Customers can purchase any combination of the three.
- Firewalls and digital security to collect and deposit payments. Never worry about the bill acceptor getting jammed or lock-picked.
- Works together seamlessly with standard bill acceptors of paper money
- Covers popular digital payments such as Apple Pay, Google Pay, Paypal, and Credit cards that customers like to use with their phones.
- Easy setup and simple plug-in.
CAVS Digital Bill Acceptor works with following karaoke players
- JB-199 IV Online
- JB-199 III Premier
- JB-199 mini II
- PlayCDG Online
- Karaoke Laptops
- Karaoke Touch Screens
Go to Registration. Follow the instructions below to fill out the form and submit.
- First Name: First name of the Vendor owner or manager
- Last Name: Last name of the Vendor owner or manager
- Login Username: Username to login to the Vendor Account
- Email: Email address of the Vendor
-
Vendor Name: Vendor name - will be displayed in Shopping Cart
For example, iVending, Five Star Vending, Heart of New York Vending, Snack Center Vending, etc. -
Vending Business Description:
-
Vending Machine: Karaoke player in use
-
Vending Type: Per song or per time
- Vending Price: Unit price (e.g. $3, $5, $10)
-
Purchase Limit: Maximum number of units that can be purchased in a single transaction (e.g. x2, x5)
This will limit the number of songs that a single customer can sing in a single turn. -
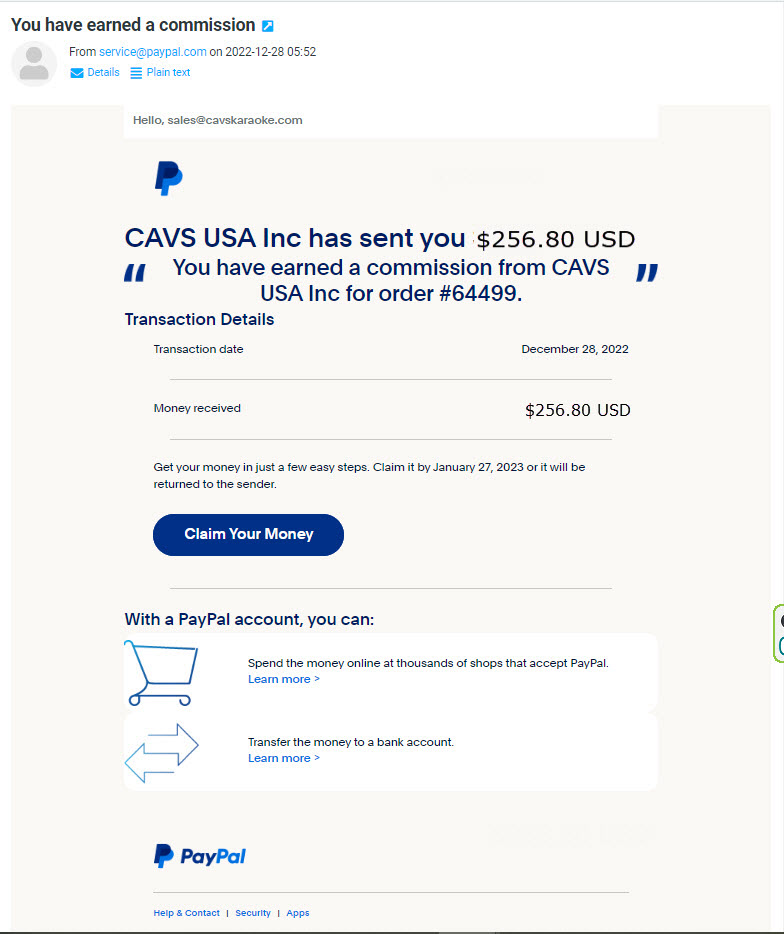
Email Address for Paypal Account: Email address associated to your Paypal account for Payouts
Vending income is sent out using Paypal Payouts.
To receive the payouts, a vendor needs a Paypal account with a registered email address.
To create a free Paypal account, go to Paypal. -
Deposit Frequency:Instant, Weekly, Bi-weekly, Monthly
Refer to 6. Vending prices and fees for the cost of each selection. -
Network Connection for Karaoke Player:
-
None
Customers use a paper songbook to find songs.
They then use Internet browser in their phones or tablets to pay online.
-
Router with No Internet
- Name (SSID) and password of the router
- Local IP address (including port number) of the karaoke player assigned by the router
However the customers will need to turn off the wi-fi in order to connect to Internet and pay online. -
Router with Internet but no Port Forwarding
- Name (SSID) and password of the router
- Local IP address (including port number) of the karaoke player assigned by the router
And they can continue to browse to pay online. -
Router with Internet and Port Forwarding
- Local IP address (including port number) of the karaoke player assigned by the router
- Public IP address of the karaoke player
It enables customers to find songs and pay online using a browser, without resorting to a paper song book or connecting to a router wi-fi. -
None
-
Vending Machine: Karaoke player in use
Press the REGISTER button to submit.
You will receive a reply within 1 or 2 days with a Location Number and a QR code.
For any question, contact CAVS Techsupport.
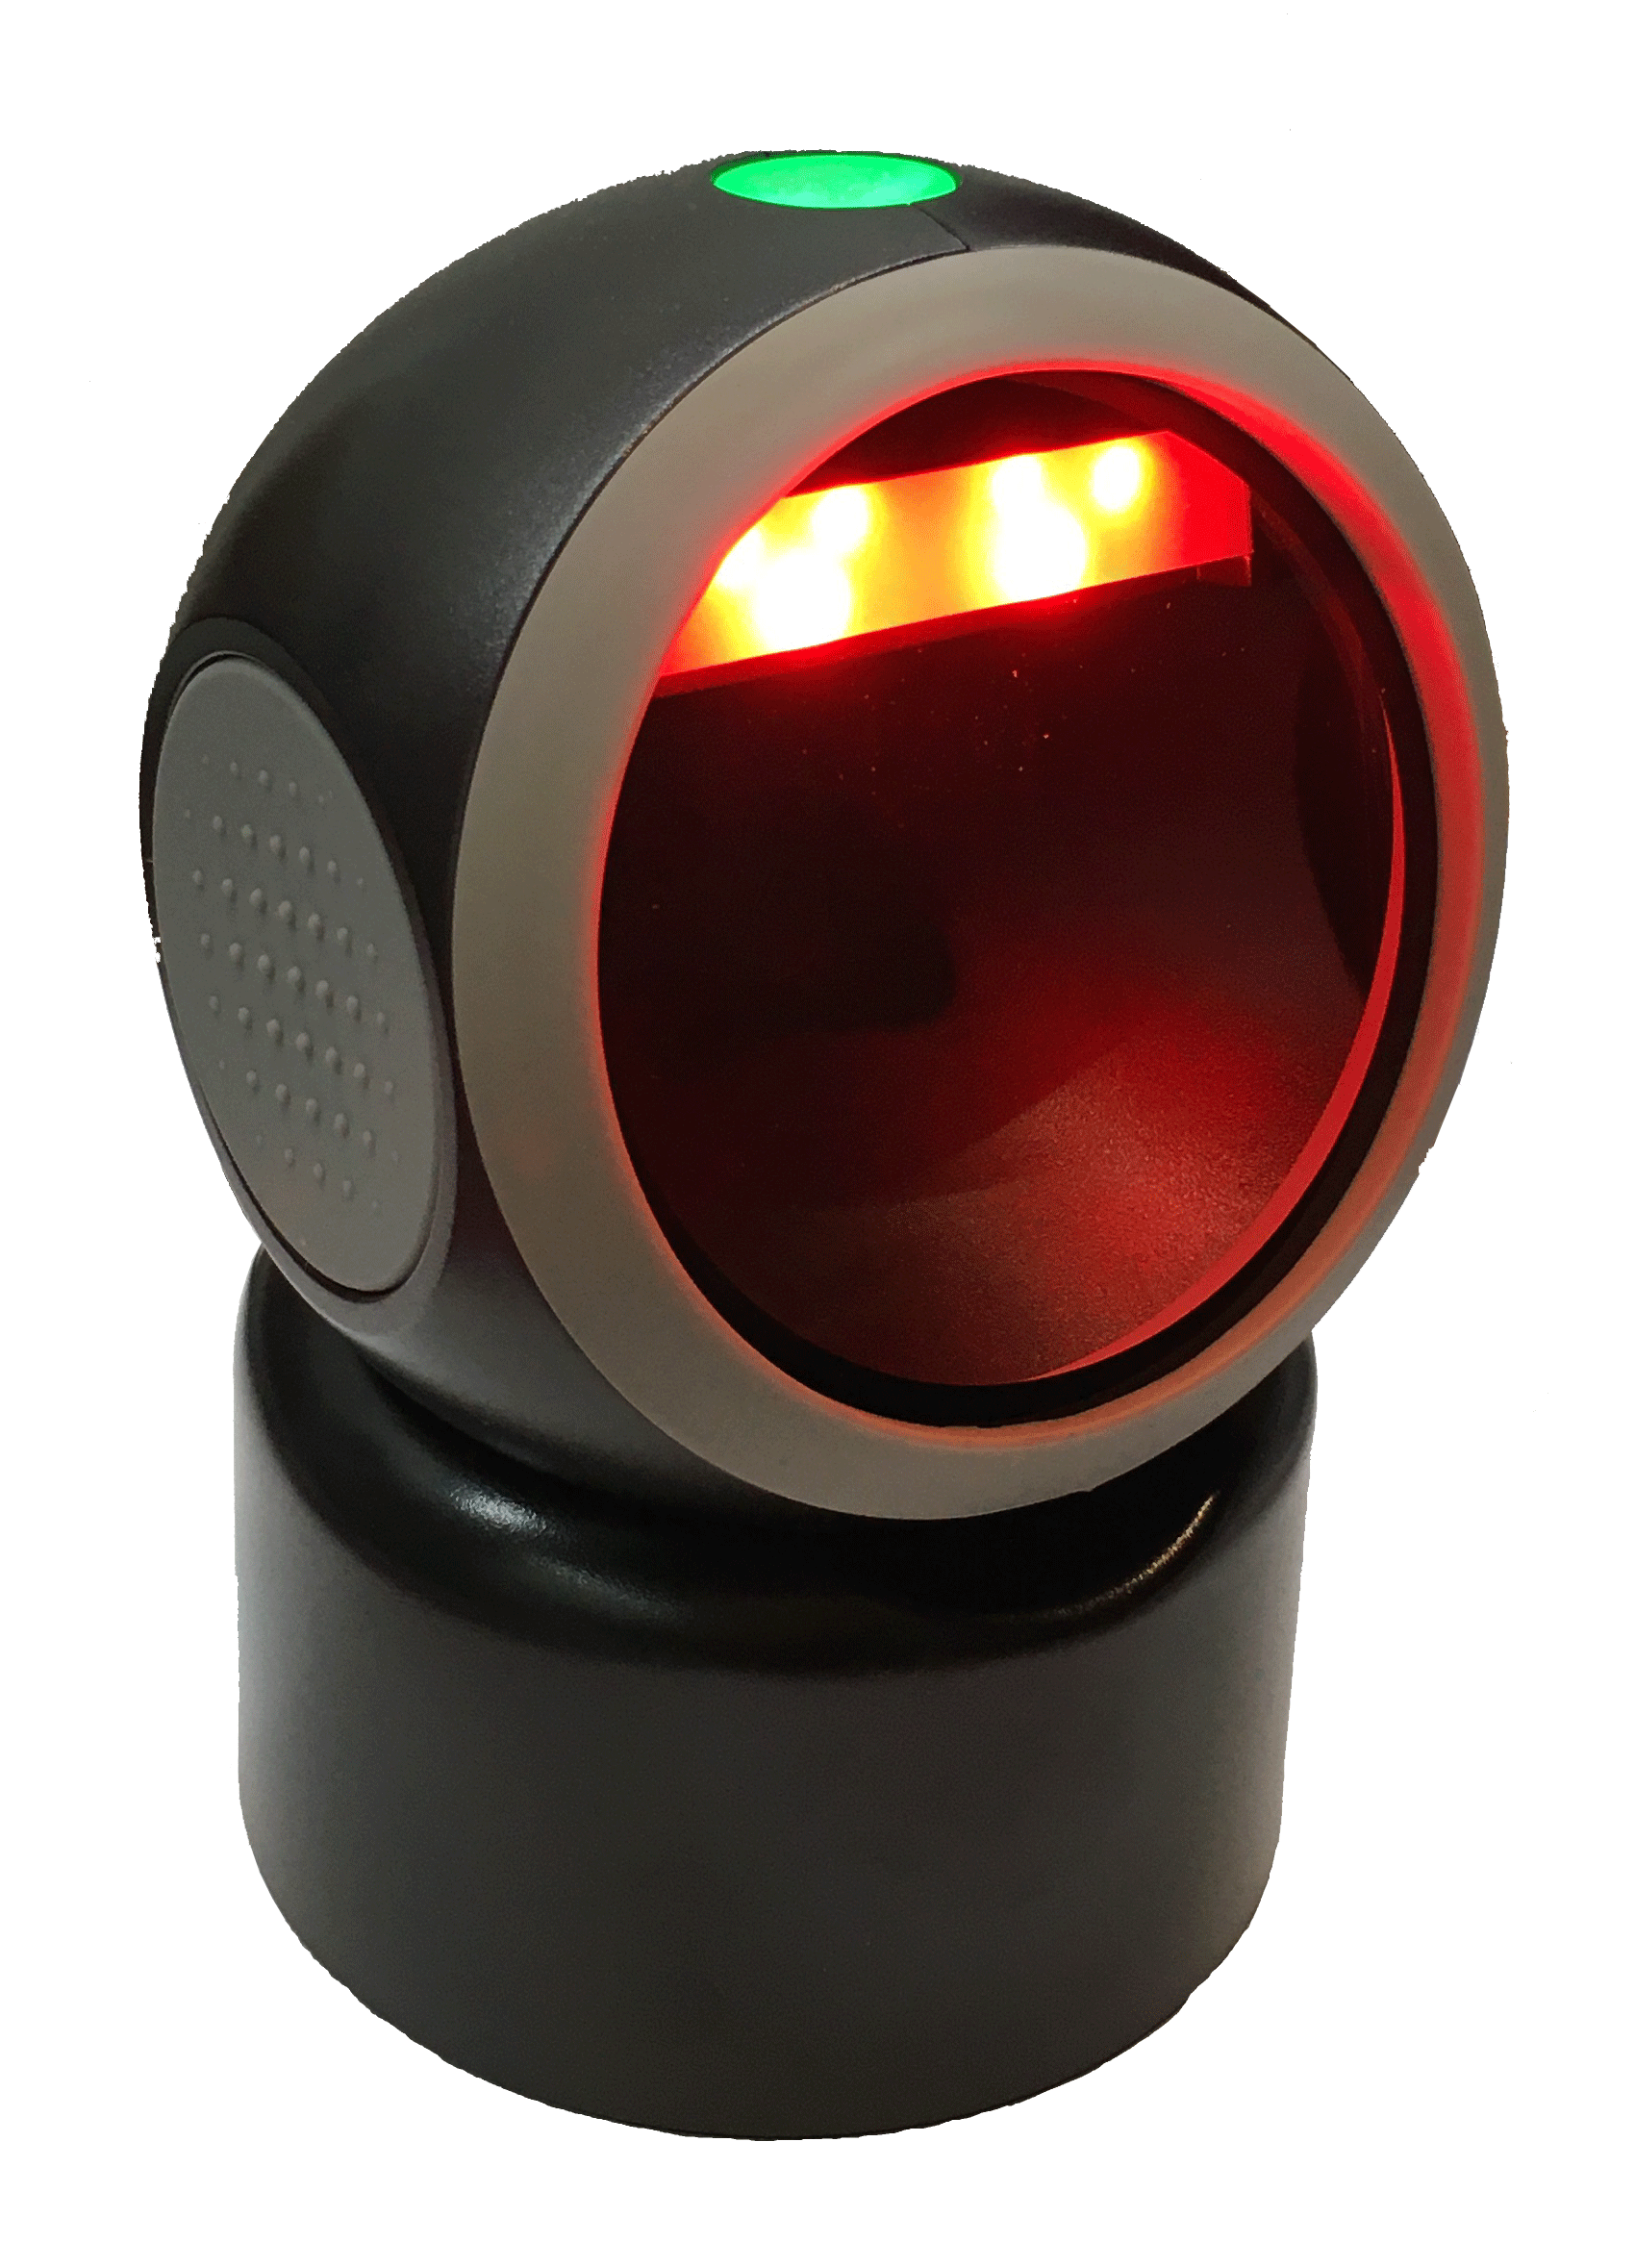
3.2.1 Connect the scanner to your karaoke player using the ethernet to USB cable which is enclosed. The ethernet end of the cable connects to the scanner.
![]()
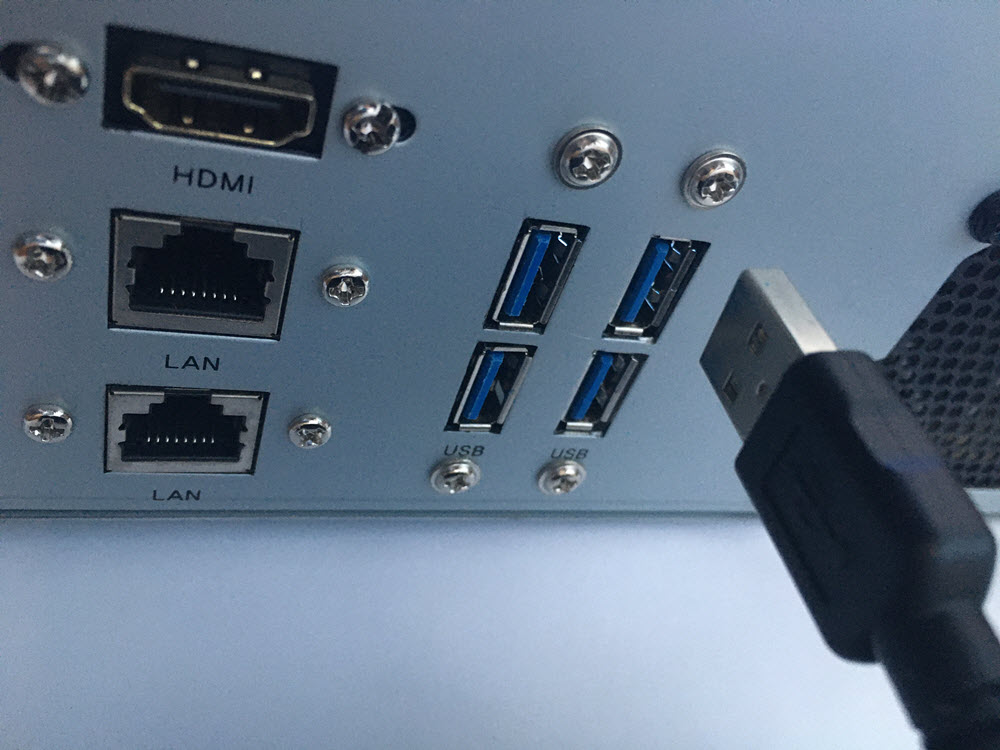
3.2.2 The USB-A end of the cable connects to a USB port of the karaoke player.
3.2.3 Note: In case you need to disconnect the cable from the scanner, press the bottom hole with a pin and while pressing remove the ethernet connector.
![]()
3.2.4 Turn on the karaoke player and the scanner will come alive with the lights and the three beeps.
3.2.5 The scanner is preset to accept digital payments ub QR codes. When in need of changing the setting, scan the barcodes given below. Here we list the essential barcodes to set the scanner.
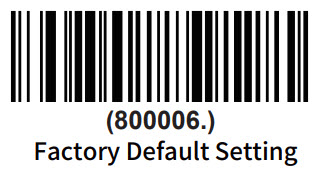
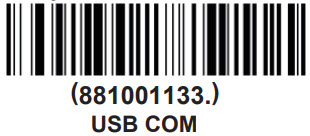
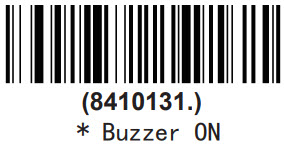
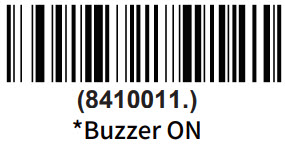
For all other changes, see Scanner Setting Guide.
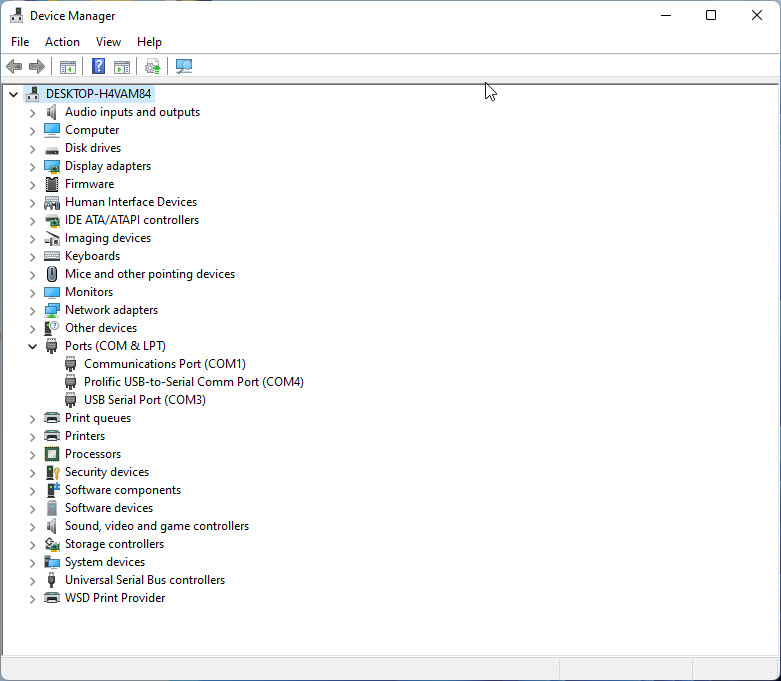
3.2.6 To find the COM port assigned to the scanner in the karaoke player, go to Windows Device Manager.
Open the Device Manager.
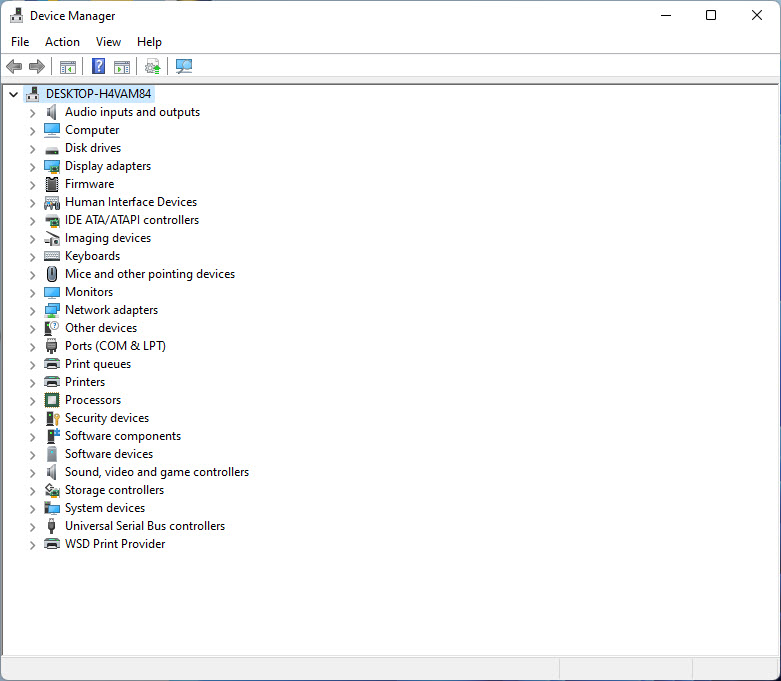
Expand the Ports (COM & LPT) and find the Prolific USB-to-Serial Comm Port (COM_X). Note the COM_X which is the COM port number needed later in 3.3 How to setup karaoke player. In the picture below, the COM port is shown as COM4.
Following instruction to setup a karaoke player applies to all CAVS Karaoke players noted in the section 2.Hardware Requirement.
3.3.1 How to setup Control Panel
Select Serial in the Control Panel > Tools.
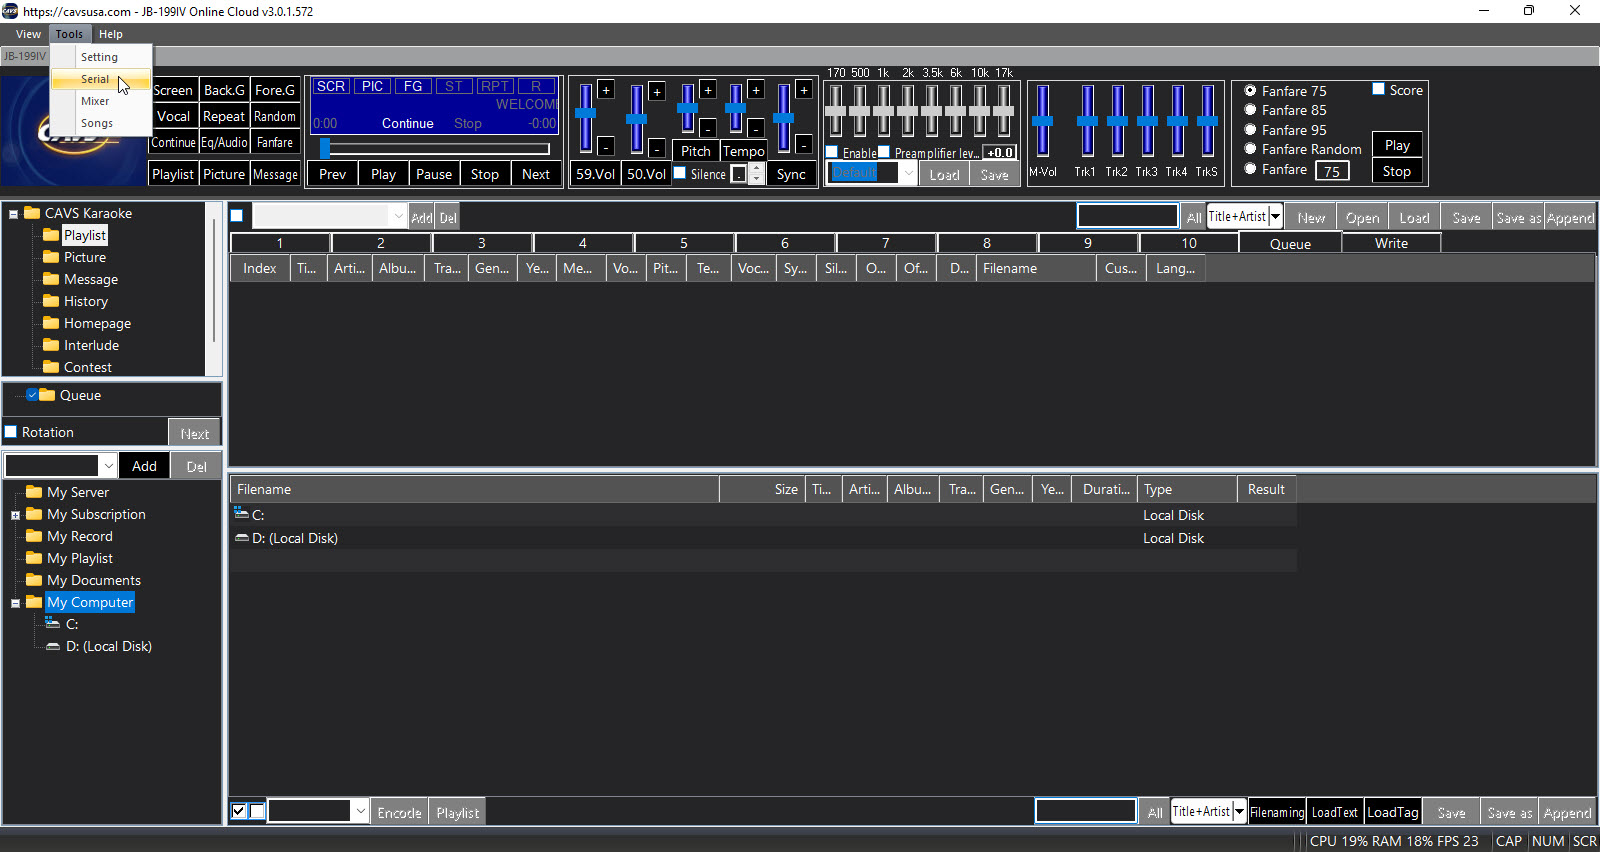
The Serial Setting window will open. Follow the instructions below to complete the setting.
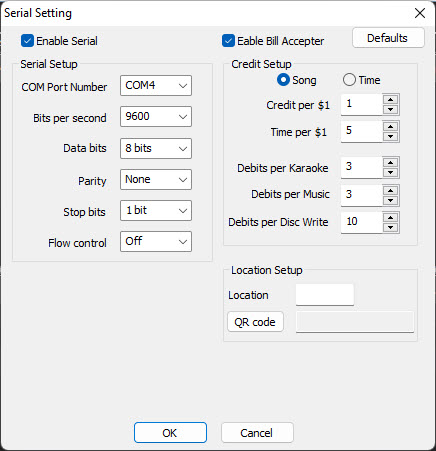
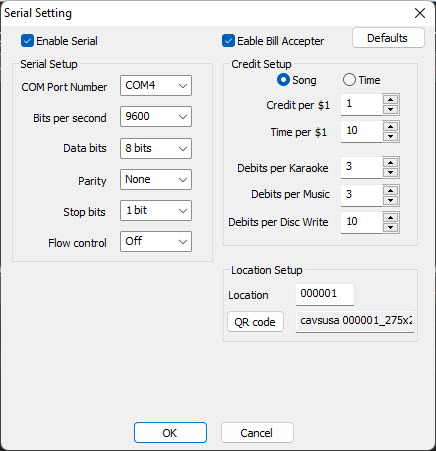
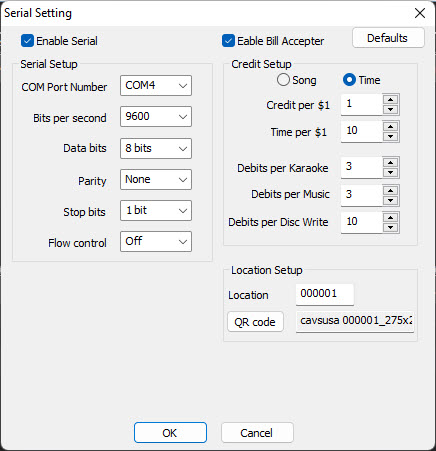
- Enable Serial: Check to enable the scanner. This is necessary for Digital Bill Acceptor.
- COM Port Number: Select the COM number of the scanner assigned in the karaoke player. See Section 3.2.6.
- Bits per second: Set to 9600.
- Data bits: Set to 8 bits.
- Parity: Set to None.
- Stop bits: Set to 1 bit.
- Flow control: Set to Off.
- Enable Bill Acceptor: Check to enable Bill Acceptor / Digital Bill Acceptor.
- Song / Time: Select the vending type.
- Credit per $1: Set how many credits are given per $1.00 payment.
- Time per $1: Set how many minutes are given per $1.00 payment.
- Debits per Karaoke: Set how many credits are charged to play a karaoke song.
- Debits per Music: Set how many credits are charged to play a regular song (without lyrics).
- Debits per Disc Write: Set how many credits are charged to record a customer singing onto a disc.
-
Location: Input the assigned location number.
The location number can be found in an email reply to your vendor registration and is used to validate each online sales. -
QR code: Press the button and select the assigned QR code.
The QR code can be found in an email reply to your vendor registration.
Download and save the file in Documents > 'Your Karaoke Player' > Image.
The QR code will appear on the monitor and when scanned, take the customers to the Shopping Cart of the Digital Bill Acceptor. - Defaults : Press to clear all fields to factory default (including Location and QR code).
Press OK.
A router connection is illustrated below using CAVS JB-199 IV Online. The connection can also be wireless using a wi-fi adopter or a built-in wi-fi of the karaoke player.
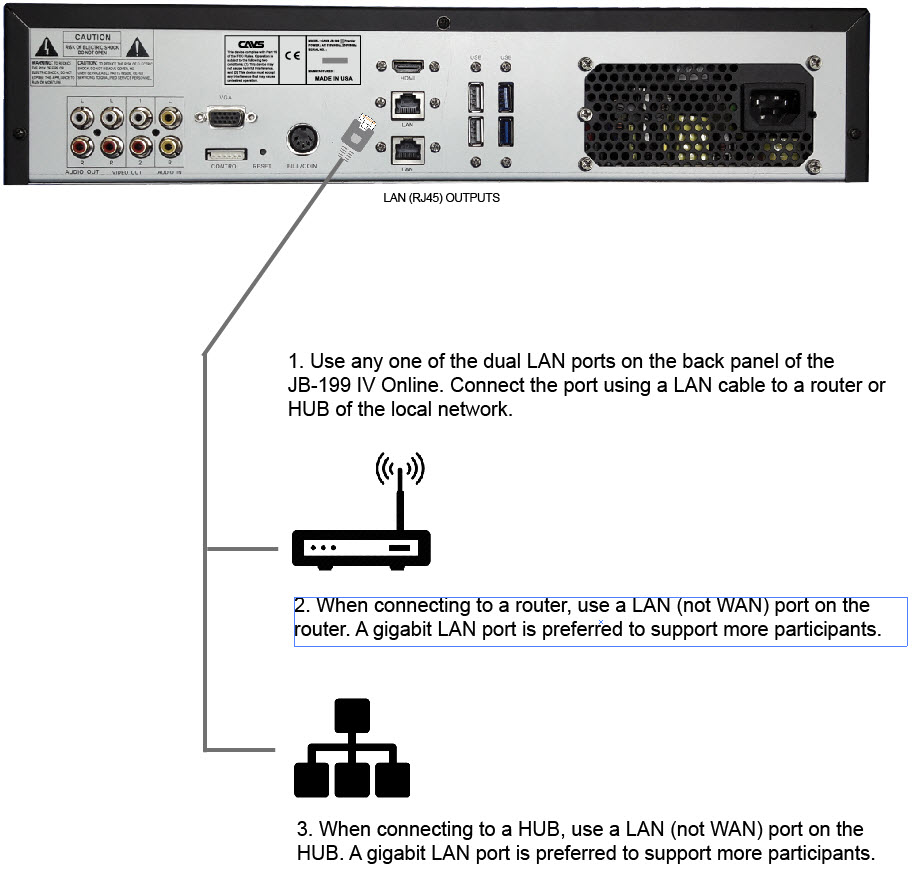
The default name (SSID) and the password of the router can be found at the bottom of the router. If changed, you must either enter into the router admin page to find the new values or reset the router for the default values.
After connecting to the router, restart the karaoke player. Go to Control Panel > Tools > Setting > Server & Browser. There you will find the local IP address including the port number of the karaoke player assigned by the router.
A router with Internet access is illustrated below using CAVS JB-199 IV Online. The connection between the router and the karaoke player can also be wireless using a wi-fi adopter or a built-in wi-fi of the karaoke player.
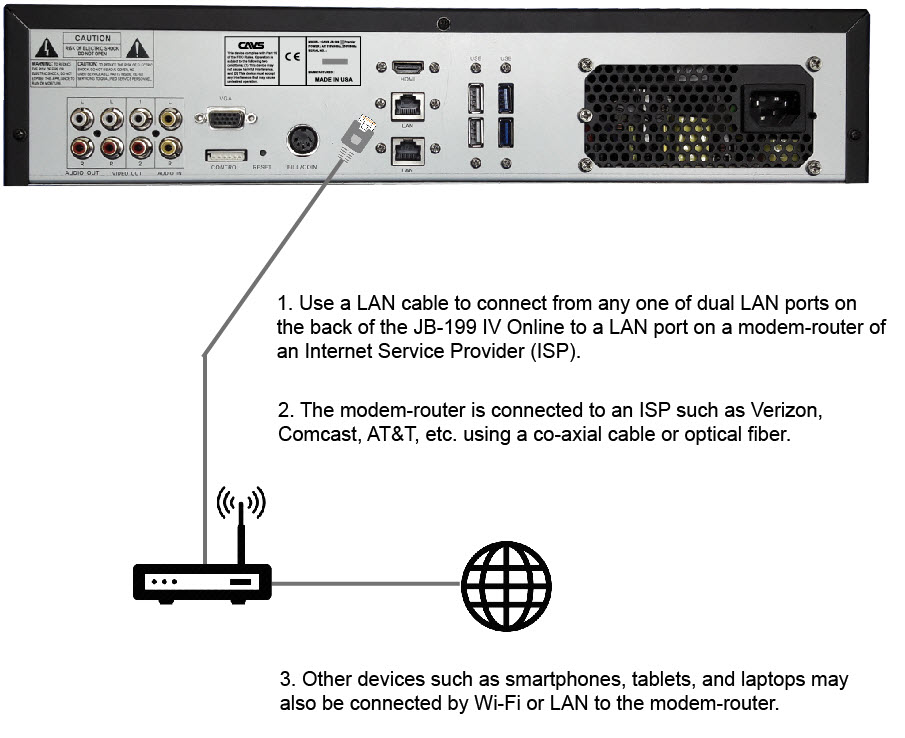
The router is connected to Internet source using a LAN cable between the WAN port of the router to the Internet source. The Internet source may be an ISP modem such as from Verizon, AT&T, or Comcast.
The default name (SSID) and the password of the router can be found at the bottom of the router. If changed, you must either enter into the router admin page to find the new values or reset the router for the default values.
After connecting to the router, restart the karaoke player. Go to Control Panel > Tools > Setting > Server & Browser. There you will find the local IP address including the port number of the karaoke player assigned by the router.
Port Forwarding
Enter into the router admin page using the ID and password given at the bottom of the router or in the router's user manual. Set the the Port Forwarding of the port found in the karaoke player and the next 10 sequential ports. For example, when the port number is 5000 as in the default case, the ports 5000 - 5010 need to be set for Port Forwarding. Select the protocol/mode as both with TCP and UDP. Forward the ports to the local IP address of the karaoke player.
Note that the specific details for port forwarding will vary between routers. In the next section, we show some examples of the Port Forwarding procedures.
Public IP address
Open an Internet browser and search for My Public IP Address.
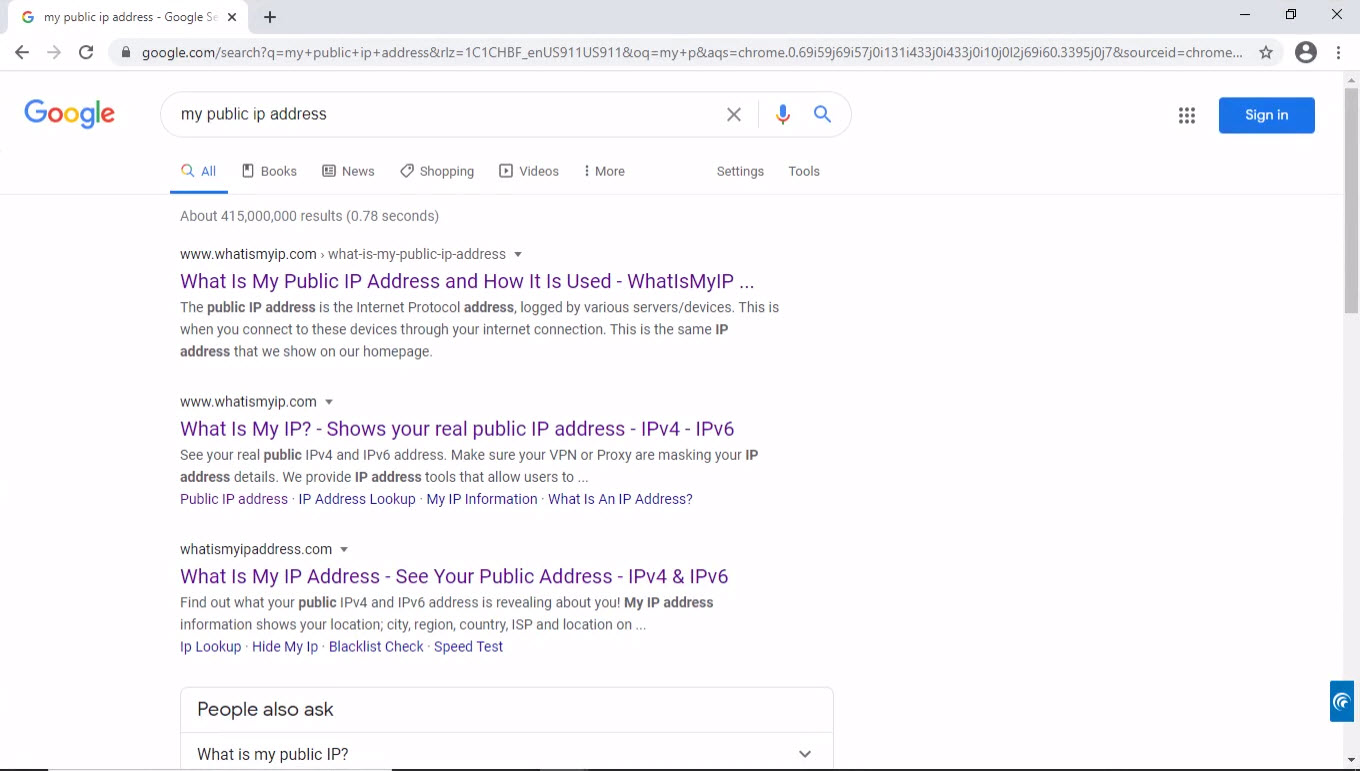
Click on a link to find the Public IP address.
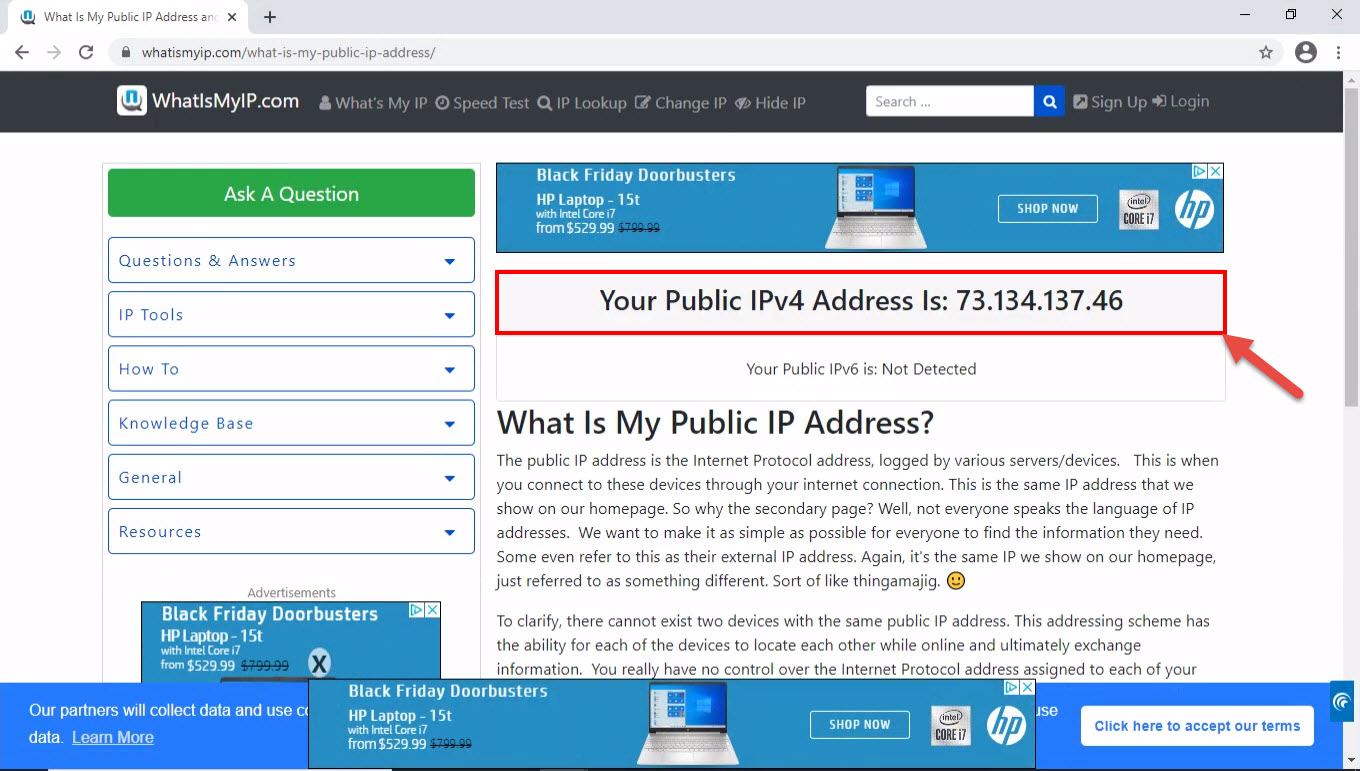
In this example, the public IP address is shown as 73.134.137.46.
Here are some examples of Port Forwarding setup instructions in commonly found routers.
-
Verizon FIOS modem-router
This modem-router acts as a router connecting direclty to the karaoke player. First step is to find the local IP address and the DNS server of the karaoke player. Go to Windows Start > Settings > Network & Internet > Status > Properties. Scroll down for the IPv4 address and the IPv4 DNS server as shown below.
Open an Internet browser and go to myfiosgateway.com or 192.168.1.1 which is the DNS server found above.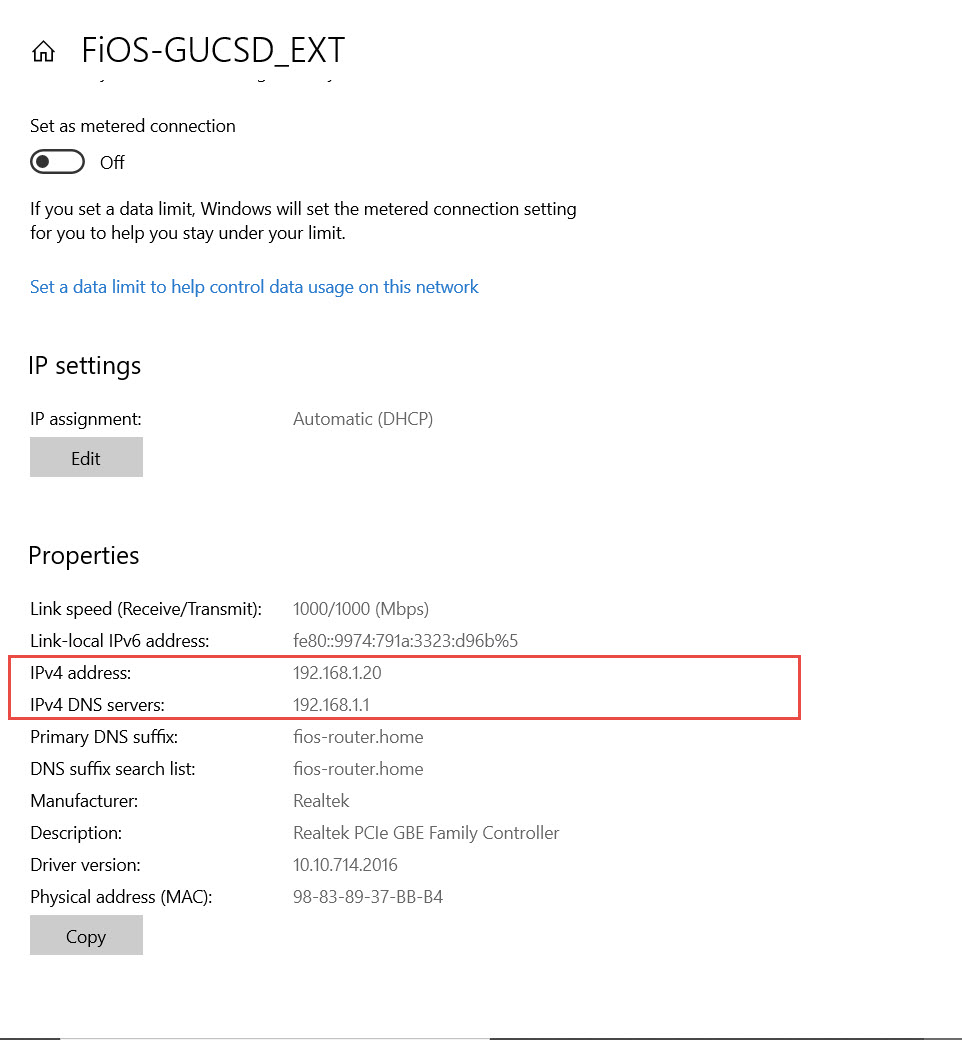
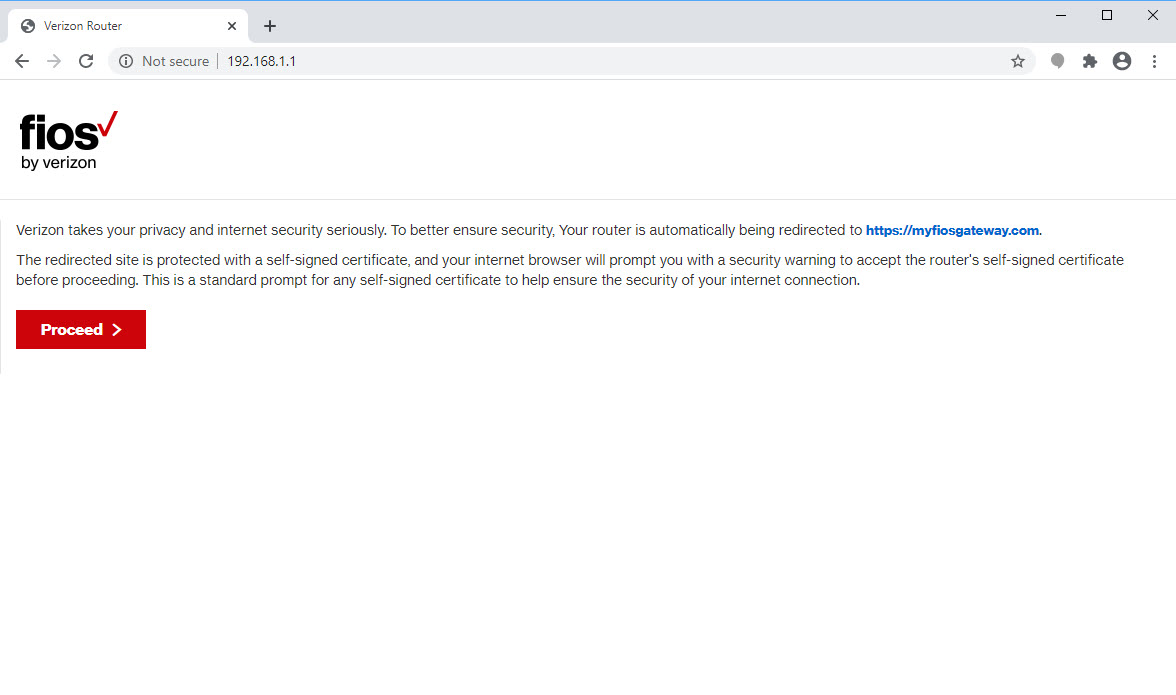
Press Proceed and input the password which is found on the modem-router device itself.
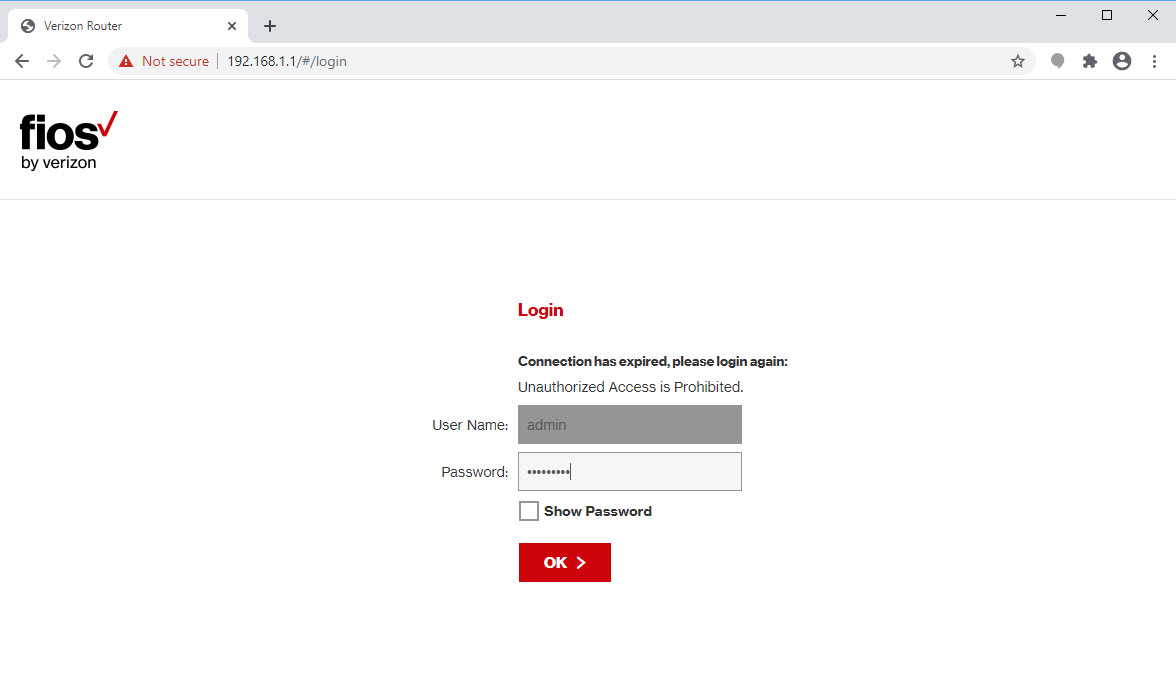
Press OK to enter the admin page as shown below.
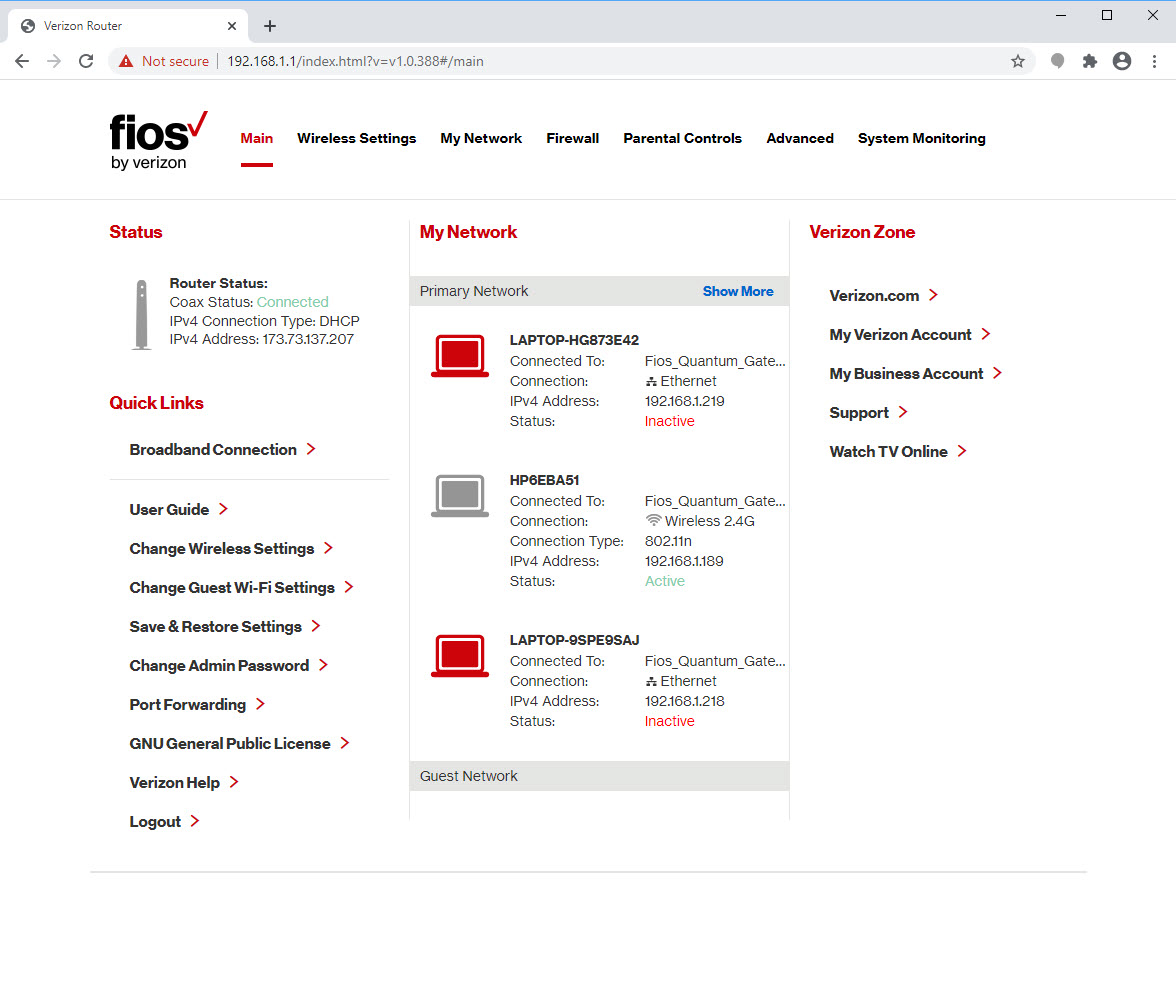
Click on Port Forwarding from the left column in the following window.
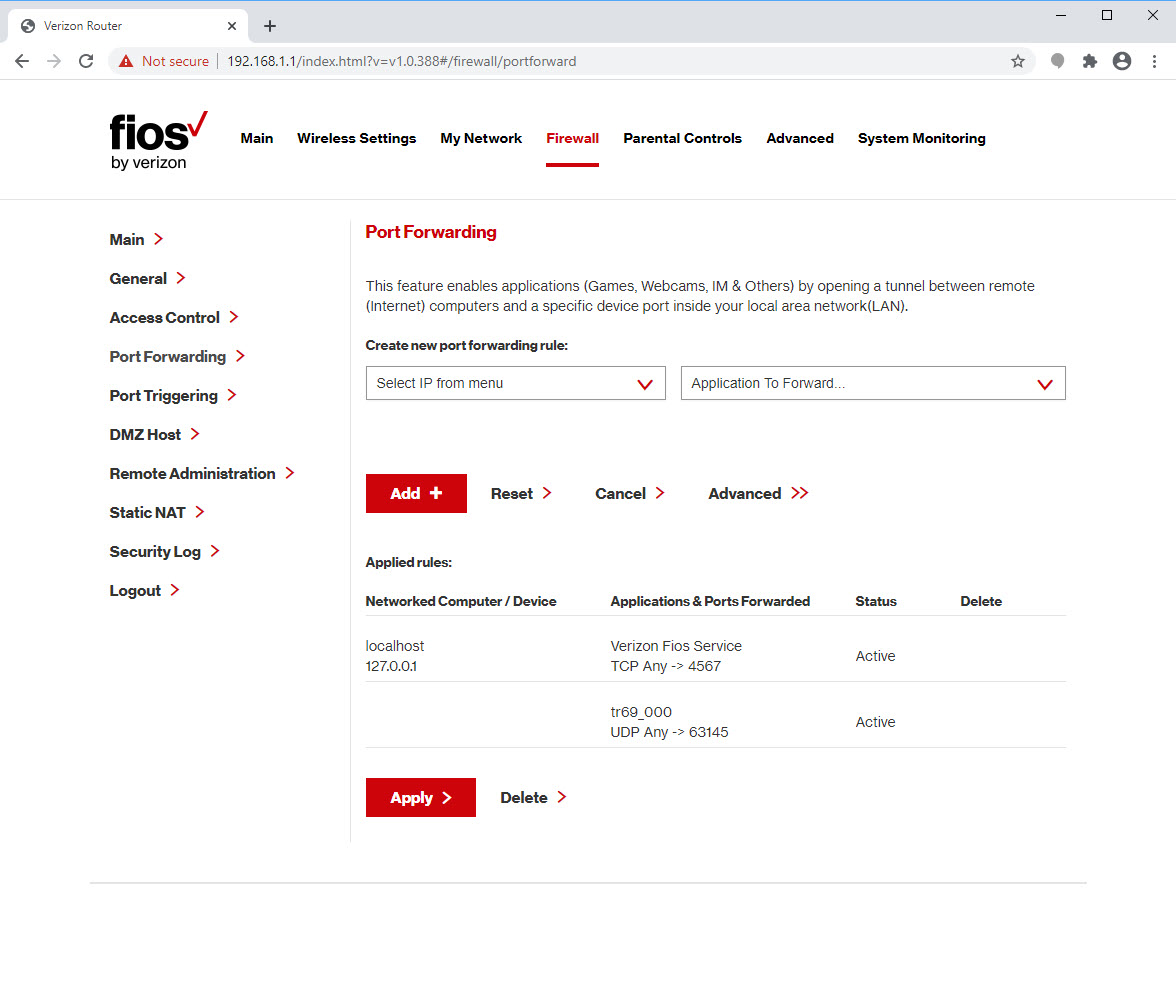
Select Specify IPv4 address and input the local IP address of the karaoke player (without the port number). Select Custom Ports as Both for TCP/UDP and 5000-5010.
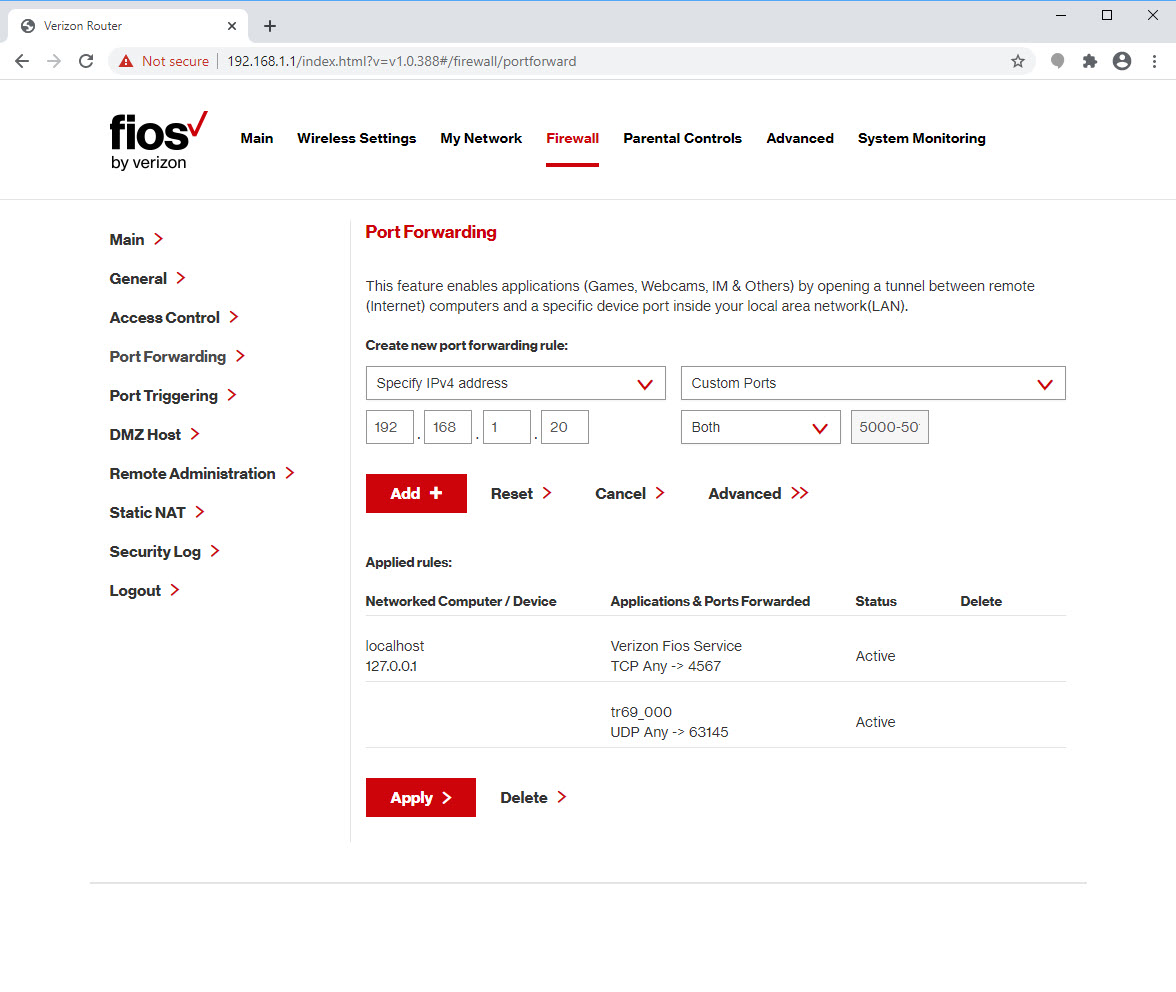
Press Add+ to create the new Port Forwarding rule as shown below.
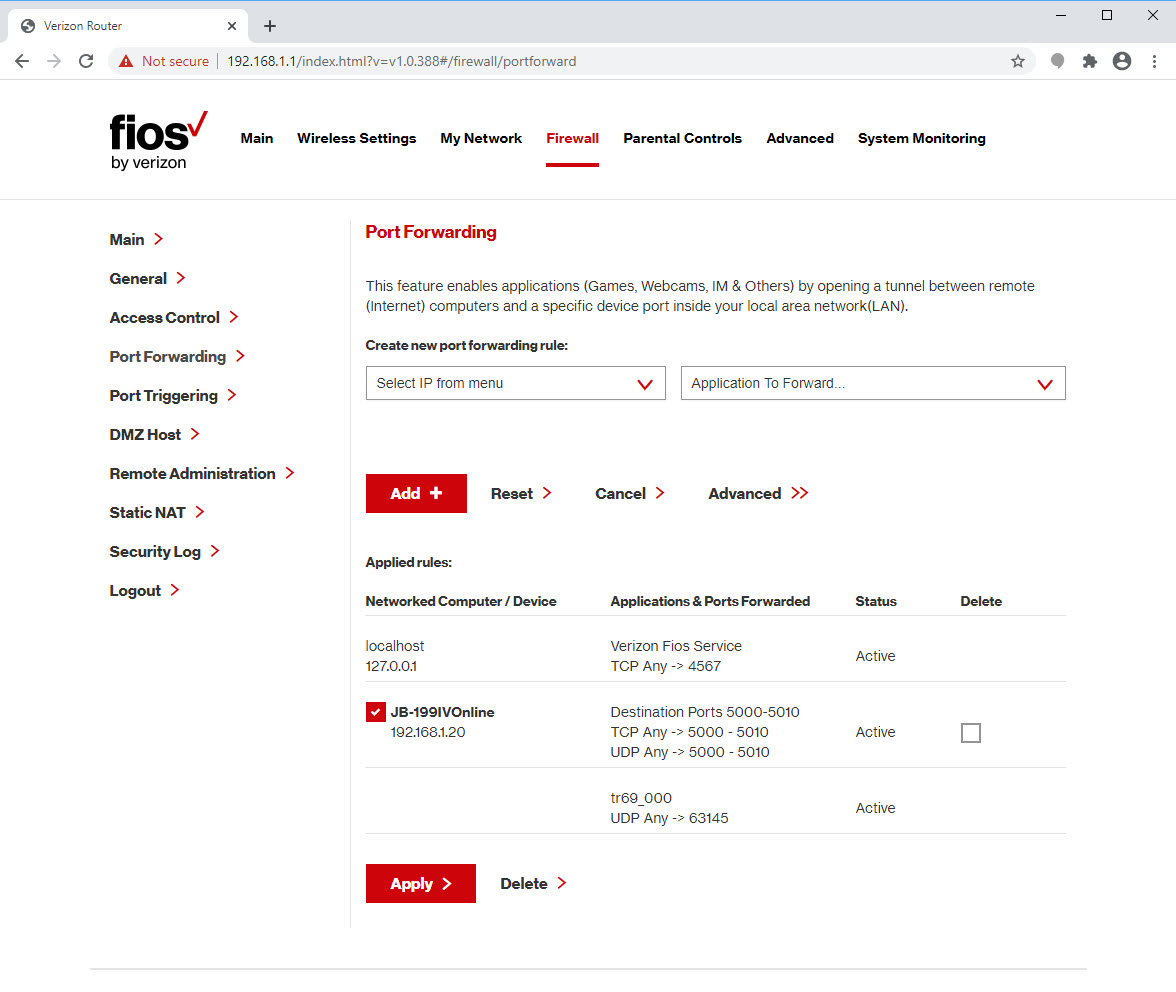
The port forwarding is complete. Press Logout from the left column and exit to the karaoke player.
-
D-Link (DSR-250) router
Check for the local IP address and the DNS server of the karaoke player at Windows Start > Settings > Network > Internet > Properties. Scroll down to the IPv4 address and the IPv4 DNS server.
Here the IPv4 address is 192.168.10.106 and the IPv4 DNS server is 192.168.10.1. Open an Internet browser and go to 192.168.10.1. A warning page may show as below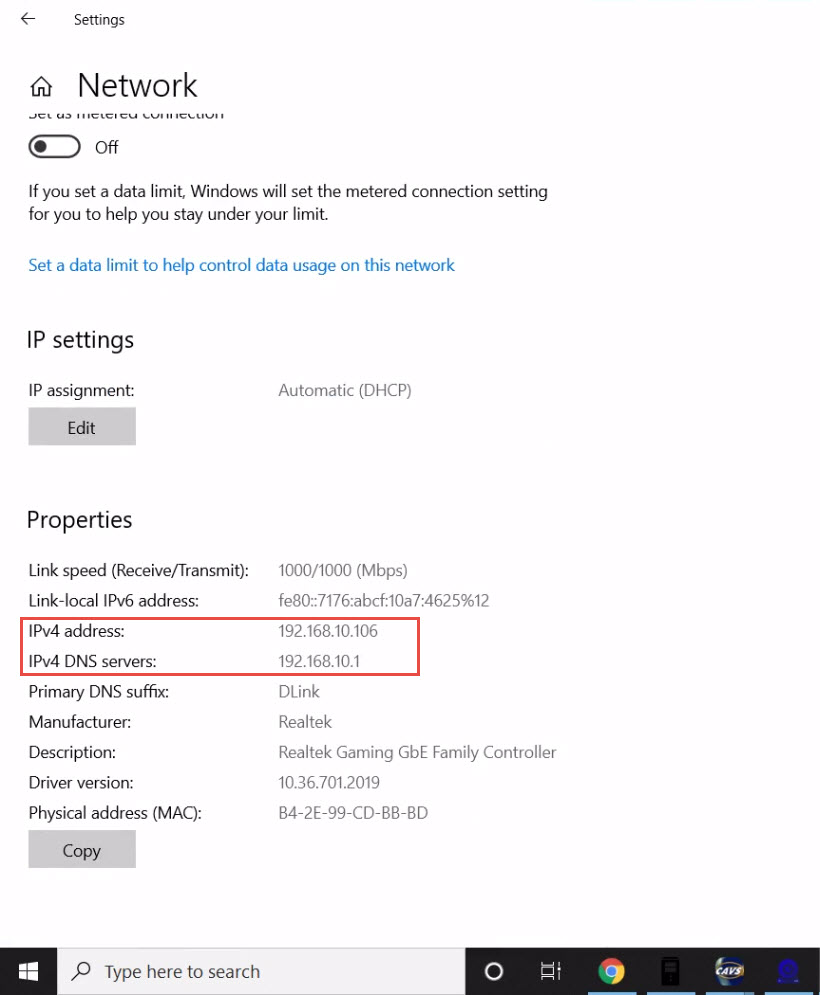
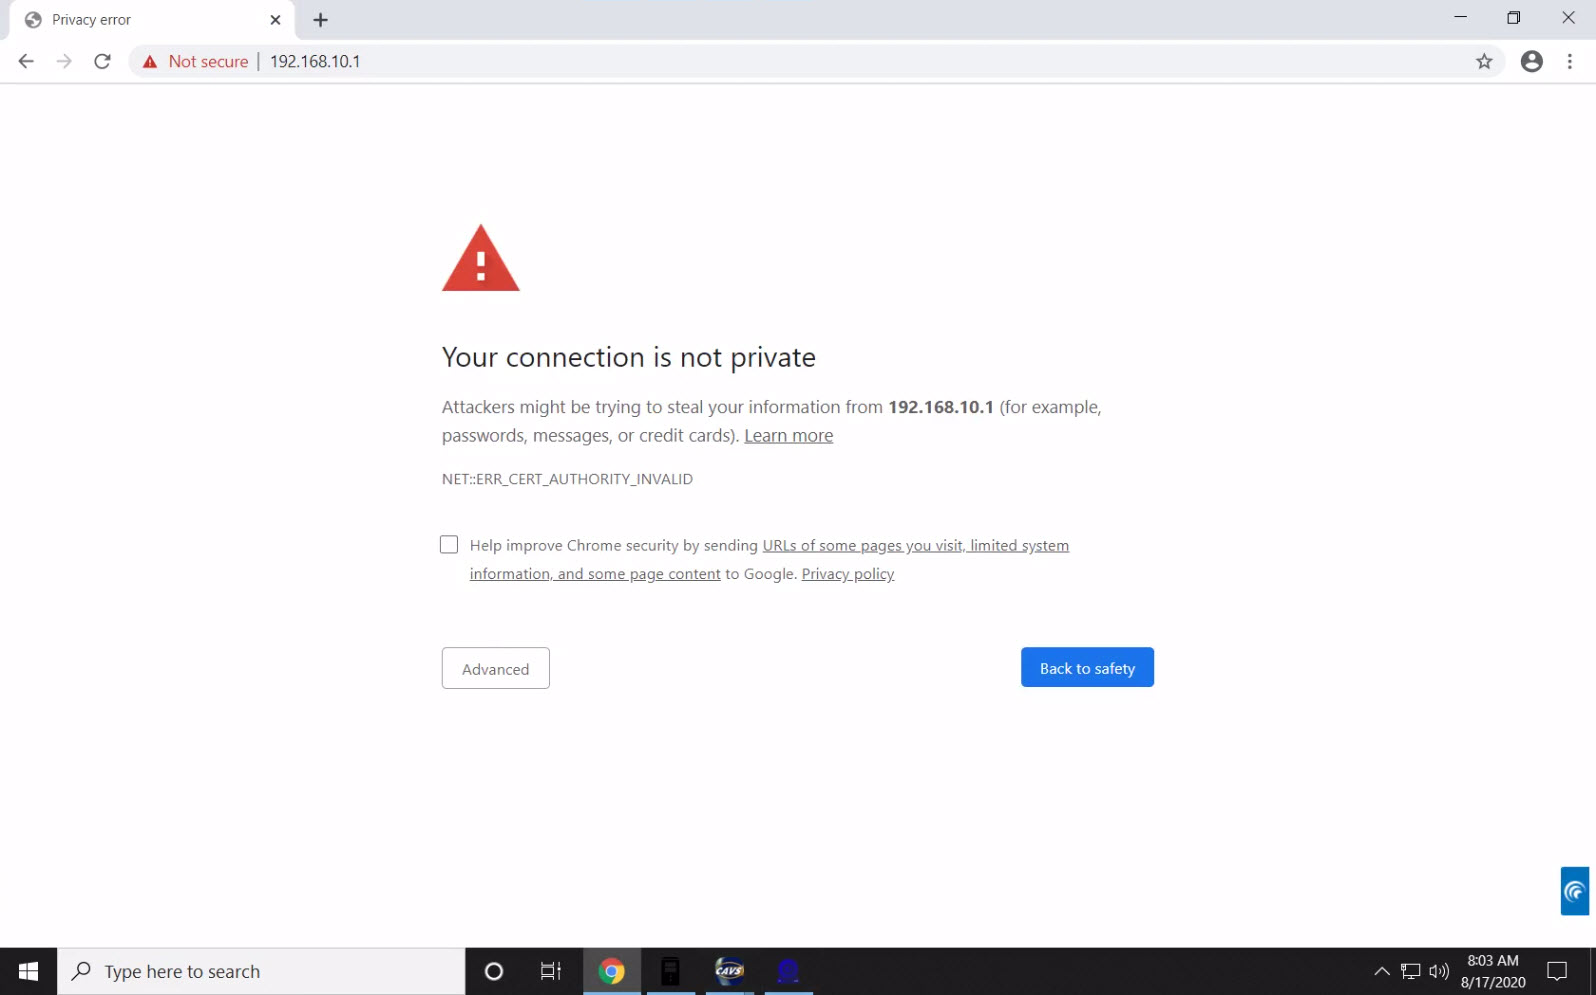
Press Advanced and proceed to the address 192.168.10.1.
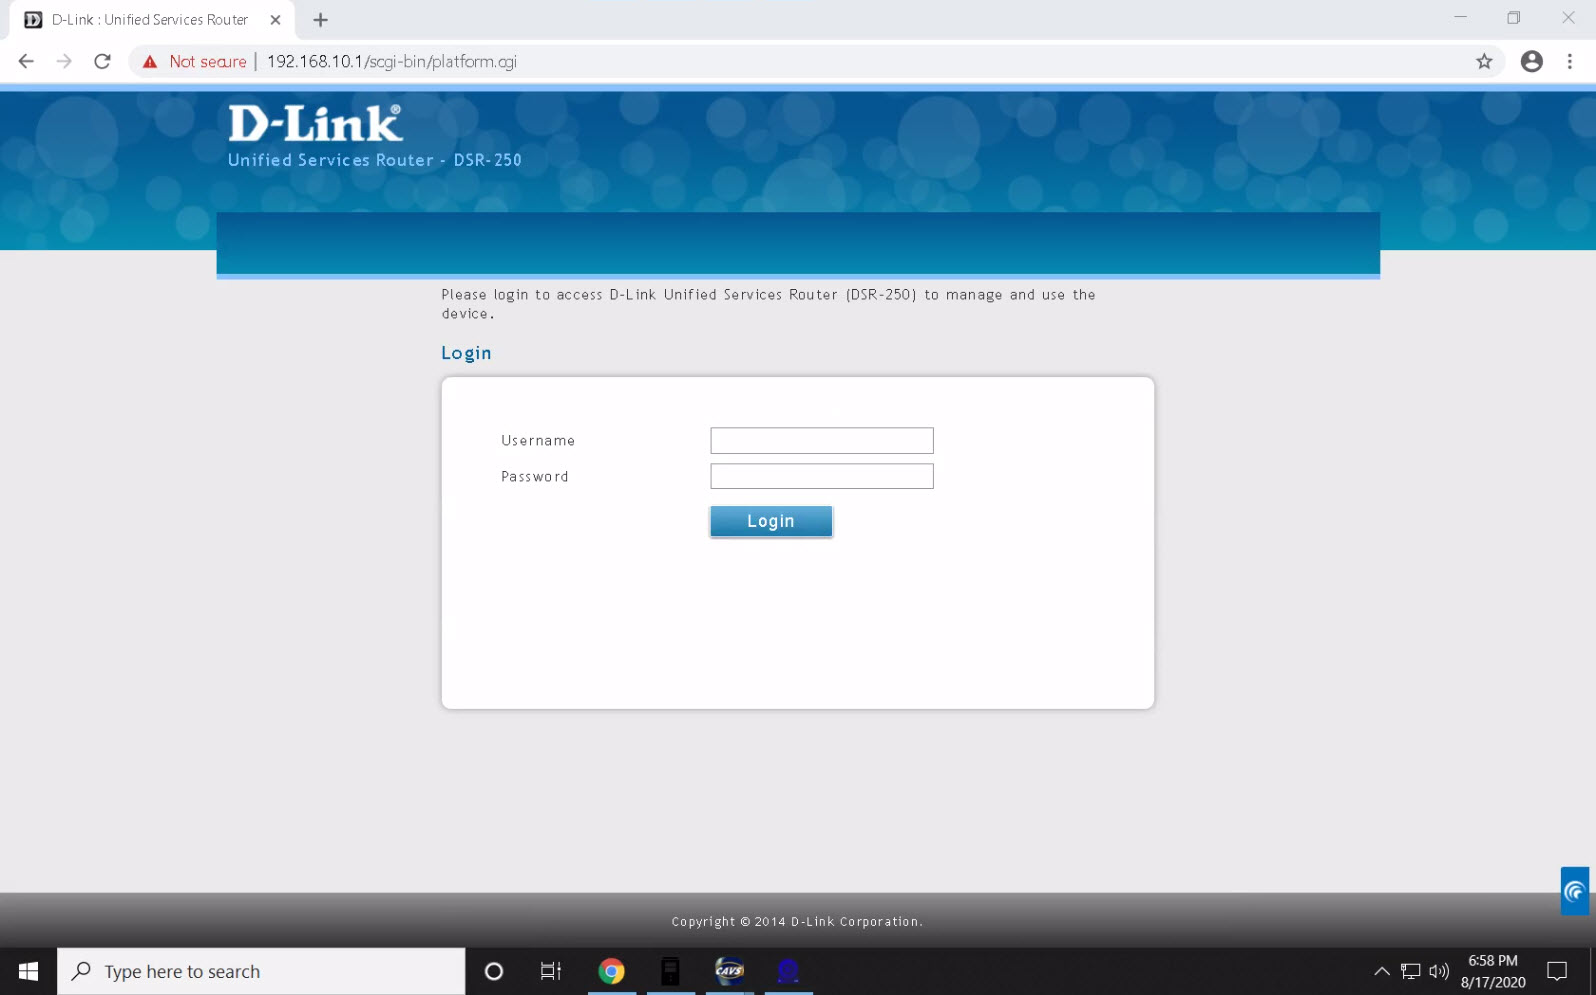
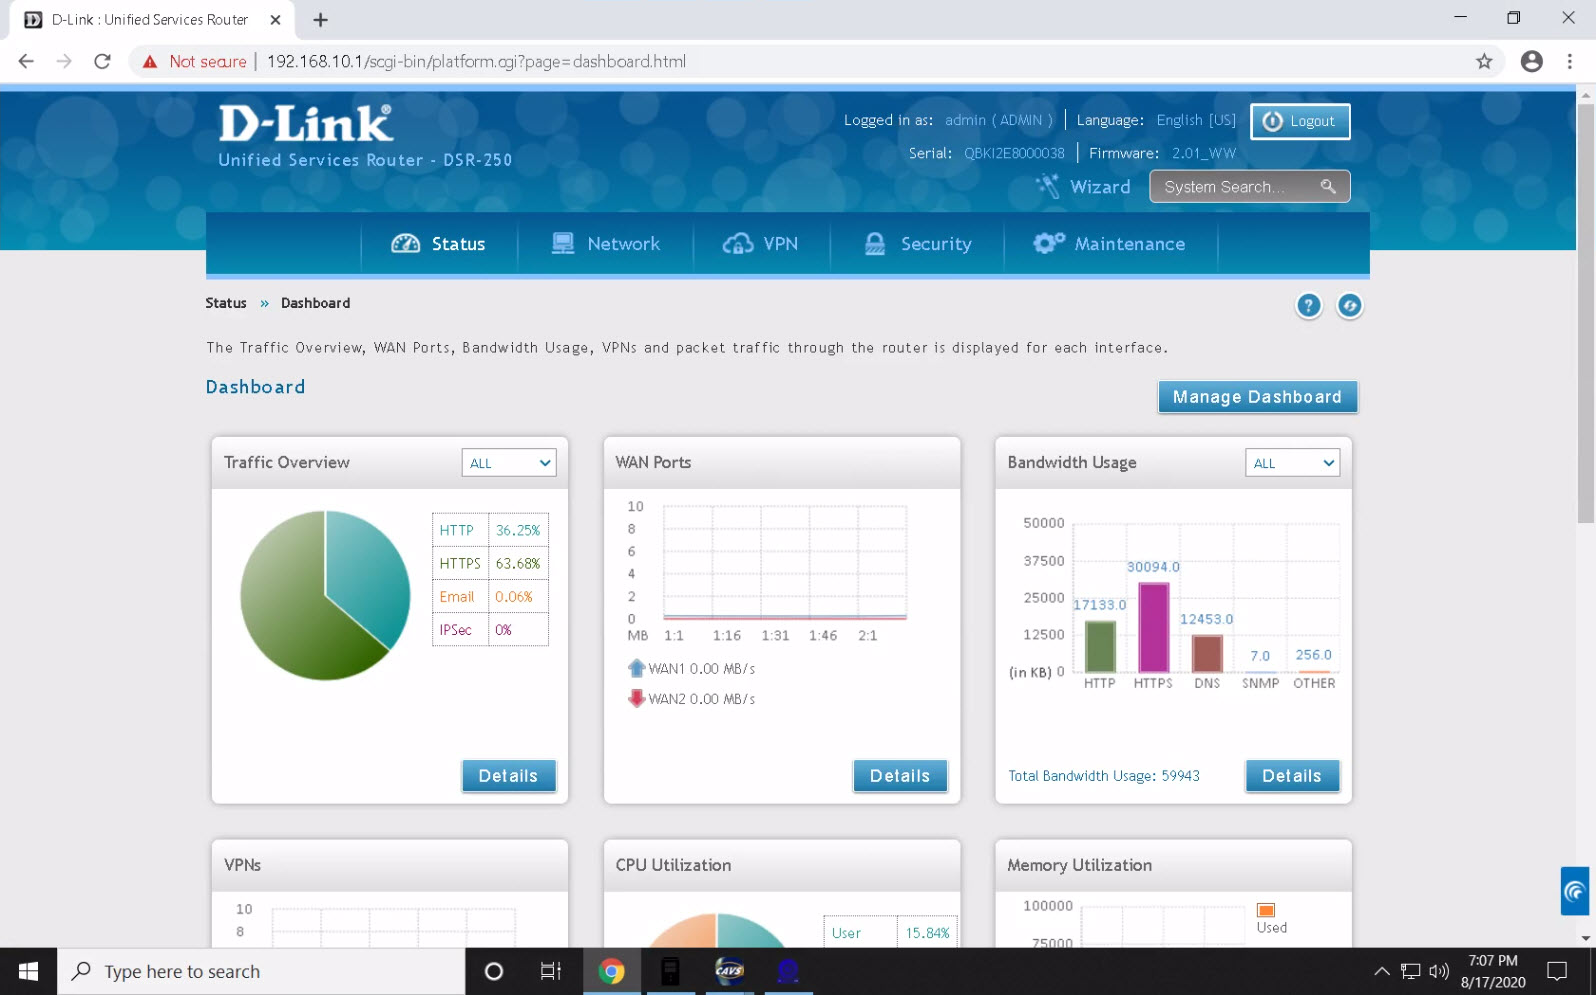
Input admin as both the Username and Password. Press Login to enter the admin page of the router.
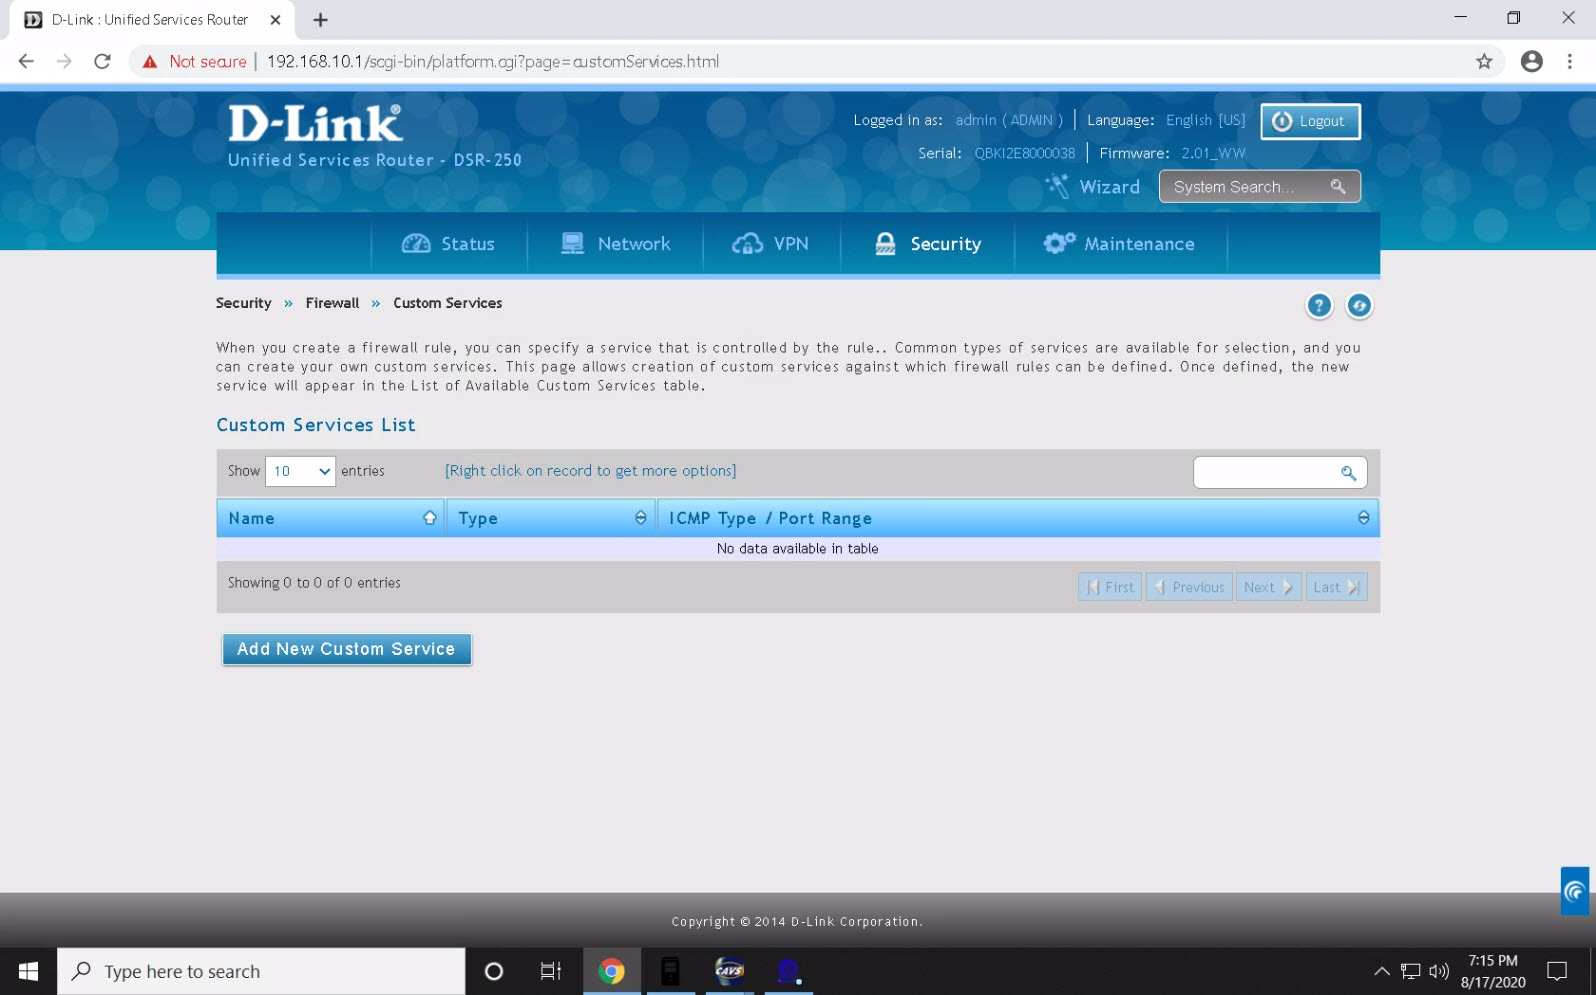
Go to Security > Firewall > Custom Service.
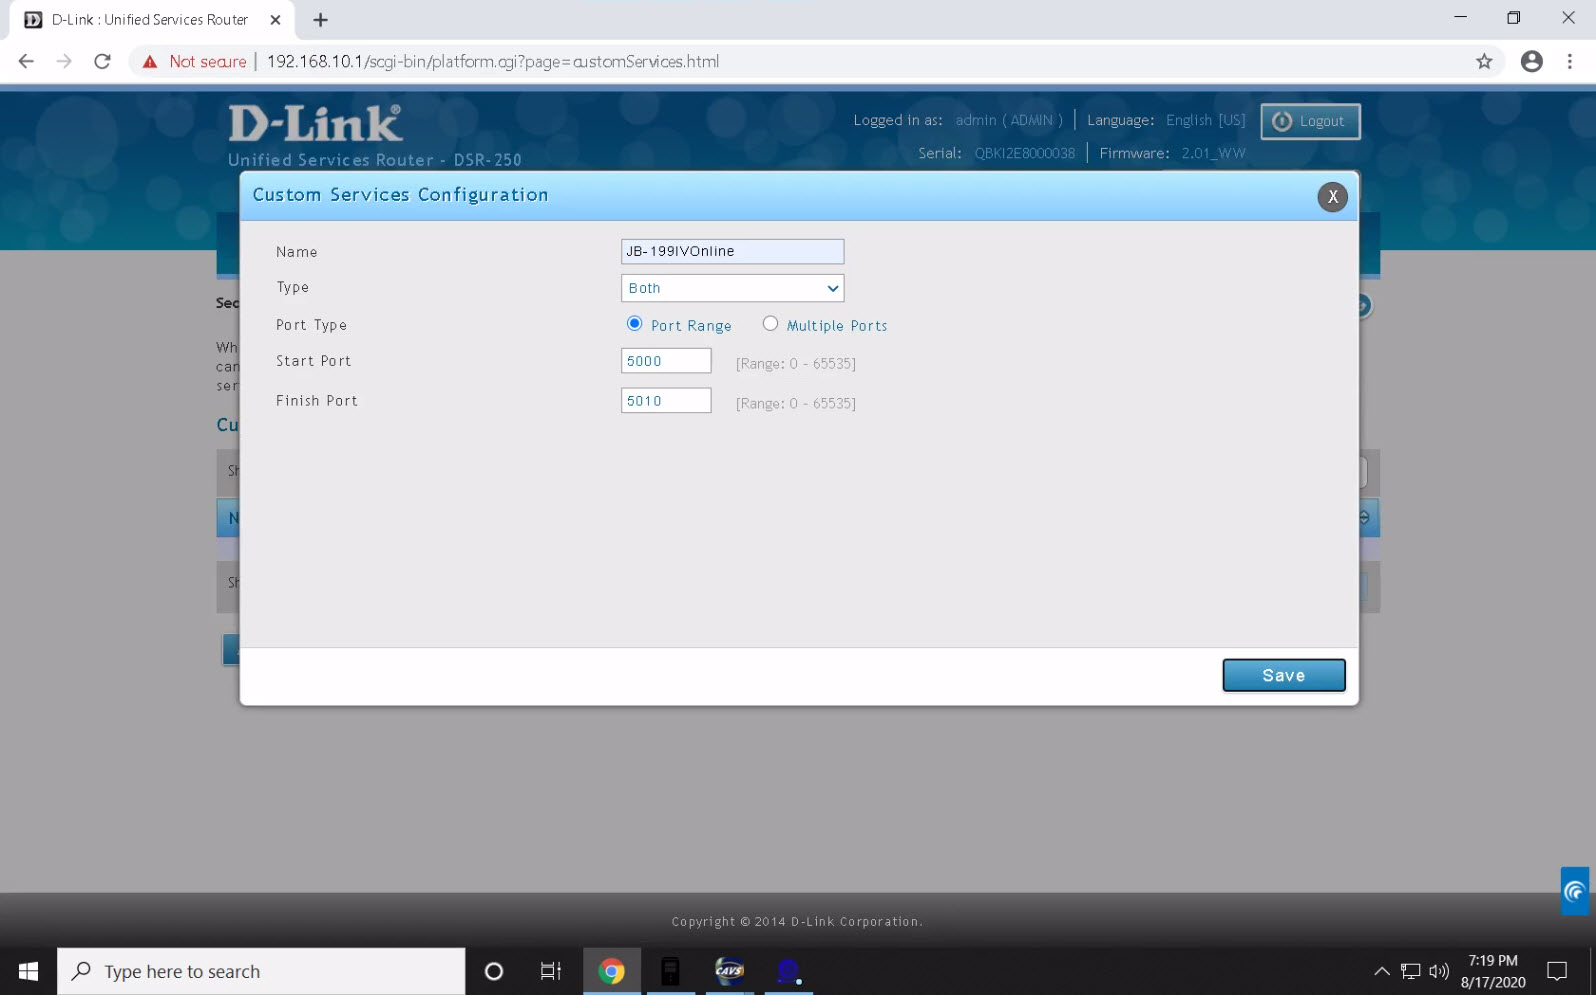
Click on Add New Custom Service. Input any name such as JB-199IVOnine, Both as the Type, 5000 as Start port, and 5010 as Finish port.
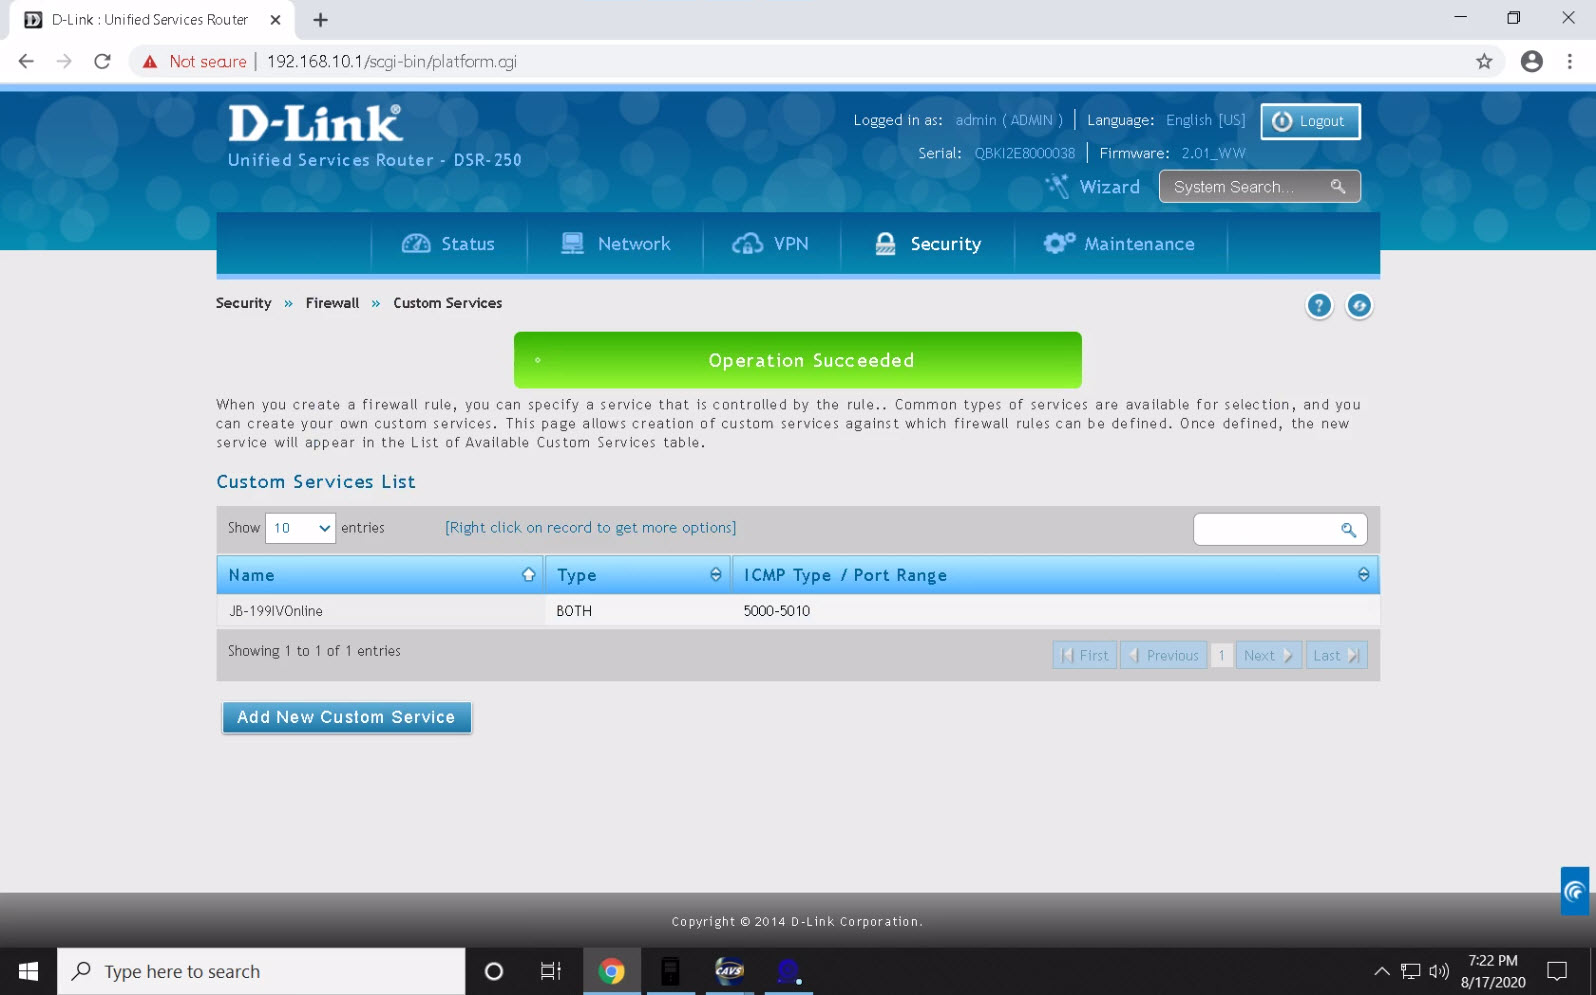
Press Save and a confirmation wll appear.
Go to Security > Firewall > Firewall Rules.
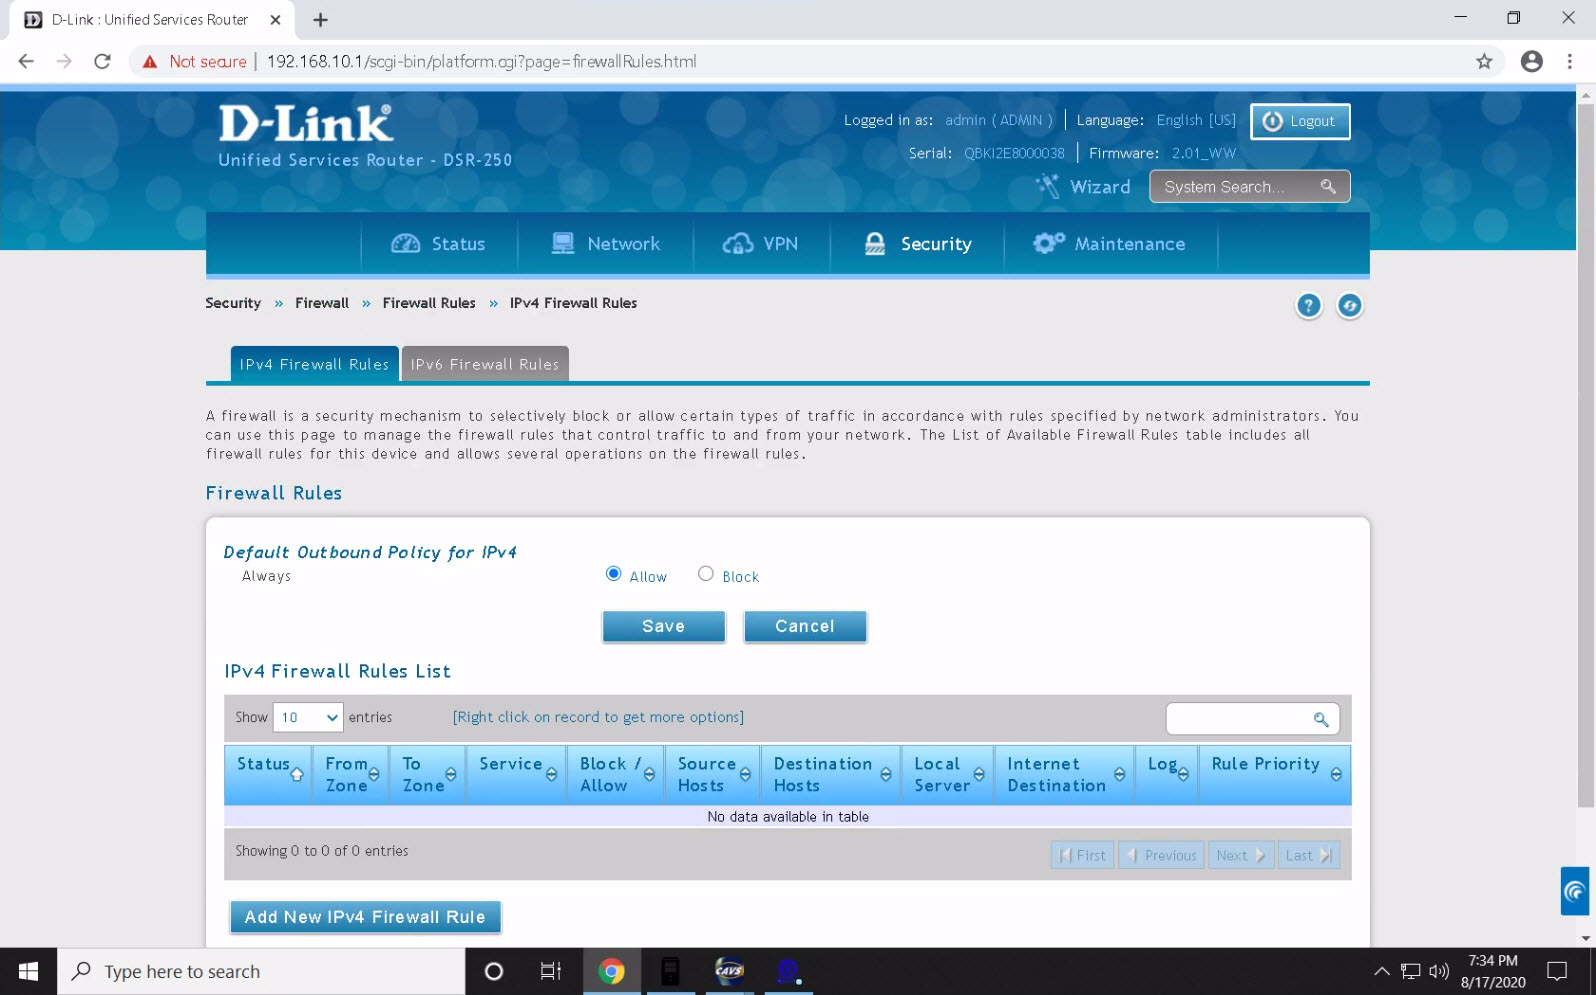
Click on Add New IPv4 Firewall Rule. Select INSECURE (WAN) for From Zone, SECURE (LAN) for To Zone, ANY for Service, Always Allow for Action, Any for Source Hosts, Never for Log, 192.168.10.106 for Internal IP Address, and WAN for External IP Address. Note that 192.168.0.106 is the local IP address of the karaoke player.
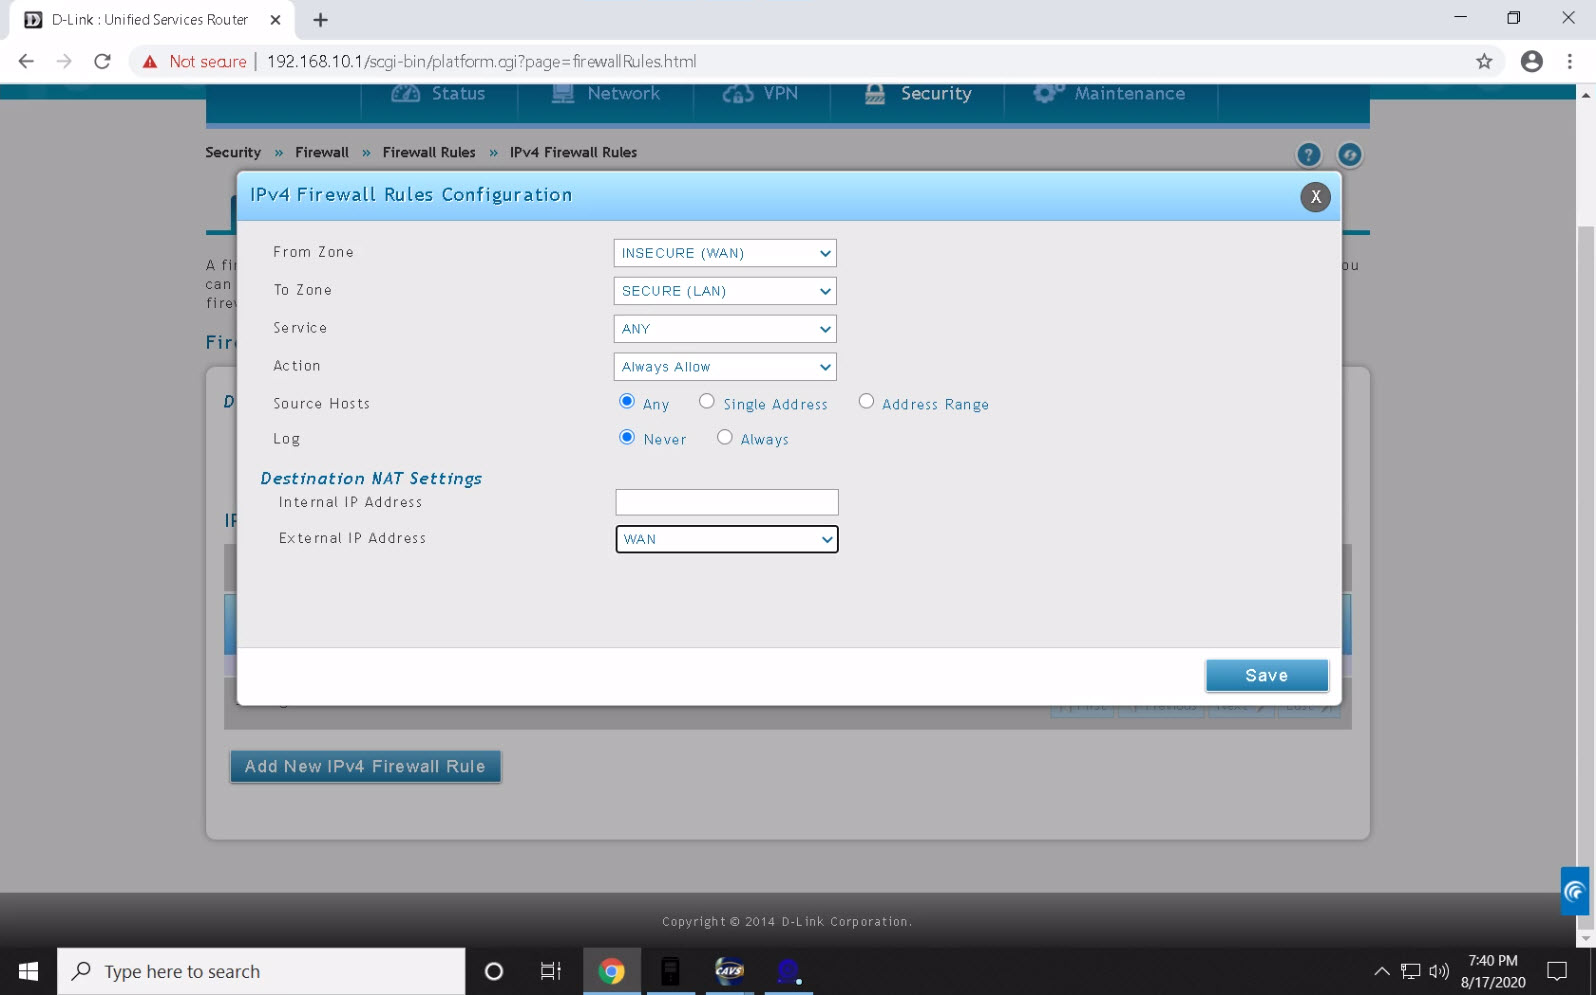
Click Save and a confirmation message will appear.
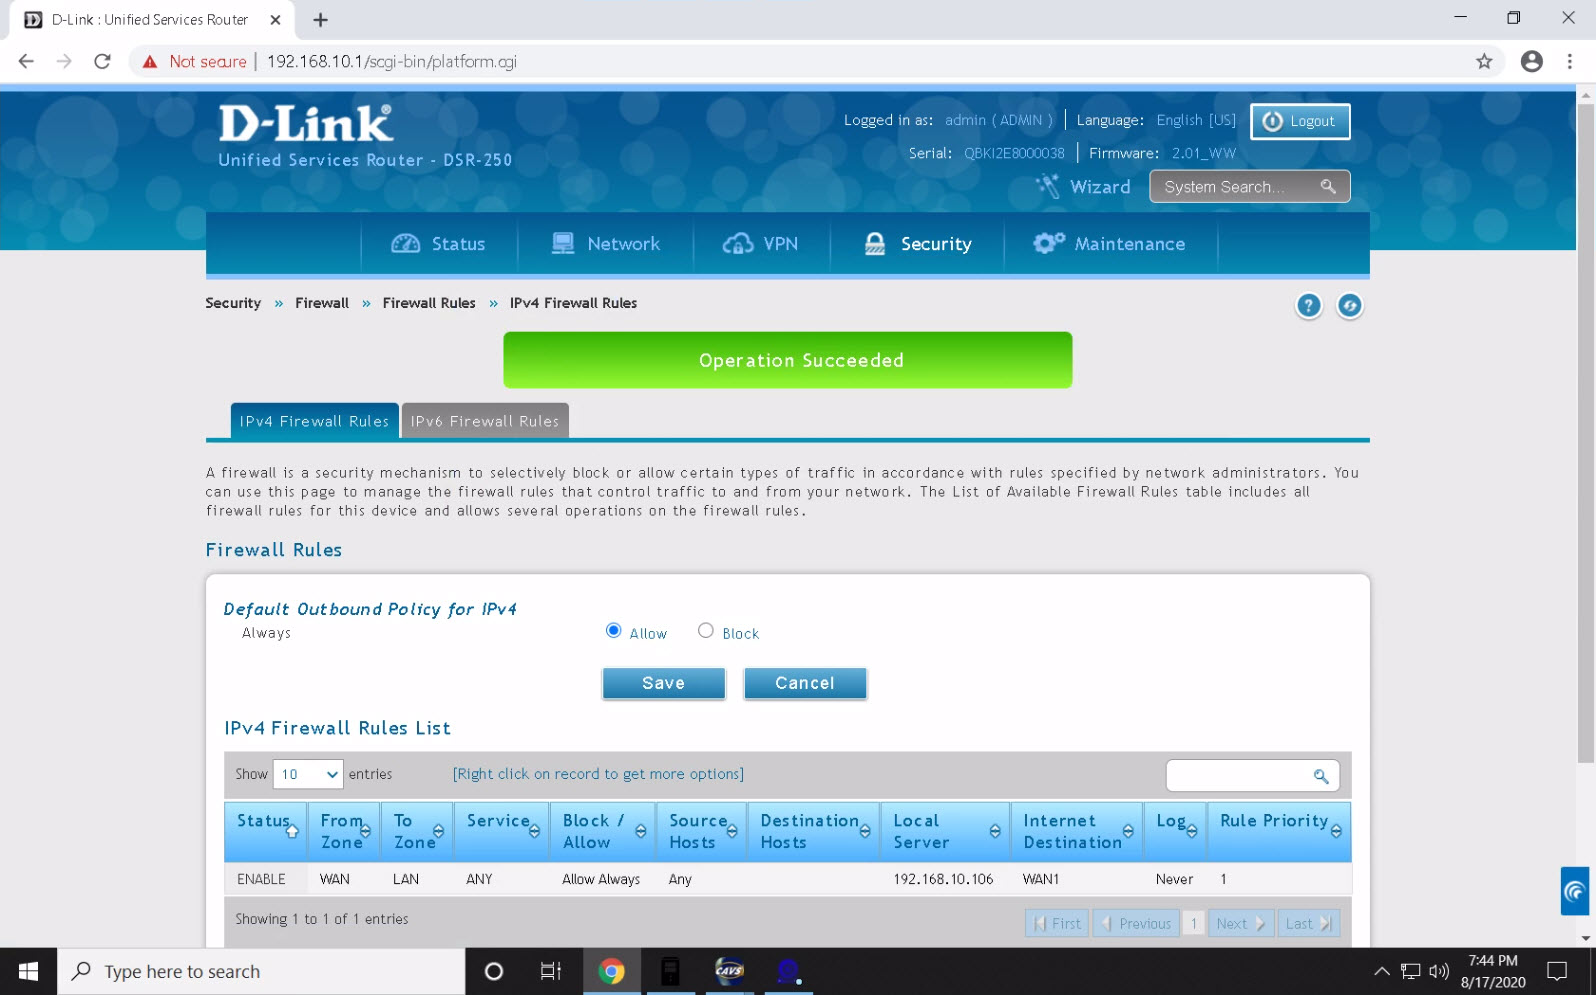
The port forwarding in complete. Logout and exit to the karaoke player.
-
Comcast Xfinity modem-router
This modem-router connects directly to the karaoke player as a router. First check for the local IP address and the DNS server of the karaoke player by going to Windows Start >Settings > Network & Internet > Status > Properties. Scroll down to the bottom to find the IPv4 IP address and IPv4 DNS server.
Open an Internet browser and go to the DNS server to open the admin page.

Login using the Username and Password given on the modem-router itself. Go to Advanced > Port Forwarding.
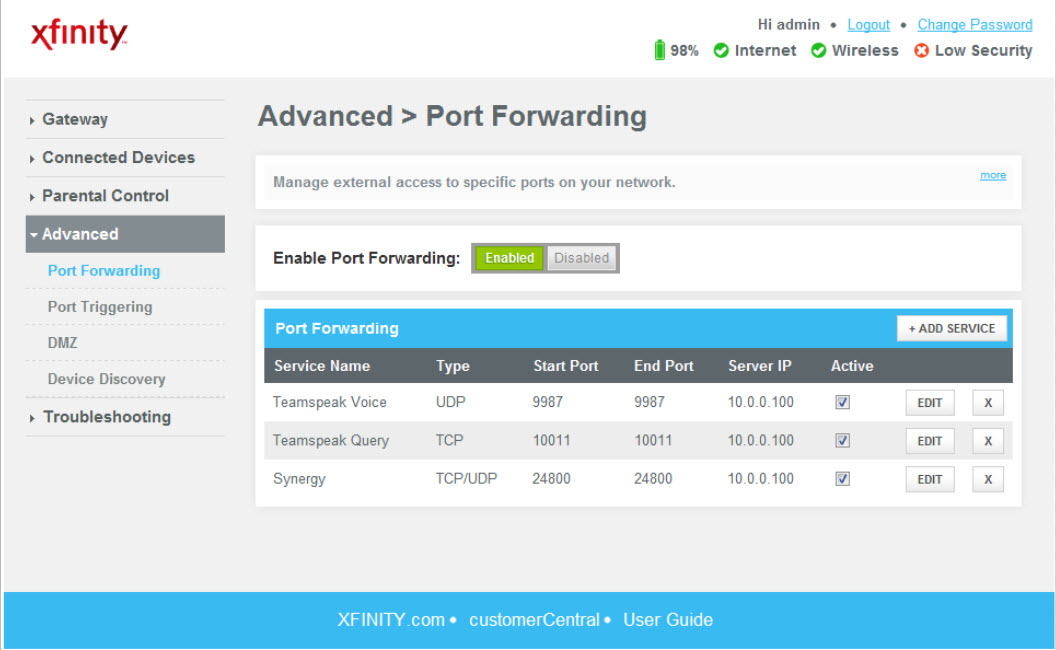
Confirm that the port forwarding is enabled. Click on ADD SERVICE.
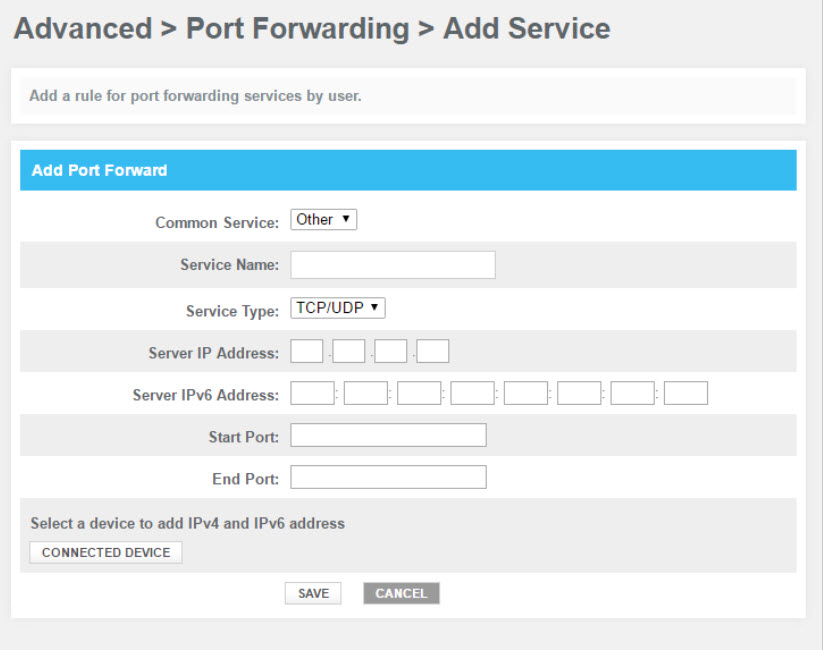
Select Others as Common Services. Input any name for the Service Name, for example JB-199IVOnline. Input the local IP address of the karaoke player as Server IP Address. Skip the Server IPv6 Address. Input 5000 as the Start Port. Input 5010 as the End Port. Click on SAVE.
The port forwarding is completed. Logout of the modem-router.