IPS MANAGER
CAVS IPS Manager is a program that has three major functions.
First, it extracts the songs of the following discs to the -MCG file format of the IPS-11G player.
- CD+G discs
- CD discs
- Super CD+G discs
Second, it converts the song files of following formats to the -MCG file format of the IPS-11G player.
- CDG + MP3: Online MP3+G downloads
- MCG + MP3: CAVS DVD USB Karaoke players: 105G USB, 203G USB, 305G USB
- NCG + MP3: CAVSJB-199 (I, II)
*Note that the song files of CAVS PlayCDG KJ Deluxe 64 LT, CAVS Karaoke Laptops, Touch Screen, and All-In-One players that are in the song file formats above can also be converted to the -MCG file format using the IPS Manager program.
Third, the IPS Manager program indexes the song files by index, title, and artist name and stores them into the USB memory devices.
- Index using the online web database
- Index using the file names
- Index using the ID Tags
- Index using the song list
- Index using the keyboard input
- Windows XP, Vista, 7, 8, or 8.1 (32 bit or 64 bit)
- DVD Recordable disc drive (to extract CD+G or Super CD+G disc)
- Internet connection (to access online web database)
- USB flash drive or USB hard drive (must be formatted FAT32)
2. Inserting the songs from a CD+G, CD, or Super CD+G disc
- Insert a CDG, CD, or Super CD+G disc into the DVD Recordable disc drive of your PC. Close any pop-up programs.
- Start the IPS Manager program.
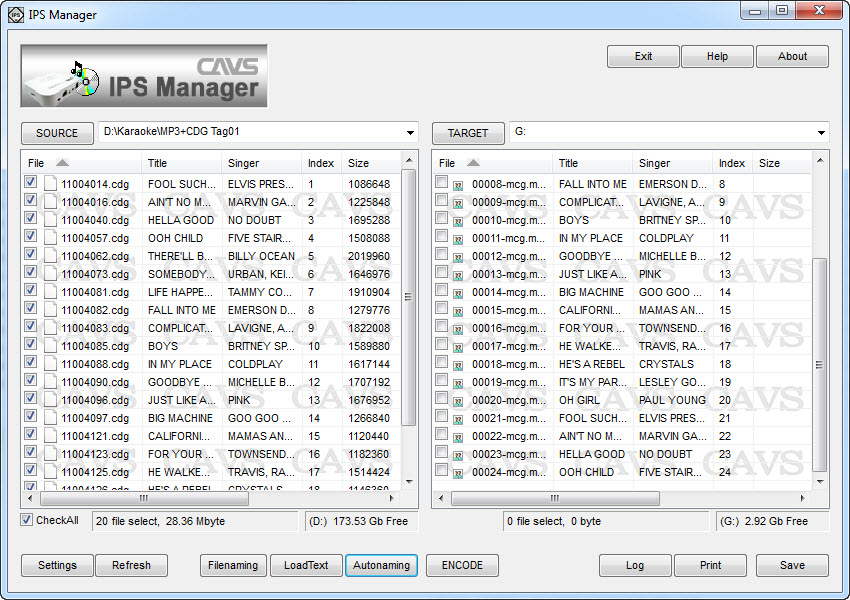
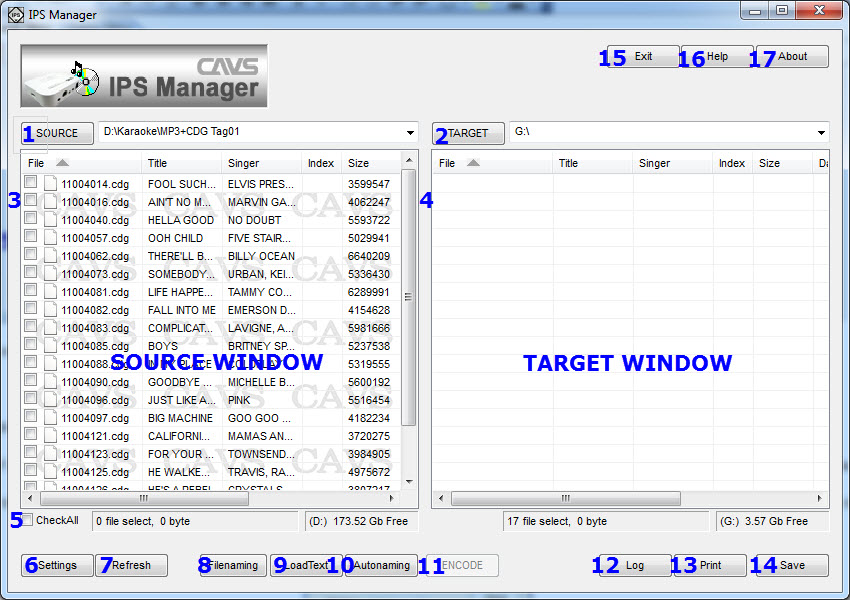
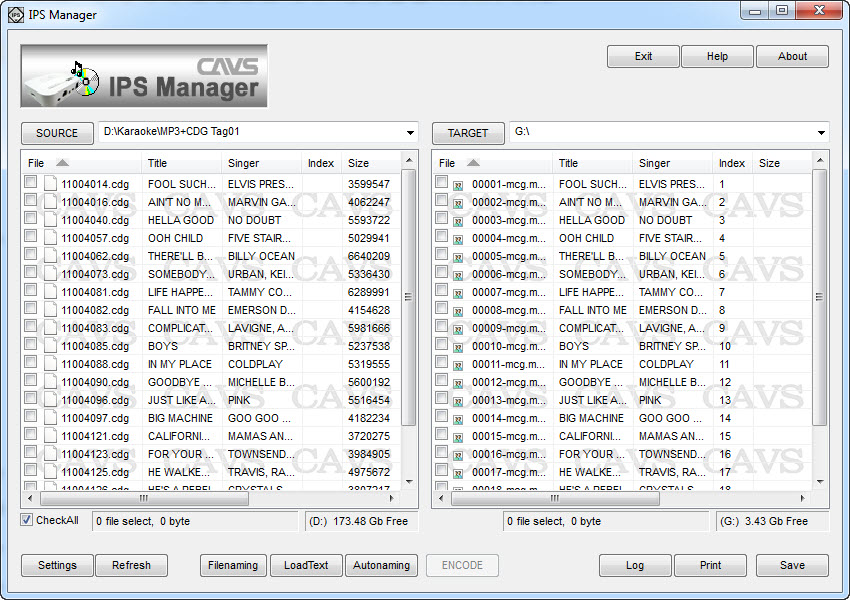
- Press SOURCE(1) and select the disc drive. The tracks in the disc will show up in the SOURCE window.
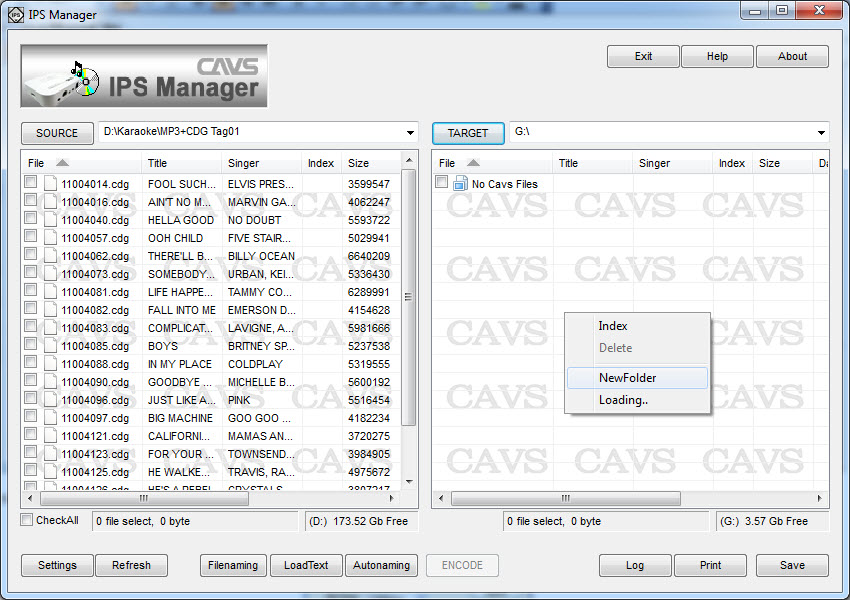
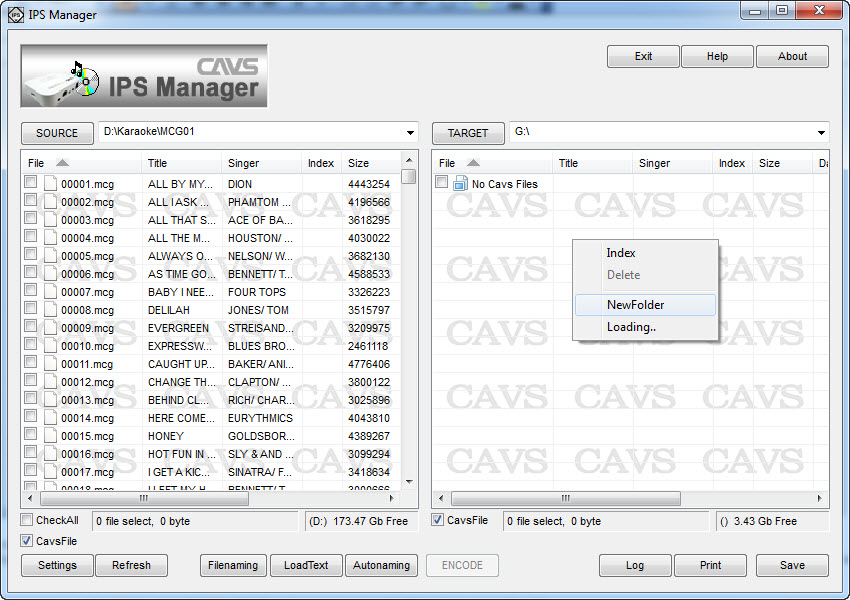
- Press TARGET(2) and select a folder of your choice (such as G:\, the root folder of an USB flash drive). If you wish to create a subfolder and it has not been created, place your mouse on TARGET window, right click, select New > Folder, and input a new folder’s name.
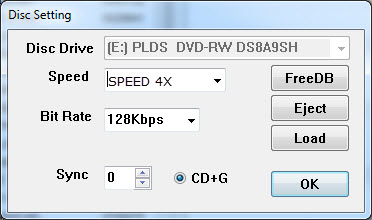
- Press Settings(6) and press FreeDB to fill in the titles and artist names of the songs using the online web database. If the disc is found in the online web database, a message will appear stating that the disc is not found.
- If the disc is not found in the online web database, there are following alternative ways to fill in the titles and artist names.
- Use the filenames to fill in the titles and artist names. Press Filenaming (6) and the following screen will appear.
Click on Clear to reset the input field. Click on the Album, Artist, Track, and Title in order that matches the file names. Press OK.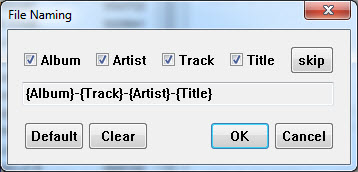
For example, if the file name of the song files are 'Love Me Tender - Presley, Elvis.cdg' and 'Love Me Tender - Presley, Elvis.mp3', then make the following input field to match the file name and press OK.
If the file name of the song files are '256 - Presley, Elvis - Love Me Tender.cdg' and '256 - Presley, Elvis - Love Me Tender.mp3', then make the following input field and press OK.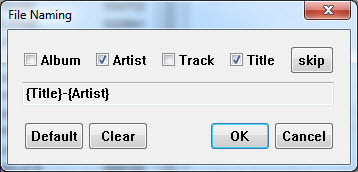
Note that the songs to which the Filenaming option will apply must first be selected.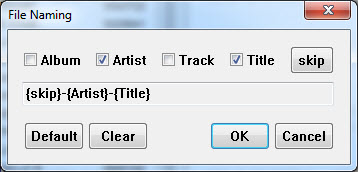
- Use a song list to fill in the titles and artist names.
Press LoadText (7) and select a song list (text file) to fill in the titles and artist names.
The song list will need to be made using the following format.
Each line represents a song and has Index, Title, and Artist name separated by "|" sign.

- Use the keyboard to manually type in the titles and artist names. Double click on any field to edit or input the field. Press Enter to save and exit. Also the disc name and volume can be searched in Internet browsers such as Yahoo or Google. When found, the title and artist names can be copies and pasted.
- Use the filenames to fill in the titles and artist names. Press Filenaming (6) and the following screen will appear.
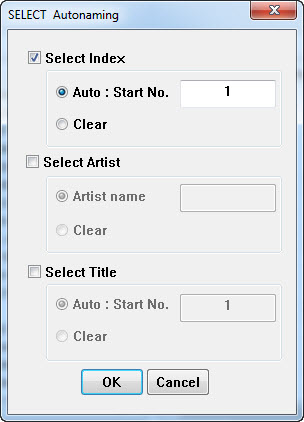
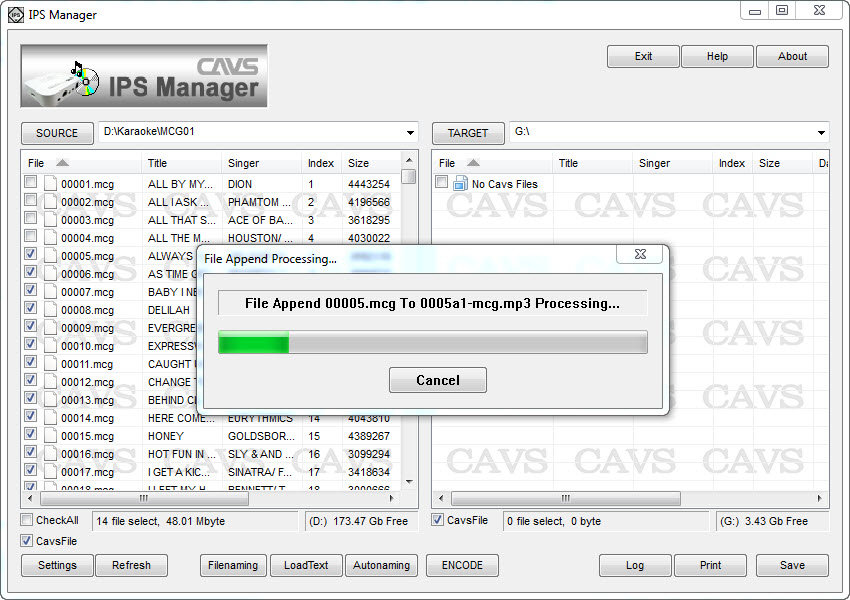
- Place the check marks on the songs (or press CheckAll button for all songs) you wish to extract. Press INDEX-TITLE(10) and select Auto:Start No. and input 1. Click OK.
- Press ENCODE(11) and the extraction will begin.
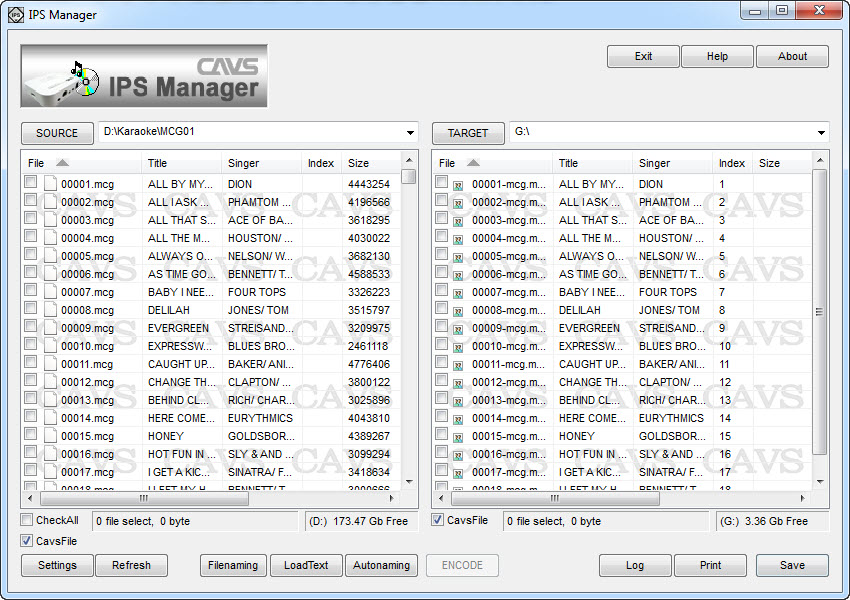
- When the extraction is completed, press SAVE(14). The -MCG song files should now be shown on the TARGET window.
- Note that when opened in the Windows Explorer, the TARGET drive G:\ will look as below.
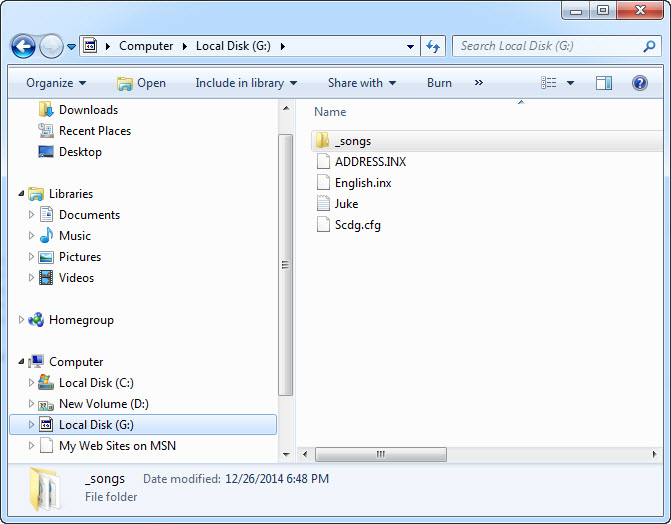
- _songs - Song file folder containing all the -MCG song files.
- Juke.txt Song list (.txt file format) containing the index number, title, and artist names of all song files.
- ADDRESS.INX - Physical addresses of the song files inside the _songs folder.
- English.inx Not in use.
- Scdg.cdg Not in use.
b. Into an existing folder with song files
- Insert a CDG, CD, or Super CD+G disc into the DVD Recordable disc drive of your PC. Close any pop-up programs.
- Start the IPS Manager program.
- Press SOURCE(1) and select the disc drive. The tracks in the disc will show up in the SOURCE window.
- Press TARGET(2) and select a folder of your choice (such as G:\, the root folder of an USB flash drive).
- Press Settings(6) and press FreeDB to fill in the titles and artist names of the songs using the online web database. If the disc is found in the online web database, a message will appear stating that the disc is not found.
- If the disc is not found in the online web database, there are following alternative ways to fill in the titles and artist names.
- Use the filenames to fill in the titles and artist names. Press Filenaming (6) and the following screen will appear.
Click on Clear to reset the input field. Click on the Album, Artist, Track, and Title in order that matches the file names. Press OK.
For example, if the file name of the song files are 'Love Me Tender - Presley, Elvis.cdg' and 'Love Me Tender - Presley, Elvis.mp3', then make the following input field to match the file name and press OK.
If the file name of the song files are '256 - Presley, Elvis - Love Me Tender.cdg' and '256 - Presley, Elvis - Love Me Tender.mp3', then make the following input field and press OK.
Note that the songs to which the Filenaming option will apply must first be selected. - Use a song list to fill in the titles and artist names.
Press LoadText (7) and select a song list (text file) to fill in the titles and artist names.
The song list will need to be made using the following format.
Each line represents a song and has Index, Title, and Artist name separated by "|" sign.
- Use the keyboard to manually type in the titles and artist names. Double click on any field to edit or input the field. Press Enter to save and exit. Also the disc name and volume can be searched in Internet browsers such as Yahoo or Google. When found, the title and artist names can be copies and pasted.
- Use the filenames to fill in the titles and artist names. Press Filenaming (6) and the following screen will appear.
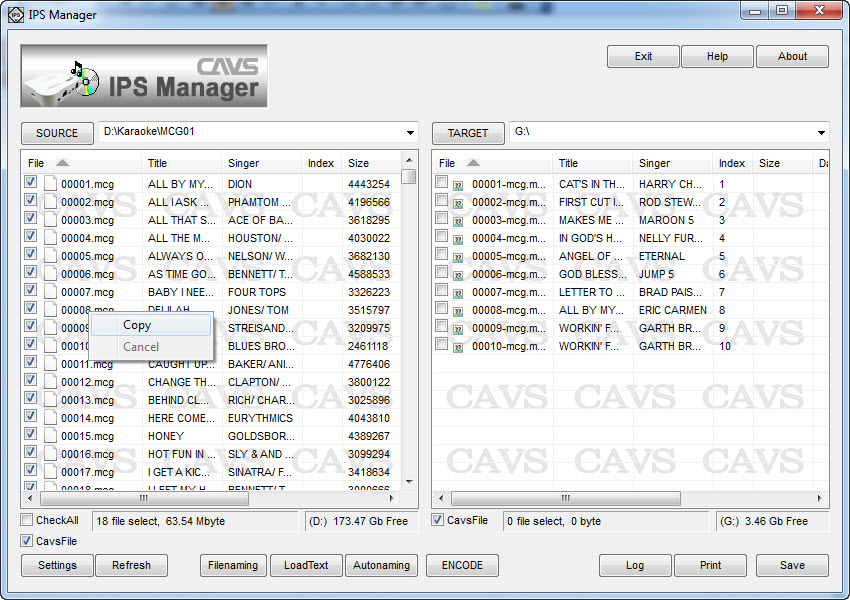
- Place the check marks on the songs (or press CheckAll button for all songs) you wish to extract. Right click on any of the songs check marked and select Copy.
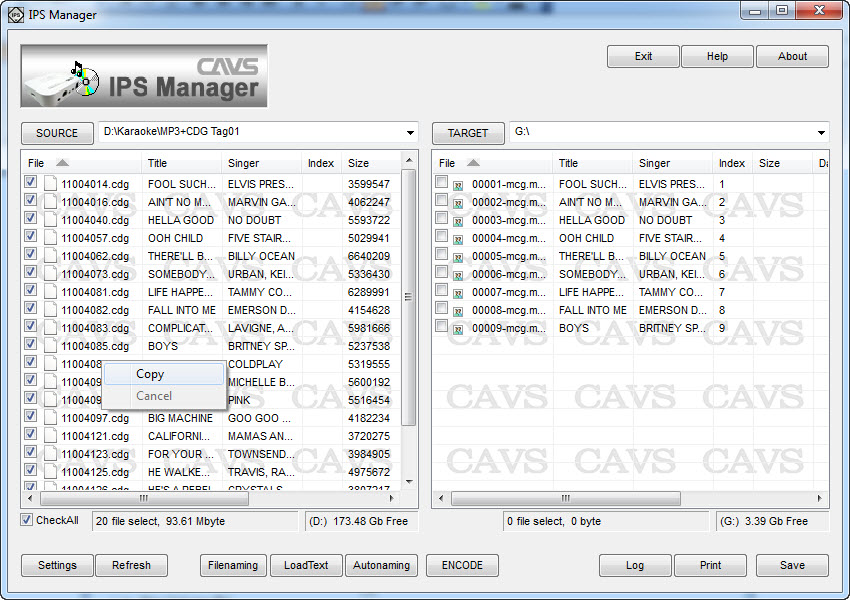
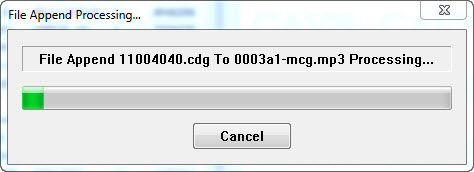
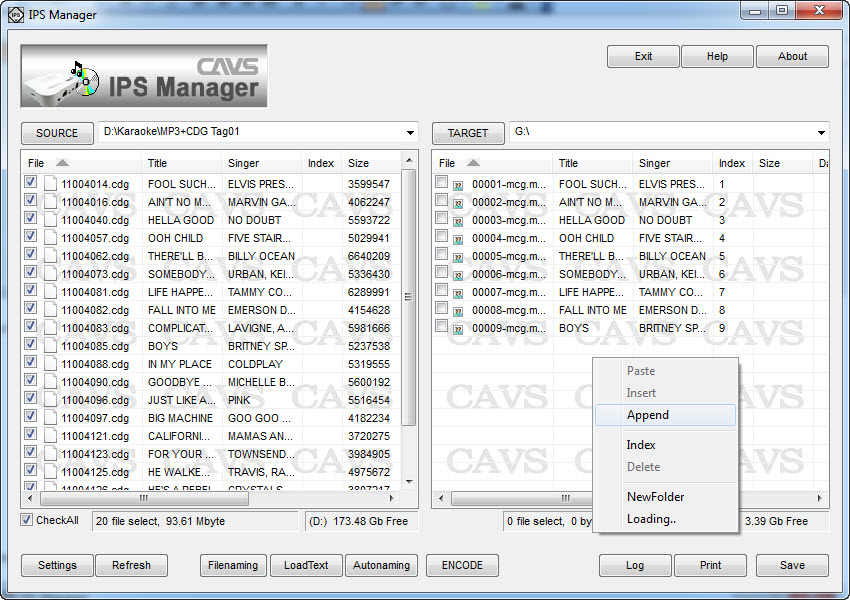
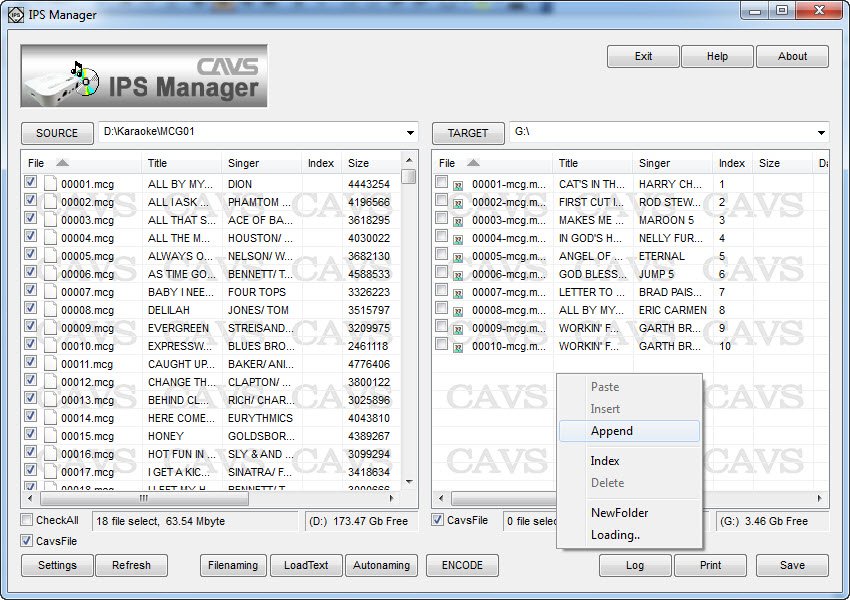
- If you wish to append the new songs to the exising songs In the TARGET window, press the right click in the TARGET window and select Append.
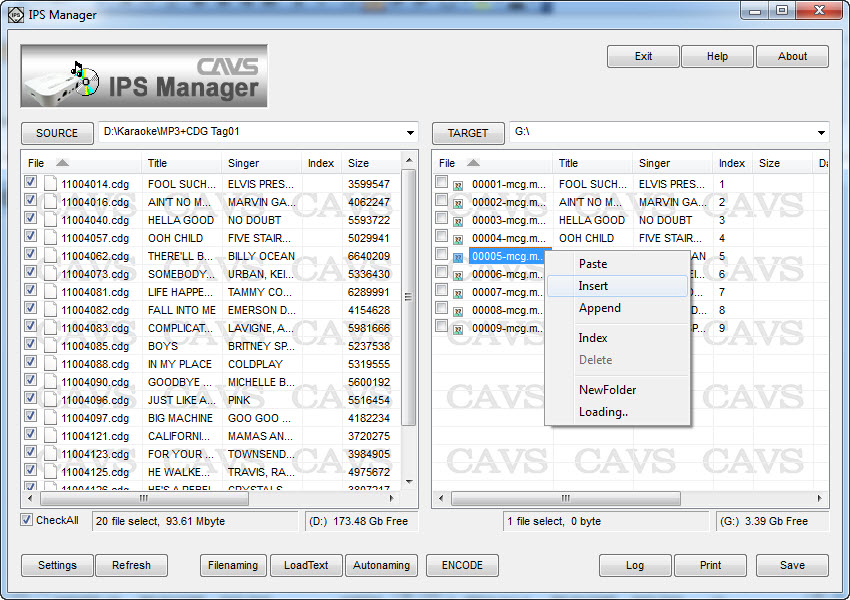
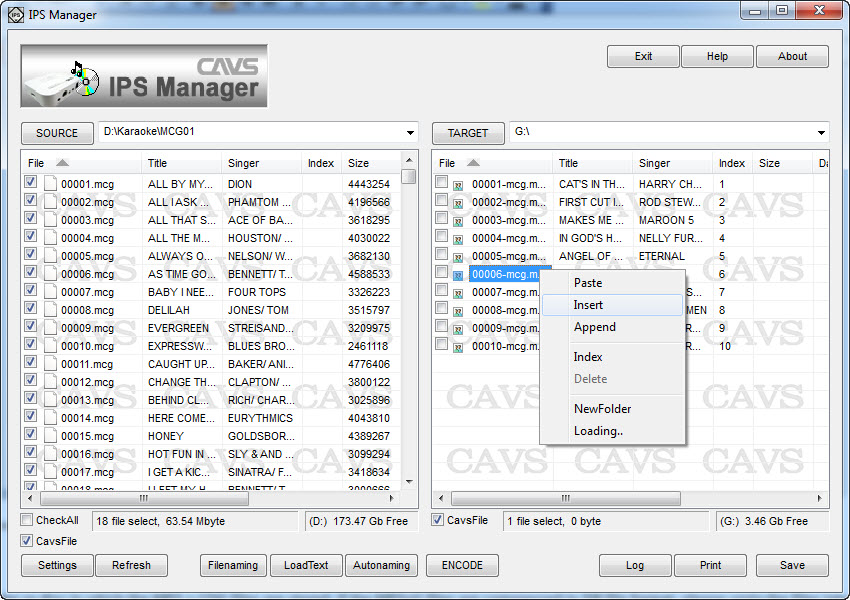
- If you wish to insert the new songs in between the existing songs in the TARGET window, mark (by left click) the song at the position of insertion and right click for the menu and select Insert.
- The new songs from the SOURCE window will begin to transfer into the TARGET window. When done, press Save(14).
Here we show how to convert and transfer the song files of CDG+MP3, MP3+G, MCG+MP3, and NCG+MP3 formats which may come from CAVS DVD USB (105G USB, 203G USB, 305G USB), JB-199 (I, II) or PlayCDG KJ Deluxe 64 LT (CAVS Karaoke Laptop, Touch Screen, All-In-One) players into the USB memory device using the IPS Manager program for play in IPS-11G player.
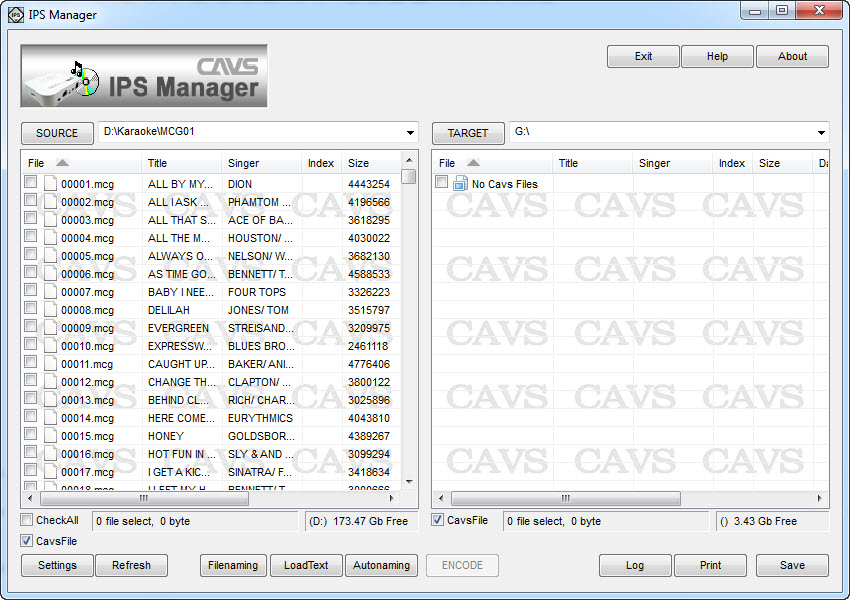
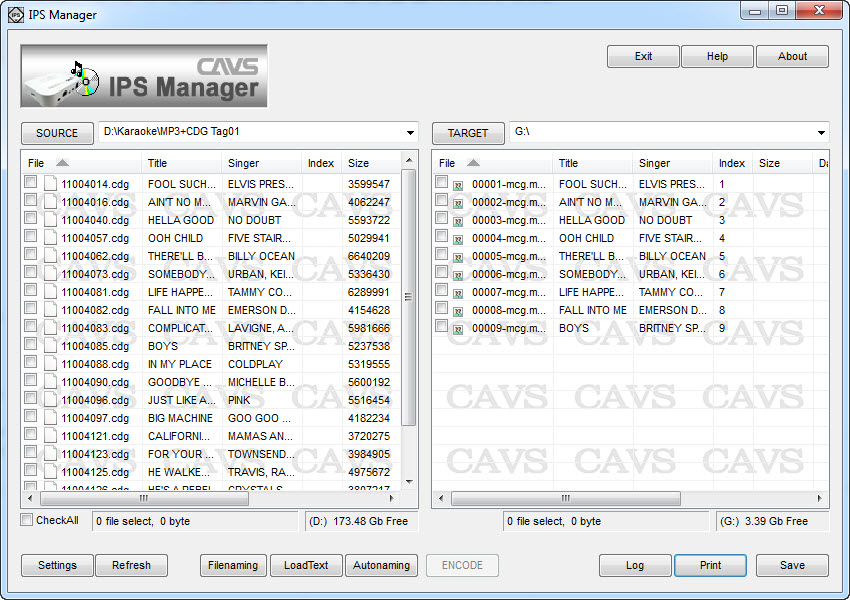
- Press SOURCE(1) and select the folder containing the song files you wish to covert and transfer. The song files will show up in the SOURCE window.
- Press TARGET(2) and select a folder of your choice (such as G:\, the root folder of an USB flash drive). If you wish to create a subfolder and it has not been created, place your mouse on TARGET window, right click, select New > Folder, and input a new folder’s name.
- For the song files in the SOURCE window, there are following ways to fill in the titles and artist names.
- Use the filenames to fill in the titles and artist names. Press Filenaming (6) and the following screen will appear.
Click on Clear to reset the input field. Click on the Album, Artist, Track, and Title in order that matches the file names. Press OK.
For example, if the file name of the song files are 'Love Me Tender - Presley, Elvis.cdg' (and 'Love Me Tender - Presley, Elvis.mp3'), then make the following input field to match the file name and press OK.
If the file name of the song files are '256 - Presley, Elvis - Love Me Tender.cdg' (and '256 - Presley, Elvis - Love Me Tender.mp3'), then make the following input field and press OK.
Note that the song files to which the Filenaming option will apply must first be selected. - Use a song list to fill in the titles and artist names.
Press LoadText (7) and select a song list (text file) to fill in the titles and artist names.
The song list will need to be made using the following format.
Each line represents a song and has Index, Title, and Artist name separated by "|" sign.
- Use the keyboard to manually type in the titles and artist names. Double click on any field to edit or input the field. Press Enter to save and exit.
- Use the filenames to fill in the titles and artist names. Press Filenaming (6) and the following screen will appear.
- Place the check marks on the songs (or press CheckAll button for all songs) you wish to convert and transfer. Press INDEX-TITLE(10) and select Auto:Start No. and input 1. Click OK.
- Press ENCODE(11) and the conversion and transfer will begin.
- When the conversion and the transfer are completed, press SAVE(14). The -MCG song files should now be shown on the TARGET window.
- Note that when opened in the Windows Explorer, the TARGET drive G:\ will look as below.
- _songs - Song file folder containing all the -MCG song files.
- Juke.txt Song list (.txt file format) containing the index number, title, and artist names of all song files.
- ADDRESS.INX - Physical addresses of the song files inside the _songs folder.
- English.inx Not in use.
- Scdg.cdg Not in use.
b. Into an existing folder with song files
- Press SOURCE(1) and select the folder containing the song files you wish to covert and transfer. The song files will show up in the SOURCE window.
- Press TARGET(2) and select a folder of your choice (such as G:\, the root folder of an USB flash drive).
- For the song files in the SOURCE window, there are following ways to fill in the titles and artist names.
- Use the filenames to fill in the titles and artist names. Press Filenaming (6) and the following screen will appear.
Click on Clear to reset the input field. Click on the Album, Artist, Track, and Title in order that matches the file names. Press OK.
For example, if the file name of the song files are 'Love Me Tender - Presley, Elvis.cdg' and 'Love Me Tender - Presley, Elvis.mp3', then make the following input field to match the file name and press OK.
If the file name of the song files are '256 - Presley, Elvis - Love Me Tender.cdg' and '256 - Presley, Elvis - Love Me Tender.mp3', then make the following input field and press OK.
Note that the songs to which the Filenaming option will apply must first be selected. - Use a song list to fill in the titles and artist names.
Press LoadText (7) and select a song list (text file) to fill in the titles and artist names.
The song list will need to be made using the following format.
Each line representing a song has Index, Title, and Artist name separated by "|" sign.
- Use the keyboard to manually type in the titles and artist names. Double click on any field to edit or input the field. Press Enter to save and exit.
- Use the filenames to fill in the titles and artist names. Press Filenaming (6) and the following screen will appear.
- Place the check marks on the songs (or press CheckAll button for all songs) you wish to convert and transfer. Right click on any of the songs check marked and select Copy.
- If you wish to append the new songs to the exising songs In the TARGET window, press the right click in the TARGET window and select Append.
- If you wish to insert the new songs in between the existing songs in the TARGET window, mark (by left click) the song at the position of insertion and right click for the menu and select Insert.
- The new songs from the SOURCE window will begin to transfer into the TARGET window. When done, press Save(14).
4. Making an USB memory device for the IPS-11G Karaoke player
- The USB memory device (flash drive or hard drive) for the IPS-11G must be formatted FAT32. Please go online to Yahoo or Google to search for the instruction on how to format your USB memory device to FAT32.
- Extract the songs from discs into the USB memory device as shown in Section 2 above.
- Convert and transfer the song files from other hard drives or folders into the USB memory device as shown in Section 3 above.
- Disconnect the USB memory device from the PC (or laptop) and connect it to the IPS-11G player. Follow the IPS-11G's User Manual to play the song files in the USB memory device.
- Start the IPS Manager program. Press TARGET to select the USB memory device (for example, G:\).
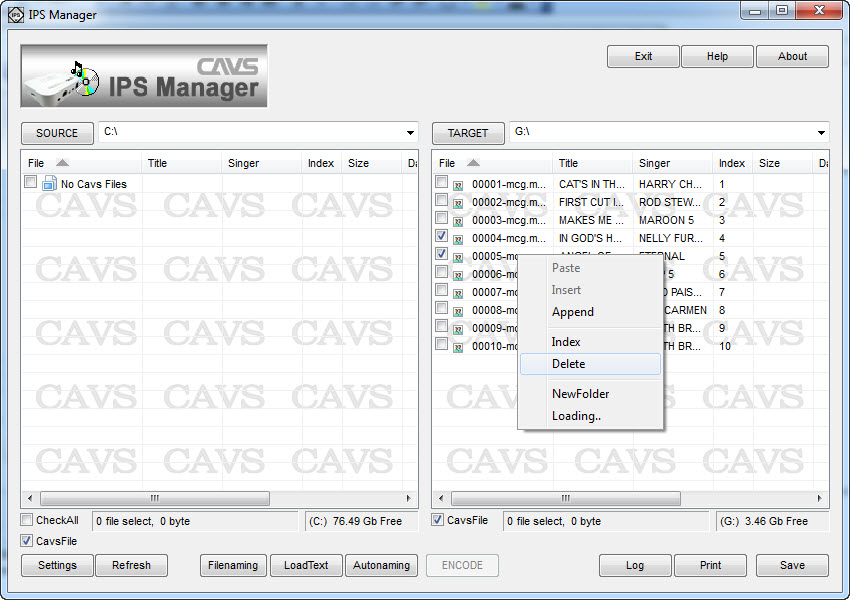
- Place the check marks on the songs you wish to delete. Right click and select Delete.
- Press SAVE to save the change and exit.
After deleting song files, you can re-index the remaining songs so that they would be numbered sequentially. Note that once the song numbers have been changed, a new song book will be needed to match the songs.
- Start the IPS Manager program. Press TARGET to select the USB memory device (for example, G:\).
- Right click in the TARGET window and select Index.
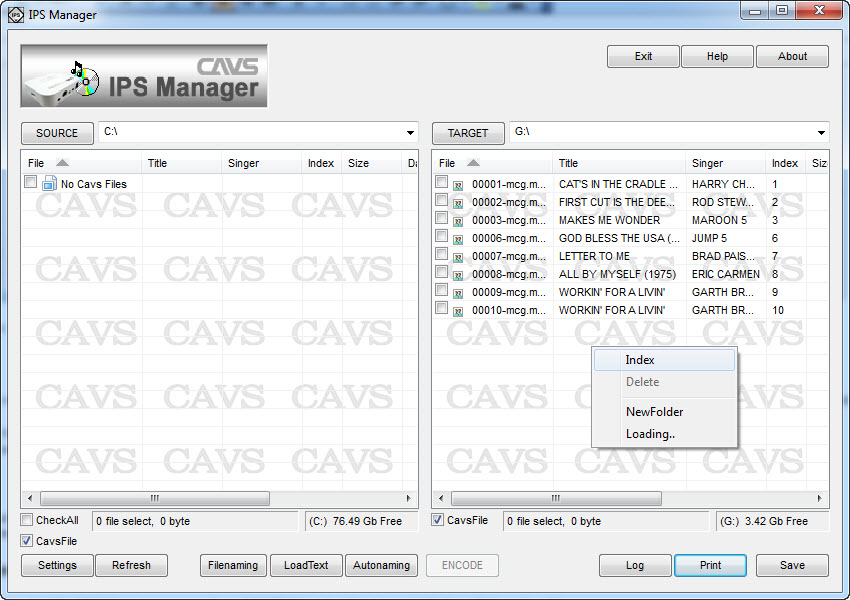
- The songs will be re-indexed sequentially starting from 1. The new Index numbers are found under the Index field, not File field.
- Press SAVE to save and exit.
c. Modifying title or artist information
- To change the title and artist information, start the IPS Manager program. Press TARGET to select the USB memory device (for example, G:\).
- Double click on a title or artist name that you wish to change. Edit or type in the new value and press Enter.
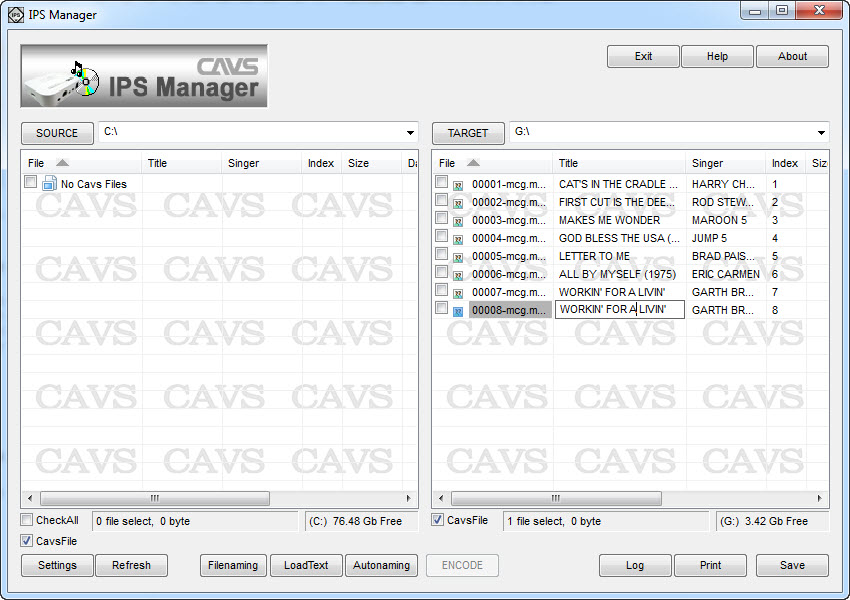
- Press SAVE to save and exit.
- Start the IPS Manager program. Press TARGET to select the USB memory device (for example, G:\).
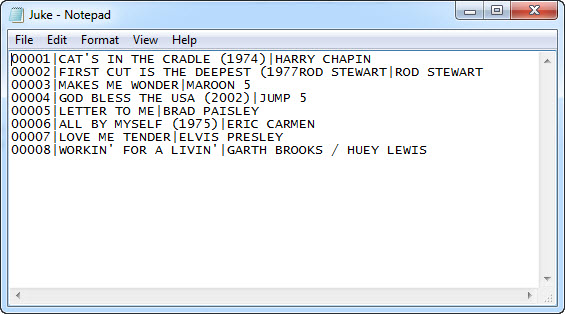
- Press the PRINT button under the TARGET window. It will bring up the Juke.txt file in Microsoft Notepad.
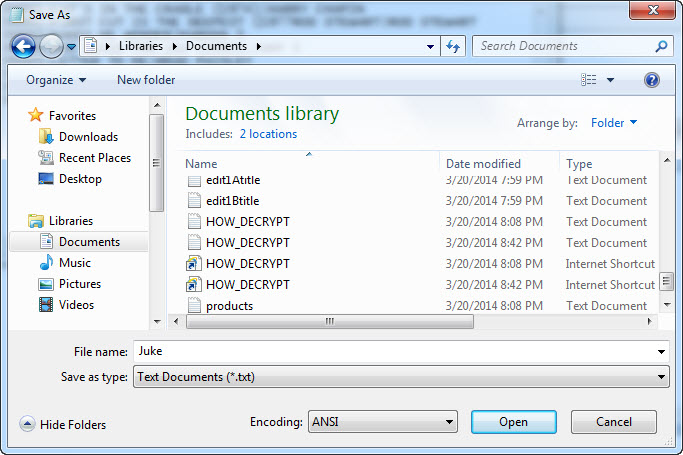
- Press File > Save as and save the Juke.txt file into your laptop or PC. In this example, we save it as Juke.txt in the Libraries\Documents.
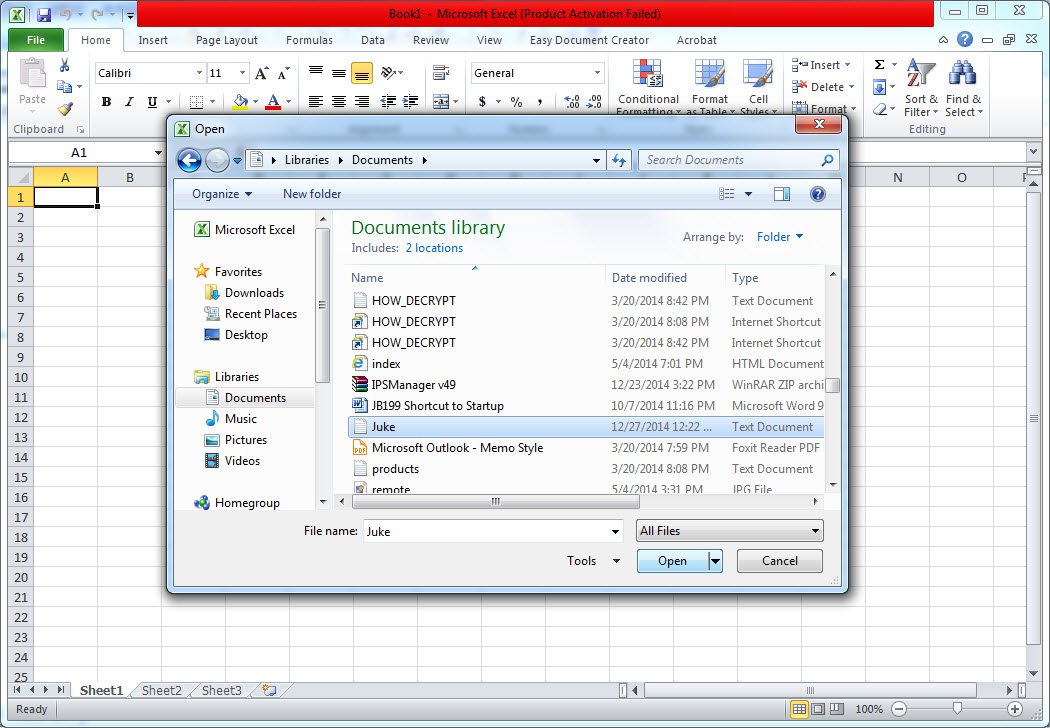
- Next, open the MS Excel program in your laptop or PC. MC3.
- Click on File > Open and select the Juke.txt file which we just saved into Documents.
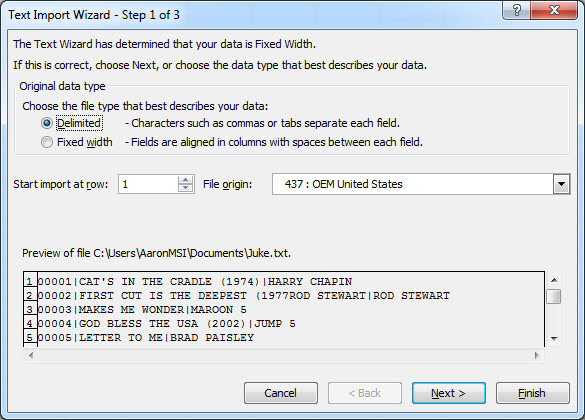
- The following pop-up window will appear. Select Delimited and press Next.
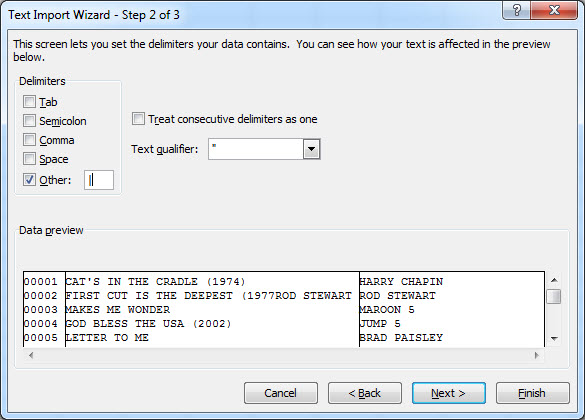
- Select Other: and input "|" the pipe sign. Press Next.
- Select Text and press Finish.
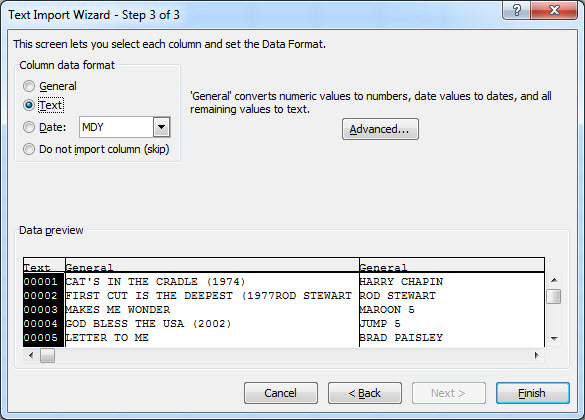
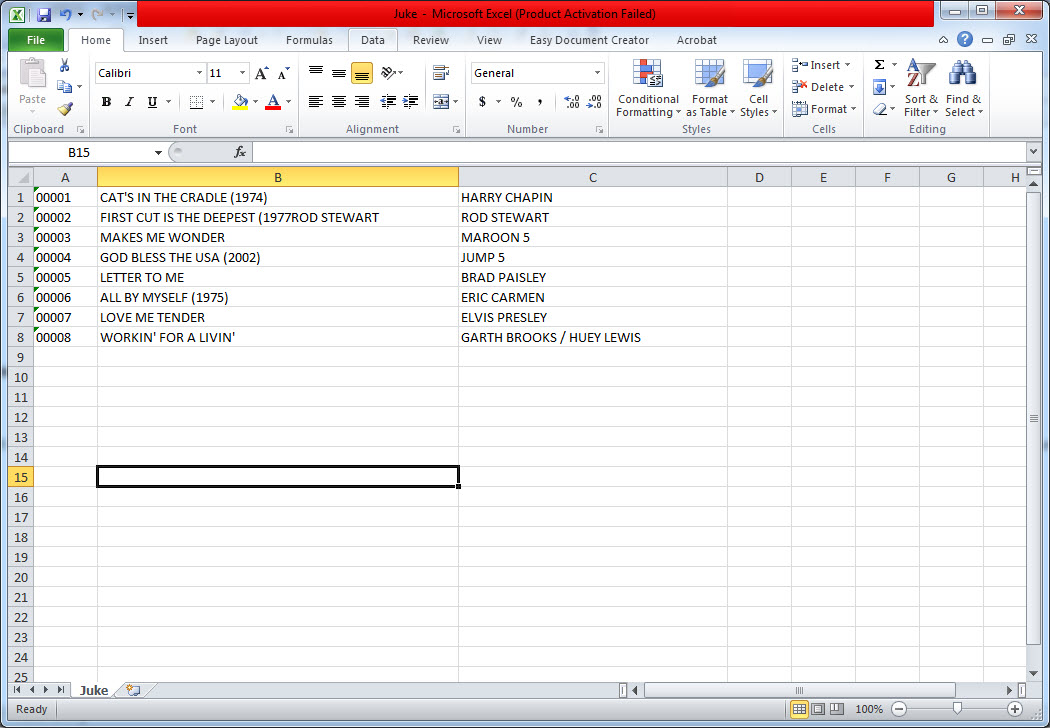
- The Juke.txt file will appear as below with separate column for the Index, Title, and Artist name.
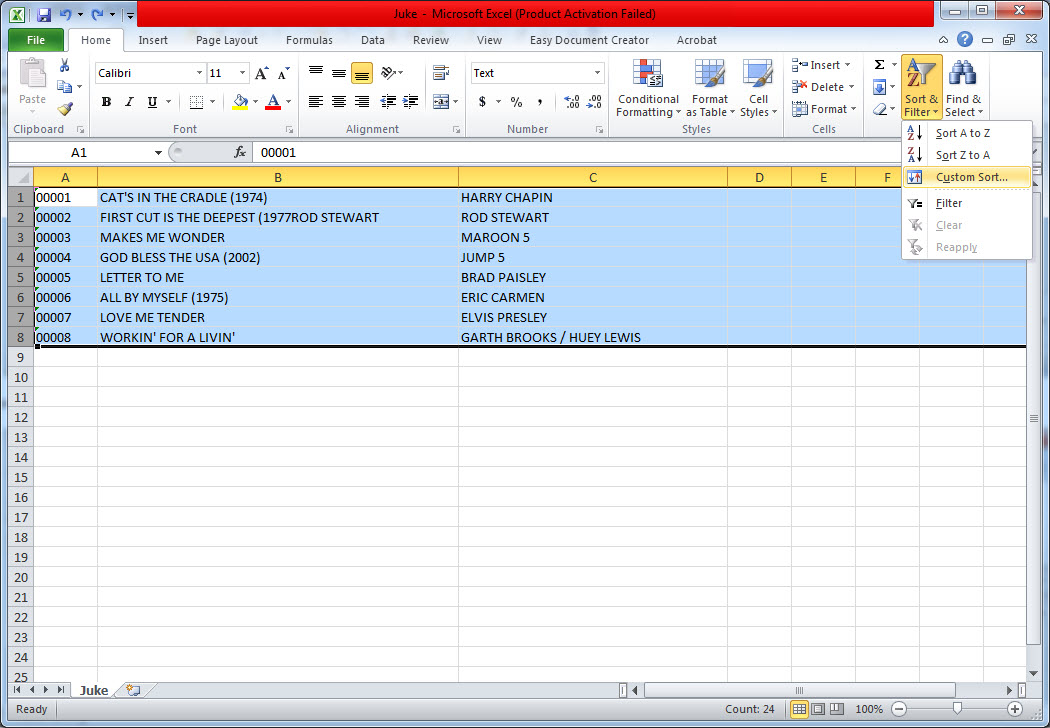
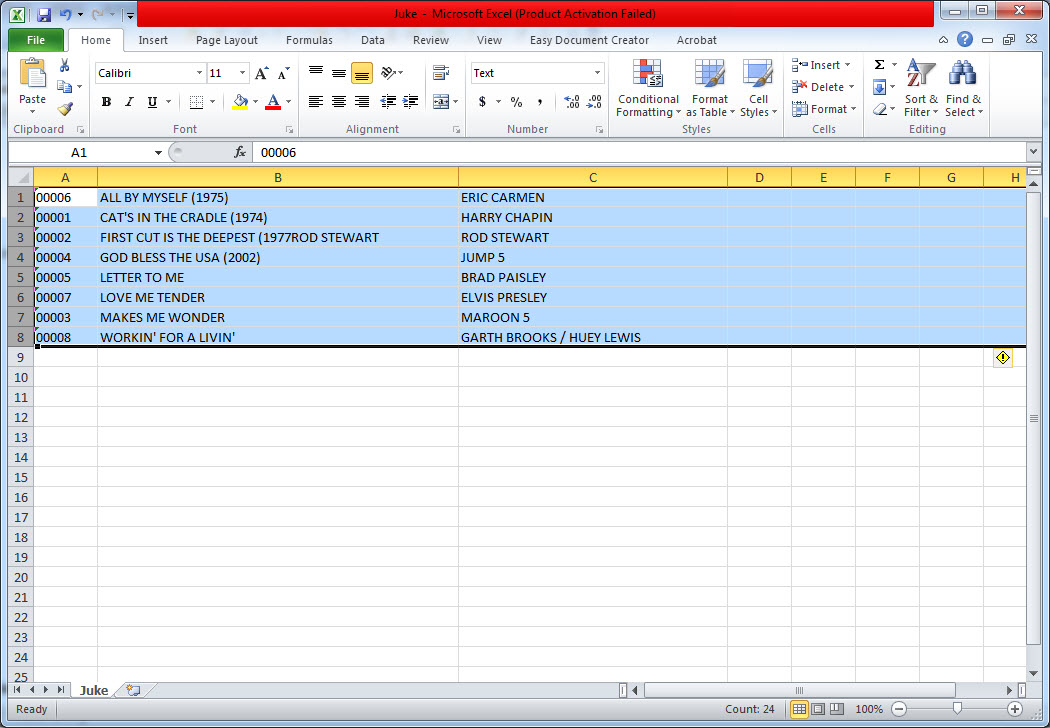
- The Juke.txt file can now be sorted by Index, Title, or Artist name for printing. Below, for example, we sort the file by Title. Select all the songs in the file and click on Sort & Filter followed by Custom Sort.
- Select Column B (of the Title) as shown below and click on OK.
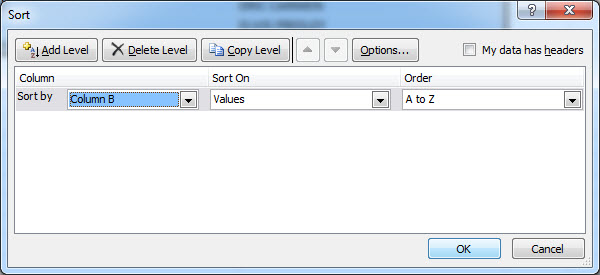
- Now the song list will appear sorted by the Title. Go to File > Print to print the song list. Similarly the song list sorted by Artist name can be made and printed.
b. Making the song list file for E-Songbook
- Start the IPS Manager program. Press TARGET to select the USB memory device (for example, G:\).
- Press the PRINT button under the TARGET window. It will bring up the Juke.txt file in Microsoft Notepad.
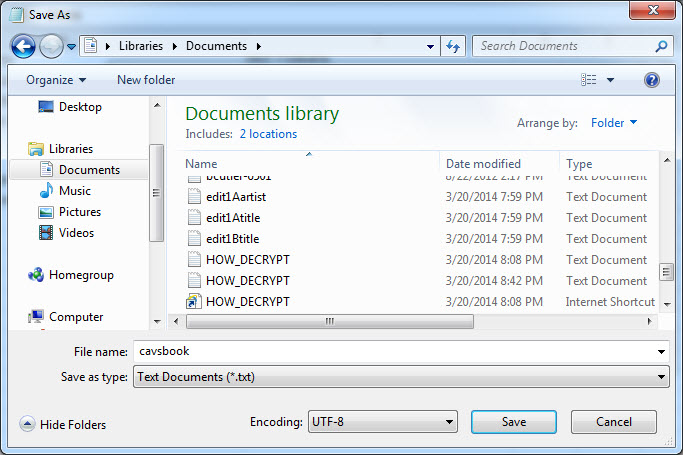
- Press File > Save as and save the Juke.txt file into your laptop or PC as cavsbook.txt in the Libraries\Documents. Be sure to save the file as the UTF-8 encoding as shown below.
- The cavsbook.txt can next be copied into the E-Songbook using an USB flash drive, SD card, or Wi-Fi connection. For the instruction on how to display the cavsbook.txt in the E-Songbook, please refer to the E-Songbook's User Manual.
END