MCG Manager - v20029
[Click to view large picture]
This manual provides instructions for managing karaoke songs with the MCG Manager program, designed for use with CAVS 205G USB and 205G Plus players.
It explains the various features of the software and how they can be utilized to organize and prepare karaoke songs for playback.
There are many video guides available that cover different aspects of using the MCG Manager program, such as handling various storage media types or working with different song file formats.
We have compiled a list of these resources below for your convenience.
How to use MCG Manager program to load songs - Video
How to play CD+G disc - Video
How to play Super CD+G disc - Video
How to play MP3+G and MP3+MCG flash drive - Video
How to load songs to External Device - Video
How to format External Device to FAT32 - Video
How to use MCG Manager to load songs - Video
How to load video song files for CAVS 205G USB Karaoke Machine - Video
CAVS 205G USB Karaoke Machine Speed Performance - Video
How to extract songs of a CD+G disc into CDG+MP3 song files in PC - Video
How to load CDG + MP3 song files into an external device using Copy & Paste for CAVS 205G USB Karaoke Machine - Video
How to customize an external device for CAVS 205G USB Karaoke Machine - Video
How to keep the old song numbers when making an external device with the MCG Manager program for CAVS 205G USB Karaoke Machine - Video
How to add more songs into an external device for CAVS 205G USB Karaoke Machine - Video
How to use MCG Manager program to load songs - Video
How to load MP4 and AVI song files
How to design multiple folders for quick access in a device for use with CAVS 205G USB player
1. General
1.1 Features
- Support the songs of CD+G, MP3+G, ZIP, AVI, and MP4 file formats.
- Fill in the title and artist of the songs using filenames, songlists, ID tags, or manual inputting.
- Encode the songs for instant playback in CAVS 205G USB or 205G Plus players
1.2 Requirements
- Windows 10, 11
- Media device such as a USB flash drive, USB hard drive, or SD card that is formatted as FAT32.
- DVD RW disc drive to extract songs from CD+G or DVD discs.
1.3 Limitations
-
The media device for the CAVS 205G USB and 205G Plus players must be formatted FAT32.
And under the FAT32 file system, the maximum partition size is 2TB, the maximum file size is 4GB, and the maximum number of files in a single folder is 65,536.
For our concern, a commonly found USB flash drive or SD card is of size 512GB or less. They are well less than the 2TB limit.
However a USB hard drive, aka external hard drive, can be larger than 2TB and will be limited to 2TB when formatted FAT32.
The hard drive should therefore be equal to or less than 2TB in size to reduce the waste.
The USB hard drive also must have its own power supply, and thus will not over-draw the power from the CAVS 205G USB or 205G Plus player.
-
The FAT32 file system implies 32,768 maximum number of karaoke songs of MP3+G, MP3+MCG, or ZIP format per folder.
This is because each karaoke song of format MP3+G, MP3+MCG and ZIP has a pair of files, audio and video.
The FAT32 file system implies 65,536 maximum number of karaoke songs of format AVI or MP4 per folder since each song consists of only a single file.
However each AVI or MP4 song is of much bigger size than those of MP3+G, MP3+MCG, or ZIP format.
The limitation on the number of files per folder can easily be resolved by making multiple folders in a media device.
Currently a media device with up to 24 folders and 100,000 songs in total is tested to playback in the CAVS 205G USB and 205G Plus players.
For more detail, go to Section 3. How to design multiple folders.
1.4 Controls and Displays
1.4.1 Controls

[Click to view large picture]
-
File
-
Help
- User Manual
- Online Upgrade
- About MCG Manager
- Source - Select a disc or folder of song files to be encoded.
- SubFolder - Check to include all files in subfolders when selecting the Source.
- Songs - Display the number of songs selected
- Check All - Select or unselect all songs
- Filename - Filename of songs
- Title - Title of songs
- Artist- Artist of songs
- Index - Assigned index of songs when encoded
- Size - File size of the songs
- Folder - Folder path of songs
- Settings - Encode settings
- Filenaming - To load title and artist from filenames
- Loadtext - To load title and artist from a text file
- LoadIDTag - To load title and artist from ID Tags
- AutoIndexing - To assign index to songs
- Video - To encode video song files (AVI, MP4)
- Encode - To encode songs (CD+G, MP3+G, and ZIP file formats)
- Target - Select a folder to store encoded songs
- Disk - Available space in Target
- Filename - Filename of songs
- Title - Titla of songs
- Singer - Artist of songs
- Index - Assigned index of songs
- Size - File size of songs
- Logview - Log of encoded songs
- Reindex - Re-assign the index of songs
- Format - To format the Target drive or folder to FAT32
- InxMake - To make Address.inx of songs when Target is in a FAT32 device
- Save - To complete the encoding process. InxMake will also run when the Target is in a FAT32 device
1.4.2 Displays
-
Adjust the width of windows and fields

[Click to view large picture]
-
Change the order of the fields
[Click to view large picture]
-
Upgrade to the latest version of the MCG Manager program - v20029 or higher.

[Click to view large picture]
2. Encoding songs
This section describe how to encode songs using the MCG Manager program.
Section 2.1 describes how to extract and encode songs when the Source is a CD+G disc.
Section 2.2 describes how to encode songs when the Source is a folder.
In both sections, we set the Target as a folder inside PC, such as C:/Karaoke Songs/, which will not be of FAT32 format.
Next, Section 2.3 describes how to save the encoded songs into a FAT32 media device for playback in CAVS 205G USB and 205G Plus players.
Note that the encoding can go directly from the Source to a FAT32 media device as the Target.
But we take an extra step of encoding songs first into a PC folder, and then take the encoded songs in the folder into a FAT 32 media device.
This is done for the following considerations.
- Speed of working with a folder within PC versus a FAT 32 media device which would be an external USB drive.
- Ease of making multiple FAT32 media devices from a PC folder versus from an external USB device.
2.1 Encoding songs from a CD+G disc
2.1.1 Encoding songs from a CD+G disc into a new folder
- Insert a CD+G disc into the DVD RW disc drive of your PC. Close any pop-up apps such as Windows Media player.
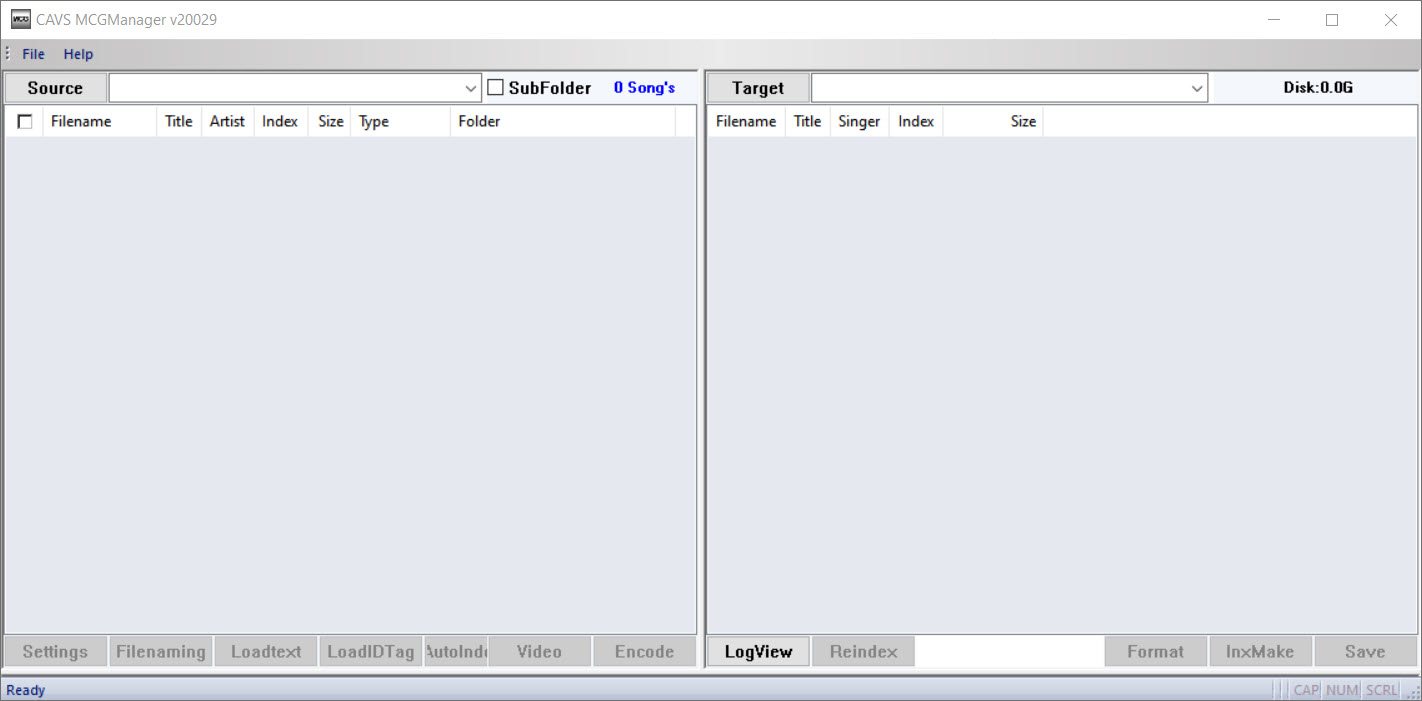
- Start the MCG Manager program.
-
Press the Source(3) button and select the disc drive.
The tracks in the CD+G disc will show up in the Source window.
The title and artist fields can be filled in manually by typing or automatically from a public data base.

[Click to view large picture]
-
Press the Target(31) button and select a folder of your choice (such as C:/Karaoke Songs/).
If the folder has not been created, click on the folder that is a level above in the file heirarchy, click on Make New Folder, and input a new folder’s name.

[Click to view large picture]
Note that a media device to use with the CAVS 205G karaoke player must be formatted FAT32.
But the Target folder, such as C:/Karaoke Songs/ is not likey to be formatted FAT32.
The MCG Manager program will automatically detect this and issue a warning message.
The user can at a later time copy the encoded songs in a folder such as C:/Karaoke Songs/ onto a media device of FAT32 format, run the MCG Manager, select the Target drive as the media device, and click on the Save(42) button.
Detailed instruction can be found in the Section 2.3 below.
-
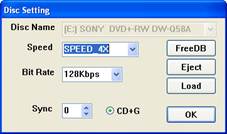
Press Settings(13) button and select FreeDB.
The disc information will be searched online and if found, the title and artist of the songs will automatically fill in.
If not found, an error message will appear.

[Click to view large picture]
The title and artist of the songs can also be filled in manually by typing. Double click on each field, type in the information, and press Enter.
-
Place a check mark on the songs you wish to encode or press CheckAll(6) button to select all songs.
Press the Encode(19) button to begin encoding.

[Click to view large picture]
- When done, the encoded songs will appear in the Target window with temporary numbers as shown.

[Click to view large picture]
- Press the Save(42) button. The MCG program will run through the encoded songs for their physical addresses. If the Target folder is not of FAT32, as in the case of C:/Karaoke Songs/, an error message will appear.

[Click to view large picture]
- Click OK and OK to continue. The encoded files will now show with their index numbers in the Target folder.

[Click to view large picture]
2.1.2 Encoding songs from a CD+G disc into an existing folder with previously encoded songs
Encoding songs into an existing folder with previously encoded songs is equivalent to adding new songs into a folder previously made by the MCG Manager program.
- Insert a new CD+G disc into the DVD RW drive. Close any pop-up apps such as Windows Media player.
- Start the MCG Manager program.
- Press Source(3) button and select the disc drive. The tracks in the new CD+G disc will show up in the Source window.
-
Press Target(31) button and select the folder with encoded songs such as C:/Karaoke Songs/.
The folder will show the previously encoded songs (MCG).

[Click to view large picture]
Note that a media device to use with the CAVS 205G karaoke player must be formatted FAT32.
But the Target folder, such as C:/Karaoke Songs/ is not formatted FAT32.
The MCG Manager program will automatically detect this and issue a warning message when the encoding completes.
The user can at a later time copy the encoded songs from a non-FAT32 folder such as C:/Karaoke Songs/ onto a media device of FAT32 format, run the MCG Manager, select the media device as the Target drive, and click on the Save(42) button.
Detailed instruction can be found in the Section 2.3 below.
-
Press Settings(13) button and select FreeDB.
The disc information will be searched online and if found, the title and artist of the songs will automatically fill in.
If not found, an error message will appear.
[Click to view large picture]
The title and artist of the songs can also be filled in manually by typing. Double click on each field, type in the information, and press Enter.
-
Place the checkmark on the songs you wish to encode or press CheckAll(6) button for all songs.
Press Encode(19) to start encoding.

[Click to view large picture]
- When the encoding completes, the newly encoded songs will show at the bottom of the Target window below the previously encoded songs. The newly encoded songs will have temporary index numbers.

[Click to view large picture]
- Press the Save(42) button. The MCG program will run through the newly encoded songs for their physical addresses. If the Target folder is not of FAT32, as in the case of C:/Karaoke Songs/, an error message will appear.

[Click to view large picture]
- Click OK and OK to continue. The newly encoded songs will show the index numbers that are sequential to the previously encoded songs.

[Click to view large picture]
2.2 Encoding songs from a folder
Supported file formats of songs are MP3+G, MP3+MCG, ZIP, AVI, and MP4.
2.2.1 Encoding songs from a folder into a new folder
- Start the MCG Manager program.
-
Press Source(3) and select the folder in which songs of MP3+G, MP3+MCG, ZIP, AVI, or MP4 file format are stored.
For the MP3+G and MP3+MCG songs, only the video files, CDG and MCG, will appear.
If the folder has many subfolders also containing songs, place a check mark on the SubFolder(4).
Next press Source(3) and select the folder.
The songs in all subfolders will appear together in the Source window.
In the example below, we select a folder Y:/Source which has many subfolders, sub-subfolders, etc. with both MP3+G and ZIP formats.

[Click to view large picture]
Note that by using the Subfolder(4) option, there may be some files, such as .txt, .jpg, etc., that are not songs.
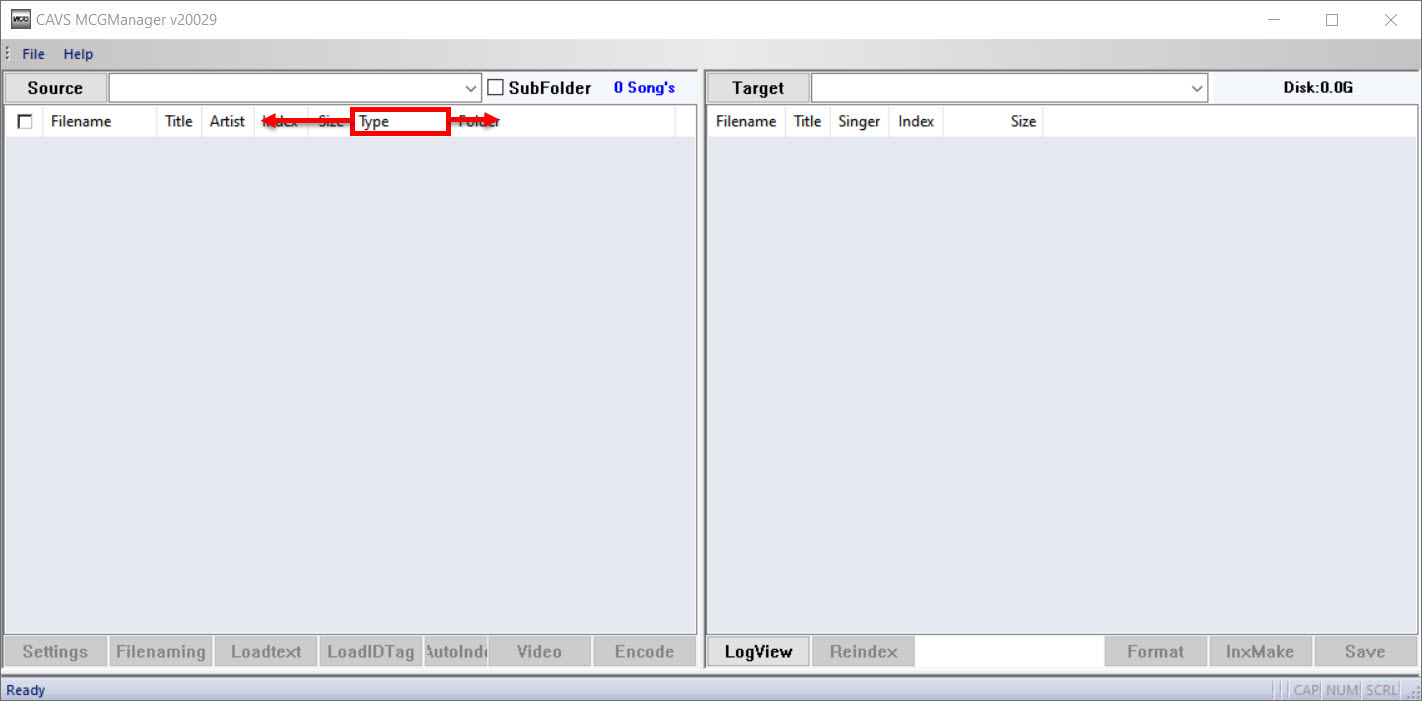
To remove these non-song files, click on Type to sort the files by Type.

[Click to view large picture]
Mark the non-song files by click and shift-click. Right click on the marked files and select Delete.

[Click to view large picture]
-
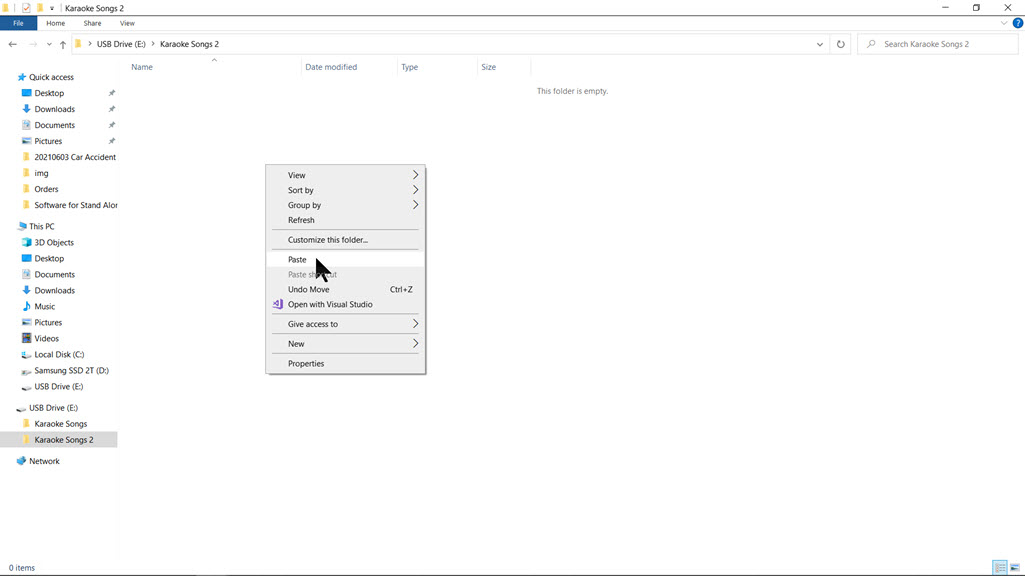
Press Target(31) and select a folder (such as C:/Karaoke Songs 2/) to store the encoded songs.
If the folder has not been created, click on the folder that is a level above in the file heirarchy, click on Make New Folder, and input a new folder's name.

[Click to view large picture]
Note that a media device to use with the CAVS 205G USB and 205G Plus karaoke players must be formatted FAT32.
But the Target folder, such as C:/Karaoke Songs 2/ is not formatted FAT32.
The MCG Manager program will automatically detect this and issue a warning message when the encoding completes.
The user can at a later time copy the encoded songs from a non-FAT32 folder such as C:/Karaoke Songs 2/ onto a media device of FAT32 format, run the MCG Manager, select the media device as the Target drive, and click on the Save(42) button.
Detailed instruction can be found in the Section 2.3 below.
-
For the songs in the Source window, there is no online database that we can use to find the title and artist information.
Thus the FreeDB option in Settings cannot be used.
The MCG Manager program provides instead the following four techniques to input the title and artist information.
-
With the title and artist information filled in, it is time to double check our work.
-
Place checkmarks on the songs you wish to encode.
-
Press Encode(19) to start encoding.

[Click to view large picture]
-
When the encoding completes, press the Save button.
The warning message indicating that the folder C:/Karaoke Songs 2 is not formatted as FAT32 will appear.
Press OK.

[Click to view large picture]
-
The "Save ... Successful end" message will appear.
Press OK.

[Click to view large picture]
- The encoded songs will appear with their permanent index number in the Target folder.

[Click to view large picture]
2.2.2 Encoding songs from a folder into an existing folder with previously encoded songs
- Start the MCG Manager program.
-
Press Source(3) and select the folder in which the songs of MP3+G, MP3+MCG, ZIP, AVI, or MP4 file format are stored.
For the MP3+G and MP3+MCG songs, only the video files, CDG and MCG, will be displayed.
If the folder has many subfolders also containing songs, place a check mark on the SubFolder(4).
Next press Source(3) and select the folder.
The song files in all of the subfolders will appear in the Source window.
In the example below, we select a folder Y:/Source which has many subfolders, sub-subfolders, etc. with both MP3+G and ZIP formats.

[Click to view large picture]
Note that by using the Subfolder(4) option, there may be some files, such as .txt, .jpg, etc., that are not songs.
To remove these non-song files, click on Type to sort the files by Type.

[Click to view large picture]
Mark the non-song files by click and shift-click. Right click on the marked files and select Delete.

[Click to view large picture]
-
Press Target(31) and select a folder such as C:/Karaoke Songs 2/ which already contains the previously encoded songs.

[Click to view large picture]
Note that a media device to use with the CAVS 205G USB and 205G Plus karaoke players must be formatted FAT32.
But the Target folder, such as C:/Karaoke Songs 2/ is not formatted FAT32.
The MCG Manager program will automatically detect this and issue a warning message when the encoding completes.
The user can at a later time copy the encoded songs from a non-FAT32 folder such as C:/Karaoke Songs 2/ onto a media device of FAT32 format, run the MCG Manager, select the media device as the Target drive, and click on the Save(42) button.
Detailed instruction can be found in the Section 2.3 below.
-
For the songs in the Source window, there is no online database that we can use to find the title and artist information.
Thus the FreeDB option in Settings cannot be used.
The MCG Manager program provides instead the following four techniques to input the information.
-
With the title and artist information filled in, it is time to double check our work.
-
Place checkmarks on the songs you wish to encode.
-
Press Encode(19) to start encoding.

[Click to view large picture]
When the encoding completes, the newly encoded songs will appear in the Target window with temporary index numbers.
-
Press the Save button.
The warning message indicating that the folder C:/Karaoke Songs 2/ is not formatted as FAT32 will appear.
Press OK.

[Click to view large picture]
-
The "Save ... Successful end" message will appear.
Press OK.

[Click to view large picture]
-
The newly encoded songs will appear with their permanent index numbers in the Target window.

[Click to view large picture]
The index numbers of the newly encoded songs will begin after the last index number of the previously encoded songs.
2.3 How to make a media device (USB flash drive, USB hard drive, or SD caed) for CAVS 205G USB or 205G Plus karaoke player
In the previous sections, the songs were encoded into a folder, for example C:/Karaoke Songs/ or C:/Karaoke Songs 2/, at the Target window. The C:/ drive however was not formatted as FAT32 and produced the warning message.
Here the folder C:/Karaoke Songs/ or C:/Karaoke Songs 2/ is copied onto a USB flash drive formatted as FAT32, and is processed again by the MCG Manager for use with CAVS 205G USB or 205G Plus karaoke player.
The procedure is same for making external USB hard drive or SD card formatted FAT32.
-
In the Windows desktop, start the File Explorer and go to the folder with encoded songs such as C:/Karaoke Songs/ or C:/Karaoke Songs 2/. Right click on the folder and select Copy.

[Click to view large picture]
- Go to the USB flash drive formatted FAT32 and paste the folder.

[Click to view large picture]
- The folder is now copied onto the USB flash drive.

[Click to view large picture]
-
Start the MCG Manager and open the folder in the USB flash drive as the Target folder.

[Click to view large picture]
The encoded songs will appear with index numbers.
-
Click on the Save(42) button. The "Save,.. Successful end" message will appear as below, without a warning message.

[Click to view large picture]
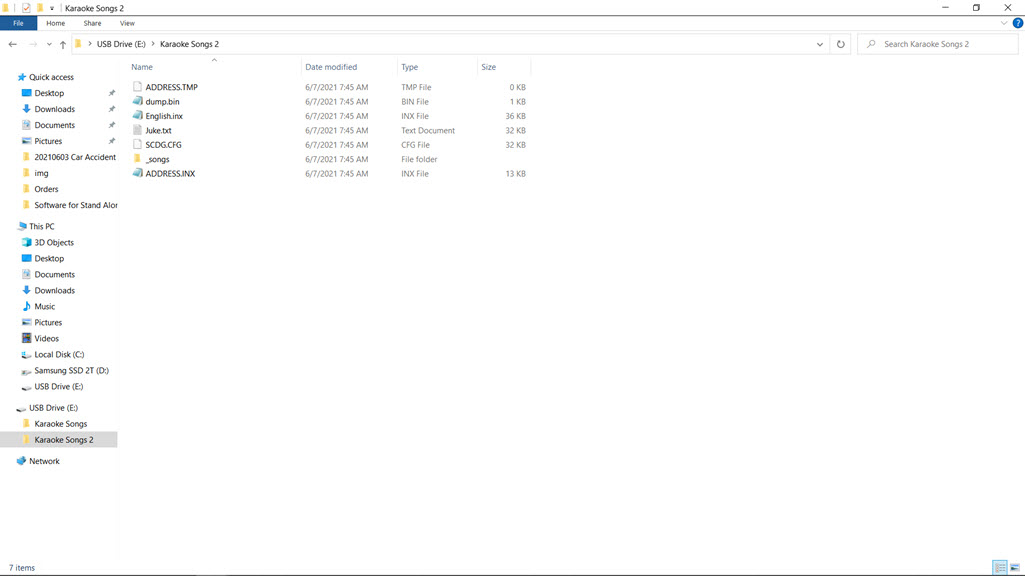
Note that inside the folder, there will now be "_songs" subfolder and ADDRESS.INX, CHECKSUM.TXT, ENGLISH.INX, JUKE.TXT, and SCDG.CFG files.
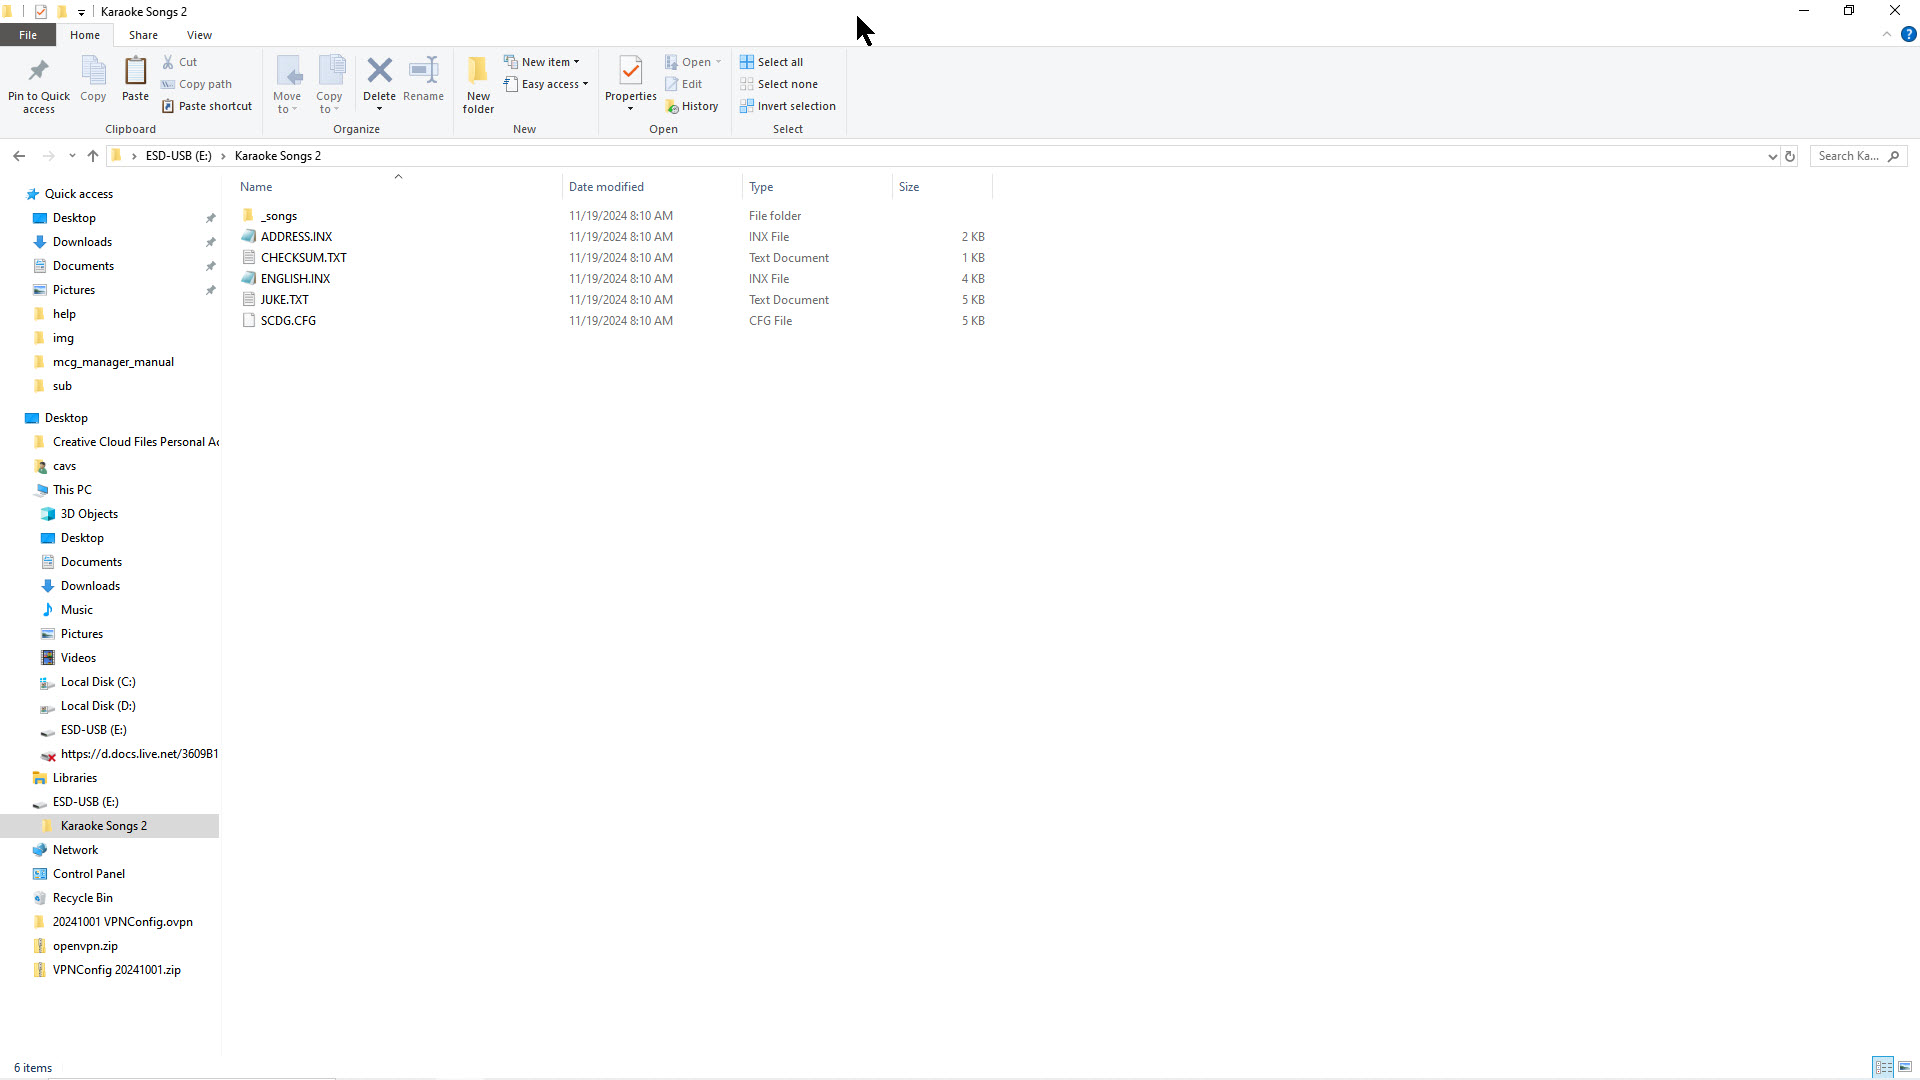
[Click to view large picture]
-
_songs - Subfolder containing encoded songs
-
ADDRESSS.INX - Physical address of songs in the media device formatted FAT32
-
CHECKSUM.TXT - Checksum of the encoded songs
-
ENGLISH.INX - Song list in Hex.
-
JUKE.TXT - Song list in text
-
SCDG.CFG - Configuration file for Super CD+G format.
-
The USB flash drive is now ready for use with the CAVS 2025G USB and 205G Plus Karaoke players.
Insert the USB flash drive into the karaoke player.
A menu to select songs will appear on the TV screen.
To play, select a song and press Play.
For more instruction on how to use the CAVS 205G USB and 205G Plus players, go to
3. How to design multiple folders in a media device
In media devices like USB flash drives, SD cards, or USB hard drives, the FAT32 format limits a single folder to a maximum of 65,536 files.
This format is necessary for playback on the CAVS 205G USB or 205G Plus players.
For karaoke songs in MP3+G, MP3+MCG, or ZIP formats, which consist of two files (audio and video) per song, the folder can hold up to 32,768 songs.
For karaoke songs in AVI or MP4 format, which are single-file songs, the folder can contain up to 65,536 songs.
To exceed this file limit, you can use multiple folders.
For example, the first folder could contain 20,000 songs, the second 25,000, and the third 30,000, allowing you to store more songs than a single folder can accommodate.
This section outlines how to organize multiple folders on your media device, allowing easy song selection without needing to navigate across folders.
In addition to the file limit, you might want to create multiple folders for other reasons, such as organizing songs by era or genre.
For instance, you could have separate folders for songs from the 80s and 90s, or for different genres like Pop and Rock.
-
Section 2 demonstrates how to encode a set of songs into a folder and transfer that folder to a media device for playback on the CAVS 205G USB and 205G Plus players.
You can then follow the same steps to create a second folder with additional songs and place it on the same media device as the first folder.
This process can be repeated to create additional folders (such as a third, fourth, etc.) with more songs, all of which can be stored on the same media device.
-
The convention in making multiple folders is to name the folders as follows.
MCG#01
MCG#02
MCG#03
...
We used folder names "Karaoke Songs" and "Karaoke Songs 2" in Section 2.
Here we use the names "MCG#01", "MCG#02", ...
-
Copy the multiple folders into a media device and for each folder run thorugh the process of Section 2.3.
This process is to open each folder in the MCG Manager on the Target window and click on the Save button to create the ADDRESS.INX file.
-
Insert the media device into the CAVS 205G USB or 205G Plus player.
Play the songs as follows.
-
For 205G USB player
-
Using the front panel or the remote control, press the number "01", "02", "03", or etc. for the matching folder in which the song you wish play is located.
-
Press the "Menu" button.
-
Press a song number such as "00001", "00002", "00003", etc., followed by "Play" or "Enter" to play the song
-
For 205G Plus player
-
Connect your phone or tablet to the 205G Plus player and open the Songbook in a browser.
-
Songs from all folders will appear together with insdex numbers in the format "Xxxxxxx".
The first digit "X" indicates the folder.
The next 6 digits "xxxxxx" indicate the song index within the folder.
-
Simply select a song and reserve to play.
4. How to organize a song database
This section describes how to organize a song database such that a media device for the CAVS 205G USB and 205G Plus player can be made with speed and flexibility.
Here the speed means less processing time, especially for the AVI and MP4 songs.
The flexibility means the ability to change the content within the medai device by adding or removing songs.
This is important especially when you need to make many copies of the media device or update it frequently for new songs.
The general idea is to use the MCG Manager program to first encode a mass of songs into a set of categorized folders of songs.
Then from the categorized folders, use the MCG Manager program again to encode into a media device for the CAVS 205G USB and 205G Plus players.
The advantages of doing the double round of MCG Manager encoding is as follows.
First, the categorized folders have songs that are already encoded by the MCG Manger.
The next encoding from the categorized folders into a media device will thus take no time.
Second, all songs in the categorized folders will have the title and artist information filled in.
The next encoding from the categorized folders into a media device will require no inputting.
Third, any set or any subset of the songs in the categorized folders can be selected for encoding into the media device.
This gives flexibility to select different songs for different media devices.
Here are the steps of making the categorized folders from a mass of songs, and making a media device from the categorized folders.
-
We atart with a mass of songs, likely found in a hard drive and sorted by prodution companies.
Open the MCG Manager and select the mass of songs in the Source window.
You can select one folder at a time or use the Subfolder option to show all songs together.
-
Select the songs in the Source window by placing the checkmarks.
You can expedite the checkmarking by first highlighting the songs by click and shift-click for a group of songs or control-click for individual songs.
Next right click on the highlighted songs and select Check to place checkmarks on all highlighted songs.
Selecting songs should be according to the way you wish to categorize the songs.
For example, if you wish to categorize the songs by eras, select only the songs of 70's, 80's, etc..
If you wish to categorize the songs by genre, select only the songs of Pop, Rock, etc.
-
Next select a folder in the Target window.
Be sure that the folder is located locally within your PC, such as in the C:\ drive.
The folder name should indicate the category of the selected songs, such as 70's or Pop.
-
Follow the steps in Section 2.2 to encode the selected songs.
When completed, you will receive a notice that the target folder is not formatted FAT32.
-
Repeat the above steps to create the second, third, etc. folders from the mass of songs.
The new folders should also be named to match the selected songs, for example 80's, 90's, etc. or Rock, Blues, etc.
The folders thus made are the categorized folders and they become the song database.
Note that each categorized folders may take time to complete depending on the number and formats of the songs.
However, the making of the categorized folders is required only once.
-
Open the MCG Manager program and select the categorized folders in the Source window.
Each folder in the categorized folders can be open separately or all together using the Subfolder option.
Next open a media device in the Target window.
Note that the media device can have a single folder or multiple folders following the steps in Section 3.
-
Select the songs in the Source window by placing the checkmarks.
You can expedite the checkmarking by first highlighting the songs by click and shift-click for a group of songs or control-click for individual songs.
Next right click on the highlighted songs and select Check to place checkmarks on all highlighted songs.
-
Encode the selected songs from the Source window into the Target window.
If needed, change the folder in the Souce window to another folder in the categorized folders.
If needed, change the folder in the Target window to another folder in the multiple folders.
Encode addtional songs into the media device.
-
Take out the media device and insert it into the CAVS 205G USB or 205G Plus player for playback.
5. How to print song list
This section shows how to print the song list of the encoded songs using MS Excel program.
We begin with the JUKE.TXT file that is found inside the media device or inside a folder such as C:/Karaoke Songs/ or C:/Karaoke Songs 2/ after encoding.
-
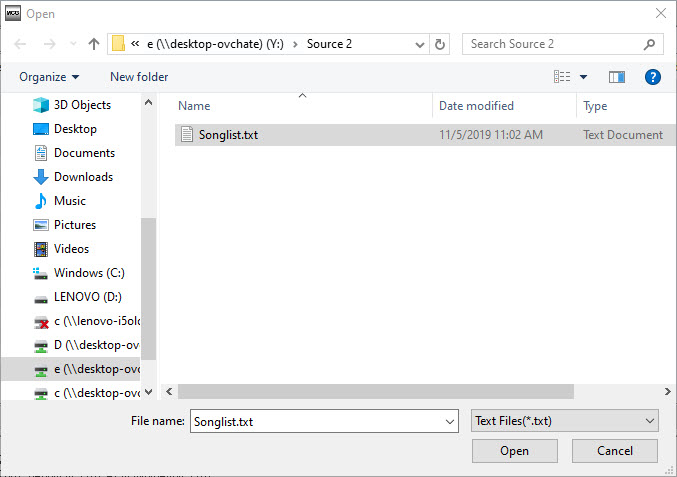
Start the Excel program. Go to File > Open inside the Excel program and navigate to the Karaoke Songs folder. In this example, we go to the folder Karaoke Songs or Karaoke Songs 2 in the USB flash drive that is created previously in the Section 4 above.

[Click to view large picture]
- There will be no file shown in the folder to select from. Click on the down arrow button with "All Excel Files (...", which is shown below with a red circle.

[Click to view large picture]
- In the popup window that appears, select "All Files".

[Click to view large picture]
- Several files will appear in the folder Karaoke Songs or Karaoke Songs 2. Select JUKE.TXT and press Open.

[Click to view large picture]
- The Text Import Wizard window will popup. Select Delimited as shown in the red circle, and press Next.

[Click to view large picture]
- Place a checkmark on Others and input the pipe sign "|" symbol which is Shift - / on keyboard. Press Next.

[Click to view large picture]
- The first column of the JUKE.TXT will be marked in black color. Select Text as shown in the red circle. Press Finish.

[Click to view large picture]
- The JUKE.TXT file will now show in three column of Index, Title, and Artist. From this point, you can edit the file as you wish (or as you can) and print..

[Click to view large picture]
-
As an example, we will continue editing the song list in one particular way for printing. First for the Index column, press A to mark the column and press Center Alignment as shown in the red circles.

[Click to view large picture]
- Press B to mark the Title column. Right click on B and select Column Width. Input 45 and press OK. Press the Left Alignment button.

[Click to view large picture]
- Press C to mark the Artist column. Right click on C and select Column Width. Input 40 and press OK. Press the Left Alignment button.

[Click to view large picture]
-
Next we sort the song list by Title. Press the red circle 1 to select all. Press the red circle 2 and select Custom Sort. In the Sort popup (the red circle 3) window, select Column B. Press OK.

[Click to view large picture]
- The resulting song list is as follows, sorted by Title, and ready to print.

[Click to view large picture]
- For the song list sorted by Artist, repeat the steps 12 - 13, sorting the list by the Column C.
6. Super CD+G
This section describe how to encode a Super CD+G disc, make a Super CD+G disc, and print the song list of a Super CD+G disc.
6.1 How to encode a Super CD+G disc
- Insert the Super CD+G disc into the DVD RW disc drive. In Windows, open the Super CD+G disc and you will find the following folders inside.

[Click to view large picture]
-
Right click on the CAVS_MCG folder. Select Copy. Go to C:/ drive and paste.
When pasting is done, rename the CAVS_MCG folder in the C:/ drive.
In this example, we rename it as SCDG01.

[Click to view large picture]
-
Next copy the folder SCDG01 from C:/ drive into the USB flash drive.
When done, the USB flash drive has the folder Karaoke Songs from the Section 4 and the SCDG01 folder from the Super CD+G disc.
The USB drive is now ready for use with the CAVS 205G USB Karaoke players.

[Click to view large picture]
6.2 How to make a Super CD+G disc
Follow the steps in the Section 2 or 3 to encode the songs into the folder C:/Karaoke Songs or C:/Karaoke Songs 2.
We now describe how to make a Super CD+G disc from the folder C:/Karaoke Songs or C:/Karaoke Songs 2 with the encoded song files inside.
-
Start the ScdgEncoder program.
This program is installed together with the MCG Manager and can be found among applications under the name CAVS.

[Click to view large picture]
- Click on the Source button and go to C:/Karaoke Songs or C:/Karaoke Songs 2. Select the file SCDG.CFG and press Open.

[Click to view large picture]
- A popup window will appear asking for the Target folder. Select the C:/ drive (the root directory). Press OK.

[Click to view large picture]
- Press the Encode button.

[Click to view large picture]
- When the Encoding finishes successfully, close the ScdgEncoder program.

[Click to view large picture]
- Next we look for the newly created CAVS_MCG folder inside the Target folder. In this example, the Target folder is the C:/ drive.

[Click to view large picture]
-
Copy the folder CAVS_MCG and write it to a blank DVD-W or DVD-RW disc to make a Super CD+G disc.
Note that the DVD-W or DVD-RW disc must be of a larger size than the CAVS_MCG folder.
6.3 How to print the song list of a Super CD+G disc
- Insert the Super CD+G disc into the DVD disc drive and open the disc. You will find the following files and folders.

[Click to view large picture]
- Go inside the DickCdg folder and you will find LIST.TXT file.

[Click to view large picture]
- Copy the LIST.TXT file out to your PC/laptop. Print the LIST.TXT file following the steps in the Section 6 with one difference in the procedure which is instead of using the "|" symbol as the delimiter, use the "#" symbol.
7. How to convert an external devices for CAVS DVD-105G, 203G, or 305G players to play in CAVS 205G USB or 205G Plus player
An external device such as a USB flash drive or USB hard drive made for the old CAVS DVD-105G, 203G, or 305G player can be easily converted to plasy in new CAVS 205G USB or 205G Plus player.
7.1 Hardware change
The first to consider is that your external device is likely 10 - 20 years old.
A new flash drive of today has a size of up to 256GB which is likely more than the size of your hard drive.
And the new flash drive is easier to carry and consumes less than a tenth of the power needed for an old hard drive.
Although your hard drive may have a power supply of its own, considering that a hard drive has a life span of 3 - 5 years, we recommend strongly to replace your hard drive to a new flash drive.
And for the replacement, you need only to copy the content of the hard drive to a new flash drive and follow the instruction below.
If you have any question regarding the replacement, contact us at techsupport@cavsusa.com.
7.2 Software change
-
Connect your external device to a PC.
In this example, the external device is USB Drive (E:) and the songs are stored in "Karaoke Songs" folder. Opening the folder in File Explorer, there are 800 song files and they appear as below.
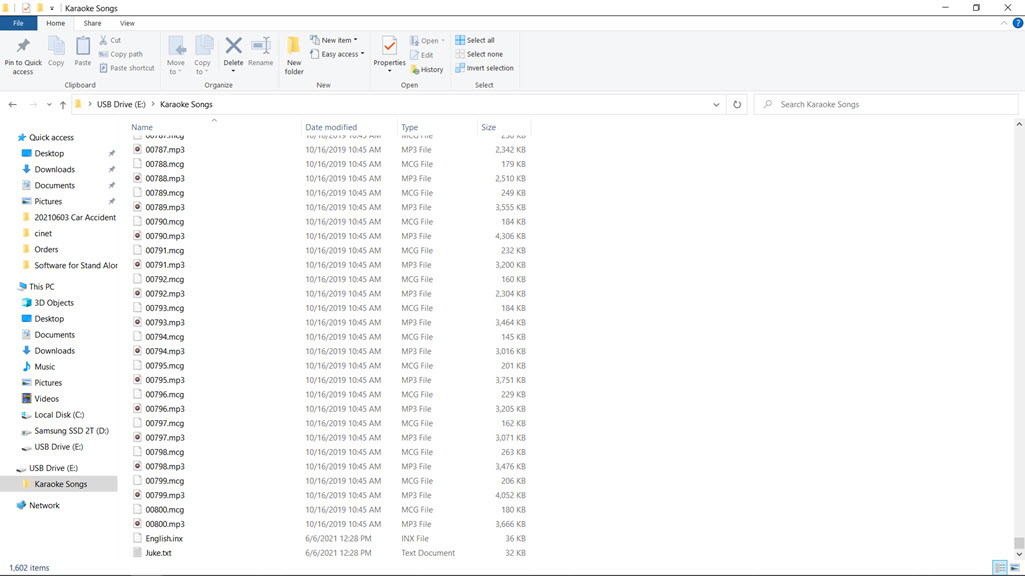
[Click to view large picture]
-
Start the MCG Manager program (v20023 or higher).
Press Target(31) and select the folder in your external device containing the song files.

[Click to view large picture]
-
The song files will appear as below. Click Save at the bottom right corner.

[Click to view large picture]
-
The song files will begin to rebuild as shown below.
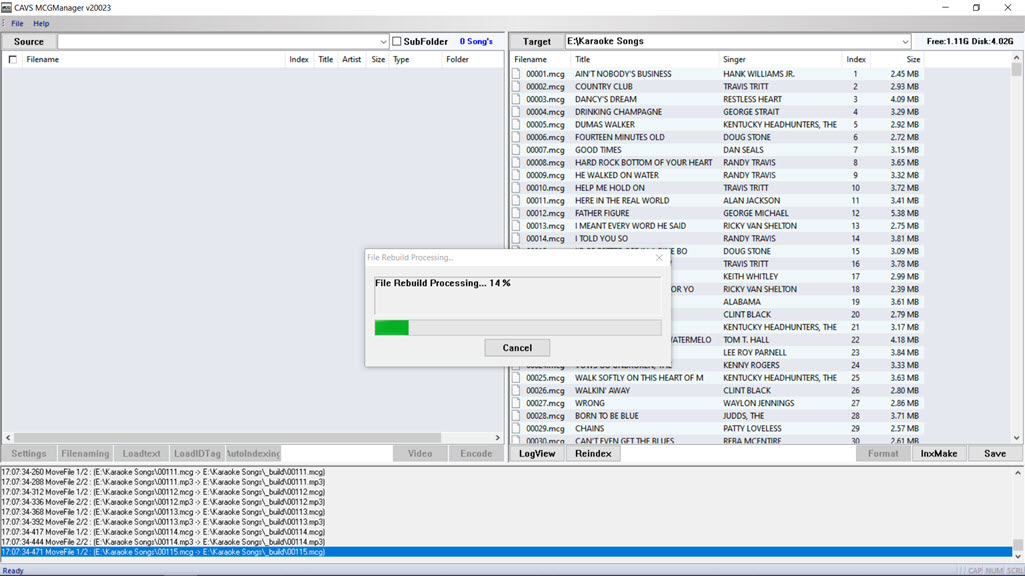
[Click to view large picture]
-
When done, the following message will appear. Click OK.
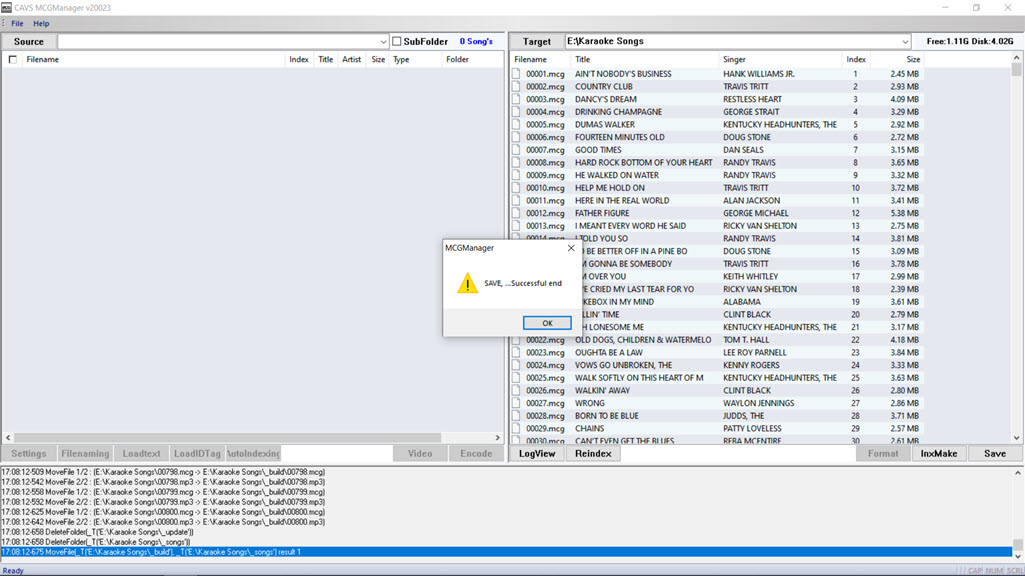
[Click to view large picture]
-
Close the MCG Manager program and take out the external device. Insert the external device to the CAVS 205G USB or 205G Plus player.
[Click to view large picture]
The external device is successfully converted for play in CAVS 205G USB or 205G Plus player.
7.3 Trouble Shooting
Due to the fast evolving Windows OS, you may experience some trouble with the external device converted as above.
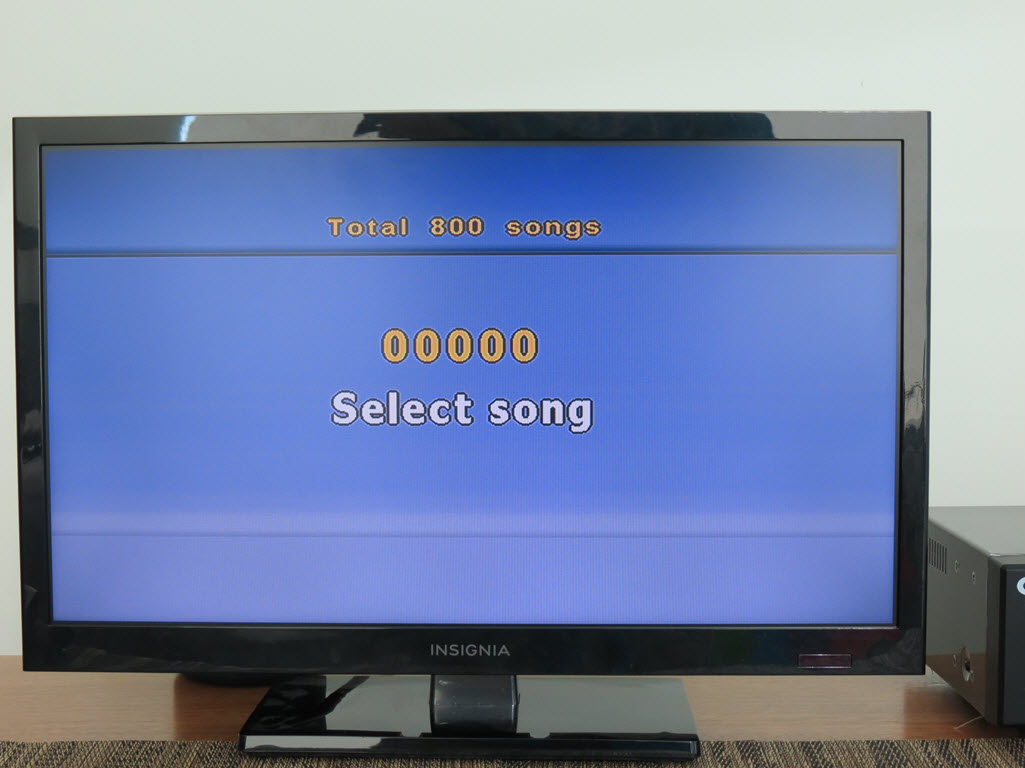
A typical example is when the following screen shows up on the TV screen when the converted external device is inserted in the CAVS 205G player.

[Click to view large picture]
Note that the total number songs at the top of the screen is shown as zero.
Follow the steps below to further modify the external device.
-
Connect your external device back to the PC and open it using File Explorer. In this example, the "Karaoke Songs" folder is shown.
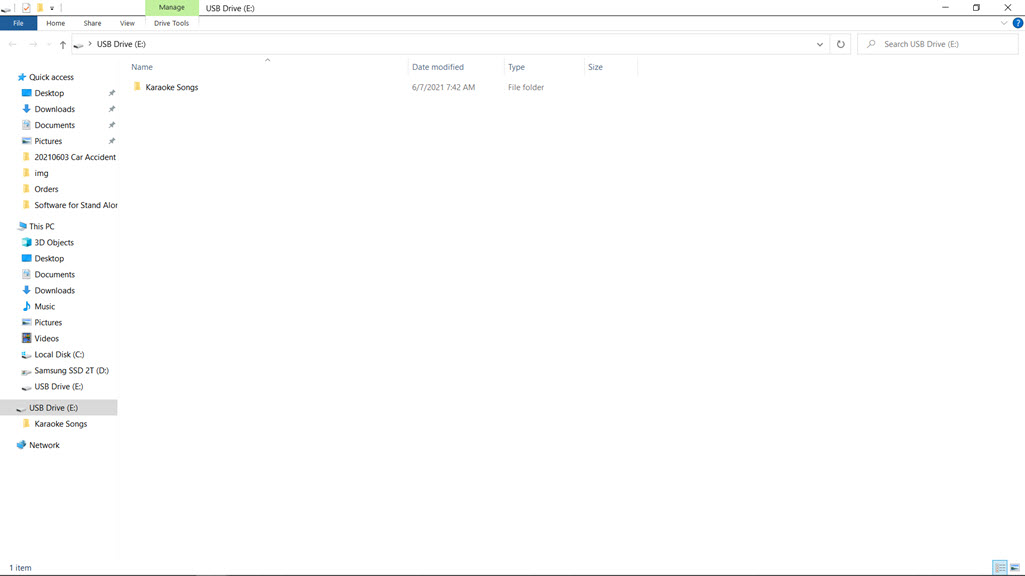
[Click to view large picture]
-
Make a new folder in the external device. In this example, "Karaoke Songs 2" is created.

[Click to view large picture]
-
Move (Cut & Paste) all files and subfolders inside the original folder to the new folder. In this example, we move all files and subfolders in "Karaoke Songs" to "karoake Songs 2". Be sure to move, not copy, the content of the original forlder to the new as there may not be enought room left in the external device.

[Click to view large picture]
-
Next delete the original folder. In this example, we delete the "Karaoke Songs" folder.

[Click to view large picture]
-
Rename the new folder as the original folder. In this example, we rename the "Karaoke Songs 2" folder as "Karaoke Songs".

[Click to view large picture]
-
Open the MCG Manager program. Press Target(31) and select the new folder in the external device.
In this example, we select the new "Karaoke Songs" folder in the Target window.
Click Save at the bottom right corner.
[Click to view large picture]
-
The song files will begin to rebuild as shown below.
[Click to view large picture]
-
When done, the following message will appear. Click OK.
[Click to view large picture]
-
Close the MCG Manager program and take out the external device. Insert the external device to the CAVS 205G USB player.
[Click to view large picture]
The external device is successfully modified to play in CAVS 205G USB player.
END